Hangprinter version 3
Posted by tobben
|
Re: Hangprinter version 3 August 07, 2018 11:19AM |
Registered: 5 years ago Posts: 79 |
|
Re: Hangprinter version 3 August 07, 2018 11:55AM |
Moderator Registered: 10 years ago Posts: 401 |
I do agree that it is preferable to correct for line flex, and to measure and use tension data for that. See for example this blog post for some Hangprinter related line flex compensation work. I think it contains something close to the model you're proposing.
Two following two scenarios made me think it's not easy:
Tight/Slack Lines Due to Mis-calibration
All installed Hangprinters will have some mis-calibration that will make lines go slack or over tight when moving far away from the origin. (We can make mis-calibration very small, but we can't rely in it being zero.) So the machine will experience slack lines and over tight lines during operation. Take the situation of slack lines. If you tighten one line, all the others will also tighten. How to decide which axis to tighten in order to wind in the slack?
Upon second thought, we could just use a simple rule, like "tighten all axes by an equal amount until we have the tension we want in all lines". We could use the equations in the linked blog post to calculate the wanted tensions. The simple rule would compensate an unknown error with a known error. This would be ok. It would give us a confidence interval for accuracy and enable the constant radius spool to work
Obstacles, Tripping In Lines and Other Unexpected Forces
See from second 22 in this video for the behaviour we want when the nozzle hits something. If the firmware blindly tries to enforce a pre-calculated tension, the nozzle would just tent to stop when meeting an obstacle.
A way to mitigate would be to detect that the nozzle has met an obstacle. When nozzle meets obstacle, one/two of the ABC lines get tighter and the rest gets slacker. Upon detecting this, we could make the firmware force the nozzle across the obstacle with greater force, while keeping the rest of the lines tight. I guess line tripping is a different story, but I'm sure we could detect it and find reasonable custom behaviour.
So yup, measuring and using tension data would be possible and make the Hangprinter better =) It would require some work, but all development is work... The tension feedback loop must work really well to properly avoid any slipping ever around the effective spool, but maybe it's easier than I imagine and turns out to just work?
Edited 1 time(s). Last edit at 08/07/2018 12:10PM by tobben.
torbjornludvigsen.com
Two following two scenarios made me think it's not easy:
Tight/Slack Lines Due to Mis-calibration
All installed Hangprinters will have some mis-calibration that will make lines go slack or over tight when moving far away from the origin. (We can make mis-calibration very small, but we can't rely in it being zero.) So the machine will experience slack lines and over tight lines during operation. Take the situation of slack lines. If you tighten one line, all the others will also tighten. How to decide which axis to tighten in order to wind in the slack?
Upon second thought, we could just use a simple rule, like "tighten all axes by an equal amount until we have the tension we want in all lines". We could use the equations in the linked blog post to calculate the wanted tensions. The simple rule would compensate an unknown error with a known error. This would be ok. It would give us a confidence interval for accuracy and enable the constant radius spool to work
Obstacles, Tripping In Lines and Other Unexpected Forces
See from second 22 in this video for the behaviour we want when the nozzle hits something. If the firmware blindly tries to enforce a pre-calculated tension, the nozzle would just tent to stop when meeting an obstacle.
A way to mitigate would be to detect that the nozzle has met an obstacle. When nozzle meets obstacle, one/two of the ABC lines get tighter and the rest gets slacker. Upon detecting this, we could make the firmware force the nozzle across the obstacle with greater force, while keeping the rest of the lines tight. I guess line tripping is a different story, but I'm sure we could detect it and find reasonable custom behaviour.
So yup, measuring and using tension data would be possible and make the Hangprinter better =) It would require some work, but all development is work...
The tension feedback loop must work really well to properly avoid any slipping ever around the effective spool, but maybe it's easier than I imagine and turns out to just work?Edited 1 time(s). Last edit at 08/07/2018 12:10PM by tobben.
torbjornludvigsen.com
|
Re: Hangprinter version 3 August 07, 2018 12:03PM |
Moderator Registered: 10 years ago Posts: 401 |
Weights, or any kind of spring load system, along the lines will start jumping around and make good print quality very hard to achieve. Even the little suspended 623 vgroove bearings I used back in 2015 vibrated enough to tattoo their eigenfrequency into every printed surface. Pic of suspended bearings here. Also see this comment about keeping a constant torque on one axis.
torbjornludvigsen.com
torbjornludvigsen.com
|
Re: Hangprinter version 3 August 07, 2018 04:46PM |
Registered: 5 years ago Posts: 79 |
One quick thought....
"Upon second thought, we could just use a simple rule, like "tighten all axes by an equal amount until we have the tension we want in all lines". We could use the equations in the linked blog post to calculate the wanted tensions. The simple rule would compensate an unknown error with a known error. This would be ok. It would give us a confidence interval for accuracy and enable the constant radius spool to work" smiling smiley
And if we fix the mover to the 0,0,0 position while tightening we could calculate position from tension.
Edited 1 time(s). Last edit at 08/07/2018 04:47PM by Dahah.
|
Re: Hangprinter version 3 August 07, 2018 05:09PM |
Registered: 5 years ago Posts: 79 |
|
Re: Hangprinter version 3 August 07, 2018 07:04PM |
Registered: 5 years ago Posts: 79 |
" Also see this comment about keeping a constant torque on one axis".
Klipper seems very promising. Will the Raspberry perform well enough for complex code of a tension based hangprinter? Better than Arduino for shure, but maybe one should think of something like the UP squared ( [up-board.org] ). That could keep everything in place. No additional PC for sim etc. in the best case? Like a HAW hardware + printer control. So one could set up and use the hangprinter eg. with a mobile phone or with a monitor and keyboard/mouse.
It's maybe too enthusiastic but........more computing power would open up future possibilities for cameras, tracking systems (e.g. pixy cam [pixycam.com]) and other sensors to enable for example printing on a given unknown complex surface.
Edited 7 time(s). Last edit at 08/07/2018 08:27PM by Dahah.
|
Re: Hangprinter version 3 August 07, 2018 07:40PM |
Registered: 5 years ago Posts: 79 |

This is just a quick concept drawing.
If one would use tubular spools and move the idlers very far away the effective radius would be guaranteed, if the angle is right.
No compact top plate!

Maybe with aluminium or carbon rods one can build a sun shaped top plate with the D spool in the middle. But it would be huge in xy size.
Or loose idlers on the sealing: Difficult to measure....
Edited 6 time(s). Last edit at 08/07/2018 08:04PM by Dahah.
|
Re: Hangprinter version 3 August 07, 2018 08:15PM |
Registered: 5 years ago Posts: 79 |
|
Re: Hangprinter version 3 August 07, 2018 08:44PM |
Registered: 5 years ago Posts: 79 |
From Vitana: Some flex comes from line modulus, but adding infinitely stiff lines alone won't solve our problems because ceilings, floors, ceiling unit sheets and plastic parts also flex. Very stiff lines are also thick, building more on the spools and making the imperfection of our buildup compensation more severe
Is it easier to use a thicker line to clamp/rubber wheel it on the constant effective radius spool or is a thin line better?
Is it easier to use a thicker line to clamp/rubber wheel it on the constant effective radius spool or is a thin line better?
|
Re: Hangprinter version 3 August 08, 2018 03:36AM |
Admin Registered: 16 years ago Posts: 13,888 |
... have you already read this old thread from 2007?
Maybe the image in the first post can give you some ideas too:
Viktor
--------
Aufruf zum Projekt "Müll-freie Meere" - [reprap.org] -- Deutsche Facebook-Gruppe - [www.facebook.com]
Call for the project "garbage-free seas" - [reprap.org]
Maybe the image in the first post can give you some ideas too:
Viktor
--------
Aufruf zum Projekt "Müll-freie Meere" - [reprap.org] -- Deutsche Facebook-Gruppe - [www.facebook.com]
Call for the project "garbage-free seas" - [reprap.org]
|
Re: Hangprinter version 3 August 08, 2018 05:33AM |
Moderator Registered: 10 years ago Posts: 401 |
If the effective spool is a straight cylinder, then we will have "cable walk" like explained by a lecturer here.
One way to keep the lines enter/exit points still is to use a threaded rod as the effective spool, and let this threaded rod move up and down through a nut when it is turned. The same lecturer talks about helix shaped grooves here.
Calculating position from tension would require extremely low friction in all idler bearings. Again, hard but I'm sure it's possible.
Yes, I think the Rpi has enough cream to do tension compensation. But if I used Klipper I could just run it on one of my other computers, no need for the Pi.
These collisions happen 0-100 times per layer. It doesn't hit very hard. If we naïvely enforce a fixed line tension, then an obstacle can force the mover/effector to a full halt because more tension is needed to get across the obstacle.
A thicker line will grip better around the effective spool. Be careful though. Your compensation idler might have to compensate many cm of line if the collector spool is small and the line is thick. Attaching an example that shows how much the current firmware would compensate if line was 0.75 mm thick, and anchors were 3 m from the origin along x, y, and z. All relevant parameters are found in the source file.
torbjornludvigsen.com
|
Re: Hangprinter version 3 August 09, 2018 02:14PM |
Registered: 5 years ago Posts: 79 |
Very good lecture. Thanks for the link!
Grooved or ungrooved cylindrical spools and idler positions that enable line walk seem too complicated and the compact top plate is such a good feature of the hangprinterV3 design. I will keep in mind that cylindrical spools are a very good way to have a constant effective radius.
I will make a prototype of the constant effective radius spool v4 for the 0.39 line. It's time to gain experience!
Edited 1 time(s). Last edit at 08/09/2018 02:14PM by Dahah.
|
Re: Hangprinter version 3 August 12, 2018 06:08PM |
Registered: 5 years ago Posts: 79 |
Just a quick idea in memory of a hangprinter failure: Cables clocked in gears.
What if we use gears instaed of a round constant effective radius spool and rubber wheels? Of course this would stress the cable incredible hard. Would gears provide enough friction? Maybe rubber coated gears?
Edited 3 time(s). Last edit at 08/12/2018 06:11PM by Dahah.
What if we use gears instaed of a round constant effective radius spool and rubber wheels? Of course this would stress the cable incredible hard. Would gears provide enough friction? Maybe rubber coated gears?
Edited 3 time(s). Last edit at 08/12/2018 06:11PM by Dahah.
|
Re: Hangprinter version 3 August 13, 2018 03:52PM |
Registered: 8 years ago Posts: 96 |
The other day, I had a similar idea. If it would be possible somehow to bite into the line. Like to force it through two gears. Obviously that would deform the line and you would see the pattern in the print. And the line wouldn't last long. But then I thought about a belt drive with a smaller pinion attached to the stepper motor driving a bigger gear, like in this quick sketch.
The line would be guided to enter between the belt and the gear at one side and it would exit on the other side. The exit line would then be spooled up on another spool like Dahah suggested.
Now the trick would be the deep grooves on the big gear which would guide the line and prevent it to be squished. The belt would barely touch the line, just enough to build up the needed friction.
I'm still not sure if this would work. Most likely the belt would wear out quick and then you would lose the grip again...

|
Re: Hangprinter version 3 August 13, 2018 07:26PM |
Registered: 5 years ago Posts: 79 |
If the cable gets just friction from the gears teeth and doesn't bend in zigzag pattern it acts like a round spool with less contact area. An alternative could be a wave-like pattern and simular rubber wheels. I mean an extruded rounded star (extremly rounded) or a rounded gear and one or more rounded star shape rubber wheels that hit the cable in the valleys (inner points of the star.) If the curve of the valleys and the hills (outer points of the star) is soft enough to not brake the cable it could maybe - it is a guess or a hope again - allow more friction compared to the round wheel because of the angles between two points on the hills and one point in the valley when the rounded star shape rubber wheel hits the line. I will think about it and maybe I will make a drawing after I finished the first prototype.
At this point the V4 seems the best design to test first. Right?
I found one possible and solvable problem in V4: The friction that is provided by the rubber wheel is in relation to the force the motor has to move to turn the spool. Is this true?
A difficulty is the very thin line. That would mean we need to have a groove in the effective spool with a flat surface area of 0.39 mm. The rubber wheel needs a flat surface area with 0.39 as well. Very thin for rubber and pressure. Rubber bends easily.... So for the first prototype I will use a larger flat surface area. It will be not as precise as a 0,39 surface area but easier to realize and it shows if it is possible to generate enough friction this way. Later prototypes can focus on precision. First version will be a proof of concept.
Edited 5 time(s). Last edit at 08/13/2018 07:55PM by Dahah.
|
Re: Hangprinter version 3 August 21, 2018 02:25AM |
Registered: 5 years ago Posts: 1 |
Hi guys, hangprinter noob here. I wanna use the CNC bits of the printer to make a gripper that picks up my phone from my table and passes it to me in the bed. I understand that the work area for most prints is a few feet by few feet. But is there any systematic restriction for the print head to reach essientially anywhere in a rectangular room? How would I go about calculating where the printer can reach and optimising the anchor and pulley locations?
Thanks in advance! Love the project
Thanks in advance! Love the project
|
Re: Hangprinter version 3 August 22, 2018 12:27PM |
Registered: 5 years ago Posts: 1 |
Hi there. What great development have been taken place. I really want to build one v3 but just after deciding that and starting to source parts i ran into the following. I cant get my hands on those mechaduinos. There is a shortage of some component it seems that is used.
If the shortage is not solved. Most v3 will be build without those mechaduinos...and what about the v4?
Anyone knows maybe a source? Or maybe just start without em?
If the shortage is not solved. Most v3 will be build without those mechaduinos...and what about the v4?
Anyone knows maybe a source? Or maybe just start without em?
|
Re: Hangprinter version 3 August 23, 2018 03:45AM |
Moderator Registered: 10 years ago Posts: 401 |
@tinkrmind
The question about reachable volume is discussed earlier in this thread.
@SanderI
Thanks! Yes, we've been hit quite hard by the global shortage of electrical components. To get closed loop right now, one would have to do some own development. One could build SmartSteps or Mechaduinos using AS5600 instead of the AS5048A, or use oDrives with any external encoder that has quadrature output.
The component shortage came as a surprise to me. I'm happy that I designed everything so that you can build a working v3 without Mechaduinos first, and then retro-fit the Mechaduinos to get the extra features later.
torbjornludvigsen.com
|
Re: Hangprinter version 3 August 24, 2018 06:37AM |
Registered: 5 years ago Posts: 7 |
Hi there. Usually I write in the FB group but Tobben told us that has problems to answer there.
I'm stuck with my V3 and have some questions.
First of all, I built a V2 HP at the end of 2017 but had problems with the toolhead. I broke it three times and finally decided to wait some time. To see the V3's development and documentation.
My frame is made with 2m aluminum tslot, joined with 3d printed pieces and zipties. I have designed this pieces but I need to test them when the printer runs , before to share with you.
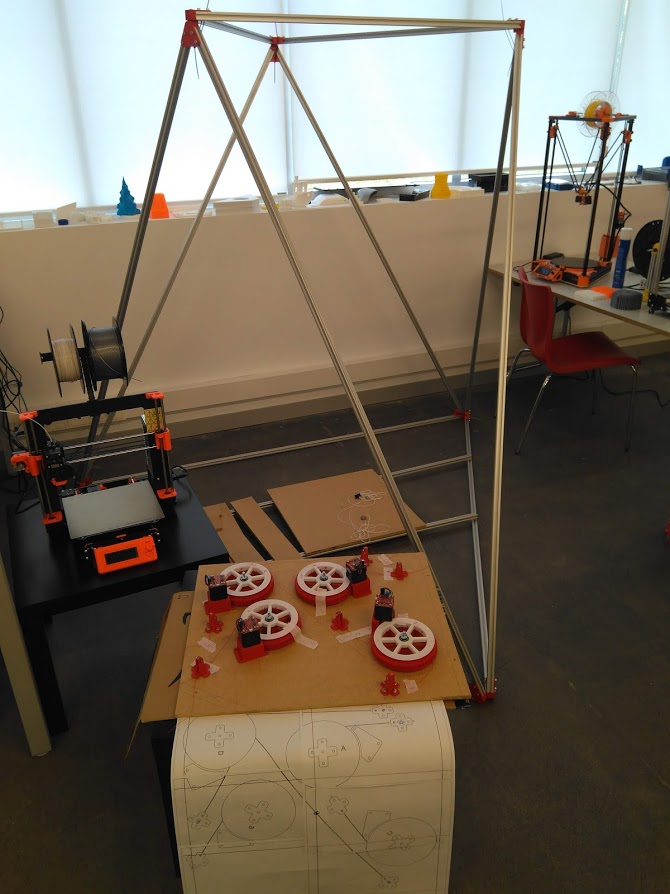
I have my board with all the spools and fishing line ready. I was lucky and bought 4 mechaduinos in june, and that is my problem just now....
It's impossible upgrade the firmware in mechaduinos. I use different arduino version, different usb cable, different usb port, different mechaduinos and always have the same problem. The computer see the arduino genuino zero native usb port, I choose the right port in the ide, start to download and during this process mechaduino restarts and changes the port. So, it dont finish correctly the proccess.
I tried clicking the white button too but always is the same behaviour. I'm crazy with this issue. I have read the official mechaduino forum and google a good time and don't find any response to this problem.
I can't upgrade the firmware an correct the I2C id. So I can't calibrate mechaduinos and continue. It's so frustrating...
Any advice will be really appreciated.
Thank you and ... HangPrinter for ever!
I'm stuck with my V3 and have some questions.
First of all, I built a V2 HP at the end of 2017 but had problems with the toolhead. I broke it three times and finally decided to wait some time. To see the V3's development and documentation.
My frame is made with 2m aluminum tslot, joined with 3d printed pieces and zipties. I have designed this pieces but I need to test them when the printer runs , before to share with you.
I have my board with all the spools and fishing line ready. I was lucky and bought 4 mechaduinos in june, and that is my problem just now....
It's impossible upgrade the firmware in mechaduinos. I use different arduino version, different usb cable, different usb port, different mechaduinos and always have the same problem. The computer see the arduino genuino zero native usb port, I choose the right port in the ide, start to download and during this process mechaduino restarts and changes the port. So, it dont finish correctly the proccess.
I tried clicking the white button too but always is the same behaviour. I'm crazy with this issue. I have read the official mechaduino forum and google a good time and don't find any response to this problem.
I can't upgrade the firmware an correct the I2C id. So I can't calibrate mechaduinos and continue. It's so frustrating...
Any advice will be really appreciated.
Thank you and ... HangPrinter for ever!
|
Re: Hangprinter version 3 August 24, 2018 08:59AM |
Moderator Registered: 10 years ago Posts: 401 |
Hi Victor! Thanks for moving traffic over to this channel And it's so cool that you're giving the HP3 design a try!
Could it be that your USB ports give too little current? So when Arduino IDE starts talking through the port, the 5V supply voltage drops, and the Mechaduino shuts down/browns out. When Arduino IDE stops trying to talk to the port, the 5V jumps back and the Mechaduino powers up again?
If this is the problem, then either a shorter USB cable or using a computer with better powered USB ports will solve it.
Are you clicking the white button once or twice? Double clicking forces the Mechaduino into "receive new firmware-mode". A single click will reset the Mechaduino and maybe cause the behaviour you're describing.
If you think Arduino IDE versions or library versions might be the problem, try using HAWs, which is pre-configured and tested to work.
torbjornludvigsen.com
And it's so cool that you're giving the HP3 design a try!Could it be that your USB ports give too little current? So when Arduino IDE starts talking through the port, the 5V supply voltage drops, and the Mechaduino shuts down/browns out. When Arduino IDE stops trying to talk to the port, the 5V jumps back and the Mechaduino powers up again?
If this is the problem, then either a shorter USB cable or using a computer with better powered USB ports will solve it.
Are you clicking the white button once or twice? Double clicking forces the Mechaduino into "receive new firmware-mode". A single click will reset the Mechaduino and maybe cause the behaviour you're describing.
If you think Arduino IDE versions or library versions might be the problem, try using HAWs, which is pre-configured and tested to work.
torbjornludvigsen.com
|
Re: Hangprinter version 3 August 28, 2018 06:50AM |
Registered: 5 years ago Posts: 7 |
Thank you Tobben!
I have started my holidays with my family. In a few days I Will try your suggestions.
Yes, I tried with once or two clicks of White button.
I Will try with other computer. I have also a HAW to test but I'm having problems to boot the pendrive.
I Will continue reporting my advance. Thank you again.
I have started my holidays with my family. In a few days I Will try your suggestions.
Yes, I tried with once or two clicks of White button.
I Will try with other computer. I have also a HAW to test but I'm having problems to boot the pendrive.
I Will continue reporting my advance. Thank you again.
|
Re: Hangprinter version 3 August 29, 2018 08:23PM |
Registered: 6 years ago Posts: 7 |
|
Re: Hangprinter version 3 August 30, 2018 02:21AM |
Moderator Registered: 10 years ago Posts: 401 |
@VictorBarahona
How is it going for you? Have you tried a shorter USB cable?
The procedure to boot a pendrive is different on different computer models. I have described those I have booted myself here.
@imrcly
The readme of the non-linear optimization code (auto-calibration-simulation-for-hangprinter) is the best source for now.
Edited 1 time(s). Last edit at 08/30/2018 04:24AM by tobben.
torbjornludvigsen.com
|
Re: Hangprinter version 3 August 30, 2018 02:41AM |
Moderator Registered: 10 years ago Posts: 401 |
@VictorBarahona
Maybe this is useful? It's the pendrive boot testing method, from my Master's thesis:
"Laptops were tested using the following procedure:
Laptops that required more research to boot or booted into an unusable state, with severe errors in screen, touchpad or keyboard handling, were considered problematic. How to enter boot configuration was noted down."
Some of the computer models in the list "Computer Models Not Booting D3D Porteus" will still work with the HAW System, since it is newer than D3D Porteus, and the underlying distros (Porteus, Slackware, Nemesis, and Arch Linux) have improved since I did the test
torbjornludvigsen.com
Maybe this is useful? It's the pendrive boot testing method, from my Master's thesis:
"Laptops were tested using the following procedure:
- Boot the laptop and look if the boot-screen informs about which button to press to enter boot configuration.
- If it didn’t, reboot while pressing Esc, F1, F2, F10, F11 and F12 repeatedly.
- If the laptop still didn’t enter boot configuration, do web search of laptop model name + boot usb.
- Inside boot configuration look for options called “boot override” or similar.
- If there exist no boot override enable “legacy mode” and/or “legacy first”, disable “secure boot” and put usb first in “boot priority order” or similar.
Laptops that required more research to boot or booted into an unusable state, with severe errors in screen, touchpad or keyboard handling, were considered problematic. How to enter boot configuration was noted down."
Some of the computer models in the list "Computer Models Not Booting D3D Porteus" will still work with the HAW System, since it is newer than D3D Porteus, and the underlying distros (Porteus, Slackware, Nemesis, and Arch Linux) have improved since I did the test
torbjornludvigsen.com
|
Re: Hangprinter version 3 September 05, 2018 08:00AM |
Registered: 5 years ago Posts: 7 |
Hi @tobben !
I tried with short and long USB cable. The behaviour is the same. The same using different Arduino IDEs , USB ports and Mechaduinos.
I tried clicking the white button one and twice. With twice entered in programming mode (not native USB port) but the behaviour didn't change.
Next week (I'm on holidays now) I will test the powered USB ports and try to boot HAW . Start from a pendrive is a pain, every computer have different method to skip UEFI, I have experience with this but don't help me now. Every time is a challenge.
Don't worry. In the past I have read about people with problems in mechaduinos. When i have good news I will write here. Perhaps could be useful for somebody
Victor

|
Re: Hangprinter version 3 September 06, 2018 12:53PM |
Registered: 5 years ago Posts: 2 |
Hi,
We are considering oDrive for an open source parallel cable robot project. Here's the project page.
[www.sensorica.co]
We started to document here.
[docs.google.com]#
We are considering oDrive for an open source parallel cable robot project. Here's the project page.
[www.sensorica.co]
We started to document here.
[docs.google.com]#
|
Re: Hangprinter version 3 September 06, 2018 09:53PM |
Registered: 6 years ago Posts: 7 |
|
Re: Hangprinter version 3 September 07, 2018 02:39AM |
Moderator Registered: 10 years ago Posts: 401 |
@Tibi
Great, the oDrive is a good alternative. I'm hoping to get some oDrive work done soon. (I'm in the process of testing out Smart Steppers right now.)
Here's a motor selection document that madcowswe (oDrive main dev) helped us with in December:
[docs.google.com]
@imrcly
How to collect data points is briefly described here:
[gitlab.com]
It's a quite manual process still.
The auto_calibration_macro.gcode was an experiment from last summer and its use has been discontinued for now.
We need smoother motion (and maybe some camera help) before we can go fully automatic with the data collection.
The gear teeth makes the axes move unevenly, so I'll be experimenting with using belts instead of gears.
I've also learned from recent experiments that our torque mode isn't perfectly smooth either.
Moving the motor shaft back and forth by hand, you can feel little "ticks" as you move across motor poles.
Getting rid of those would make fully automatic data collection much easier.
Gearing down helps, and oDrives might be smoother than Mechaduinos and Smart Steppers, but they are more expensive...
I'll look into if I can write a smoother torque mode for Mechaduino/Smart Steppers today.
torbjornludvigsen.com
|
Re: Hangprinter version 3 September 08, 2018 12:18PM |
Registered: 6 years ago Posts: 7 |
|
Re: Hangprinter version 3 September 11, 2018 01:54PM |
Registered: 8 years ago Posts: 96 |
Can someone give me a hint where to look for errors?
I'm trying to put the Mechaduinos in torque mode, but only B-motor reacts to the G95 command.
Since I can spin all the motor with G6 command, I'm a bit confused...
According to the wiring diagram you have to hook some cables from the level shifter only to the B-motor, is that correct?
I'm trying to put the Mechaduinos in torque mode, but only B-motor reacts to the G95 command.
Since I can spin all the motor with G6 command, I'm a bit confused...
According to the wiring diagram you have to hook some cables from the level shifter only to the B-motor, is that correct?


Sorry, only registered users may post in this forum.