Adjustable frame for the Hangprinter
Posted by atmark
|
Adjustable frame for the Hangprinter July 22, 2018 06:52AM |
Registered: 8 years ago Posts: 96 |
Hi
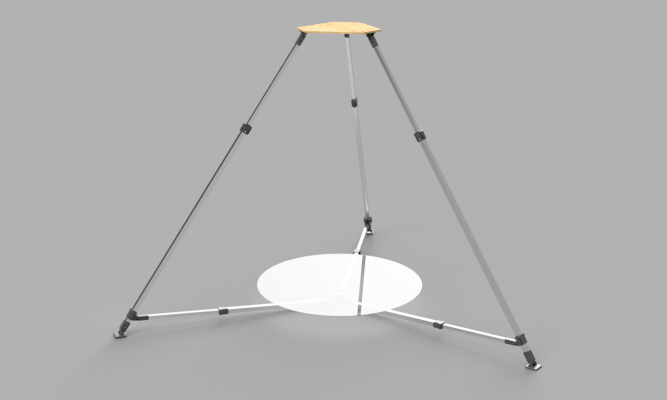
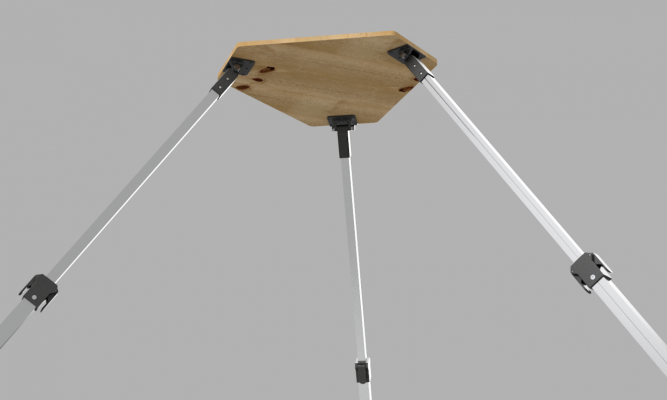
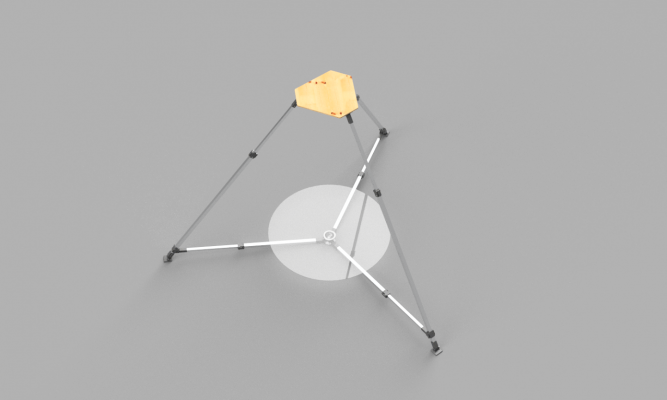
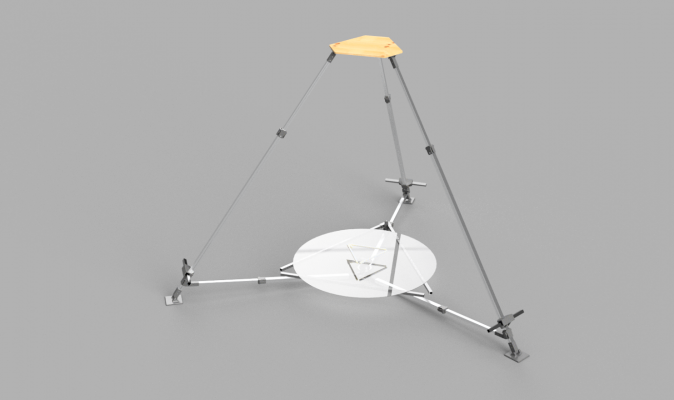
I've been designing and building a frame for the Hangprinter as it needs to be movable in my case. I need to set it up at different spots and I would like to be able to calibrate the frame in an easy manner. The design takes inspiration from Tobben's wooden frame, but adds more durability, sturdiness and adjustability. This includes the option to level the frame and print bed in relation to ground as well as in relation to the print head.
The Z-anchors are still in development, but they will be vertically adjustable. Manually first, later on by winches.
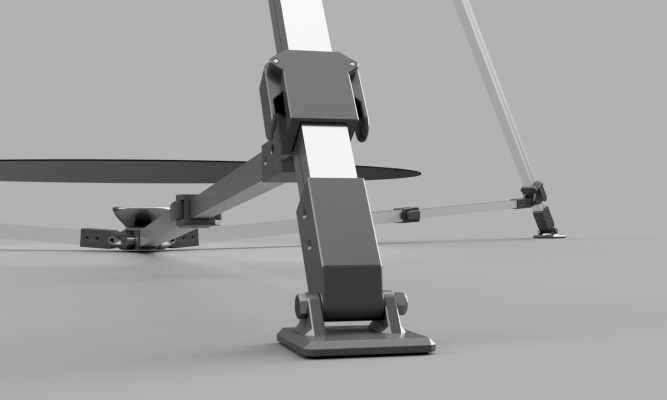
The print bed frame will rest on a big ball joint and it will have three screws for Z-height calibration. I haven't decided yet how those screws will be implemented.
Height of those legs is 2-3 meters and distance from center 1-2 meters. Print bed diameter in the images is 1,5 meters. Height of the printer base plate from ground is 2,5 meters. The legs and cross bars are made of aluminum (30x30 and 40x40 mm). The print bed is thought to be tempered glass, but I could also go with an aluminium disc. The glass disc would weight around 20-30 kg depending on it's thickness.
I would appreciate to hear your comments and ideas!
I've been designing and building a frame for the Hangprinter as it needs to be movable in my case. I need to set it up at different spots and I would like to be able to calibrate the frame in an easy manner. The design takes inspiration from Tobben's wooden frame, but adds more durability, sturdiness and adjustability. This includes the option to level the frame and print bed in relation to ground as well as in relation to the print head.
The Z-anchors are still in development, but they will be vertically adjustable. Manually first, later on by winches.
The print bed frame will rest on a big ball joint and it will have three screws for Z-height calibration. I haven't decided yet how those screws will be implemented.
Height of those legs is 2-3 meters and distance from center 1-2 meters. Print bed diameter in the images is 1,5 meters. Height of the printer base plate from ground is 2,5 meters. The legs and cross bars are made of aluminum (30x30 and 40x40 mm). The print bed is thought to be tempered glass, but I could also go with an aluminium disc. The glass disc would weight around 20-30 kg depending on it's thickness.
I would appreciate to hear your comments and ideas!

|
Re: Adjustable frame for the Hangprinter August 06, 2018 09:03AM |
Moderator Registered: 10 years ago Posts: 401 |
Awesome!
Will you include a layout for the spools that works with your top plate?
You can generate such a layout by changing the translations and rotations in the Hangprinter's original layout file:
[gitlab.com]
If you survive the Openscad text editing, you get in reward the possibility to make a 2d-printable pdf of your layout easily
torbjornludvigsen.com
|
Re: Adjustable frame for the Hangprinter August 06, 2018 03:11PM |
Registered: 8 years ago Posts: 96 |
Thanks!
Yes, I will include it. First I have to sort out few other things.
Indeed, that was a thing I wanted to ask you, if the spool layout is fixed or if it can be altered. Great, if the spool layout can be rotated and translated. What about the distance from the spool to the line rollers? Obviously A, B and C distances must be same, but is it necessary to keep them at the given length? I'll try to keep the top plate dimensions within 900x700 mm so it can be manufactured with a mid-sized laser cutter.
In your recent blog post about the future design goals you wrote about belt drives. There was also an image of Alexander's prototype. Is this the direction you are aiming at? Is it something I should consider a starting point for the spool layout?
I'll try to make a sense of openscad. It's not really intuitive, at least not to me
This is how the design looks at the moment. I've added a print bed sub frame for better support of the bed and for dimensional stability of the main frame. Line anchors will be attached on movable cross bars on the legs. Later on, I could imagine anchor sleds rolling on bearings. Maybe those sleds could be pulled by additional D-lines so that the anchors would move in relation with the effector. What do you think?
The print bed is really giving me some headache... Although, the big ball joint cup can handle the weight alone. It already holds my whole weight with only 15% infill, so that's no issue. But how to design transportable, rigid and flat print surface... I think it should be able to fold, roll or otherwise pack it in smaller size for transport. Any ideas?
company website // portfolio // project gallery // instagram
|
Re: Adjustable frame for the Hangprinter January 21, 2020 08:59AM |
Registered: 4 years ago Posts: 11 |
|
Re: Adjustable frame for the Hangprinter January 22, 2020 01:24AM |
Registered: 8 years ago Posts: 96 |
Hey
I've been running the Hangprinter on this frame now for over a year and I've learnt a lot during that time about the printer and the frame.
One thing is, that it is currently quite complicated to calibrate it. Tobben's auto-calibration script helps a lot, but there are also things to consider like the flatness of the floor, z-position of the anchor points, correct angles of the frame legs, etc. But once dialed in, you can do pretty amazing stuff.
Like a 1,5 meter tall beer bottle I'm going to finish today
I'm currently quite busy, but I'll try to find time to publish the blueprints of the frame soon.
Edit: Oh, and you can check the build process in the gallery link down below
Edited 1 time(s). Last edit at 01/22/2020 01:25AM by atmark.
company website // portfolio // project gallery // instagram
|
Re: Adjustable frame for the Hangprinter January 22, 2020 03:30AM |
Moderator Registered: 10 years ago Posts: 401 |
|
Re: Adjustable frame for the Hangprinter January 23, 2020 09:49AM |
Admin Registered: 11 years ago Posts: 3,096 |
|
Re: Adjustable frame for the Hangprinter January 23, 2020 01:48PM |
Registered: 8 years ago Posts: 96 |
Quote
Ohmarinus
Omg that failure is horrific!
You are refering to the huge blob on the extruder?
Yes, that happens when you have a line failure, I think Tobben you had this too once? Or something similar at least.
There is room for security related improvement, in this case a way of measuring the line tension would have been needed to sense a failure and thus stopping the print.
Small steps, here and there, but eventually this will be a marvelous printer!
Edited 2 time(s). Last edit at 01/23/2020 01:50PM by atmark.
|
Re: Adjustable frame for the Hangprinter January 24, 2020 08:55AM |
Registered: 4 years ago Posts: 11 |
Quote
atmark
Hey
I've been running the Hangprinter on this frame now for over a year and I've learnt a lot during that time about the printer and the frame.
One thing is, that it is currently quite complicated to calibrate it. Tobben's auto-calibration script helps a lot, but there are also things to consider like the flatness of the floor, z-position of the anchor points, correct angles of the frame legs, etc. But once dialed in, you can do pretty amazing stuff.
Like a 1,5 meter tall beer bottle I'm going to finish today
I'm currently quite busy, but I'll try to find time to publish the blueprints of the frame soon.
Edit: Oh, and you can check the build process in the gallery link down below
Great gallery! the frame looks almost as digital as it does in the visualisation! amazing!
also really like that sculpture with supports (much more than without to be honest haha
In meanwhile, keep up great work! i ll be checking here to see if some documentation appears
it is indeed not too easy to calibrate but i was actually hoping taht once you got sort of uniform structure for the printer - which would be this very frame - it would become much faster (right?)autocalibration didnt help me much, but i ll give it another shot, once i put the printer up again!
|
Re: Adjustable frame for the Hangprinter January 26, 2020 09:34AM |
Registered: 8 years ago Posts: 96 |
Quote
pvsfa
it is indeed not too easy to calibrate but i was actually hoping taht once you got sort of uniform structure for the printer - which would be this very frame - it would become much faster (right?)
autocalibration didnt help me much, but i ll give it another shot, once i put the printer up again!
Well, you won't get any speed advantages, since the v3.3 works with Nema 17 stepper. They are underpowered for the mechanics. If you ramp up the speed you will end up with sagging lines as the spools can't wind them as fast as they should. And sagging lines lead to possible line tangling, which ultimately ruins your print. You can upgrade to Nema 23 to get more juice, but ensure first that your stepper driver can handle the power output.
Version 4 is the one, that brings you the speed and lifting power. But, we aren't there yet.
Edited 1 time(s). Last edit at 01/26/2020 02:09PM by atmark.
Sorry, only registered users may post in this forum.