Home
>
RepRap User Groups
>
Europe
>
Italy RepRap User Group - Gruppo RepRap Italia
>
Discussioni generali - NO PROBLEMI DELLA STAMPANTE
>
Topic
RepRap con assi makerbot
Posted by apk656
|
RepRap con assi makerbot January 31, 2014 10:50AM |
Registered: 10 years ago Posts: 17 |
Ciao a tutti, sto costruendo questa stampante che lavora con il sistema di assi adottato dalle Makerbot. La scheda che sto usando e' la megatronics v2.0 di reprapworld.com.
Qualcuno di voi sa dirmi se posso utilizzare la scheda che ho per far funzionare la mia stampante come una makerbot? Ho visto che tutte le stampanti che lavorano con quel sistema utilizzaano la mighty board e il firmaware ufficiale makerbot, devo comprare una mightyboard per stampare come le makerbot o posso utilizzare la mia megatronics v2.0 con marlin?
Grazie a tutti in anticipo
Andrea


|
Re: RepRap con assi makerbot January 31, 2014 12:32PM |
Registered: 11 years ago Posts: 1,865 |
Ciao.
Vai tranquillo e buon lavoro
Enrico
[www.dapa3dservice.it] [www.studiodapa.it]
repstrap dApA, Ramps 1.4, MarlinKimbra / scanner 3D Cubify Sense / Formlabs Form 2
Vai tranquillo e buon lavoro
Enrico
[www.dapa3dservice.it] [www.studiodapa.it]
repstrap dApA, Ramps 1.4, MarlinKimbra / scanner 3D Cubify Sense / Formlabs Form 2
|
Re: RepRap con assi makerbot January 31, 2014 06:19PM |
Registered: 10 years ago Posts: 19 |
|
Re: RepRap con assi makerbot February 01, 2014 07:41AM |
Registered: 11 years ago Posts: 146 |

|
Re: RepRap con assi makerbot February 01, 2014 09:39AM |
Registered: 10 years ago Posts: 221 |
Anche io sto facendo qualcosa di simile, mi chiedo se hai usato un solo motore per l'asse Y , se non hai paura che si impunti per flessione sulla sinistra. Sinceramente la stampante 3D la vedo solo in questa conformazione di base, non vedo motivazioni per complicarla con movimentazioni complesse. Insomma sulla struttura, la penso come te.
Saluti Gianni
Edited 1 time(s). Last edit at 02/01/2014 09:41AM by giacos.
Repstrap Nuragh, Ramps 1.4, Arduino, 5 x 8825, Hotend Nuragh
per nozzle dado a cupola forato da 0,22 sino a 0,37 intercambiabile. (No Hbot, no Core XY)
Saluti Gianni
Edited 1 time(s). Last edit at 02/01/2014 09:41AM by giacos.
Repstrap Nuragh, Ramps 1.4, Arduino, 5 x 8825, Hotend Nuragh
per nozzle dado a cupola forato da 0,22 sino a 0,37 intercambiabile. (No Hbot, no Core XY)
|
Re: RepRap con assi makerbot February 01, 2014 02:07PM |
Registered: 11 years ago Posts: 1,865 |
Ciao.
Per informazione generale la makerbot è passata al sistema h-bot. Più snello ed equilibrato
Edited 1 time(s). Last edit at 02/01/2014 02:56PM by enricodare.
Enrico
[www.dapa3dservice.it] [www.studiodapa.it]
repstrap dApA, Ramps 1.4, MarlinKimbra / scanner 3D Cubify Sense / Formlabs Form 2
Per informazione generale la makerbot è passata al sistema h-bot. Più snello ed equilibrato
Edited 1 time(s). Last edit at 02/01/2014 02:56PM by enricodare.
Enrico
[www.dapa3dservice.it] [www.studiodapa.it]
repstrap dApA, Ramps 1.4, MarlinKimbra / scanner 3D Cubify Sense / Formlabs Form 2
|
Re: RepRap con assi makerbot February 02, 2014 10:24AM |
Registered: 10 years ago Posts: 17 |
Angelo2001: l'alluminio è da 30mm...
enricodare: ti irngrazio per il tuo incoraggiamento a proseguire ma penso di aver bisogno di un tuo aiuto nella configurazione dei motori e relativi endstop, al momento riesco a far funzionare solo un asse alla volta. Per caso esiste una guida dettagliata su come funziona marlin per la configurazione degli assi per una stampante di questo tipo?
GjBob: appena posso faccio delle foto al carrello e le posterò il prima possibile.
gjacos: non so risponderti perchè devo ancora effettuare una stampa.... ti farò sapere non appena riesco a configurare il tutto
Grazie a tutti per le risposte,
Andrea
|
Re: RepRap con assi makerbot February 02, 2014 03:43PM |
Registered: 11 years ago Posts: 1,865 |
ciao,
sostanzialmente non cambia molto nella configurazione.
il tuo asse x è il ponte dove si muove il carrello, l'Y l'asse delle due barre laterali, la z ha lo spostamento inverso.
Per gli endstop deciderai per x e y, per lo z va in alto.
Comincia impostando accelerazioni e velocità basse nel firmware ed esegui le calibrazioni secondo le guide.... per tutto il resto c'è master... ops, il forum
La questione è quella delle masse da spostare, ma verificherai sul campo
Enrico
[www.dapa3dservice.it] [www.studiodapa.it]
repstrap dApA, Ramps 1.4, MarlinKimbra / scanner 3D Cubify Sense / Formlabs Form 2
|
Re: RepRap con assi makerbot February 02, 2014 04:11PM |
Registered: 10 years ago Posts: 17 |
|
Re: RepRap con assi makerbot February 03, 2014 04:18PM |
Registered: 10 years ago Posts: 1 |
Ciao ,
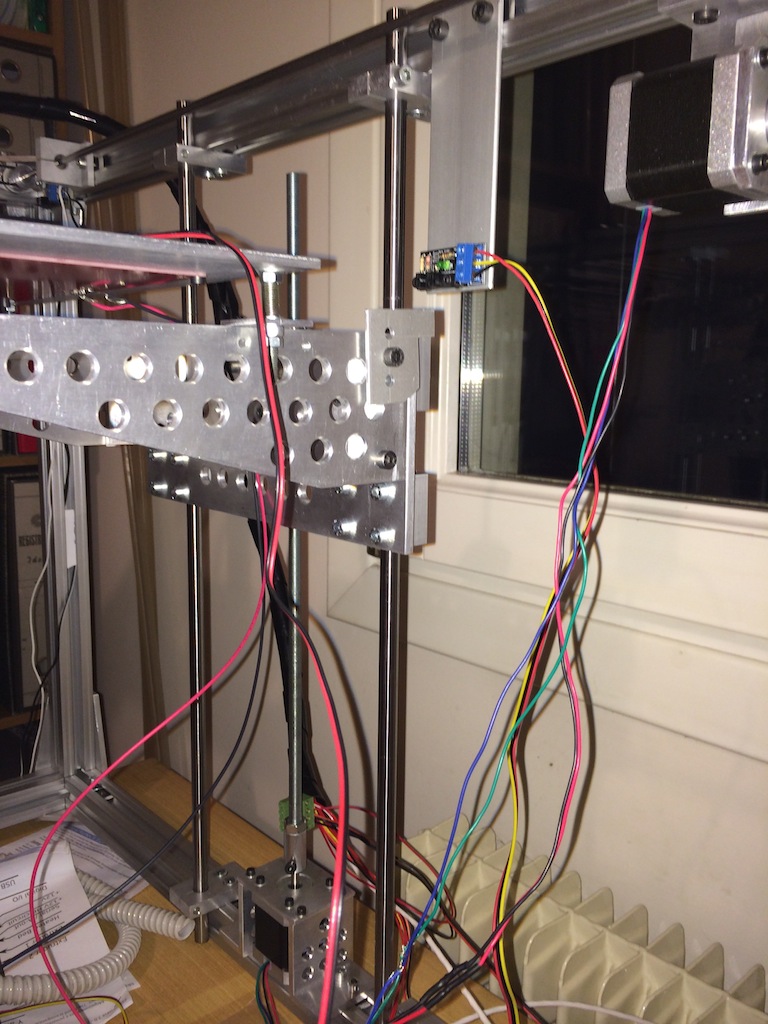
Anche io sto progettando una cosa simile (sono ancora alla fase di disegno con CAD) ; con questa configurazione (movimento piatto solo su Z) si dovrebbe ridurre la dimensione esterna relativa all' asse Y. Davvero spettacolosa la meccanica tutta in metallo ( carrelli e sedi cuscinetti), l'hai fatta tu o si trova in commercio ?. L'unico mio dubbio (scusami se mi permetto ) potrebbero essere le eccessive oscillazioni di tutto il telaio, quando si stampa velocemente; i giunti angolari non sono troppo piccoli ?
Complimenti per il lavoro
|
Re: RepRap con assi makerbot February 07, 2014 10:44AM |
Registered: 10 years ago Posts: 17 |
update:
Sono riuscito a far funzionare gli assi X e Y. Dai test che ho fatto i motori sembrano sopportare molto bene il peso della struttura ed il carico a cui sono sottoposti, il movimento degli assi x e Y e' molto fluido. Volevo premettere che ho 16 anni e questa e' la prima volta che costruisco una stampante in 3d
Sto avendo dei problemi nella configurazione dell'asse Z, quando premo home su cura se il piatto si trova sotto l'endstop va su a scatti di circa 2mm e devo premere home ripetutamente fino a che non arriva all'endstop, una volta arrivato sopra l'endstop quando premo home va giu, su e poi giu ossia fa il movimento che dovrebbe fare quando il piatto si trova sotto l'endstop... Ho provato tutte le possibili combinazioni di inversione della direzione dei motori e della logica degli endstop ma nessuna ha mai funizonato ( ho gia' provato a modificare z_HOME_DIR da -1 che era il parametro di default a 1 ma non ha funzionato lo stesso ) . Ho postato il codice che sto usando attualmente.
- Come posso impostare le dimensioni della stampante sia nel codice che nel programma? ci sono conti da fare o c'e' un particolare metodo di misurazione ?
Le foto dei dettagli degli assi sono scaricabili da questo link:
[www.dropbox.com]
//===========================================================================
//=============================Mechanical Settings===========================
//===========================================================================
// Uncomment the following line to enable CoreXY kinematics
// #define COREXY
// corse Endstop Settings
#define ENDSTOPPULLUPS // Comment this out (using // at the start of the line) to disable the endstop pullup resistors
#ifndef ENDSTOPPULLUPS
// fine Enstop settings: Individual Pullups. will be ignord if ENDSTOPPULLUPS is defined
#define ENDSTOPPULLUP_XMAX
#define ENDSTOPPULLUP_YMAX
#define ENDSTOPPULLUP_ZMAX
#define ENDSTOPPULLUP_XMIN
#define ENDSTOPPULLUP_YMIN
//#define ENDSTOPPULLUP_ZMIN
#endif
#ifdef ENDSTOPPULLUPS
#define ENDSTOPPULLUP_XMAX
#define ENDSTOPPULLUP_YMAX
#define ENDSTOPPULLUP_ZMAX
#define ENDSTOPPULLUP_XMIN
#define ENDSTOPPULLUP_YMIN
#define ENDSTOPPULLUP_ZMIN
#endif
// The pullups are needed if you directly connect a mechanical endswitch between the signal and ground pins.
const bool X_ENDSTOPS_INVERTING = false; // set to true to invert the logic of the endstops.
const bool Y_ENDSTOPS_INVERTING = false; // set to true to invert the logic of the endstops.
const bool Z_ENDSTOPS_INVERTING = true; // set to true to invert the logic of the endstops.
//#define DISABLE_MAX_ENDSTOPS
// For Inverting Stepper Enable Pins (Active Low) use 0, Non Inverting (Active High) use 1
#define X_ENABLE_ON 0
#define Y_ENABLE_ON 0
#define Z_ENABLE_ON 0
#define E_ENABLE_ON 0 // For all extruders
// Disables axis when it's not being used.
#define DISABLE_X false
#define DISABLE_Y false
#define DISABLE_Z false
#define DISABLE_E false // For all extruders
#define INVERT_X_DIR true // for Mendel set to false, for Orca set to true
#define INVERT_Y_DIR true // for Mendel set to true, for Orca set to false
#define INVERT_Z_DIR false // for Mendel set to false, for Orca set to true
#define INVERT_E0_DIR false // for direct drive extruder v9 set to true, for geared extruder set to false
#define INVERT_E1_DIR false // for direct drive extruder v9 set to true, for geared extruder set to false
#define INVERT_E2_DIR false // for direct drive extruder v9 set to true, for geared extruder set to false
// ENDSTOP SETTINGS:
// Sets direction of endstops when homing; 1=MAX, -1=MIN
#define X_HOME_DIR -1
#define Y_HOME_DIR -1
#define Z_HOME_DIR -1
#define min_software_endstops true //If true, axis won't move to coordinates less than HOME_POS.
#define max_software_endstops true //If true, axis won't move to coordinates greater than the defined lengths below.
// Travel limits after homing
#define X_MAX_POS 205
#define X_MIN_POS 0
#define Y_MAX_POS 205
#define Y_MIN_POS 0
#define Z_MAX_POS 200
#define Z_MIN_POS 0
#define X_MAX_LENGTH (X_MAX_POS - X_MIN_POS)
#define Y_MAX_LENGTH (Y_MAX_POS - Y_MIN_POS)
#define Z_MAX_LENGTH (Z_MAX_POS - Z_MIN_POS)
// The position of the homing switches
//#define MANUAL_HOME_POSITIONS // If defined, MANUAL_*_HOME_POS below will be used
//#define BED_CENTER_AT_0_0 // If defined, the center of the bed is at (X=0, Y=0)
//Manual homing switch locations:
#define MANUAL_X_HOME_POS 0
#define MANUAL_Y_HOME_POS 0
#define MANUAL_Z_HOME_POS 0
//// MOVEMENT SETTINGS
#define NUM_AXIS 4 // The axis order in all axis related arrays is X, Y, Z, E
#define HOMING_FEEDRATE {6*60, 6*60, 4*60, 0} // set the homing speeds (mm/min)
// default settings
#define DEFAULT_AXIS_STEPS_PER_UNIT {78.7402*2,78.7402*2,200*8/3*2,760*1.1*2} // default steps per unit for ultimaker
#define DEFAULT_MAX_FEEDRATE {500, 500, 5, 25} // (mm/sec)
#define DEFAULT_MAX_ACCELERATION {1000,1000,100,1000} // X, Y, Z, E maximum start speed for accelerated moves. E default values are good for skeinforge 40+, for older versions raise them a lot.
#define DEFAULT_ACCELERATION 100 // X, Y, Z and E max acceleration in mm/s^2 for printing moves
#define DEFAULT_RETRACT_ACCELERATION 100 // X, Y, Z and E max acceleration in mm/s^2 for r retracts
// Offset of the extruders (uncomment if using more than one and relying on firmware to position when changing).
// The offset has to be X=0, Y=0 for the extruder 0 hotend (default extruder).
// For the other hotends it is their distance from the extruder 0 hotend.
// #define EXTRUDER_OFFSET_X {0.0, 20.00} // (in mm) for each extruder, offset of the hotend on the X axis
// #define EXTRUDER_OFFSET_Y {0.0, 5.00} // (in mm) for each extruder, offset of the hotend on the Y axis
// The speed change that does not require acceleration (i.e. the software might assume it can be done instanteneously)
#define DEFAULT_XYJERK 20.0 // (mm/sec)
#define DEFAULT_ZJERK 0.4 // (mm/sec)
#define DEFAULT_EJERK 5.0 // (mm/sec)
//===========================================================================
Grazie in anticipo per le risposte,
Andrea
|
Re: RepRap con assi makerbot February 07, 2014 12:23PM |
Registered: 10 years ago Posts: 88 |
Quote
apk656
... Volevo premettere che ho 16 anni e questa e' la prima volta che costruisco una stampante in 3d
Andrea, continua così .. mi stai dimostrando che esistono ancora ragazzi a cui interessa "sperimentare" e studiare qualcosa per arrivare ad un obiettivo.
Hai tutta la mia stima indipendentemente dai risultati che otterrai, ma sono sicuro che farai strada
complimenti
|
Re: RepRap con assi makerbot February 07, 2014 02:14PM |
Registered: 10 years ago Posts: 221 |
Sorry, only registered users may post in this forum.