Hello!, a Noob and his cheap hot end "design"
Posted by epengr
|
Hello!, a Noob and his cheap hot end "design" March 13, 2011 03:43PM |
Registered: 13 years ago Posts: 43 |
Hello all,
I'm new here, just starting to gather materials to build a Prusa Mendel. I'm a grad student and trying to do this for as cheap as possible.
To that end, I decided to take a run at designing my own hot end. Here it is! I'd love to hear and comments or suggestions. There are some obvious serious issues but nothing that can't be easily resolved, I think.
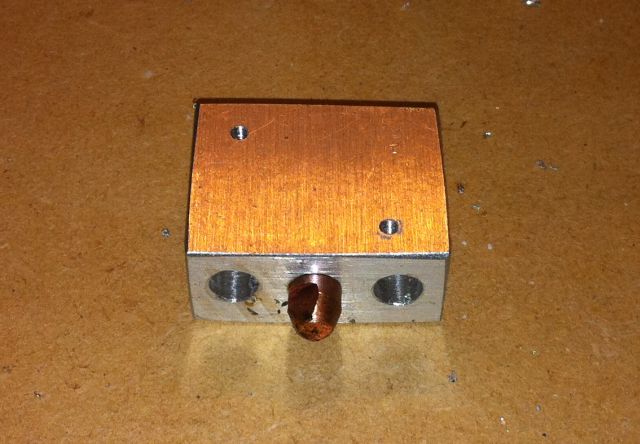
There's minimum machining, I had access to drill press but it could be done with a hand drill. All you need is a little piece of Aluminum (or a big piece and a hack saw), and a tap.
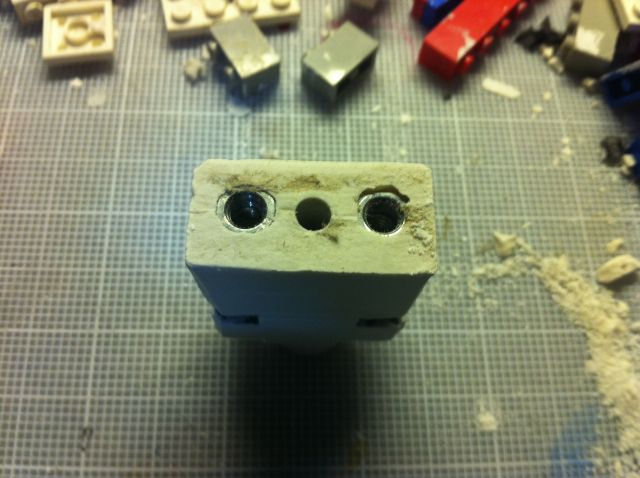
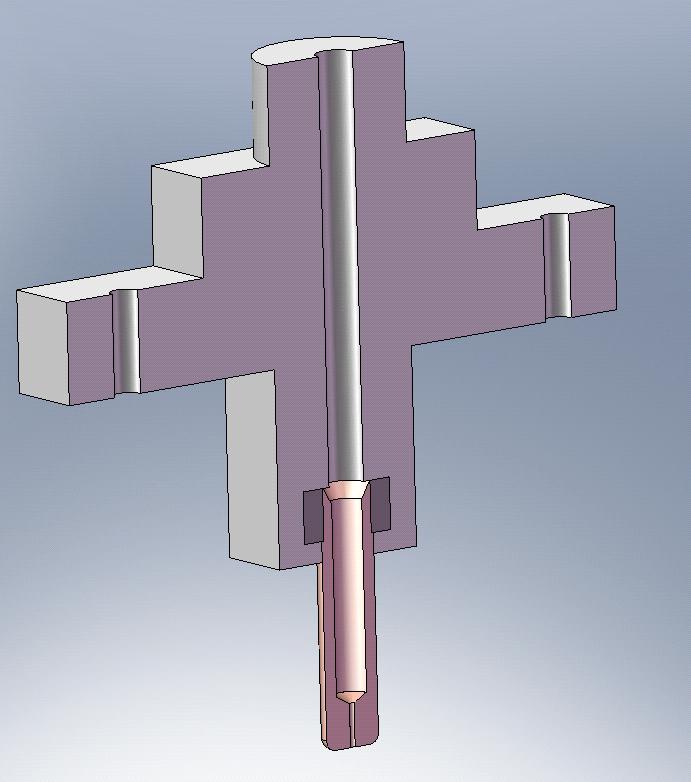
The tip is a 0.6 mm MIG welder tip, cut down, tapered and drilled inside to 3.5 mm. There are tapped holes to attach a pair of 15 Ohm 15 W power resistors to be wired in parallel (they were available.)
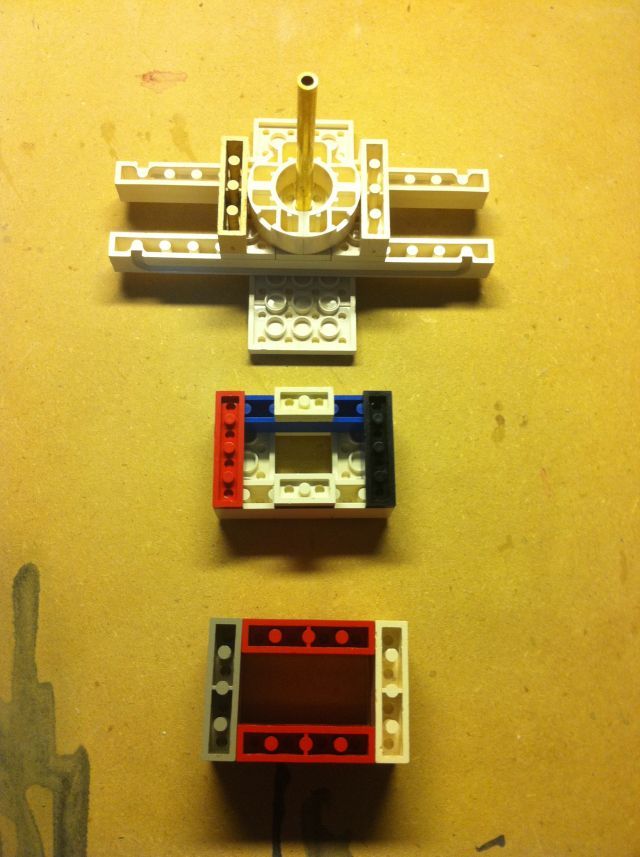
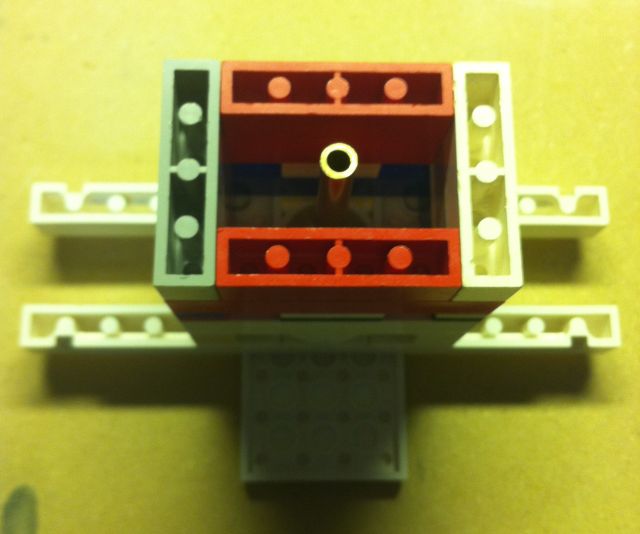
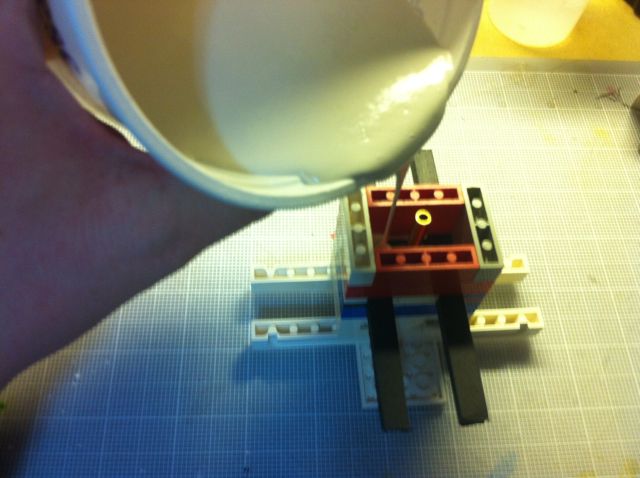
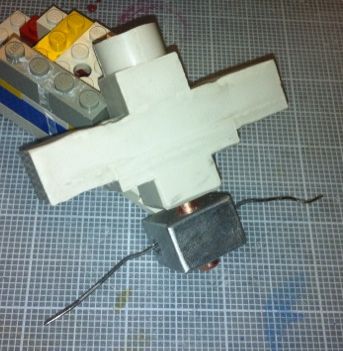
The thermal break is going to be made from Hydrostone, a Plaster of Paris type material that's MUCH strong than PoP. I created a mold out of LEGOs (yes, LEGOs - so awesome) that will have 2 captive nuts to mount the tip block and a groove to attache a mount plate a la MakerGear. A brass tube was inserted to created a channel for the plastic - it will be pulled out after. [EDIT: added photos of placing captive nuts.]
I've never used LEGOs for this before, demolding was a little tricky in places but it worked out well. Is take at least several hours for the hydrostone to fully set and the excess moisture to evaporate, so you can modify and fine tune it pretty easily by carving carefully with a knife.
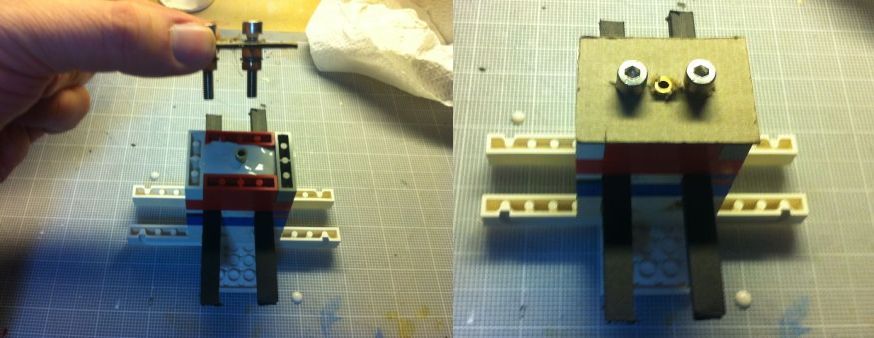
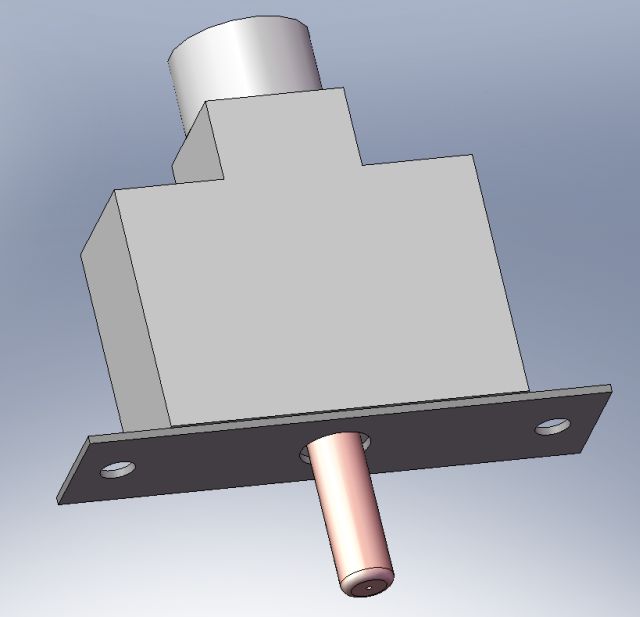
Here it's "assembled", with the resistors installed and foamcore board serving as a mount (for now). The the x-carriage and Wades parts were printed by North90ty, who gave me a great deal. I'm very lucky to have another repraper here in town.
Oh, and before making the thermal break I did test it with plugging it in to a 12V supply directly (no T controller), monitoring the temp with a digital thermometer. Horribly unscientific of me, but I took no pics and didn't even document anything but it took ~5 min to get to 180-200 C range and I ran some PLA (given to me for free for testing by North90ty, thanks!) through it pretty easily. It appeared to work similar to other hand-tested extruders I've seen videos of.
I also tested the Hydrostone's thermal properties - roughly. I took an old well dried cast I did and set it on a hot stove (on min). The piece was 18 mm tall. The burner was ~350 C. After giving it time to reach equilibrium the top of the piece was only ~120 C. Since the hot end won't get that hot and the thermal break is 35 mm there should be no problem. This test piece became brittle since, I assume, the heat started to return it to its anhydrite state - even though the temp will be lower this still could be a problem. Time will tell.
EDIT: I forgot to say - net out of pocket cost: $6 for 6 MIG tips. I scavenged/had everything else. (I could make 5 more hot ends for free now, too! -1.75mm maybe?)
TODOs:
* Drill and tap new holes and rotate the resistors so that the contacts don't extend down past the tip (my first version used a full length MIG tip so this wasn't a problem, but the tip was too far from the hot zone.)
* Countersink the the tip block mounting bolts
* Wait a day or two for the Hydrostone to fully set
* Test the tip attached to the thermal break (TAKE VIDEO), check thermal gradient
* Check integrity of Hydrostone after heating
* Get on with the rest of the reprap (I have the frame built, bearings are in the mail. Need to find motors and decide on electronics (RAMPS?)).
Thanks for reading!
-David
Edited 3 time(s). Last edit at 03/14/2011 10:58AM by epengr.
I'm new here, just starting to gather materials to build a Prusa Mendel. I'm a grad student and trying to do this for as cheap as possible.
To that end, I decided to take a run at designing my own hot end. Here it is! I'd love to hear and comments or suggestions. There are some obvious serious issues but nothing that can't be easily resolved, I think.
There's minimum machining, I had access to drill press but it could be done with a hand drill. All you need is a little piece of Aluminum (or a big piece and a hack saw), and a tap.
The tip is a 0.6 mm MIG welder tip, cut down, tapered and drilled inside to 3.5 mm. There are tapped holes to attach a pair of 15 Ohm 15 W power resistors to be wired in parallel (they were available.)

The thermal break is going to be made from Hydrostone, a Plaster of Paris type material that's MUCH strong than PoP. I created a mold out of LEGOs (yes, LEGOs - so awesome) that will have 2 captive nuts to mount the tip block and a groove to attache a mount plate a la MakerGear. A brass tube was inserted to created a channel for the plastic - it will be pulled out after. [EDIT: added photos of placing captive nuts.]


I've never used LEGOs for this before, demolding was a little tricky in places but it worked out well. Is take at least several hours for the hydrostone to fully set and the excess moisture to evaporate, so you can modify and fine tune it pretty easily by carving carefully with a knife.


Here it's "assembled", with the resistors installed and foamcore board serving as a mount (for now). The the x-carriage and Wades parts were printed by North90ty, who gave me a great deal. I'm very lucky to have another repraper here in town.

Oh, and before making the thermal break I did test it with plugging it in to a 12V supply directly (no T controller), monitoring the temp with a digital thermometer. Horribly unscientific of me, but I took no pics and didn't even document anything but it took ~5 min to get to 180-200 C range and I ran some PLA (given to me for free for testing by North90ty, thanks!) through it pretty easily. It appeared to work similar to other hand-tested extruders I've seen videos of.
I also tested the Hydrostone's thermal properties - roughly. I took an old well dried cast I did and set it on a hot stove (on min). The piece was 18 mm tall. The burner was ~350 C. After giving it time to reach equilibrium the top of the piece was only ~120 C. Since the hot end won't get that hot and the thermal break is 35 mm there should be no problem. This test piece became brittle since, I assume, the heat started to return it to its anhydrite state - even though the temp will be lower this still could be a problem. Time will tell.
EDIT: I forgot to say - net out of pocket cost: $6 for 6 MIG tips. I scavenged/had everything else. (I could make 5 more hot ends for free now, too! -1.75mm maybe?)
TODOs:
* Drill and tap new holes and rotate the resistors so that the contacts don't extend down past the tip (my first version used a full length MIG tip so this wasn't a problem, but the tip was too far from the hot zone.)
* Countersink the the tip block mounting bolts
* Wait a day or two for the Hydrostone to fully set
* Test the tip attached to the thermal break (TAKE VIDEO), check thermal gradient
* Check integrity of Hydrostone after heating
* Get on with the rest of the reprap (I have the frame built, bearings are in the mail. Need to find motors and decide on electronics (RAMPS?)).
Thanks for reading!
-David
Edited 3 time(s). Last edit at 03/14/2011 10:58AM by epengr.
Attachments:
open | download - Tip holder.jpg (51.6 KB)
open | download - LEGO mold apart.jpg (80.1 KB)
open | download - LEGO mold assembled.jpg (39.1 KB)
open | download - The Pour.jpg (47.4 KB)
open | download - after cast 1.jpg (86.1 KB)
open | download - after cast 2 - captive nuts.jpg (56.5 KB)
open | download - Assembled.jpg (62.7 KB)
open | download - Mounting bolts.jpg (57.8 KB)
|
Re: Hello!, a Noob and his cheap hot end "design" March 14, 2011 04:58AM |
Registered: 13 years ago Posts: 7,616 |
Looks great, David. Your posting would also make a fine Wiki page. Give this thing a name and go ahead!
Regarding the technical stuff:
- The mass of the heated element is somewhat an issue. Having half the amount of aluminium would be a bit better.
- You have heating resistors with heatsinks! These resistors shouldn't heat the air around the nozzle, but the nozzle it's self. On how it's done right, see the Wiki: [reprap.org]
| Generation 7 Electronics | Teacup Firmware | RepRap DIY |
|
Re: Hello!, a Noob and his cheap hot end "design" March 14, 2011 12:09PM |
Registered: 13 years ago Posts: 43 |
Thanks! And thanks for the feedback!
I was thinking of a wiki page, but I wanted to finish testing and get some feed back first. Seemed like Epengr Fundamentally Flawed Extruder wouldn't make a great page (from my point of view), but it's a catchy name.... the Effe...
The mass is higher than I would have liked, but it's pretty much set by the footprint of the resistor. When I rotate the resistors I may be able to shave a few mm off the top.
I did notice the heat sinks! But the contact conductivity will be more efficient (that's why they're flange mounts). I actually picked up a pair of 6.8 Ohm 2W axial resistors to try something along the lines of what you linked to, but I was unsure about over driving the resistor, especially without really good thermal contact with the block and I don't have a thermal adhesive handy.
I can't claim any credit for this approach anyways, it's how the "pro's" do it. Although I just noticed that the Mk6 is insulated - probably a good idea.
And the idea of a welding tip I found on the Hydraraptor blog - it's probably mentioned here somewhere too.
The idea of a hydrostone thermal break is all me though. As far as I know.
|
Re: Hello!, a Noob and his cheap hot end "design" March 14, 2011 03:06PM |
Admin Registered: 17 years ago Posts: 7,879 |
It might be "as the pros" do it but I think I pioneered it here: [hydraraptor.blogspot.com]
I then found this works better: [hydraraptor.blogspot.com]
And finally settled on an even smaller resistor: [hydraraptor.blogspot.com]
Each time I moved to a physically smaller resistor I found I needed less power and it heats up faster. The reason is most of the heat is lost from the surface, so the smaller the surface area the less power you need.
Makerbot went in the opposite direction and use a lot more power, too much for the extruder controller, so they added a relay board, but if you calculate the lifetime of a relay constantly switching a heavy load you will find it isn't very long! They also picked resistors that can't handle the temperature and they have started failing.
Is hydrastone strong in extension, as there is quite a lot of force on the nozzle?
[www.hydraraptor.blogspot.com]
|
Re: Hello!, a Noob and his cheap hot end "design" March 14, 2011 03:28PM |
Registered: 13 years ago Posts: 43 |
Yes... "pro's" was in quotes for a reason (not because I think it's the same as underlining it, like so many people seem too... a pet peeve of mine).
I saw it and had access to the resistors so I thought I'd try it. It does work. I'm already thinking of going with a smaller design along your lines, as mine does put out a LOT of heat (whereas I'd prefer it was putting it IN the plastic.) I don't desire a reprap that double as a tanning bed.
I picked up a couple PhillipsECG flameproof 2W 6.8Ohm resistors before I tried this one but thought that resistor rated for the power load was a safer approach.
As for the strength of hydrostone, I haven't seen any data on that, only compressive strengths. It's VERY strong stuff - really impreesive to handle. I'm not convinced that it'll work though, since even if it is strong enough there's a good chance it'll weaken when it's heated.
This is VERY experimental. I'll let you know how it turns out.
There are so many designs and ideas out there, it's hard for a noob like me to figure out what the latest and greatest is. Thanks for pointing me towards your work - I'll have aclose look at it.
-David
I saw it and had access to the resistors so I thought I'd try it. It does work. I'm already thinking of going with a smaller design along your lines, as mine does put out a LOT of heat (whereas I'd prefer it was putting it IN the plastic.) I don't desire a reprap that double as a tanning bed.
I picked up a couple PhillipsECG flameproof 2W 6.8Ohm resistors before I tried this one but thought that resistor rated for the power load was a safer approach.

As for the strength of hydrostone, I haven't seen any data on that, only compressive strengths. It's VERY strong stuff - really impreesive to handle. I'm not convinced that it'll work though, since even if it is strong enough there's a good chance it'll weaken when it's heated.
This is VERY experimental. I'll let you know how it turns out.
There are so many designs and ideas out there, it's hard for a noob like me to figure out what the latest and greatest is. Thanks for pointing me towards your work - I'll have aclose look at it.
-David
|
Re: Hello!, a Noob and his cheap hot end "design" March 14, 2011 05:34PM |
Registered: 13 years ago Posts: 486 |
|
Re: Hello!, a Noob and his cheap hot end "design" March 14, 2011 06:56PM |
Registered: 13 years ago Posts: 43 |
I was thinking about a bottom support plate, but with the aluminum heater block in contact with it, even little M3 thread rods running up to the x carriage might get warm enough to warp the ABS (maybe?) so some type of thermal break would still be needed and I'm trying to stay away from "fancy" materials like peak. I'm on track to get this printer operational for ~$350 Canadain so I'm pinching pennies  .
.
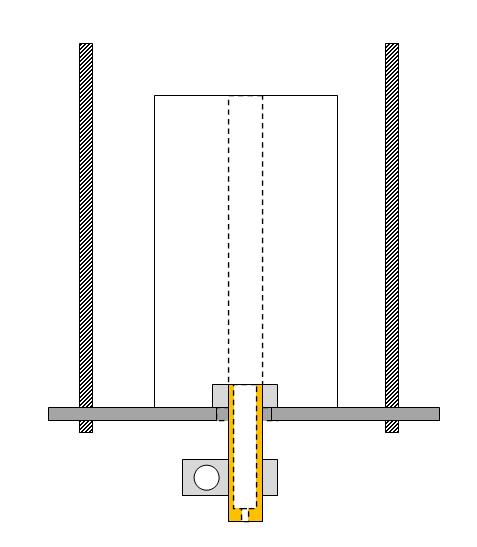
Nophead got me thinking though. If I move to a smaller resistor like he's using, I could eliminate the big Aluminum block in favor of a small "heat coupler" block attached the MIG tip/nozzle dirrectly. The tip/ could then screw into a captive nut on the Hydrostone directly and metal support plate could be run until the hyrdostone in such a way as to avoid direct contact with hot parts.
Here's a laughable WordArt sketch of what I mean:
.Nophead got me thinking though. If I move to a smaller resistor like he's using, I could eliminate the big Aluminum block in favor of a small "heat coupler" block attached the MIG tip/nozzle dirrectly. The tip/ could then screw into a captive nut on the Hydrostone directly and metal support plate could be run until the hyrdostone in such a way as to avoid direct contact with hot parts.
Here's a laughable WordArt sketch of what I mean:

|
Re: Hello!, a Noob and his cheap hot end "design" March 14, 2011 10:45PM |
Registered: 13 years ago Posts: 43 |
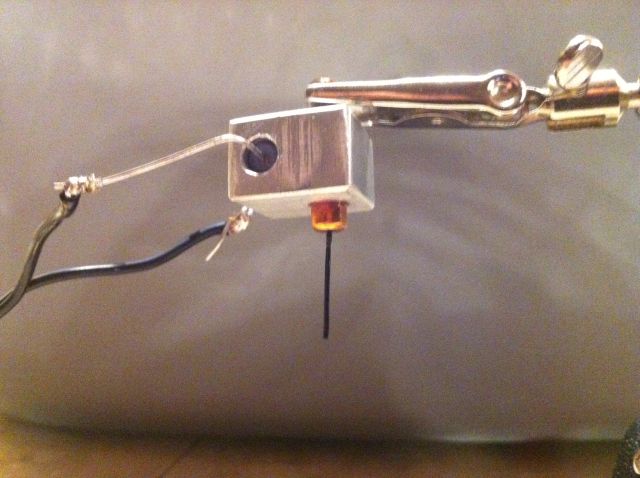
Alright, here's the first test (and, incidentally my first youtube video ever).
As you can see, I can hold the top of the Hydrostone by hand - it's just warm. An excellent start.
I hacked a 2W axial resistor tip heater together earlier and this thing takes FOREVER to heat up compared to it. I pretty much consider this heater design obsolete (thanks nophead for the good info), but I'm very hopeful about the hyrostone thermal break idea after this test.
On the plus side, with all that thermal mass, it doesn't cool down quickly and you can really jam the PLA through this thing fast!... or so it seems to me. I don't have much to compare to.
I don't know if the extruded stream going snaky is normal or not, but the quick test I did with the axial resistor setup didn't do that - the MIG tip I used there hadn't been drilled out and it was 0.6 mm full length (I'm surprised that it worked). I suspect I drilled this tip out too much and the extruded stream is turbulent? Any thought?
Here's the rough test of the axial resistor setup:
It was surprising easy to feed through considering the length of the 0.6 mm portion. I'm thinking of drilling one out and leaving a good 5 mm at 0.6 mm diameter to hopefully create a nice smooth flow.
As you can see, I can hold the top of the Hydrostone by hand - it's just warm. An excellent start.
I hacked a 2W axial resistor tip heater together earlier and this thing takes FOREVER to heat up compared to it. I pretty much consider this heater design obsolete (thanks nophead for the good info), but I'm very hopeful about the hyrostone thermal break idea after this test.
On the plus side, with all that thermal mass, it doesn't cool down quickly and you can really jam the PLA through this thing fast!... or so it seems to me. I don't have much to compare to.
I don't know if the extruded stream going snaky is normal or not, but the quick test I did with the axial resistor setup didn't do that - the MIG tip I used there hadn't been drilled out and it was 0.6 mm full length (I'm surprised that it worked). I suspect I drilled this tip out too much and the extruded stream is turbulent? Any thought?
Here's the rough test of the axial resistor setup:

It was surprising easy to feed through considering the length of the 0.6 mm portion. I'm thinking of drilling one out and leaving a good 5 mm at 0.6 mm diameter to hopefully create a nice smooth flow.
|
Re: Hello!, a Noob and his cheap hot end "design" March 15, 2011 04:02AM |
Registered: 13 years ago Posts: 486 |
what are you planning for the interface between the mig tip and the tube? I think you may benefit from drilling out the top of the mig tip to 4mm and using some 4mm OD, 3mm ID PTFE sleeving that goes all the way up the middle of your insulator and most of the way into the hotend. That will ensure a smooth and slippery surface where the hot end meets the cold end. If you read up on extruders, I think you will find that is critical.
|
Re: Hello!, a Noob and his cheap hot end "design" March 15, 2011 01:11PM |
Registered: 13 years ago Posts: 43 |
north90ty was asking me pretty much the same question last night.
I challenge your preconception that you need "fancy" materials like Teflon to make this work! (Read as: I'm cheap).
My plan is, generally-ish, to have the hole through the hydrostone (which is a very smooth material) slightly smaller than the enterance to the MIG tip and to tapper the top of the MIg tip to "funnel" the plastic into it.
WordArt wouldn't cut it - I had to whip out SolidWorks:
Any thoughts welcome.
I challenge your preconception that you need "fancy" materials like Teflon to make this work! (Read as: I'm cheap).
My plan is, generally-ish, to have the hole through the hydrostone (which is a very smooth material) slightly smaller than the enterance to the MIG tip and to tapper the top of the MIg tip to "funnel" the plastic into it.
WordArt wouldn't cut it - I had to whip out SolidWorks:

Any thoughts welcome.
|
Re: Hello!, a Noob and his cheap hot end "design" March 15, 2011 01:25PM |
Registered: 13 years ago Posts: 49 |
epengr Wrote:
-------------------------------------------------------
> As for the strength of hydrostone, I haven't seen
> any data on that, only compressive strengths.
> It's VERY strong stuff - really impreesive to
> handle. I'm not convinced that it'll work though,
> since even if it is strong enough there's a good
> chance it'll weaken when it's heated.
You could always embed a threaded plate and studs inside the hydrostone. That would keep the heat loss to a minimum.
Sorry, no time to draw a picture -- think a capital 'U" with the sides being panhead screws (screw heads at top) and the heater barrel threading into a hole through a plate that makes up the bottom of the "U". The screws convert the tension to compression and the large flat-bottom heads spread the force.
> I picked up a couple PhillipsECG flameproof 2W
> 6.8Ohm resistors before I tried this one but
> thought that resistor rated for the power load was
> a safer approach.
I have some of those resistors that I gave a quick try to. I think mine were 3W ones. I'm just starting so nothing conclusive, but they didn't explode on my (so far one) quick trial. They have slightly bulbous ends, which leaves a gap between them and the heater block down their middle, which I'm not terribly thrilled about. Wish I hadn't used all my dad's ceramic resistors as a kid cause they had perfectly cylindrical exteriors
|
Re: Hello!, a Noob and his cheap hot end "design" March 15, 2011 03:26PM |
Registered: 14 years ago Posts: 28 |
One thought about putting your taper in the opening of the nozzle...
The nozzle itself being brass will likely be roughly the same temperature, and then above it you will see a (hopefully) sharp gradient from your nozzle temp down as you go up the barrel. The issue I see here, is that your plastic will be warming up before it enters the taper, and if it reaches 40-80 degrees Celsius then it will tend to swell and will likely jam.
You'll probably want the diameters of your heater barrel the same once your plastic starts to get heated above 40 degrees.
Very cool design, can't wait to see it working!
|
Re: Hello!, a Noob and his cheap hot end "design" March 15, 2011 04:26PM |
Registered: 13 years ago Posts: 43 |
>
> You could always embed a threaded plate and studs
> inside the hydrostone. That would keep the heat
> loss to a minimum.
>
> Sorry, no time to draw a picture -- think a
> capital 'U" with the sides being panhead screws
> (screw heads at top) and the heater barrel
> threading into a hole through a plate that makes
> up the bottom of the "U". The screws convert the
> tension to compression and the large flat-bottom
> heads spread the force.
>
I think I get what you're saying, but by embedding the support then the whole hydrostone block won't be in compress, it will transition from compression to extension at the bolt/plate. I would do as I tried to depict in my wordart sketch above, and should be easier to see here:
>
> I have some of those resistors that I gave a quick
> try to. I think mine were 3W ones. I'm just
> starting so nothing conclusive, but they didn't
> explode on my (so far one) quick trial. They have
> slightly bulbous ends, which leaves a gap between
> them and the heater block down their middle, which
> I'm not terribly thrilled about. Wish I hadn't
> used all my dad's ceramic resistors as a kid cause
> they had perfectly cylindrical exteriors
I ripped off another of nophead's fine ideas and wrapped the resistor in foil. I used a narrow strip to "fill-in" that dip and then a couple wraps around the whole thing. It could go either way - if the foil is compressed it should be a good conductor. If there are several layers of foil in that dip that aren't in good contact then I've created an excellent heat shiled, basically wrapping it in a thermos.
> You could always embed a threaded plate and studs
> inside the hydrostone. That would keep the heat
> loss to a minimum.
>
> Sorry, no time to draw a picture -- think a
> capital 'U" with the sides being panhead screws
> (screw heads at top) and the heater barrel
> threading into a hole through a plate that makes
> up the bottom of the "U". The screws convert the
> tension to compression and the large flat-bottom
> heads spread the force.
>
I think I get what you're saying, but by embedding the support then the whole hydrostone block won't be in compress, it will transition from compression to extension at the bolt/plate. I would do as I tried to depict in my wordart sketch above, and should be easier to see here:

>
> I have some of those resistors that I gave a quick
> try to. I think mine were 3W ones. I'm just
> starting so nothing conclusive, but they didn't
> explode on my (so far one) quick trial. They have
> slightly bulbous ends, which leaves a gap between
> them and the heater block down their middle, which
> I'm not terribly thrilled about. Wish I hadn't
> used all my dad's ceramic resistors as a kid cause
> they had perfectly cylindrical exteriors
I ripped off another of nophead's fine ideas and wrapped the resistor in foil. I used a narrow strip to "fill-in" that dip and then a couple wraps around the whole thing. It could go either way - if the foil is compressed it should be a good conductor. If there are several layers of foil in that dip that aren't in good contact then I've created an excellent heat shiled, basically wrapping it in a thermos.
|
Re: Hello!, a Noob and his cheap hot end "design" March 15, 2011 06:21PM |
Registered: 14 years ago Posts: 1,092 |
If the Hydrazone doesn't turn out to be smooth enough, you may be able to use some PTFE tubing with a 3.1 or so mm ID down the centre of it.
BTW: You could cast it with the PTFE tube in there in the first place (put it over the brass tubing you used). This way it'll always be the right diameter around the PTFE, and the Hyrdazone will stop it expanding. Also as it's fairly thin, the PTFE itself shouldn't expand anywhere near as much.
BTW: You could cast it with the PTFE tube in there in the first place (put it over the brass tubing you used). This way it'll always be the right diameter around the PTFE, and the Hyrdazone will stop it expanding. Also as it's fairly thin, the PTFE itself shouldn't expand anywhere near as much.
|
Re: Hello!, a Noob and his cheap hot end "design" March 15, 2011 07:07PM |
Registered: 13 years ago Posts: 49 |
epengr Wrote:
-------------------------------------------------------
> I think I get what you're saying, but by embedding
> the support then the whole hydrostone block won't
> be in compress, it will transition from
> compression to extension at the bolt/plate. I
> would do as I tried to depict in my wordart sketch
> above, and should be easier to see here:
Nevermind. On second look, what I was thinking is a stupid idea. I was thinking that the barrel should be screwed into the plate, not into the stone, and the plate embedded into the stone to insulate it. That would leave the metal taking the tension forces and the stone compressive ones. Now, I suspect that's a really bad idea because the embedded metal would spread the heat inside the hydrostone, and because it's all inside the insulator, the heat will end up heating the filament.. which is exactly the opposite of the desired effect.
> I ripped off another of nophead's fine ideas and
> wrapped the resistor in foil.
Yeah, I just finally spotted that tidbit the other day myself and I'll be doing that with my next heater. Obviously, I didn't do it with this one, but I did at least squish some heat sink compound in there with it... well, with one of the resistors, anyway
> If there are several layers of
> foil in that dip that aren't in good contact then
> I've created an excellent heat shiled, basically
> wrapping it in a thermos.
Just make sure the shiney side faces away from the resistor And maybe make a logroll with heatsink compound between the layers.
I'm tempted to cut one of the reistors open to see if I can safely sand them to a cylinder.
-------------------------------------------------------
> I think I get what you're saying, but by embedding
> the support then the whole hydrostone block won't
> be in compress, it will transition from
> compression to extension at the bolt/plate. I
> would do as I tried to depict in my wordart sketch
> above, and should be easier to see here:
Nevermind. On second look, what I was thinking is a stupid idea. I was thinking that the barrel should be screwed into the plate, not into the stone, and the plate embedded into the stone to insulate it. That would leave the metal taking the tension forces and the stone compressive ones. Now, I suspect that's a really bad idea because the embedded metal would spread the heat inside the hydrostone, and because it's all inside the insulator, the heat will end up heating the filament.. which is exactly the opposite of the desired effect.
> I ripped off another of nophead's fine ideas and
> wrapped the resistor in foil.
Yeah, I just finally spotted that tidbit the other day myself and I'll be doing that with my next heater. Obviously, I didn't do it with this one, but I did at least squish some heat sink compound in there with it... well, with one of the resistors, anyway
> If there are several layers of
> foil in that dip that aren't in good contact then
> I've created an excellent heat shiled, basically
> wrapping it in a thermos.
Just make sure the shiney side faces away from the resistor
And maybe make a logroll with heatsink compound between the layers.I'm tempted to cut one of the reistors open to see if I can safely sand them to a cylinder.
|
Re: Hello!, a Noob and his cheap hot end "design" March 15, 2011 07:15PM |
Registered: 13 years ago Posts: 43 |
patbob Wrote:
-
> Yeah, I just finally spotted that tidbit the other
> day myself and I'll be doing that with my next
> heater. Obviously, I didn't do it with this one,
> but I did at least squish some heat sink compound
> in there with it... well, with one of the
> resistors, anyway
I haven't been able to find heat sink compound rated above 130C or so, did you find some or is it just normal stuff? How's it holding up?
> I'm tempted to cut one of the resistor open to see
> if I can safely sand them to a cylinder.
Why wreck the resistor - just sand it down and if you end up with a cylinder before you see the wire wrap you're golden!
(Whatever happens, as long as the resistance is still as spec'd once it's crammed in the heater block it should be fine)
Edited 1 time(s). Last edit at 03/15/2011 07:19PM by epengr.
|
Re: Hello!, a Noob and his cheap hot end "design" March 15, 2011 07:37PM |
Registered: 13 years ago Posts: 43 |
I'm trying hard to make this for near $0 - between resistors and tips I'm up to $8 (oh my, no!) but PTFE tubing doesn't come cheap (I don't think) and isn't even available locally (I don't think).
If I have to break down and order stuff, I'll likely just order a commercially made hot-end. I'm not arrogant enough to think that I can create something radically better than nophead's design or what makergear has to offer (I'm not sure who's design that is). I'm not going to invest anything but time and a few odds and ends in my design. All I have going for me is that I'm cheap, and I think I can make a hot end cheaper than the experts here!
You did give me an idea though... It's a long shot, but I could try wrapping the brass tube in PTFE pipe tape. If I lube the pipe first I may be able to remove the pipe after casting and have the PTFE stay put. I don't know if it would stand up of slough off as soon as you ram a filament down it. Worth a try, it's cheap (free, I have some already)!
Well, the Rev 2 thermal break should be just about set! I'm gonna go demold it!
> BTW: You could cast it with the PTFE tube in there
> in the first place (put it over the brass tubing
> you used). This way it'll always be the right
> diameter around the PTFE, and the Hyrdazone will
> stop it expanding. Also as it's fairly thin, the
> PTFE itself shouldn't expand anywhere near as
> much.
|
Re: Hello!, a Noob and his cheap hot end "design" March 15, 2011 07:56PM |
Registered: 13 years ago Posts: 43 |
Okay,
Here's what I ended up with. I made the mold rather quickly, and I didn't get exactly what I wanted.
Have you ever tried modeling in negative space with LEGOs??? Not easy!
I should work though, as a test.
I need to drill out the tip yet and drill the mounting holes and give it a good 24 hours to dry (although I just recalled that baking it may make it stronger - the faster you remove the residual moisture the better. I'll have to double check that.)

|
Re: Hello!, a Noob and his cheap hot end "design" March 16, 2011 01:41AM |
Registered: 13 years ago Posts: 49 |
epengr Wrote:
> I haven't been able to find heat sink compound
> rated above 130C or so, did you find some or is it
> just normal stuff? How's it holding up?
Just normal stuff. Dunno how its holding up -- I sealed the resistor in the tube with fire cement and there doesn't seem to be much reason to remove it to check (those resistors are only a couple dollars a pair). Worst case I'll use the heater till it dies then dissect it to analyze the failure.
> Why wreck the resistor - just sand it down and if
> you end up with a cylinder before you see the wire
> wrap you're golden!
That's my plan.. although it'll have to wait until I have a failed one to bother. As long as they work, no sense in fussing over it. It was a bigger issue for me because I was trying to slide it in a piece of brass tubing for that first heater.. and it just barely fit because of the end bumps. My next heater will have a drilled hole, so the hole for the resistor will be a little larger.
> (Whatever happens, as long as the resistance is
> still as spec'd once it's crammed in the heater
> block it should be fine)
+1
>Have you ever tried modeling in negative space with LEGOs??? Not easy!
Lego mold? Not tried that one yet. Might though if this works for you since it would amuse me to use legos to make the mold for the insulator for my legostrap
|
Re: Hello!, a Noob and his cheap hot end "design" March 30, 2011 04:12AM |
Registered: 13 years ago Posts: 3 |
|
Re: Hello!, a Noob and his cheap hot end "design" July 02, 2011 01:18PM |
Registered: 13 years ago Posts: 4 |
> The tip is a 0.6 mm MIG welder tip, cut down,
> tapered and drilled inside to 3.5 mm. There are
> tapped holes to attach a pair of 15 Ohm 15 W power
> resistors to be wired in parallel (they were
> available.)
> [forums.reprap.org]
> ename=Tip+holder.jpg
Hi Epengr...
Interesting idea... I'm also trying to use a 0.6mm welder tip on my hot end, but I found out that, although the ID is 0.6mm, extruded ABS comes out as 1.1mm diameter... As a normal brass tip of 0.5 usually extruded a filament of 0.6-0.7, It was a surprise to me to get 1.0-1.1mm...
But my problem is that when printing I'm getting LUMPS of ABS being created due to the ABS expanding way over what I expect, and when the nozzle comes back it makes a sort of "track" in the middle of the extruded material, creating the lamps on the edges of the track...
Have you had any problem like this?
-H
|
Re: Hello!, a Noob and his cheap hot end "design" July 02, 2011 02:14PM |
Registered: 13 years ago Posts: 43 |
I did notice that the extruded width was larger than expected. I can't help much with your problem as I quickly gave up on this project - it wasn't worth the time to try and save $30. I just ordered a groove-mount and tip from makergear.com. I'm very happy with it.
I assume you had to drill out the welding tip to create a channel/melting chamber for the plastic? How much of the 0.6 mm channel did you leave at the end? If it's too short you may end up with more of an aperture than a channel which would result in substantial turbulence. This could be the cause of what you're observing.
If anyone was follow this project, structurally the Hydrostone has possibilities but it's not suitable for the plastic channel. A Teflon tube would likely work but I didn't want to keep throwing good money after bad in an attempt to reinvent the horse, as it were.
|
Re: Hello!, a Noob and his cheap hot end "design" July 02, 2011 06:03PM |
Registered: 16 years ago Posts: 824 |
Sorry, only registered users may post in this forum.