Adobe Illustrator to 3D- Any tips?
Posted by JBuck
|
Adobe Illustrator to 3D- Any tips? August 31, 2013 08:42PM |
Registered: 10 years ago Posts: 5 |
Greetings all! Thanks for allowing me to post my first post. New Reprap user here. Have a background in vector graphic programs (CorelDraw, Illustrator). I'm very comfortable creating drawings in those programs, but I've spent no less than 20 hours in the last 3 days trying to get things into something that is 3D and I'm at my wits end and need some guidance.
I was TRYING to use 123 Design. It appears only the online version allows any importing and when I export an SVG file out of Illustrator, it comes into 123D as just one solid block with no geometry. So I downloaded Blender. Can't get my SVG file into Blender either. I went back into Illustrator, exported as a DXF and then imported the DXF in Blender and it was a real mess. It created all kinds of crazy lines running all over the place, making my drawing look like a porcupine. Downloaded FreeCAD and when it imports the file, it messes up the geometry. I drew an object in Illustrator, mirrored it and welded to together. So it's a symmetrical object. When it opens in FreeCAD, it's not even close to being symmetrical. If I import a DXF in FreeCAD, it makes my object a big blob that only roughly has the same shape as the original shape.
I can't believe it's been so difficult to take 1 simple shape and get in into something 3D for printing. Surely there has to be an easy way to take vector graphics and get them done without having to learn Blender (which makes learning Photoshop look easy!).
Any tips, tricks, ideas, suggestions, advice? I'm really excited about the new printer, but I can't help but be extremely frustrated that I can't figure out how to make a flat drawing into 3D with ease.
I apologize if this has been asked and answered many times, but in my searching, it only brought up a few results and none of them seemed to apply.
So what's the easy path for getting out of Illustrator into finished stl file? I'm designing on a Mac if that matters, but the reprap is running on a PC.
Thanks in advance!
Edited 1 time(s). Last edit at 08/31/2013 08:42PM by JBuck.
|
Re: Adobe Illustrator to 3D- Any tips? September 01, 2013 12:18AM |
Registered: 11 years ago Posts: 730 |
SVG import in FreeCAD has actually gotten a lot more reliable lately, more so than DXF. Unfortunately you're using an operating system which is barely compatible. None of the developers own Macs so the Mac version (which was provided by a forum member, not by the FreeCAD team) has bugs the Windows and Linux version don't have. I don't know about other open source software, but Mac is the worst operating system to use FreeCAD on. That is, until some Mac developers start contributing to the project. Which if the past few years are any indication, won't happen any time soon.
If you were using Windows or Ubuntu, it would be as easy as installing the latest development release, something that is not available on Mac.
In any case, the best place to get help on FreeCAD is the FreeCAD forum.
If you were using Windows or Ubuntu, it would be as easy as installing the latest development release, something that is not available on Mac.
In any case, the best place to get help on FreeCAD is the FreeCAD forum.
|
Re: Adobe Illustrator to 3D- Any tips? September 01, 2013 08:36AM |
Registered: 10 years ago Posts: 5 |
Thanks! Yes, I read the notes about FreeCAD when I downloaded it, saying the OSX version wasn't maintained. I'm not married to FreeCAD by any means. I'll use anything if I can just find a process that works. I have 3-4 Macs here and 5 or 6 PC's. I have no issues installing anything on PC's, but I'd like to maintain all my drawing on my Mac. So I could draw in Illustrator, export it as .dxf, .dwg, or .svg and then import it on a PC with ____________software and I'd be fine with that.
I'm just not getting any remote indication that what I'm trying to do works and works easily. Blender just seems to be SOOO much overkill. It's dealing with all the camera angles, scenes, etc. I know I don't need any of that stuff, but it seems like the simplest tasks take me 30 minutes, like trying to find the dimensions of a selected object
Only think I am stuck on is using Illustrator. Everything else, I'll happily change if it's an easier to understand and use workflow.
Any suggestions?
|
Re: Adobe Illustrator to 3D- Any tips? September 01, 2013 10:49AM |
Registered: 11 years ago Posts: 730 |
|
Re: Adobe Illustrator to 3D- Any tips? September 01, 2013 12:44PM |
Registered: 10 years ago Posts: 5 |
Thanks again, but please reread what I said. This has nothing to do with Mac. I'm asking how to get an eps or svg file into something that's easy to use.
I've created files on the PC (CorelDraw) and in Illustrator on the PC and Illustrator on the Mac. Not a single svg or eps file I have created on any platform comes into any 3D modeling program properly. That's my question.
I just created a eps out of CorelDraw on a PC and used 123d Design online, and imported the eps. It brings a solid block into 123d Design. Doesn't bring in any of the actual shapes that were in the eps file. That's all PC, nothing to with a Mac.
|
Re: Adobe Illustrator to 3D- Any tips? September 01, 2013 10:53PM |
Registered: 11 years ago Posts: 730 |
Quote
JBuck
Thanks again, but please reread what I said. This has nothing to do with Mac.
And yet you already wrote:
Quote
JBuck
but I'd like to maintain all my drawing on my Mac.
So which one is it? You're asking for an easy process: I told you, I have no idea of one on Mac since I left that OS 15 years ago. And actually, I've been on Ubuntu (Linux distro) since 2007, so I don't know 123D Design either. For personal projects I use open source software exclusively.
FreeCAD is what I know, I seldom use Inkscape and last used Illustrator years ago. As I said, if you could use the latest development release of FreeCAD I could walk you through it - I have no idea about other software. BTW have a look at this topic, it may interest you, it's about a new Mac build of FreeCAD based on the development branch. [sourceforge.net]
And sorry but with no provided sample file from you we can only stay with generalities. I would say, make sure you have no fill or pattern filling your profiles (this just makes the import harder), make sure the profiles are perfectly closed, and that they do not intersect each other.
If you don't provide an example (preferably SVG) I cannot help further.
|
Re: Adobe Illustrator to 3D- Any tips? September 02, 2013 12:15AM |
Registered: 11 years ago Posts: 730 |
Okay I tried importing several SVG files into Blender and they all imported fine (with colors discarded). They were made with FreeCAD or Inkscape.
So I suspect if you can't get an SVG imported into Blender your SVG file may be at fault. You could try installing Inkscape and opening your SVG file in it, that may indicate if it's compatible.
So I suspect if you can't get an SVG imported into Blender your SVG file may be at fault. You could try installing Inkscape and opening your SVG file in it, that may indicate if it's compatible.
|
Re: Adobe Illustrator to 3D- Any tips? December 29, 2013 06:43PM |
Registered: 10 years ago Posts: 12 |
I've been using Illustrator/Corel/Photoshop to create complex splines/paths/displacement maps that I use with Lightwave for over 15yrs...
I've just gotten into 3D printing with the purchase of a Makerbot Replicator2 a week or so ago.
I'm currently printing a pencil case + lid that has raised relief 'Art Nouveau' style design motifs on it's outward facing surfaces. The 'Art Nouveau' design motifs were drawn up in Illustrator to the exact size required (black & white - NO shades of gray!!), exported as 600dpi tiff files> loaded into Photoshop>Select>Colour Range>(Black target colour) Fuzziness level 200>OK... then turn selection into Path>Save path... before File>Export>Paths to Illustrator (I know... "Shouldn't Illustrator automatically create paths?!!" - but for some reason a standard *.ai file doesn't import so well into 3D or CAD type appz - at least not from myh experience...) - then Importing into Lightwave as "EPS". Once loade into a layer, I can then extrude, bevel, rail, extrude, lathe, add splines before 'skinning' for a more "sculptural" effect, etc, etc, etc.
Photshop (or any bitmap/image editor) can be used to create displacement maps (i.e. 'gray scale' or monotone images). These can be mapped onto any flat (well in most cases they're smoother than what they'll be once the displacement map is applied to them!!) subdivided (the heavier the subdivision the more detailed the resulting mesh - but the more memory intensive it is too!) you create in a 3D app (Lightwave, 3DS Max, Blender etc, etc. I'm not so sure about 'pure' CAD appz being able to 'displacement map' gray scale images...)
I've used displacement mapping to create things I'd like to print as Lithophanes (thinnish, 3D transluscent, sculptural surfaces that when lit from behind look like the original image that created them!!) for use in lamps/window hangings etc.
BTW, I've tried using Blender... but it's so difficult to wrap my head around the analogies used in it's tool/workspace implementations - especially given how long I've been using Lightwave... but, horses for courses: I'm sure some people wouldn't have a clue how to navigate around LW, let alone build something!
Either way; using appz like Illustrator/CorelDraw/Photoshop to take 'short-cuts' in building complex 3D models is definitely worth the time and effort of exploring until you find the right combination of appz/processes to achieve the result you're after.
Enjoy!!!
Oh; and Happy New Year!
|
Re: Adobe Illustrator to 3D- Any tips? December 30, 2013 11:44AM |
Registered: 13 years ago Posts: 137 |

|
Re: Adobe Illustrator to 3D- Any tips? January 08, 2014 10:55PM |
Registered: 11 years ago Posts: 334 |
Steve could you post up some pics of the pencil case? I would love to see a guide of your process.
WWW.ZATOPA.COM - Your Place for high quality 3D Printing Filament and accessories
WWW.ZATOPA.COM - Your Place for high quality 3D Printing Filament and accessories
|
Re: Adobe Illustrator to 3D- Any tips? January 21, 2014 10:05AM |
Registered: 10 years ago Posts: 1 |
|
Re: Adobe Illustrator to 3D- Any tips? January 26, 2014 12:59PM |
Registered: 13 years ago Posts: 137 |
Things may be looking up for Mac users who want to use FreeCAD see http://forum.freecadweb.org/viewtopic.php?f=4&t=5452
|
Re: Adobe Illustrator to 3D- Any tips? February 05, 2014 06:46PM |
Registered: 10 years ago Posts: 12 |
Sorry I haven't responded in quite a while... Too flamin' busy!!
And given how busy I am at the moment, you'll have to excuse me for being brief in my response/reply.
I've attached a couple of screenshots that show/hopefully explain two of the methods. I wasn't able to track down all of the files I used to create the final 3D models - given I usually delete most of my 'working' files once the final model is done. they just take up heaps of space, and given the final model won't need making again; as long as I've backed it up to DVD, Blu-ray, external HD and NAS as I'm now accustomed to doing and none of them pack it in that is!!
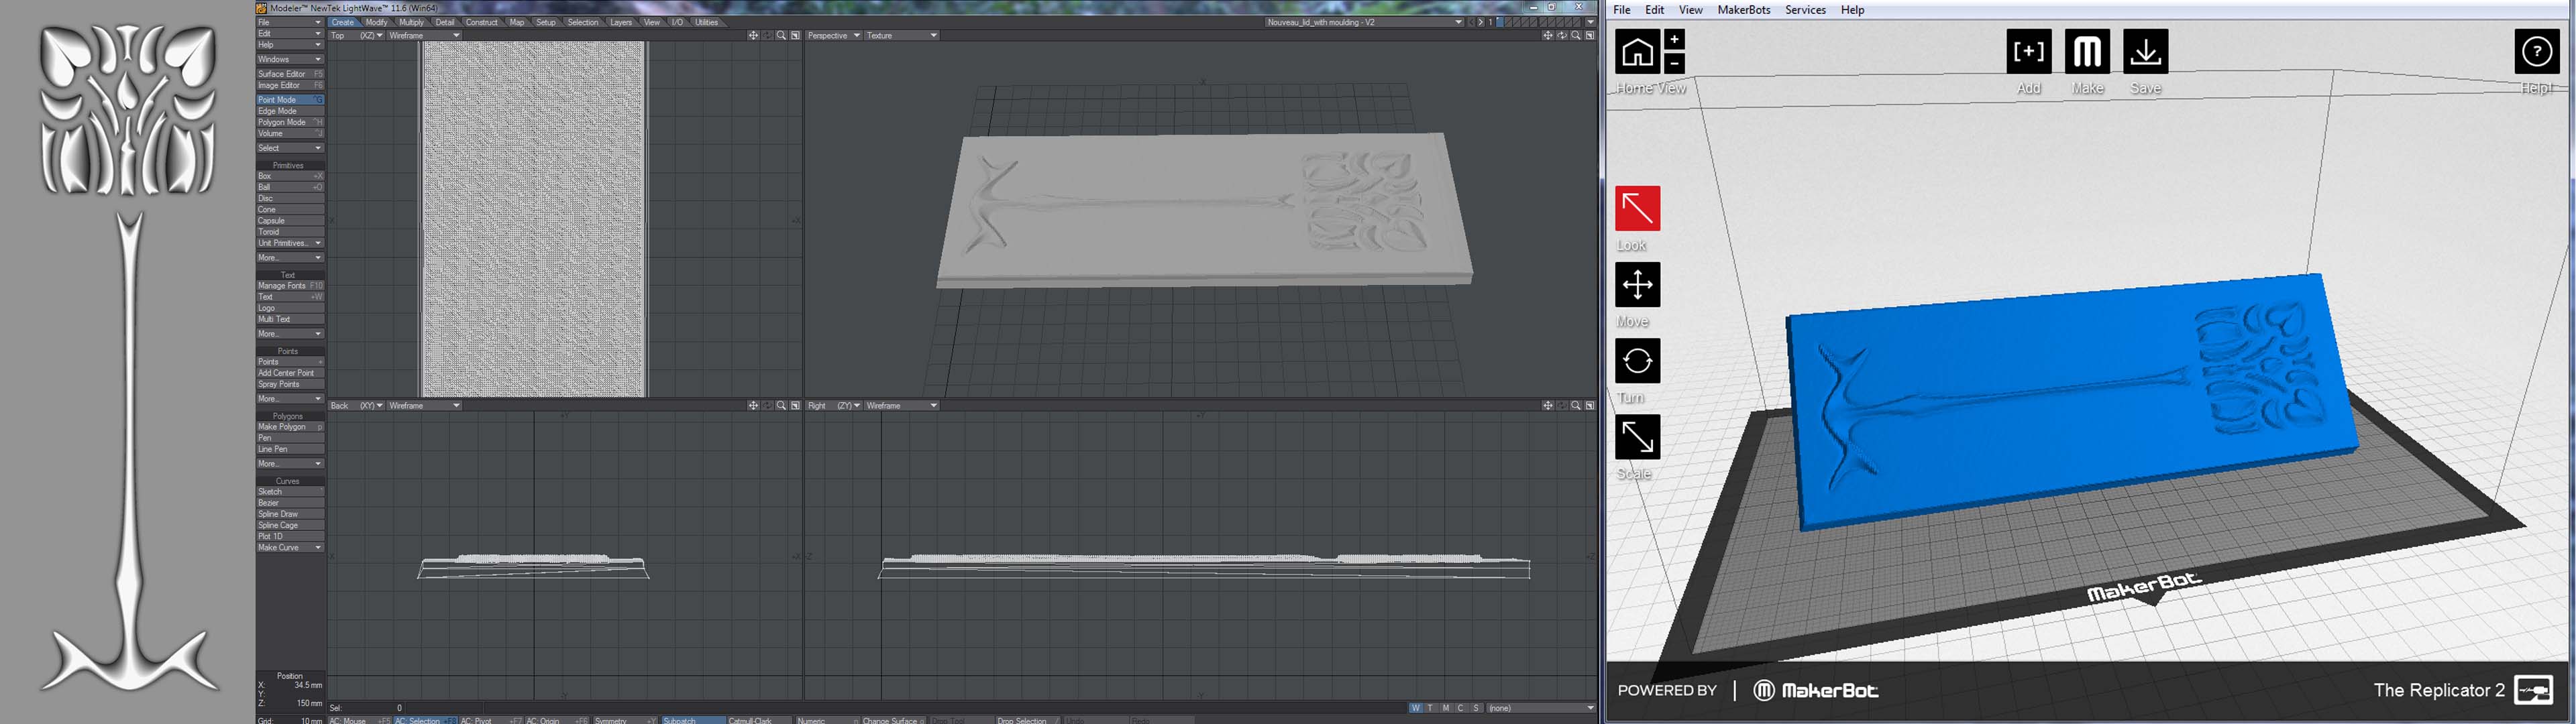
Anywayz; the method used in screencap 'displacement explanaition 1.jpg' is a grey scale displacement map crafted in Photoshop that's based on a vector black and white Illustrator file, which is then applied (as a *.tiff format) onto a VERY subdivided top surface of the pencil case lid 3D master object I created for myself in Lightwave. (BTW; in Lightwave, the displacement map is applied in the Layout component - not the Modeler component... Not sure about Maya or 3DS although I do know Blender's displacement mapping capabilities are a bit convoluted and not so easy to find.) Once the displacement map has been applied to one's satisfaction, the resulting 3D object is re-saved out of Lightwave Layout as a 'transformed object' in *.lwo format - re-saved from Lightwave Modeler as an *.stl (or *.obj) - checked in Meshlab/Meshmixer or Netfabb (or even all three just to be sure!!) before loading into the 'slicer' software... In my case that's Makerbot's Makerware, given I'm using a Replicator2, from where I can send directly to the printer or save onto SD external media or onto HD for future shuffling of the *.x3g sliced file.
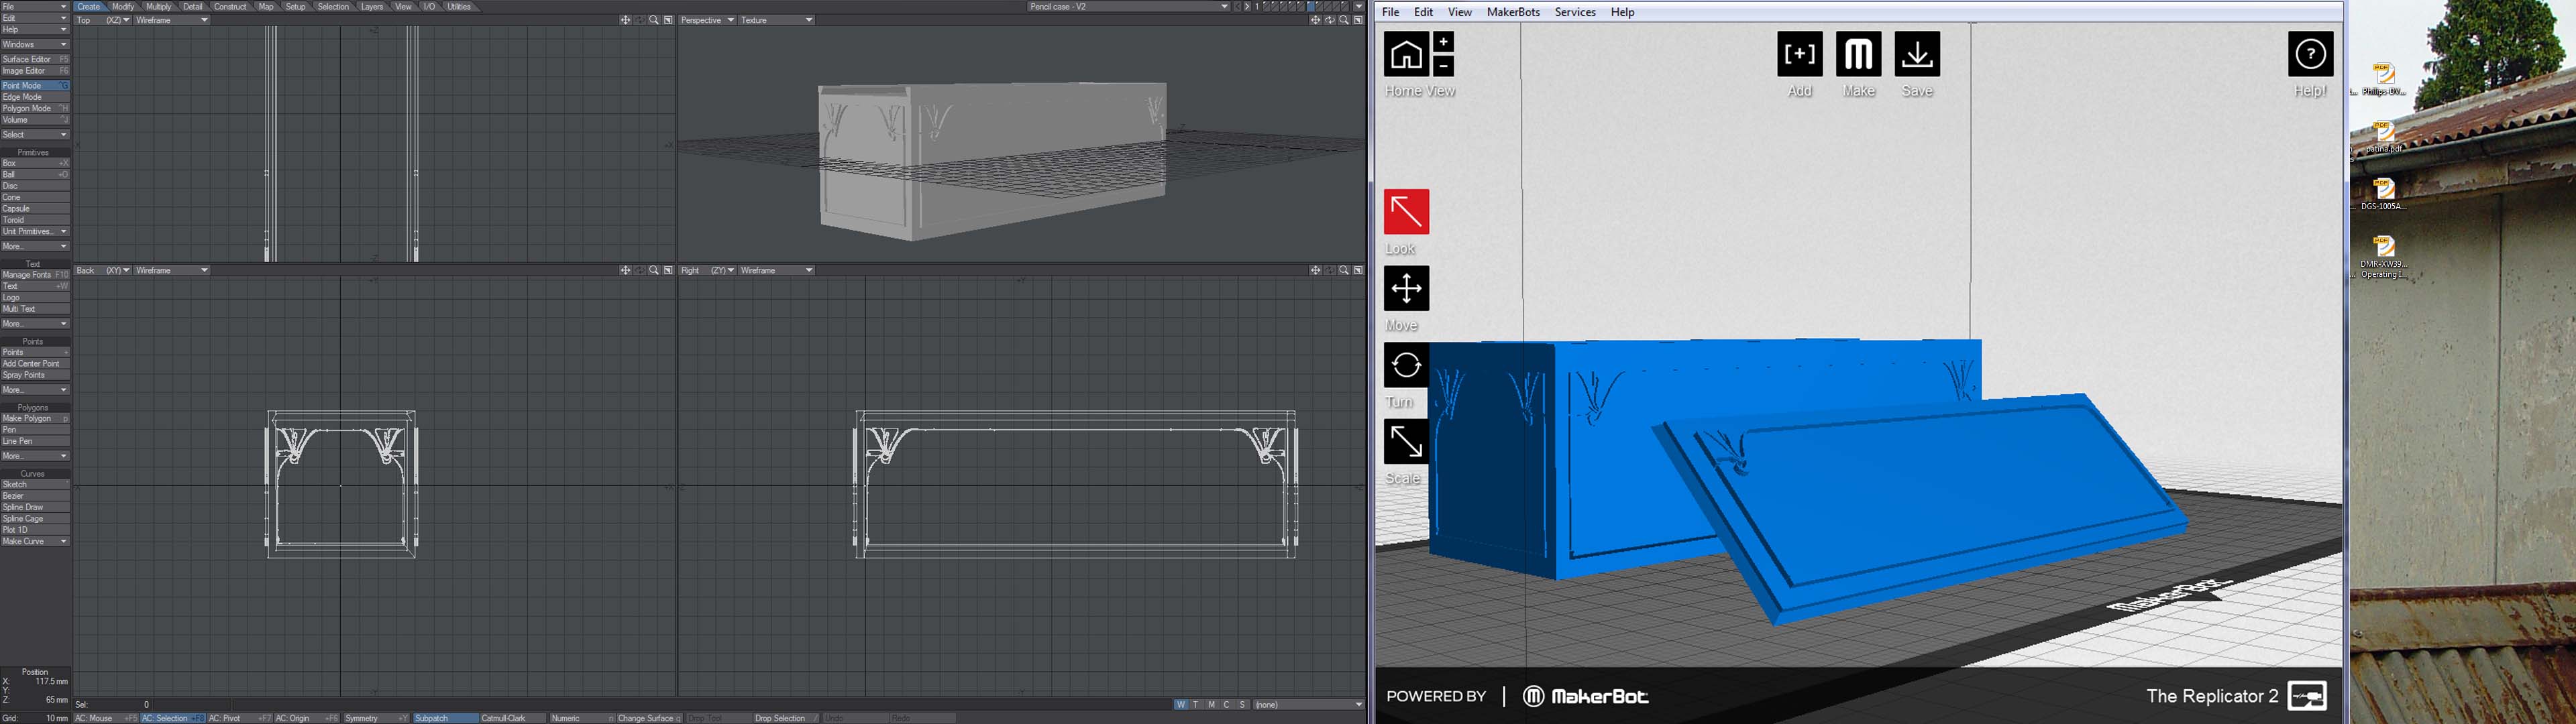
The method used in 'geometry explanaition 1.jpg' is to create the design motif in Illustrator, save as *.ai (eps) - import into Lightwave Modeler as EPS (closed polys) - extrude the resultant closed polys, copy/paste the extruded result onto an empty background layer of the already open target object, then "solid drill" usually via stencil mode onto the selected surface that's in the active layer. Once the design has been 'etched' onto the surface, I select the new surface polys (named so they're easy to identify and select!) and then either extrude/loft whatever you want to call 'raising' the polys in your 3D app of choice. Some motifs/patterns/designs don't require 'insetting' and look better raised straight out of the flat surface without 'rounding of the top faces of the motif/pattern/design; while others will... That's something that experience helps decide - and knowledge of your 3D app will aid in achieving.
Everything from there on is pretty much the same as with my explanaition of the grey scale methodology. I can't be certain that I've remembered in detail every last minute action that I had to undertake to achieve the end result/s - but, I'm pretty sure that I've recalled enough of my process that - unless you hit some errant key or did something unexpected, you'd be able to emulate what the screen shots show, as long as you're a reasonably knowledgable operator of a computer and the apps I've mentioned.
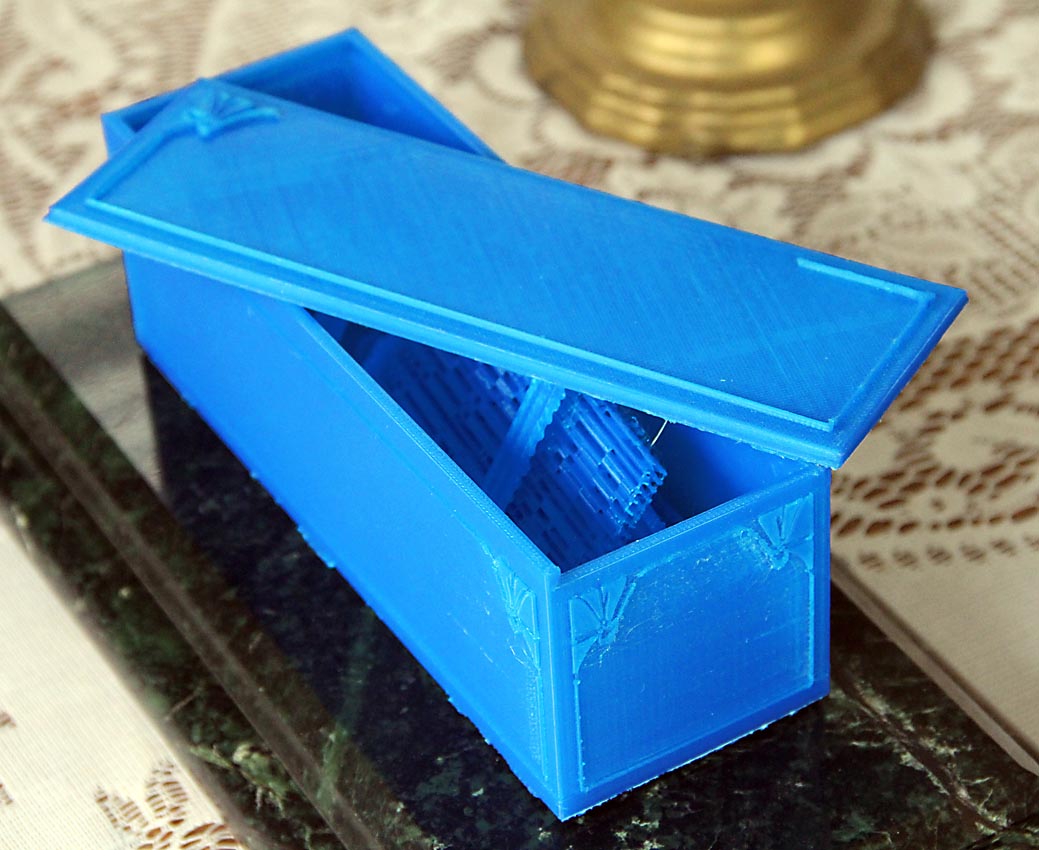
Suffice it to say however - that even when you achieve a pretty good looking result - the process of 3D printing can still have some surprises up it's sleeve!! For instance, the case shown in the 'geometry' example, printed with some of the finer horizontal straight lines partially missing, and because I was mucking around with custom print settings, the infill didn't print so the base and sides didn't print with the sort of bond/strength one would expect... and given the bottom of the horizontal straight line in the motif corresponded with the internal join between side and base, the printer sort of spat the dummy just to compound the problem.
Meanwhile; i've been printing other sculptural stuff... so I haven't got around to printing a more successful pencil case version; from which I intend to make a mould for casting multiples.
The problem with these 3D printers is sometimes the quantity of ideas of things to make!!
Hope that helps!
And given how busy I am at the moment, you'll have to excuse me for being brief in my response/reply.
I've attached a couple of screenshots that show/hopefully explain two of the methods. I wasn't able to track down all of the files I used to create the final 3D models - given I usually delete most of my 'working' files once the final model is done. they just take up heaps of space, and given the final model won't need making again; as long as I've backed it up to DVD, Blu-ray, external HD and NAS as I'm now accustomed to doing and none of them pack it in that is!!
Anywayz; the method used in screencap 'displacement explanaition 1.jpg' is a grey scale displacement map crafted in Photoshop that's based on a vector black and white Illustrator file, which is then applied (as a *.tiff format) onto a VERY subdivided top surface of the pencil case lid 3D master object I created for myself in Lightwave. (BTW; in Lightwave, the displacement map is applied in the Layout component - not the Modeler component... Not sure about Maya or 3DS although I do know Blender's displacement mapping capabilities are a bit convoluted and not so easy to find.) Once the displacement map has been applied to one's satisfaction, the resulting 3D object is re-saved out of Lightwave Layout as a 'transformed object' in *.lwo format - re-saved from Lightwave Modeler as an *.stl (or *.obj) - checked in Meshlab/Meshmixer or Netfabb (or even all three just to be sure!!) before loading into the 'slicer' software... In my case that's Makerbot's Makerware, given I'm using a Replicator2, from where I can send directly to the printer or save onto SD external media or onto HD for future shuffling of the *.x3g sliced file.
The method used in 'geometry explanaition 1.jpg' is to create the design motif in Illustrator, save as *.ai (eps) - import into Lightwave Modeler as EPS (closed polys) - extrude the resultant closed polys, copy/paste the extruded result onto an empty background layer of the already open target object, then "solid drill" usually via stencil mode onto the selected surface that's in the active layer. Once the design has been 'etched' onto the surface, I select the new surface polys (named so they're easy to identify and select!) and then either extrude/loft whatever you want to call 'raising' the polys in your 3D app of choice. Some motifs/patterns/designs don't require 'insetting' and look better raised straight out of the flat surface without 'rounding of the top faces of the motif/pattern/design; while others will... That's something that experience helps decide - and knowledge of your 3D app will aid in achieving.
Everything from there on is pretty much the same as with my explanaition of the grey scale methodology. I can't be certain that I've remembered in detail every last minute action that I had to undertake to achieve the end result/s - but, I'm pretty sure that I've recalled enough of my process that - unless you hit some errant key or did something unexpected, you'd be able to emulate what the screen shots show, as long as you're a reasonably knowledgable operator of a computer and the apps I've mentioned.
Suffice it to say however - that even when you achieve a pretty good looking result - the process of 3D printing can still have some surprises up it's sleeve!! For instance, the case shown in the 'geometry' example, printed with some of the finer horizontal straight lines partially missing, and because I was mucking around with custom print settings, the infill didn't print so the base and sides didn't print with the sort of bond/strength one would expect... and given the bottom of the horizontal straight line in the motif corresponded with the internal join between side and base, the printer sort of spat the dummy just to compound the problem.
Meanwhile; i've been printing other sculptural stuff... so I haven't got around to printing a more successful pencil case version; from which I intend to make a mould for casting multiples.
The problem with these 3D printers is sometimes the quantity of ideas of things to make!!
Hope that helps!
|
Re: Adobe Illustrator to 3D- Any tips? February 05, 2014 07:42PM |
Registered: 10 years ago Posts: 12 |
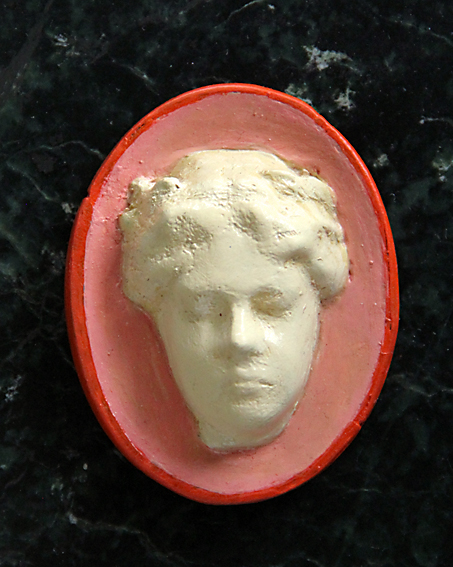
I've added a pic of a printed pencil case, as well as a pic of a brooch... just so you get an idea of how the case printed out - with it's aberrations as I mentioned; as well as an idea of some of the other things I've been printing along with the finishing surfaces I've been experimenting with.
BTW, the deep orange around the edge of the brooch is prep for gold leafing, and the actual brooch size is 5.5cm from top most point to the bottom extremity so it's not real big! I printed at 0.1mm and the print time was approx. 60min. in case you're wondering.
Cheers!!
BTW, the deep orange around the edge of the brooch is prep for gold leafing, and the actual brooch size is 5.5cm from top most point to the bottom extremity so it's not real big! I printed at 0.1mm and the print time was approx. 60min. in case you're wondering.
Cheers!!
|
Re: Adobe Illustrator to 3D- Any tips? February 13, 2014 05:41PM |
Admin Registered: 11 years ago Posts: 3,096 |
Sorry, only registered users may post in this forum.