Eventorbot

Contents
Eventorbot! Open source 3D printer.
The Mission and challenge behind Eventorbot, was to build a rigid, low cost 3d printer. Using less parts, easy to assemble, and is capable to self replicate most of its parts. It is 100% open source project, and all plans are available for anyone interested. Since 80% of the Eventorbots parts are printable. Once you build your first machine, you can make it even more affordable for friends, family, or the community. With the single solid steel frame, it eliminates 40% of parts and cost that other 3d printers uses for a housing and structure. Making it easier and more affordable for anyone to own a 3d Printer ("Lets just start printing our own stuff").
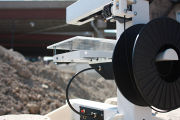
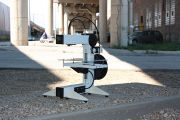
The unit is supposed to resemble a robotic arm with hydraulic tubes. It was designed for prints to be less affected by vibrations. With the 1 solid frame, any vibrations of any axis will cause the other axis to move with it. For example: If the X axis causes a slight vibration/1mm movement to the right, the Z and Y axis will also move that 1mm to the right. This will result in a better print as everything will remain squared.
http://www.thingiverse.com/thing:28915#
Direct download v1.0 Plans: File:Blue print.skp
For more images and updates like:
http://www.facebook.com/pages/Eventorbot/111169638934671
UPDATE (10-22-12): Link for dual extruder attachment board. Thanks to one of our backers: Kyle Kronyak. Either Kyle or I will have it available to purchase assembled: http://www.reprap.org/wiki/SLUM
PDF documents for Hot End (for 1.75mm and 3.0mm): http://eventorbot.com/files/Diagram%20for%20hotend.zip
Specifications
- Printed Parts: 37
- Non-Printed Parts: 2.5" square steel frame (16 gauge/1.5mm/.0598" thick, cost: less then $20.00)
- Printing Size: 152 x 152 x 152 (mm)
- Material Cost: $300-$500 (DIY)
- Costs: $799 (assembled)
- Precision: .1mm-.5mm nozzle

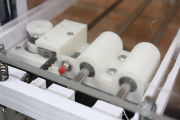
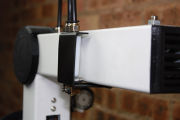
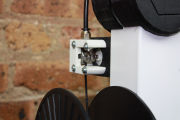
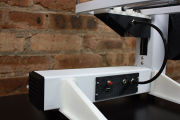
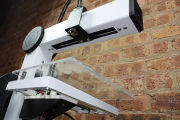
- Images of an Eventorbot


Video clips
360 Degree Rotating View of an Eventorbot
One of Eventorbots first ever test prints
Assembly Tutorials
Assembly of Eventorbot. X axis tutorial part 1
Assembly of Eventorbot. X axis tutorial part 2
Assembly of Eventorbot. Z axis tutorial part 3
Assembly of Eventorbot. Z axis tutorial part 4
Assembly of Eventorbot. Extruder tutorial part 5
Assembly of Eventorbot. Y axis tutorial part 6
Assembly of Eventorbot. Y axis tutorial part 7
Assembly of Eventorbot. Y axis tutorial part 8
Frame Engineering Drawings
After you have finished the frame and have welded the corners together, you will also have to cut a 2.5" x 2.5" square on top of the frame (the corner caps will cover this corner).

Parts list:
- (1) 4' long, 2 1/2" metal square tube (this will be used for the main frame and the hot head mount). Diagram: http://www.thingiverse.com/download:85781
- (3) Nema 17 stepper motor (at least 3 kg-cm 4 Wire). Specs for current motors used PDF: http://eventorbot.com/pics/3%20kg-cm%204%20Wire%20NEMA%2017%20Stepper%20Motor.pdf
- (1) Geared stepper motor for extruder. (model: PG35L-048).
- (12) 8mm linear bearings, model: LM8UU. Pic: http://eventorbot.com/pics/LM8UU.jpg
- (4) 8mm ball bearing, model: 608Z. Pic: http://eventorbot.com/pics/608Z.jpg
- (1) 9 1/2" long 5/16 threaded rod (for Z axis). Note: Most likely you will have some leftover after your 9 1/2" cut, use that piece to cut a 13mm long piece for: http://eventorbot.com/pics/rod%20for%20extruder%20bearing.jpg
- (6) 10.5" long 8mm rod. Pic: http://eventorbot.com/pics/8mm%20linear%20rod.jpg
- (1) Coupler 5mm to 8mm. Pic: http://eventorbot.com/pics/5mm-8mm%20coupler.jpg
- (1) Set of printed plastic parts (stl files listed on thingiverse.com soon).
- (optional) 1 set of printed decorative end caps (stl files listed on thingiverse.com soon).
- (1) Set of screws. List: http://eventorbot.com/hardware.htm
- (1) Sanguinololu 1.3a mother board with ramps. Ramps to be compatible to steppers (it should come with pin connectors and pins). Pic: http://eventorbot.com/pics/Sanguinololu%20board.jpg
- (1) MK7 drive gear (gear to drive the filament). Pic: http://eventorbot.com/pics/mk7_drive_gear.jpg
- (1) 4 foot of XL timing belt. PDF: http://eventorbot.com/pics/XL%20schematic.pdf
- (4) Push button momentary end stop switches. Pic: http://eventorbot.com/pics/Push%20button%20momentary%20switch.JPG
- (1) Bed. Aluminum or pexi-glass 8.5" x 11", 1/8" thick. (thickness does not have to be exact). Diagram: http://eventorbot.com/pics/bed%20diagram.skp
- (4) Springs for bed (this box should have all the springs you need for any circumstances: http://www.homedepot.com/h_d1/N-5yc1v/R-100142075/h_d2/ProductDisplay?catalogId=10053&langId=-1&keyword=springs&storeId=10051#.UDZP5tXDCSo
- (8) Rubber feet (bore holes need to be able to allow 10-32 screws) Pic: http://eventorbot.com/pics/rubber%20feet.jpg
- (1) Roll of 1/4" black poly tubing. Cut to: (1)14" for hothead wires, (1)20" for filament feeder, (1)12" for bed to mother board tray connection. Pic: http://eventorbot.com/pics/hose.jpg
- (6) Air pneumatic tube 6mm push in connector fittings. (Total Size 21mm x 12mm/ 0.82" x 0.47"(L*W) Thread Diameter 9mm/ 0.354) Pic: http://eventorbot.com/pics/hose%20connector.jpg
- (1) 5.5 mm x 2.1mm DC power jack socket female panel mount connector. Pic: http://eventorbot.com/pics/DC%20Power%20Jack.jpg NOTE: If you choose to use a hotbed, upgrade this jack to something that can handle at least 13amps. As for your power source, you can use a Xbox 360 power brick. Xbox 360 power brick is 16amp and is more then enough to handle the power (under $20.00).
- (1) Laptop charger 12 volt DC at least 5 amp. Pic: http://eventorbot.com/pics/power%20supply.jpg
- (1) Hot end assembly: http://eventorbot.com/files/Diagram%20for%20hotend.zip http://www.youtube.com/watch?v=ahse-027CR4&feature=plcp
Locations for screws
File: "Hardware.skp" shows the locations of all the screws. Please use the free google sketchup software, to zoom and view in 3D. http://www.thingiverse.com/download:86011
Printable plastic parts
STL files and quantity's of prints:
(2) bed A p1 P-022: http://www.thingiverse.com/download:85931
(2) bed A p2 P-023: http://www.thingiverse.com/download:85932
(1) bed carriage p1 P-012: http://www.thingiverse.com/download:85921
(1) bed carriage p2 P-013: http://www.thingiverse.com/download:85922
(1) bed carriage p2 P-015: http://www.thingiverse.com/download:85924
(1) bed carriage p3 P-014: http://www.thingiverse.com/download:85936
(1) bed p1 P-020: http://www.thingiverse.com/download:85929
(1) bed p2 P-021: http://www.thingiverse.com/download:85930
(1) extruder housing P-002: http://www.thingiverse.com/download:85911
(2) footing 1 P-009: http://www.thingiverse.com/download:85917
(4) footing 2 P-010: http://www.thingiverse.com/download:85918
(1) mother board tray P-003: http://www.thingiverse.com/download:85912
(3) motor mount P-005: http://www.thingiverse.com/download:85913
(2) pulley gear P-006: http://www.thingiverse.com/download:85914
(2) rod support p1 P-016: http://www.thingiverse.com/download:85925
(2) rod support p2 P-017: http://www.thingiverse.com/download:85926
(1) spool holder P-011: http://www.thingiverse.com/download:85919
(1) spool holder 2 P-011: http://www.thingiverse.com/download:85920
(1) x carriage P-007: http://www.thingiverse.com/download:85915
(1) x carriage part 2 P-008: http://www.thingiverse.com/download:85916
(1) z carriage p1 P-018: http://www.thingiverse.com/download:85927
(1) z carriage p2 P-019: http://www.thingiverse.com/download:85928
Optional Decorative caps:
(2) corner cap P-001: http://www.thingiverse.com/download:85933
(2) end cap P-004: http://www.thingiverse.com/download:85934
Forum
Since the lauch of the project a forum has been set up, for help and more information:
http://eventorbot.com/forum/index.php
Eventorbots siblings
Created by: Richard Taylor
Very nice alterations.
- Add printed geared extruder to take a NEMA17 stepper.
- Add fan to bottom end cap.
- Make a hot end mount with aluminium L section and printed parts (for J-Head).
- Use $2 plastic shelf mounts from IKEA for feet! (Great idea!)
View images: http://www2.artaylor.co.uk/eventorbot.html
Download blue print: http://www.artaylor.co.uk/eventorbot/Blue_print.skp