Budaschnozzle/nl
Release status: Working

| Description | Echt free/libre hot end
|
| License | GPLv3
|
| Author | |
| Contributors | |
| Based-on | |
| Categories | |
| CAD Models | |
| External Link |
Contents
Intro
- The BudaSchnozzle 1.0 is een open source verwarmings element.
- Geinspireerd door Arcol.hu_Hot-End_Version_3.0
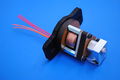
geassembleerdd Budaschnozzle v1.0
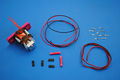
Budaschnozzle onderdelen

Doorsnede afbeelding
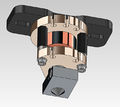
3D CAD Rendering


Features
- Aluminum Blok Weerstand Verwarmings element
- Makkelijk te assembleren en uit elkaar te halen zonder lijm
- Trek ontlasting
- Bevat gedraaide aluminum and stalen onderdelen, en laser gesneden houten onderdelen
- Compatibel met Wade's and Greg's extrudeer mechanismen
- Op dit moment compatible met:
- De standaard Prusa Mendel wagen
- Onze Supa-Flat wagen
- Mendel OpenX Bling wagen
- Shapercube 2.x wagen
Specificaties
- Grootte: (H,B,L) 55mm, 40mm, 40mm
- Aluminum blok weerstand
- Gedraaide aluminium warmte blok: 18.4mm x 25mm x 8.3mm
- Gedraaide aluminium spuitmond
- Thermistor temperatuur data: Honeywell 135-104LAG-J01
- Weerstand verwarmings element: Vishay RWM06226R80JA15E1
- Aluminum en koper heatsink
- PEEK GF30 isolator
- PTFE inner sleeve
- Laser gesneden hard houten onderdelen
- Gedraaide roestvrij stalen achterplaat
Montage
Het monteren van de Budaschnozzle is SUPER gemakkelijk. Zodra je wagen gemonteerd en gereed is, plaats je de Budaschnozzle in de wagen in het gat voor de extrudeerkop. Lijn de gaatjes van de Budaschnozzle montage plat op met de montage gate in de wagon. Put your extruder on top of the Budaschnozzle mount plate lining up the extruder mount holes with the holes in the mount plate and carriage. Push in the the screws that are compatible with your carriage (generally M4 screws). Screw on the nuts and tighten the screws. Bam, done.
Tip: Put a scrap piece of plastic filament through the extruder and into the hot-end before you tighten down the extruder. You do not need to heat the Budaschnozzle, just lightly push the filament down until it reaches the nozzle. This will align the filament travel space to give a nice smooth movement of the filament through the extruder and hot-end.
lege X-wagen
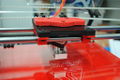
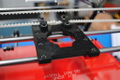
Budaschnozzle geplaatst in de wagen
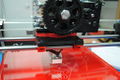
Budaschnozzle gemonteerd en vastgeschroefd op de wagen.


Waarschuwingen
Er zijn wat beperkingen aan het ontwerp van deze Budaschnozzle. Deze beperkingen ontstaan door de PEEK isolator. Voorkom schade aan de PEEK isolator door de volgende richtlijnen te volgen:
- Verwarm niet heter dan 230C
- Zorg er door dat de spuitmond nooit kan slepen over het printbed als de eerste laag worst reprint. Dit kan zodanige materiaalspanningen opleveren dat de PEEK isolator barst.
- Als je een verstoping hebt in de spuitmond is het het best om de spuitmond schoon te maken in plaats van er plastic in te blijven duwen.
- Het is verstandig om de toe te voeren plastic draad door een stuk schuimplastic of spons te laten lopen om stof vervuiling te voorkomen.
- Extrudeer niet sneller dan 90mm/min. Als je het sneller doet loop je de kans dat de PEEK isolator wordt opgeblazen.
Onderhoud
- Het vervangen van een kapotte PEEK isolator
<videoflash type="youtube">Xl8VK9ulFJE</videoflash>
Thermistor
Er is een temperatuur tabel gemaakt voor de Honeywell 135-104LAG-J01 thermistor gebruikt in de Buddhaschnozzle. The temperatuur tabel is toegevoegd aan de Sprinter firmware en wordt aangeschakeld door thermistor 7 in de Configuration.h file in Sprinter. Verander de regel "#define THERMISTORHEATER 1" to "#define THERMISTORHEATER 7"
Source
| FILE | TYPE | DESCRIPTION | DOWNLOAD |
|---|---|---|---|
| Bill of Materials | Spread sheet | Spread sheet of bill of materials | .ods |
| Heater Block | 2D & 3D CAD drawings | CAD drawing for the heater block | .pdf, .SLDDRW, .SLDPRT |
| Nozzle | 2D & 3D CAD drawing | CAD drawing for the nozzle | .pdf, .SLDDRW, .SLDPRT |
| Peek Isolator | 2D & 3D CAD drawing | CAD drawing for the PEEK isolator | .pdf, .SLDDRW, .SLDPRT |
| Upper Plate | 2D & 3D CAD drawing | CAD drawing for the Upper Plate | .pdf, .SLDDRW, .SLDPRT |
| Lower Plate | 3D CAD drawing | CAD drawing for the Lower Plate | .SLDPRT |
| Backup Plate | 2D & 3D CAD drawing | CAD drawing for the Backup Plate | .pdf, .SLDDRW, .SLDPRT |
| Copper Heatsink | 2D & 3D CAD drawing | CAD drawing for the Copper heatsink | .pdf, .SLDDRW, .SLDPRT |
| Budaschnozzle Mount | 3D CAD model and drawing | 3D CAD model for the Budaschnozzle mount | .stl, .SLDPRT |
Leveranciers
Dit ontwerp wordt niet meer gebruikt. Kijk alsjeblieft naar het Budaschnozzle 1.1 ontwerp.