Lautr3k Build Manual
This page is a development stub. Please enhance this page by adding information, cad files, nice big images, and well structured data!
Contents
Tools
- M3 Nut Wrench (or ajustable wrench)
- M5 Nut Wrench (or ajustable wrench)
- Framing Square
Printed Parts

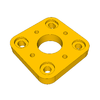
2mm motor spacer

30mm fan mount
40mm fan mount - left

40mm fan mount - right

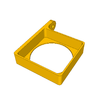
adjustable z screw mount

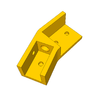
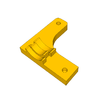
bracket 22° - left
bracket 22° - right
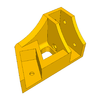
bracket 68° - left

bracket 68° - right

2 x bracket 90° - 20x20mm

6 x bracket 90° - 40x20mm
2 x bracket 90° - T

16 x cable clip

extruder body
extruder flange - dirty upgrade

extruder idler - dirty upgrade

x carriage - nut side
x carriage - tool side
x end - bearing side - in

x end - bearing side - out
x end - motor side - in

x end - motor side - out

x endstop mount
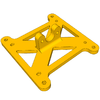
y carriage

y end - bearing side

y end - motor side

y endstop mount

z endstop mount
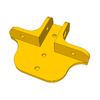
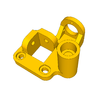
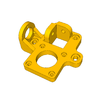
2 x z motor mount


Mini V Wheels
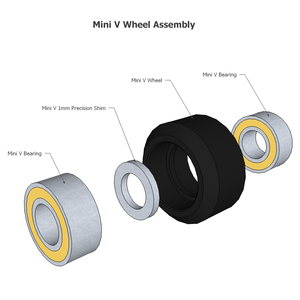
We will begin by assembling 16 Mini V wheels.

X Axis
X Carriage

Take the "x carriage - tool side" part.
Optionally, add two M3 nuts, for future use. Glue, or welding with filament and a hot tip.
Add the four M5x40mm screws.

Add the four wheels with spacers.
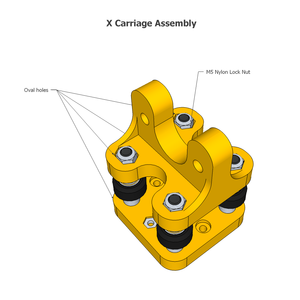
Add the "x carriage - nut side" part.
Ensure that all oval holes are face to face and do not overtighten the screws.
Put the assembly on a flat surface as pictured, with the oval holes at the top.
Tighten the two bottom screws firmly.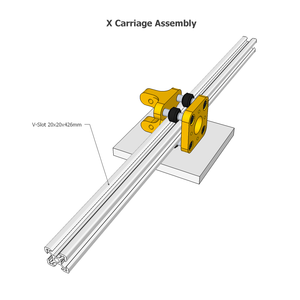
Two techniques.
1 - Slide the 20x20x426mm V-Slot profile, push the wheels down, and tighten the top screws ... sometimes it works well ...
2 - Push the wheels down, loosely tighten the top screws, and gently slide the 20x20x426mm V-Slot profile. Finally tighten the top screws.
It is not always perfect, do not despair, and try again.


X End - Motor side

Follow the same setup as the x-carriage.
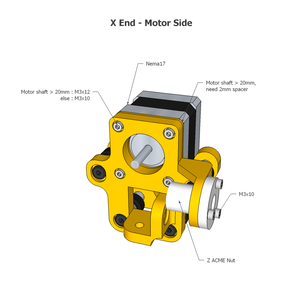
Add the Nema17 motor with four M3x10mm if the shaft is less or equal to 20mm, if greater use M3x12mm and add the "2mm motor spacer" as pictured. (Or cut the shaft)
Add the Z axis ACME nut with three M3x10mm. If it's hard to screw, tap the three holes.


X End - Bearing side
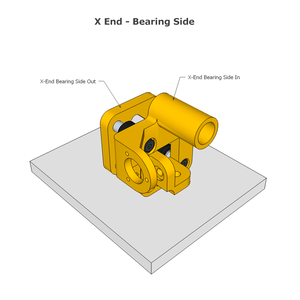
Follow the same setup as the x-carriage.

Add the Z axis ACME nut with three M3x10mm. If it's hard to screw, tap the three holes.


X Lead Screw
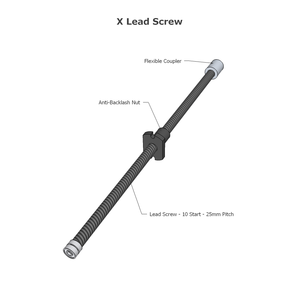
Pay special attention to the orientation of the nut on the Lead Screw, it is important.
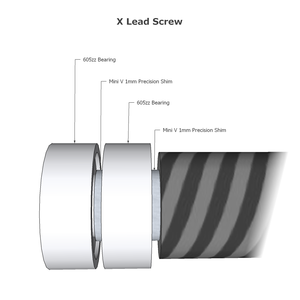
Details for mounting bearings.


X Axis Assembly
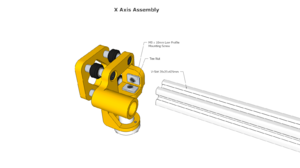
Add two T-Nuts on the X-End with two M5x10mm. Slide the X-End on the 20x20x426mm V-Slot profile. Adjust and tighten the screws firmly.

Slide the X-Carriage on the 20x20x426mm V-Slot profile.

Add the lead screw, without securing the nut.

If you do not have a drop in T-Nut, add a T-Nut for the X Endstop. As for the first X-End, add two T-Nuts with two M5x10mm and slide.

Adjust the space between the two X-Ends to 410.2mm and tighten the screws firmly. Do not forget to tighten the flexible coupler.
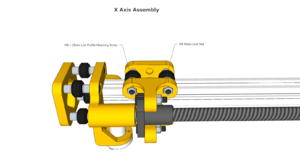
Drag the X-Carriage to the bearing side. Fix the nut firmly without forcing.

Turn the lead screw by hand to move the carriage to the opposite side, the force must be constant, no stops or catching! If all went well, the X Axis is completed.


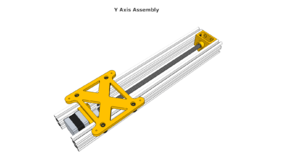
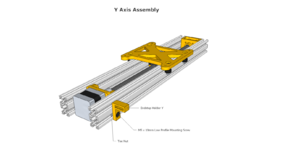
Y Axis
Y End - Bearing side
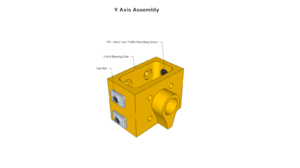
Add four T-Nut on the y-end with four M5x8mm.
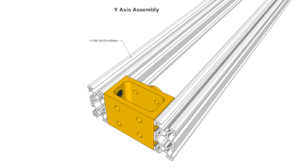
Slide the y-end between the two 40x20x480mm V-Slot profile. Adjust and tighten the screws firmly.


Y Lead Screw
Same as the X axis.
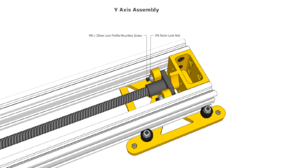
Y End - Motor side
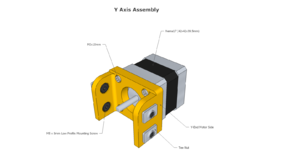
Fix the Nema17 motor on the y-end with four M3x10mm and add four T-Nut with four M5x8mm on the y-end.
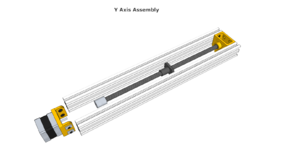
Clip the lead screw assembly in the x-end and slide the motor side.
Adjust and tighten the screws firmly.


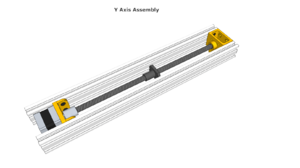
Y Carriage
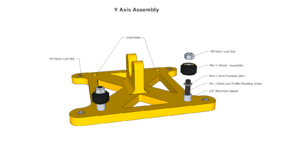
Take the "y carriage" part. Add four M3 nuts.
Add two wheels with spacers in round holes and tighten the screws firmly.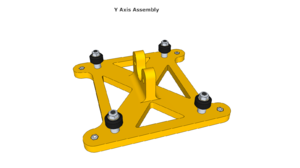
Add the two others wheels with spacers in oval holes, push the wheels outwards and do not overtighten the screws.
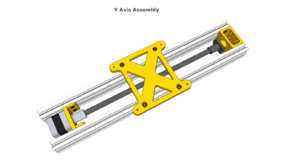
Move the nut to the x-end (bearing side). Clip the "y carriage" on the "y assembly". Push the wheels inwards. Tighten the screws by applying pressure inwards. (Sorry I can not explain better than that.)
Drag the "y carriage" on the bearings side. Fix the nut firmly without forcing.
Turn by hand the lead screw to move the carriage to the oposite, the force must be constant, no hard point! If all went well, the Y axis is completed.
(Do not like me.) Do not forget to install the "y endstop mount" ... unless you have a drop-in T-Nut.


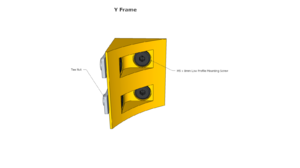
Y Frame
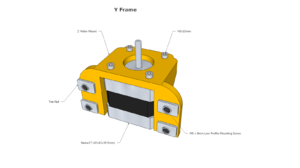
Prepare the two "z motor mount" as pictured.
Prepare six 40x20mm 90° brackets with four T-Nut and four M5x8mm.

Slide on the 20x20x430mm T-Slot profile four 40x20mm 90° brackets ans four T-Nut as pictured. Currently do not tighten the screws too much, just to keep up.
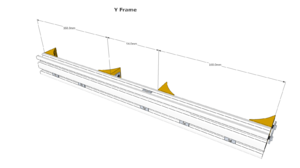
Add five T-Nut at the bottom and one at the top, they serve to cable clip.
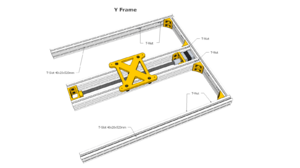
Working on a flat surface. Add the y-assembly and the two 40x20x520mm T-Slot profile. Adjust the brackets and tighten all screws firmly. Add six T-Nut at the bottom and one at the top, they serve to cable clip.

Slide the two z motor mount on the 40x20x520mm T-Slot profile. Slide four T-Nut on the 20x20x430mm T-Slot profile, fix the two 40x20mm 90° brackets. Currently do not tighten the screws too much, just to keep up.

Adjust and tighten all screws firmly.


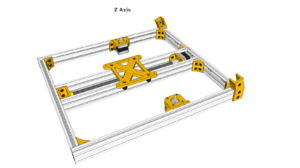
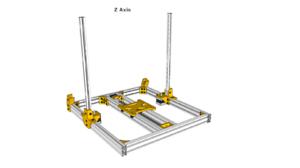
Z Axis
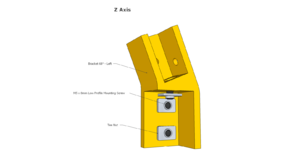
Prepare the two 68° brackets (left and right) with three T-Nut and three M5x8mm.
Slide the two 68° brackets and tighten all screws firmly. Add two T-Nut with two M5x8mm in the top holes.

Fix the 90° T-Bracket on the 20x20x430mm V-Slot with three T-Nut and three M5x8mm, adjust and tighten all screws firmly. Preload the four other T-Nut with M5x8mm.
Slide the two Z axis, not need to be accurate at the moment and do not tighten the screws too much, just to keep up. Add one T-Nut on the right Z Axis for the endstop.
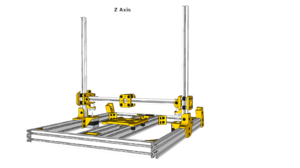
Slide the X axis assembly on z axis.

Attach the two 20x20mm 90 ° bracket on the 20x20x430mm T-Slot. Slide four T-Nut as pictured and slide the assembly along the z axis. Adjust and tighten all screws firmly.
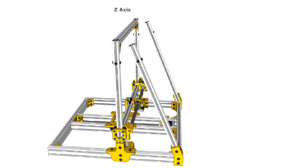
Slide the two 20x20x440mm T-Slot on the back and tighten all screws firmly.Reserve five T-Nut on each side, as pictured.
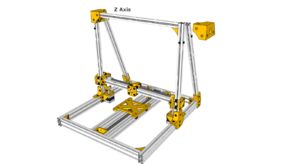
Slide the two 22° brackets by the sides.

Use a hex wrench to lock the T-Nut, remove the screws and push the T-Nut in front of the hole, put the screw and do not tighten too much.

Voila, everything is in place. I have no particular method to adjust the levels. Normally everything set up automatically, but before tightening all the screws, you must ensure that everything is a right angle. Work on a stable flat surface and set a level.


Videos
Thank you to Carl for his great videos. <videoflash type="youtube">X5bPem2hh_c</videoflash> <videoflash type="youtube">kuloG72xqf0</videoflash> <videoflash type="youtube">5nwVchJLtB4</videoflash> <videoflash type="youtube">ZBfXjolRQyw</videoflash> <videoflash type="youtube">A6LyTU46RN0</videoflash> <videoflash type="youtube">KSSrlIKi3uw</videoflash> <videoflash type="youtube">V7ezXC4jaPw</videoflash> <videoflash type="youtube">2b_HYLjOPpw</videoflash>