RUG/Pennsylvania/State College/Printers/PSU Unit B
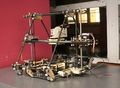
On this page you will find the current status of the Unit B Mendel. Also, this is will be a staging area for our personal edits to the various instruction wikis on the RepRap site. Our Mendel Unit is a Techzone Gen 3 Laser-cut Mendel. So far, no major design components have been changed from what you get from Techzone.
Most of the information below will be incorporated in the LaserCut Mendel Assembly page.
Contents
Mendel Generation 3 Current Condition
Week 4
Week 2


Staging Area for Instructions
The information below will be where our group first posts instructions for the Mendel unit before moving it to LaserCut Mendel Assembly page. This information will most likely be incomplete and/or not in a logical order. If you are building a Laser-Cut Mendel, got to the link above for the instructions.
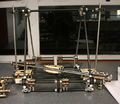
X Axis
The X-axis of the Mendel holds the extruder and allows it to move laterally left and right. The X-axis jig is also part of the Z-axis as the entire X-axis moves up and down along the Z-axis.
Assembly
- Gather the laser cut parts shown in the picture below. Also, have the nuts, bolts and washers bag close at hand.
- First, assemble the “right hand side”. Be sure to start with the larger piece facing the way it is shown in the picture below.
- Push screws through “side pieces” and through the base piece as shown.
- Note: Put 3 washers on each of the outer screws (the picture only shows 1 on each). This is because the screws being used have an un-threaded portion that will not allow the pieces to tighten unless extra washers are used. (see corrected image in step _). You could also decide to put them on in step


| ||||||||||

