RepRapResco
Contents
What is RepRap#Resco?
RepRap#Resco is a Prusa iteration 2 build by the R.eS.Co. research company. We made some little modifications and choose between the numerous possibilities/variations and made our "RepRap cocktail". Since we want to clearly state the origin of our work and also to have an unique name that refers our particular printer, we created the name RepRap#Resco (yes, really not so great ;)
So this IS NOT a new printer/design, it's simply our "way" to build the RepRap Prusa i2. However because some of our thoughts could be useful to others, we decided to make a wiki page and describe our setup in details.
General guidelines
In the front of all the RepRap world variations/modifications you'll need some guidelines that help you to don't lose yourself and achieve a consistent result. Our guidelines are:
- Reliability over all
- Follow standard RepRap as possible
- Print quality over print speed
This takes us to the following decisions.
Features
The RepRap#Resco characteristics are:
- All metal extruder (RescoHotEnd): in order to avoid hot end plastic parts failures
- Aluminium bed with heater on the bottom: to assures a perfectly stable and flat surface
- T5 printed pulley no reduce the vitamins and the cost
- LM8UU linear bearings to reduce maintenance and increase repeatability and print quality
See the following sections for some details.
Bed fixing
We think that PCB heater is great, but we find that fix over it a glass sheet with some bulldog clips doesn't look so good. So we decided to use the "old" Mendel style. We have an aluminium bed of 5mm fixed by screws. In the pictures you can see that using a plastic spacer (usually used in electronics) allow us to use two screws for each fixing point. A flaring head screw is used on the top surface to assure that the screw head can't interfere with the nozzle movements. A standard M3 screw is used for "pull" the bed from behind the y plate. This setup allows simpler bed levelling: you can place the nozzle right on the top screw and then use the bottom one to adjust the bed height.


Also the bed is only fixed in three points (instead of four). This really simplify the bed levelling:
- place the nozzle on a fixing screw
- adjust the bed height with the opposite screw
- repeat for other two fixing screws
if your frame is not deformed at the end your bed will perfectly adjusted (I plan to make a video on this).
Bed heating
Because we decided to heat the bed from behind, we can use all the different heater types. PCB solution is elegant, but not so cheap. Then we found this thing: Ghetto HBP (and heater done with stripboards) and we decided for it. It's really cheap, thin and light. We add some blind tapped holes in our bed and the it's a done deal.
We use a metallic sheet to assures that the solder thickness is really limited. So with a kapton layer on the copper strips we can directly attach they against the bed bottom surface. In this youtube video (RepRap#Resco assembly #7 - The bed) we show you assemble this type of bed.
X carriage
Since your all metal RescoHotEnd need a fan to cool down the cold-end, we decided to modify the x-carriage to mount it. The carriage you see in the picture is based on Prusa i2 one. It can house a 30mmx30mmx10mm fan. The fan air is splitted: one part cool down the hot end, the other is piped to cool down the bed around the nozzle (this idea was taken from various Thingverse fan holders). To print this part we use Skeinforge because it has the option of generate support "exterior only". In this way the two bridges are printed without support, while the air pipe are.
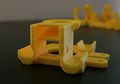
Modified x carriage with fan mount and air pipe
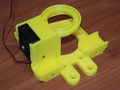
Modified x carriage with fan
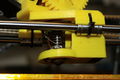
Modified x carriage in place on the printer


X ends
We slightly modify the x axis ends that at that times comes with the LM8UU Prusa iteration 2. We replaced the snap-in smooth rods system with the "old" screws and nuts traps. In this way the part is less prone to crack (we use only ABS for print machine parts). To make them still more robust we increased the material around the smooth bars holes. We also modified the idle end to act as a stop for the x carriage in order to protect the fan (the carriage hit the idle end before the fan).
Endstop holders
As endstop we use mechanical switch that comes with two holes of 2.5mm diameter. We reamed they to 3mm and use the modified endstop holder (that can house three nuts) that you see in the picture.
Z axis home stop
To easly set the extruder zero position we use an adjustable stop. You can see it in the pictures. The use of a spring assure that the stop doesn't move during print.

Files
The following table contains the link to the modified parts files
| Part | Link |
|---|---|
| X carriage with fan | http://www.resco-research.com/downloads/x-carriage-with-fan.stl_.zip |
| Electronics fan mount | http://www.resco-research.com/downloads/electronics-fan-support.stl_.zip |
| Endstop holder | http://www.resco-research.com/downloads/endstop-holder.stl_.zip |
| X motor end | http://www.resco-research.com/downloads/x-motor-end.stl_.zip |
| X idler end | http://www.resco-research.com/downloads/x-idler-end.stl_.zip |