TechZone Tip Assembly
The instructions on this page are for assembling the tip and extruder kit(s) from TechZoneCommunications.
The information may be useful for general assembly of tips and other designs, but no attempt is made to address them specifically in this document.
If you purchased a kit from TechZoneCommunications, and are having difficulty, please contact us (TechZoneCommunications) at Our Contact Page
Background
Here at TechZone (short for TechZoneCommunications) we have learned the hard way, that the tip is probably the hardest and most finicky part in the RepRap. Unfortunately that set us up to cause a lot of problems for many of you (our customers and design users).
When we first released the LaserCut Mendel (LCMendel) we thought it would be a piece of cake to make and deliver hot ends, after all, everyone with a RepRap has a hot end and we presumed that they worked just fine. In the weeks (which became months) that followed we found out that we were Fools (notice I capitalized that word). We probably spent far too long re-inventing the wheel, and should have bitten the bullet and purchased everyone their favorite tip and called it good. That certainly would have saved us some money!
Even with the current version of tips that we have shipped, I am not completely content with the design, I am certain that there are some improvements to be made. However, what we currently provide (Aug 27, 2010) is a good design, and I am confident it is no more finicky or flawed than the many other designs out there. I did break down and order several in from other vendors and set them up and compared their performance before I finally released our tip.
With that in mind, you should know that tweaking the settings of your machine, will improve, or impare the performance of your printing - ALOT. I suppose that many of the more experienced RepRap users know this already, but, for those of you who are new to RepRap, this may be your first "warning."
Contents
Hot End Assembly

Included in the Kit
- (1) Brass tip; it is machined from a solid bar of brass and threaded to a standard 7mm thread, bored with ~3mm bore until it is about 1mm from the end, the end has a 1/2mm hole in it and is ground with a taper.
- (1) Oak Insulator, with Teflon insert; We played with several insulators, and didn't like any of them we even had trouble with the standard Teflon and/or peek insulators, then we found on a chart that Oak is 1/10th as conductive as the Teflon or peek! So, we make the insulator out of oak. We recommend some care in your firmware and tip construction, Wood is flammable....
- (1) Nichrome heater wire; This wire is insulated with fiberglass, but that fiberglass is just wrapped on the wire, so we overcoat that with high temperature silicone so that it doesn't unravel as you use it.
- (1) Type K thermocouple wire; This is insulated in a fiberglass braid, it has two wires in there, one wrapped in Yellow the other wrapped in red.
- (1) 1cc of High Temp Goop; we use two different kinds of "Goop" one is a high temperature silicone - which is copper colored - purchased from an auto parts store, the other is a silicone cement - which is black - purchased from a hardware store (both come in large qty packages, so we repackage it into a small syringe).
- (2) small brass or copper crimp connectors (these are shipped to you in a small envelope)
- (2) Small screws to attach the Oak block to the extruder body
Hot End Assembly Instructions


- One is a hight temperature silicone we purchase from an autoparts store, it is good up to ~350 degrees Celcius. It also remains flexible after it cures - give it about 24 hour to cure. it can be handled and you can finish the assembly after about one hour. It is copper colored.
- The other is a Silicone Cement product we get at a hardware store. It is good up to ~535 degrees Celsius. It is Hard and rigid when it cures, I would give it 24 hours of cure time as well. It can be handled after about 2 hours. It is black in color.
Both of these are shipped to you in a small syringe, you can use the syringe to apply the goop to the tip, I find it is helpful to use a toothpick to help press it into place and spread it around the way I want it. Sometimes, it will get stuck in the small end of the syringe (especially the black stuff, it has chunks and fibers and stuff in it) I just use a toothpick to clear the end of the syringe (picture in gallery below) If you don't like the syringe, you can just cut it apart, we use the syringe for ease of packaging and shipping (and to keep it from curing before you get to use it).
One cc is more than enough to do your tip, you can save the extra for a second tip, or you can apply the extra to your tip to act as a better insulator as I have done (see gallery below for photo).

Using a toothpick to clear the tip when it gets stuck.
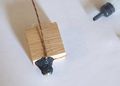
All the cement from the syringe applied as extra "insulation."

Let your tip dry and cure for an hour or two before continuing. Go watch a movie, or take your sweetheart to dinner (it may help make up for the long hours you have spent on this project!)


All this effort is made, because the nichrome wire does not solder well, in fact it solders very very poorly.
Thermocouple A-D converter with OneWire
Connection to the Extruder Body
History of our design
Some people have asked for pictures of our development process, and regretablly, I don't have pictures of all the designs we made and tested, but here are a few of the more noteable pieces. If you are one of our customers who recieved something different than what is in the photos here, please take a picture and post it to this section, I will add descriptions of what we were attempting to do.
Many Thanks to all of you who have helped (both directly and indirectly).