Ultibots/Micro Extruder
This page is a development stub. Please enhance this page by adding information, cad files, nice big images, and well structured data!
//identifies pages under construction. remove when the page is relatively stable.
Release status: working
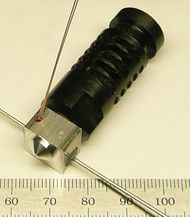
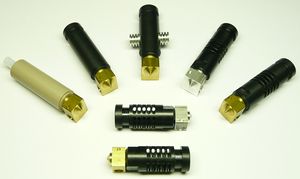
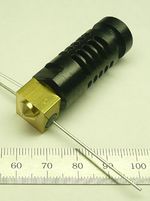
| Description | Micro Extruder for PG35L motors. Derived from TrinityLabs Micro Extruder with ideas from Okatake, Scotty Mason and some ideas from me.
|
| License | CCSA
|
| Author | |
| Contributors | |
| Based-on | |
| Categories | |
| CAD Models | |
| External Link |
Introduction
This nozzle is a combination of ideas from other nozzle designs combined with a goal to reduce the number of custom machined parts to a bare minimum. By reducing the number of machined parts, it is hoped that the cost of this hot-end can be kept down while improving the reliability.
The use of a machined piece of round PTFE, as a liner, was requested in one of two designs by Brian Briggs.
The idea of using the PTFE tubing as a liner, from the Cold End to the tip, was borrowed from the Makerbot Mk V extruder design.
The PTFE tubing also acts to "bridge" the joint between the PEEK insulator and the brass nozzle/heater. By not having the filament in contact with this joint it is hoped that any possibility of leakage will be completely eliminated.
The use of a combination heater and nozzle was borrowed from ParCan's Inline Heater Nozzle Variation. However, instead of the heater resistor being mounted parallel to the path of the filament it is mounted perpendicular to the path of the filament. This was done to both reduce the length of the nozzle and to make it a little easier to run the leads from the heater resistor. Combining the heater and nozzle also helped to meet the goal to keep the number of custom machined parts to a minimum.
Advantages
- Internally, the filament path is identical to that of an already proven design.
- The design is simple as the number of custom machined parts is kept to a minimum.
- If necessary, the PTFE liner can be replaced by using an off-the-shelf piece of PTFE tubing.
- The PTFE is not stressed nor used to provide support. This reduces a point of failure that is part of other designs.
- A resistor is used as a heater. There is no need to wrap nichrome wire or to bake a heater core.
- Heat transmission is improved as there is no thermal junction where a separate heater screws onto the nozzle.
- With most versions weighing in at under 25 grams and the lightest version weighing in at under 13 grams, this design is very light.
Disadvantages
- Considerable machining is required.
Parts List
Micro Extruder V1
Summary: First Micro Extruder copy of Trinity Labs extruder. The body is stronger and has M3 nut slots that don't penetrate the entire body.
[http://www.thingiverse.com/thing:28503}
Micro Extruder V2
Summary: Added a hollow set-screw to retain the PTFE liner.
Mk V-BV
Summary: As the old thermistor was discontinued, another thermistor was substituted.
| Quantity | Part | Description | Part Number |
| 1 | J-Head Nozzle (v4.1) | Machined Brass Nozzle/Heater Combination, Version 4 | |
| 1 | Nozzle Holder (v5) | Machined PEEK Nozzle Holder, Version 5 | |
| 1 | PTFE liner (v2) | 1/8" ID, 1/4" OD PTFE tubing, Version 2 | McMaster-Carr 5033K31 |
| 1 | Heater Resistor | Axial, 5.6 ohm, 1%, 5W | UB5C-5.6-ND |
| 1 | Thermistor 5 | Semitec | 104GT-2 |
| 1 | Hollow-lock socket set screw | 5/16-24 hollow-lock socket set screw | McMaster-Carr 91301A150 |
| 1 | Flat Washer | 1/4" OD Flat Washer | McMaster-Carr 98032A436 |
Sundries
| Description | Part Number | Notes |
| PTFE Insulation For EPCOS or Semitec Thermistor, 0.012" ID | McMaster-Carr 5335K9 | For J-Head Mk I through J-Head Mk V-BV |
| PTFE Insulation For Honeywell Thermistor, 0.012" ID | McMaster-Carr (To Be Added) | For J-Head Mk VI |
| PTFE Insulation For Heater Resistor, 0.047" ID | McMaster-Carr 5335K15 | |
| 20 AWG High Temperature Wire | McMaster-Carr 8209K11 |
Version 6
Material: Brass Bar Stock, 1/2" Square, 1.000" Long
Finished Weight: ~11.3 grams (will need verified)
- Cut a piece of brass bar stock 1 inch long plus enough to adequately hold the stock in the lathe.
- On the brass bar stock, find the center of the axis of the nozzle. (The axis is centered at 0.250 +-0.001, from one edge, and 0.157 -0.000 +0.003 from an adjacent edge.) This can be done by various means ranging from using a milling machine to using marking fluid, a height gauge, and a surface plate.
- Mount the brass bar stock in a 4-jaw chuck on a lathe. Adjust the chuck so that the nozzle axis is on center.
- Turn the threaded end of the nozzle down to 0.3125 +0.000 -0.004. This section is 0.500 +-0.005 long.
- For the first 0.150 +-0.010, of the threaded section, down to an OD of 0.255 (6.5mm) +0.000 -0.002.
- Thread the nozzle to 5/16-24 up to the shoulder of the heater section.
- Drill out the center of the nozzle with a 3.5mm drill bit. This will create a heat chamber that is the entire length of the brass nozzle.
- Remove the work piece and mount it by the threaded end so that the threaded end is centered in the lathe.
- Cut-off any excess material.
- Machine the nozzle tip to the desired profile leaving the heater block section 0.325 thick.
- Drill the nozzle orifice.
- Using a size C drill bit, drill the heater resistor hole through the heater block section. The remaining brass, between this hole and the edge opposite of the melt chamber, should be 0.020 +-0.002 thick.
- Drill the thermistor hole. (Change this....)
Nozzle Holder
Notes:
- PEEK nozzle holders have a maximum working temperature of roughly 248 degrees Celsius. Due to many variables, it is highly recommended that this temperature is not to be approached. Above this temperature, PEEK will melt and the hot-end will fail.
- PEEK normally is made in either tan or black and either color can be used. Black is normally used as it looks better, however, at times suppliers may be out of one color and the other color can be substituted.
Mk V
- Secure the brass nozzle in a vise by the heater section.
- Wrap a couple of turns of PTFE tape (plumbing tape) around the brass threads.
- Screw the nozzle holder down onto the nozzle. If no flats are milled, use a pair of pliers to tighten the nozzle. The nozzle holder can be protected from the pliers by first wrapping it with a rag or paper towel. If there are flats milled, a 13mm (1/2") open-end wrench can be used to tighten the nozzle.
- Remove the brass nozzle from the vise.
- Slide the PTFE liner down into the nozzle holder. The PTFE liner needs to be inserted such that the flat end is making contact with the brass and the internally tapered end is towards the top.
- Install the washer.
- Screw in the hollow-lock socket set screw. Ensure that the washer stays centered while tightening this set screw. Use a piece of filament to ensure that the set screw is not too tight as the liner can become compressed and obstruct the passage. If this happens, slightly loosen the set screw.
Heater Resistor
The heater resistor can be installed one of 3 ways:
- Put a little bit of muffler repair putty on the resistor and slide it into the hole. It can be cured by letting it set a couple hours before bringing the hot-end up to temperature.
- Slide the heater resistor in the hole. If it fits tightly, this will work. If there is any gap, between the resistor and brass, it may result in failure of the heater resistor.
- Wrap a thin strip of aluminum foil around the heater resistor and adjust it by gradually cutting it shorter until the resistor and file slide it into. Care must be taken to ensure that the proper amount of aluminum foil is used in order to take up any gap between the heater resistor and the brass.
Thermistor
Note: The thermistor table, for Thermistor 1, is here.
- Insulate the leads to the thermistor. This is usually accomplished one of two ways.
- Use Kapton tape as insulation by separating the leads and sandwiching the leads in-between two strips of Kapton tape.
- Use PTFE insulation and slide it over each lead.
- Place the thermistor in its hole and secure it with Kapton tape.
Installation
Using the Mounting Holes in the Wade Extruder
- Insert the nozzle holder in the 5/8 inch (16mm) hot-end socket.
- Using a sharp instrument or other object, mark the 4 hole locations on the nozzle holder.
- Remove the nozzle holder.
- Using a round file, file the mounting grooves in the nozzle holder in order to create 2 grooves for the mounting screws or bolts to pass through.
- Install the hot end.
Using The Support Washer
Note: The support washer cannot be used for hot-ends starting with the Mk V.
- Prior to installing the optional support washer, mark and drill the appropriate mounting holes on the support washer.
- Install the optional support washer in between the J-Head Nozzle and the nozzle holder.
- Use the support rods, screws, and/or washers to hold the hot-end in place.
Using Wire With The Support Washer
- Cut 4 evenly-spaced slots in the support washer.
- Run the wire into the channels.
- Tighten the wire vertically and diagonally. Then wrap wire around the middle tightly, tightening all of the vertical and diagonal runs.
Using A Mounting Groove
Use a nozzle holder that is machined with the optional mounting groove and a cold-end that is designed for using a mounting groove or an adapter plate adapter plate for a mounting groove. In this configuration, a mounting groove is normally required.
Wildseyed Simple Hot End Mounting System
Note: Ensure that the cold-end either has a 5/8" mounting hole or can be drilled out to 5/8".
Follow the mounting instructions for the Wildseyed Simple Hot End.
Notes
General
- In the Mk1 version, the cold-end of the PTFE liner will need to be retained in order to prevent it from backing out of the hot-end. With some extruders, such as the Wade Extruder, the PTFE liner will easily be retained by the socket that retains the hot-end. If the liner is not properly retained, there is a high probability of the nozzle developing a leak.
- While printing ABS, if the nozzle clogs due to crystalized filament the temperature is most likely too high.
- Either black or tan PEEK can be used for the nozzle holders. Black PEEK is usually used as it looks nicer. However, sometimes suppliers are out of black PEEK and tan PEEK has to be substituted.
- When using a hot-end, with a vented PEEK nozzle holder (i.e. Mk IV-B), it is critical that the milled vents are not obstructed in any way. These vents are used to cool the hot-end by both removing as much PEEK as possible, to prevent the liner from being insulated, and to allow air to blow through and cool the hot-end. If these vents are obstructed (i.e. taped over), it is quite possible that PLA will jam in the hot-end.
Nozzle Orifice
Troubleshooting
- PEEK appears to have a maximum temperature of 248 degrees C. If the nozzle pushes out of the PEEK nozzle holder, this temperature was most likely exceeded.
- If the nozzle is leaking, between the PEEK nozzle holder and the brass nozzle, check to see if the hollow set-screw is snug. This set-screw is located at the cold end and retains the liner. Wrapping PTFE tape, around the brass threads, will help to eliminate leaks as well.
- It is possible for the PTFE liner to impede the filament path if the hollow set-screw is too tight. This is because of the taper at the hot end of the PTFE liner.
- Ensure that the thermistor value is set to "1".
- In the event that the extruder is not feeding correctly, loosen up the pinch wheel and ensure that the filament can be fed by hand. Also, if possible, independently verify the temperature of the hot-end.
- If a cooling fan is blowing directly on a non-insulated nozzle, it is possible to have an uneven temperature on either side of the brass nozzle/heater. Under the right conditions, this can cause a condition where the temperature is correct, on one side, and too high, on the other. To resolve this problem, either insulate the brass or direct the airflow away from the brass.
Testing
Weights
Note: All weights include the heater and heat sensor unless otherwise noted. Weights may vary slightly from what is listed.
| Hot-End | Weight | Notes |
| J-Head Mk II | 27.1 grams | |
| J-Head Mk II | 17 grams | Using nozzle v2. |
| J-Head Mk III | 21.9 grams | |
| J-Head Mk III-B | 30.0 grams | |
| J-Head Mk IV | 16.8 grams | With nozzle v2, optional improvements, and v4 50mm nozzle holder |
| J-Head Mk IV-B | 25.6 grams | With nozzle v1 and v4 50mm nozzle holder. |
| J-Head Mk IV-B | 26.5 grams | With nozzle v1, it's optional improvements, and v4 50mm nozzle holder. |
| J-Head Mk V | 12.8 grams | |
| J-Head Mk V-B | 20.5 grams | |
| J-Head, Experimental Fluted | 14.7 grams | With nozzle v2 and fluted nozzle holder. |
| Geared Extruder Nozzle | 29.7 grams | Original design with aluminum heater block and without hardware. |
| ParCan v2 | 27.5 grams |


