Инструкция по эксплуатации RepRap II "Мендель": Программное обеспечение
Contents
Вступление
На этой странице описывается программное обеспечение для управляющего компьютера, позволяющее из компьютерных моделей деталей которые вы хотите распечатать получить файлы для отправки в принтер RepRap.
Программное обеспечение управляющего компьютера работает в 2 шага:
- Загрузка моделей для распечатки, генерация из них инструкций RepRap G-Code, сохранение G-Code в файл.
- Загрузка полученного G-Code файла и отправка его в принтер RepRap для распечатки.
Оба эти шага описываются на этой странице.
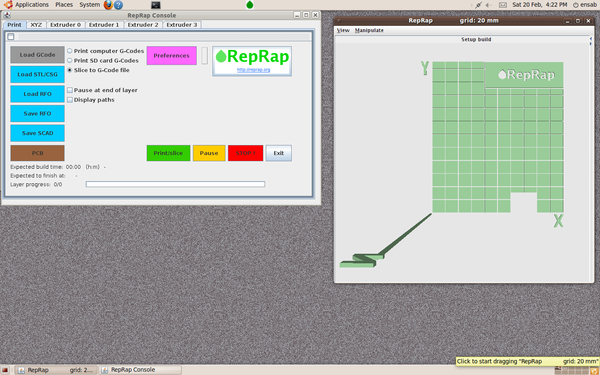
Когда вы запускаете RepRap Java, открывается 2 окна. Левое окно это консоль, позволяющее вам настроить печатаемые объекты, печатать их и, конечно, интерактивно управлять принтером RepRap. Правое окно это план базовой площадки принтера с моделью детали загруженной из STL файла которую вы хотите напечатать. Это окно позволяет разместить деталь на базовой площадке принтера там, где вы хотите, чтобы машина ее напечатала.
Загрузка моделей и сохранение их в формате G-Code
Обычно работа начинается с клика по голубой кнопке "Load STL". При этом появляется окно выбора файла, в котором можно найти и выбрать STL файл содержащий модель вещи, которую вы хотите напечатать.
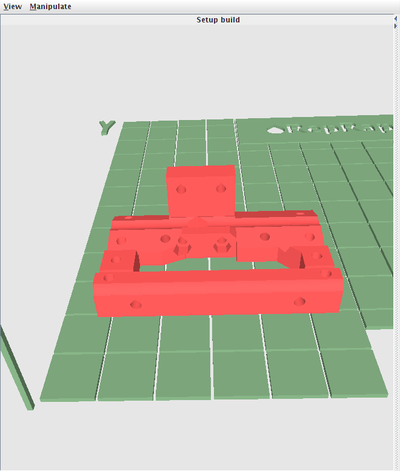
При загрузке модель размещается в начале координат (нижний левый угол). Всплывающее окно (на рисунке) появится, чтобы выбрать количество копий модели и какой экструдер будет использован. Выбор экструдера зависит от желаемой вами поверхности готового объекта (Экструдеры описаны ниже).
Вы можете вращать базовую площадку принтера в правом окне при зажатии левой кнопки мыши. Колёсико мыши приближает/удаляет вид площадки, а правая кнопка при зажатии позволяет смещать вид вверх/вниз/влево/вправо.
Обычно вам не захочется печатать деталь прямо в нижнем левом углу (начало координат). Если вы щелкните левой кнопкой мыши по модели, она изменит свой цвет, что покажет, что была она выделена. После вы можете перемещать ее по поверхности базовой площадки зажав правую кнопку мыши в место, где вы хотите ее напечатать. Клетки зелёной сетки координат имеют стороны шириной 20 мм. Вы можете вращать выделенный объект на 90o вокруг координатных осей X и Y нажатием <CTRL>X и <CTRL>Y. Шаг вращения вокруг оси Z составляет 45o (комбинация клавиш <CTRL>Z). Вращение объекта вокруг оси Z на 45o нужно для того, чтобы при заполнении объекта направление линий сетки заливки совпадало с осями X и Y. Это позволит сэкономить электроэнергию, так как большую часть времени будет приведена в движение лишь одна из осей вместо обоих. К тому же процесс печати будет менее шумным. Если масштаб в вашем STL файле в дюймах, вы можете изменить его для выделенного объекта на миллиметры умножением на 25.4 с помощью сочетания клавиш <CTRL>I. Чтобы удалить выделенный объект нажмите клавишу <DELETE>.
Чтобы снять выделение с объекта щелкните по зеленому пустому месту базовой площадки. Вам снова станут доступны операции приближения/смещения/вращения вида базовой площадки с помощью мыши.
печать более одной модели одновременно
Вы можете загрузить более одного STL файла для одновременной печати: несколько разных объектов или копии одного и того-же объекта. Just click on the blue "Load STL" button again, then position them in different places. Leave a gap of about 5mm between different objects to be built.
If you have several STL files loaded in a pattern that you may want to use again, you can save the whole lot by selecting the "Save RFO" button. RFO files are a standard RepRap file format (described here) for saving collections of objects positioned on the machine's build base.
You can also load one or more RFO files with the "Load RFO" button, select individual parts in them, move them about, or delete them, add extra STL files, and then save the lot as an RFO file again.
Printing things made from more than one material
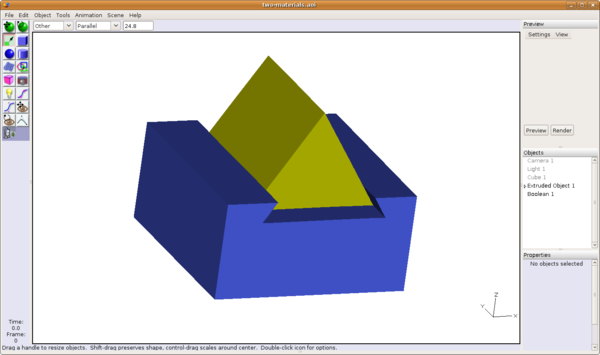
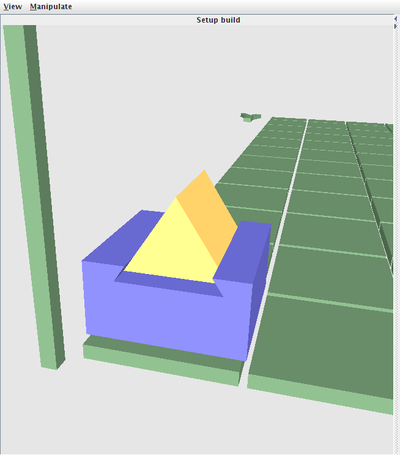
This picture shows two interlocking but separate shapes designed in Art of Illusion. If you position them both so the base (blue) shape is at the origin and the other part is in the correct relative position, and then save both as separate STL files, you can load them into the RepRap host software preserving the correct positions relative to each other, and build them from different (or the same) material. In this case, the dove-tail would cause the materials to interlock.
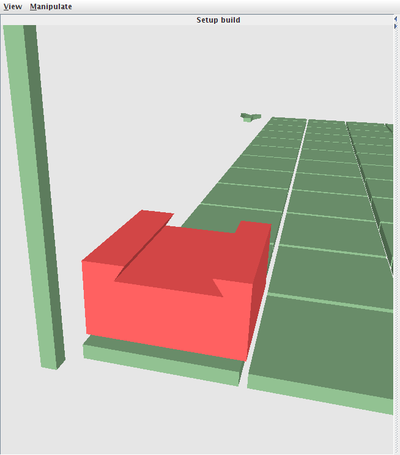
First load the STL of the shape that is the base or reference object. Choose the material to make it from, then select it (so it changes colour) but leave it at the origin where it was loaded.
Then load the second STL for the second shape and choose its material. It will be positioned in the correct (i.e. designed) position relative to the first, and they will both be locked together in this relative positioning.
If you select the base shape, you can then move the composite object about the build base as one thing to the position where you want to build it.
If you save one or more of these combined objects as an RFO file, they will be re-loaded in the correct orientation and position when you subsequently read that file in.
This facility depends on the CAD system that was used to design the objects recording the X, Y and Z coordinates of the objects that you design actually at the place in the CAD system's coordinate system where you designed them when it writes them as STL files. Beware - not all CAD systems do this.
Infill and support
You will see that there are a number of tabs on the console labelled Extruder_n. The RepRap host software is capable of dealing with multiple physical extruders depositing multiple materials. In addition, one physical material may have several logical extruders associated with it. These logical extruders can have different parameters associated with them, so that, for example, one might be used to extrude material-A finely for the surfaces of a part to be printed, another might be used to extrude material-A coarsely for quick solid infill of the part, and a third might extrude material-A in a deliberately weak pattern to form a support for overhangs that can easily be broken away. Alternatively, you can outline in material-A, infill in material-B and support with material-C.
You can change all the many parameters of each extruder by clicking on "Preferences".
In the preferences for each extruder are fields containing the names of two other extruders: InFillMaterialType(name) and SupportMaterialType(name). These are the extruders to use to build infill pattens and support patterns respectively for the material for the extruder that names them. See the description of preferences for full details. To turn infill or support off for a particular material, change the appropriate field to say "null" (without the quotes).
Sending the G-Codes to a file
When you are happy with the layout, select the "Send GCodes to file" option, and then select "Print". This will put up another file-selector window to allow you to specify the G-Code file that you want to save the results in.
If you wish, before selecting "Print" you can select "Display paths". This will open a graphics window that will show the paths that the machine will follow to make each Z-slice of the objects being printed.
You can also select "Pause at end of layer". This pauses the generation of output at the end of each layer to allow you to inspect the slice pattern. Continue/Cancel buttons will be displayed as each layer is about to be written to allow you to continue or to cancel the whole process.
When the GCode file has been written, exit the program with the "Exit" button.
To print your GCode file that you just generated on your RepRap machine, see the next section.
The control console tabs
If you are going to control your RepRap machine interactively, or get it to print a pre-computed G-Code file, plug the RepRap machine's USB cable into the computer before starting this host software.
The Print tab
Here is a list of all the buttons and options on the "Print" tab, and what they do.
Load GCode
To activate this, you will have to select "Print on GCode RepRap" (see below).
If you have created a GCode file (as above, or from elsewhere) this allows you to load it for actual printing on the machine. You will be shown a file selector window to choose your GCode file. When you have specified this, just hit "Print".
Load STL
This lets you select STL files to load onto the RepRap's base for printing, as described above.
Load RFO and Save RFO
These allow the loading, printing, and saving of several multiple-material objects all in one go. (See above.)
Print on GCode RepRap
Select this to put the program in its mode where it sends a pre-computed G-Code file to the RepRap machine to print it. When you select this, the STL and RFO buttons will be greyed-out, as they are not active in this mode.
Send GCodes to file
Select this to put the program in its mode where it takes STLs or RFOs that you have loaded, slices them, and saves the commands to the RepRap machine needed to build them as G-Codes. When you select this, the GCode button will be greyed-out, as it is not active in this mode.
Pause at end of layer
Selecting this check-box will cause the software to pause at the end of each layer it makes from loaded STL or RFO files. At the start of the next layer a small window is displayed to allow you to instruct the software to continue (you can also cancel the build at such points).
This button has no effect when building an object from a GCode file. This is because in general there is no way to tell from the contents of such a file where one layer ends and the next begins. But see the "Pause" button below.
Display paths
This opens a small graphics window in which the pattern of each layer is displayed as it is computed and saved to a G-Code file.
Preferences
Selecting this will open a tabbed window that will allow you to edit all the many parameters that control the operation of the RepRap machine. These parameters are described here.
If you have loaded STL files this causes them to be converted to a G Code file and saved. If you have loaded a GCode file, this causes it to be printed on the RepRap machine.
Pause
When the RepRap machine is building something, this causes the machine to pause. The pause doesn't happen instantly as the control signals sent to the machine are held in a short buffer, and the pause button can have no effect until the buffer is exhausted.
The "Pause" button becomes a "Resume" button once the machine has paused.
Stop!
At the moment this does the same as "Pause" above. We are working on getting it to stop the RepRap machine instantly.
Exit
This exits the program.
Progress indicators
At the bottom of the tab are the name of the file being printed, and a set of build-progress indicators. These give an estimate of the time the build will take, when it will end, and a layer count. There is also a progress bar.
The XYZ tab
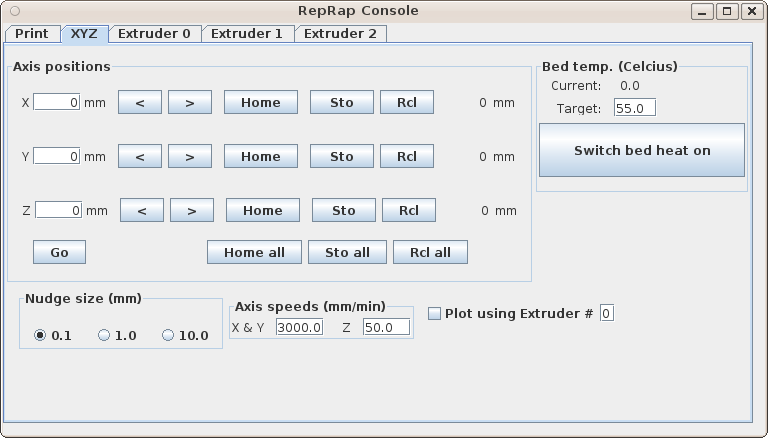
The XYZ tab allows you to move your RepRap machine around directly for testing, experimenting, and servicing.
The three numbers down the left are for you to type coordinates in as a target to go to. Selecting "Go" will then cause the RepRap machine to move to that position.
The arrow keys nudge the axes by the distance specified in the "Nudge size" box at the bottom.
The "Home" buttons cause the corresponding axis to drive to its low-value endstop position and to zero its coordinate. There is also a "Home all" button that homes all three axes at once.
The "Sto" buttons store the current coordinate in the field on the right, and the "Rcl" button recalls that coordinate to become the target for a subsequent click of the "Go" button. This is particularly useful if you are in mid-build and have paused the RepRap machine. You can store the position where the machine paused ("Sto all") then move it about to do things like cleaning the extruder. Finally put it back where it paused ("Rcl all" followed by "Go") then resume the build.
The "Axis speeds" are (I hope) self-explanatory. Note that these only control the axis speeds for the buttons in this tab. When you are saving G-Codes or using them to build an object, the software will use the speeds you set in the preferences file, and ignore the values in these boxes.
If you check the "Plot using extruder" box and subsequently click "Go", the machine will plot the line using the selected extruder rather than just moving.
The Extruder tabs
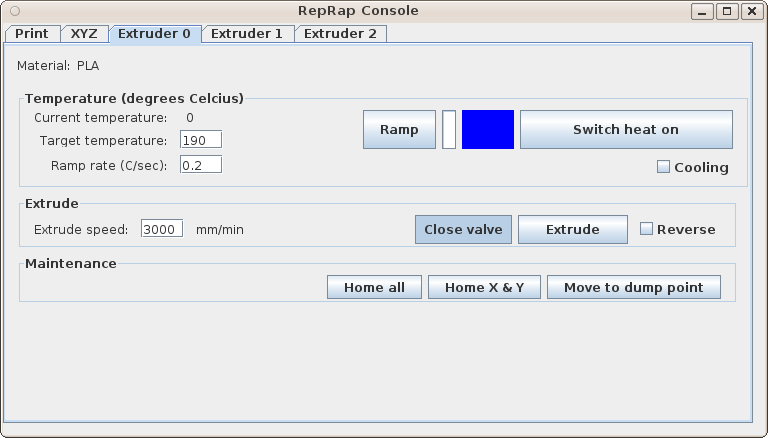
The extruder tabs allow you direct control over the RepRap machine's extruders. ("Feedstock remaining" isn't implemented yet.) The tabs are divided into three sub-panels:
Temperature
This displays the current temperature of the extruder at the top. This temperature is updated every five seconds or so at all times when the RepRap machine is not transmitting a G-Code file to the machine to build.
The target temperature allows you to set what temperature you want. Note that the temperature that initially appears in this box is the default one for the extruder (defined in the preferences file) and that changing the value in this box does not change the default; also, that default is what will be used for builds (as with speeds above). To change the default, select "Preferences" in the "Print" tab.
Selecting the "Switch heat on" button will turn the extruder's heater on and you should see the temperature start to rise. The same button toggles the heater off. There is a progress bar for the temperature as it increases, and also a coloured panel that goes from blue to red as the extruder passes from a temperature that you can touch to one that you can't...
Selecting the "Ramp" button will cause the extruder's heater to ramp up to the target temperature at a rate set by the "Ramp rate" box. This is useful for such things as curing fire-cement round a newly-constructed extruder by warming it up very slowly.
Checking the "Cooling" box will turn the extruder's cooling fan on.
Extrude
Selecting the "Extrude" button will turn on the extruder's feed motor (if it has one) for a few seconds at a rate set by the speed box. The rate will be in millimeters of extrudate per minute. Once again, the initial speed is the one in the preferences file, and it is that preferences value that will be used for any actual build, not any number that you put in this box. The box just controls the speed on the "Extrude" button.
Checking the "Reverse" box causes the motor to turn backwards.
The "Close valve" button toggles the extruder's valve open and closed (if it has a valve).
Maintenance
These buttons are, I think, self-explanatory.
Alternatives
There are alternative ways to run your RepRap than the one described on this page. Most notably these are the Skeinforge program, which is a tool chain that takes 3D objects and turns them into GCode files for sending to a RepRap, and ReplicatorG, which is a program for taking GCode files and printing the objects they represent on a RepRap machine.
For minimalist transmission of Gcode files to a RepRap using Linux/Unix machines from the command line, there are gcdump, and gcgen to create Gcode commands for simple RepRap control. These are available as C source or pre-compiled binaries and work well on the OLPC.
