Proxxon Micromot 50
|
English • العربية • български • català • čeština • Deutsch • Ελληνικά • español • فارسی • français • hrvatski • magyar • italiano • română • 日本語 • 한국어 • lietuvių • Nederlands • norsk • polski • português • русский • Türkçe • українська • 中文(中国大陆) • 中文(台灣) • עברית • azərbaycanca • |
This page is about using the Proxxon Micromot 50, a handheld grinder, which is also suitable for light duty milling, e.g. isolation milling of PCBs. With some simple modifications, performance and usefulness can be increased.
Contents
Advantages
- Affordable. Some US $40 to $50 or € 25.- to € 30.- unmodified.
- Only about 250 grams, allowing high accelerations.
- Thin design, resulting in low vibrations. Not well balanced, though.
- Runs well on 12 V, so you can plug it into your RepRap electronics directly.
- Easy to modify.
- Taking into account its price, a robust design.
- Tool-less mill bit changing possible.
Only 40 watts, sufficient for about 3 mm end mills in wood or plastics. Plenty for isolation milling.
Model Choice
As of this writing, three models are available. The cheapest one without built in speed control is the best one for the purposes described here. The RPM control on the higher priced models doesn't work with switched power supllies, like PC PSUs, anyways. But the simple model can be regulated with PWM, a feature available in all RepRap electronics.
Small diameter drills often come with a 3.175 mm shaft (1/8"), so having a collet instead of a chuck in the cheaper models is actually an advantage. Collets are generally more precise than chucks.
Disassembly
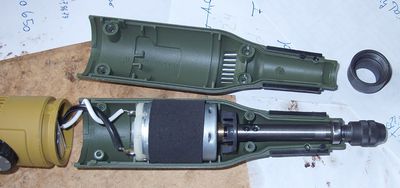
To disassemble a Micromot you have to know this metal cylinder right above the chuck/collet is a cap nut (Überwurfmutter). Find well sized pliers and a piece of rubber to put in between the pliers and the cap nut, then find a good grip and screw it off. It's a right handed thread. Requires some force.
That done, unscrew the four screws with phillips head you find on the back. The housing should mostly fall apart on its own, there are no snaps and no glue was used in the factory.
You should end up with something like this:
Reducing Axial Play
Open the housing, unscrew the grub screw holding the spindle on the motor shaft to make this assembly a bit shorter. Thighten the grub screw lightly, then close the housing. You've hit the right spot if the spindle turns a bit stronger, but still turns well. After full reassembly, the max. RPM should be some 10% to 20% lower than unmodified.
When milling, this will warm the bearing near the collet, of course. If it gets above some 45 °C (it starts burning your fingers), make a pause. The warming will reduce after a few hours of usage.
Set it up for Probing
On the top end of the motor housing, you can find soldering lugs, on the perimeter, between the ones going to the power supply. These are fine for getting a ground connection to the milling tip, allowing to use the Micromot for probing on conductive surfaces.
Accordingly, drill a hole into the Micromot's housing (drill from inside to outside), put a not-too-thin isolated wire through it, make a knot on the inside for a stress relief and solder the wire there. After reassembly, you can further connect this wire to the endstop connector of your electronics.
On the electronics side, the probe is set up like a mechanical endstop. Teacup Firmware provides SLOW_HOMING and ENDSTOP_STEPS in config.h for tuning and also turns off the endstop voltage if endstops are not in use. Keeping endstop voltage all the time results in erosion of the mill bit when the ground connection is kept during milling.
Enhancing the Collet
Tolerances on the collet insert are often a bit too loose. Accordingly, the mill bit inserted isn't always straight, the actually milled diameter varies on the very same mill bit.
When pushing the insert into the shaft, it shouldn't fall in, but glide in snugly. If there's too much play, simply put a piece of adhesive tape around the cylindrical part of the insert until it does. Simple, but effective.
