Rap@Home
Release status: Working
| Description | Documentation of progress and resources related to Rap@Home project
|
| License | |
| Author | |
| Contributors | |
| Based-on | |
| Categories | |
| CAD Models | |
| External Link |
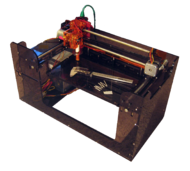
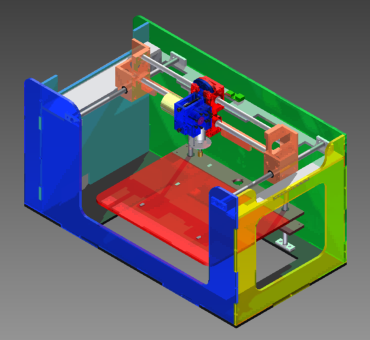
The Rap@Home is a 3D printer which was developed for a high school engineering capstone course. It primarily consists of alternate acrylic chassis for the Makerbot electronics, the fabrication of which is easy and cost-effective for high school shops equipped with a 1' by 2' laser cutter. Its development followed the formal design process, along with any other criteria which we (3 high schoolers) choose to work under. The finished product is now used by the tech department for educational use; ideally, more printers will be made available to other schools in the district. The source and funding will be handed on to future students in this course, so that they may improve and continue work on this printer. This project is currently complete; we have a working build of the original version. Subsequent participants in the project (or even you!) can use the attached source CAD to build a MK2, which is cheaper and better than the original.
Contents
Overview
The process which me must use roughly resembles the following:
- History - Past solutions to related problems
- Interviews & surveys - Wants and opinions of potential customers
- Voice of the customer - Rank customer needs and wants from survey's
- Product Requirements - How the customer wants will be satisfied
- Research Past Solutions - How has this project been completed in the past, and how have related projects succeeded
- Solution - Brainstorm and think of own solution
- Design Stage - CAD the solution
- Prototyping and Testing - Test final design
Justification/Sales Pitch
The formal justification for the project was that home manufacturing could solve many issues related to sustainability, shipping costs, availability of parts, and other nice juicy problems to tackle. We placed some emphasis on a developing African village scenario, where A) small, simple solids could have high value and B) suppliers are not likely to ship. On the consumerist side, we likened it to the PC in the 70's- a bunch of basement geeks are exploring a technology which will have an important place in the future. For this reason, it's a pretty nice investment for a school district to make.
We also took a quick look at why a school would need a printer. We asked a few department heads the following questions: whether or not a 3D printer is worth $500, whether or not they could use it in class, and if they could think of any specific examples of how it could be used. First stop was the tech department; suffice it to say that there was no shortage of uses or support. Next was the art department; the teacher we talked to was intrigued by the possiblity of translating motion into a solid object. Anyone have a good idea on how to accomplish that?. In her opinion, $500 is a small sum to fund this project. The head of the Math department, thought that he could use the printer on rare occasions, for example the end of the year projects where models of entities such as hypercubes are needed. In his opinion, $500 is only worth it if the printer was shared by the school; he would not buy one specifically for the math department (fine by us).
Research Stage
If you're on this forum, I imagine you must know a little bit about the history of 3D printing. If not, keep looking around; you won't be looking long.
Existing Solutions
Our research plan was to identify the technology behind 3D printing so as to familiarize ourselves, then to compare the different qualities of the Fab@Home, RepRap, and MakerBot (having previously identified these as the best options). The metrics for comparison were (amongst other things) price, size, resolution, profile, and software. It was decided that MakerBot and RepRap use the best (cheapest and most flexible) control system, while Fab@Home has superior user-friendliness (in hardware and software) as well as a hot-swappable tool head that accepts syringe, cutters, plastic tools, etc.
At this stage, "existing solutions" is very high-level; although we did spend plenty of time looking at projects like the Pirated CupCake, that type of research didn't come until later.
Consult the Experts
Since we're located in Ithaca, we took a trip up to Cornell to meet Jeffery Lipton, who gave us a tour of the Fab@Home lab and explained the technology, software, and ideas behind their printer. In the end, we realized that all printers aren't so different from each other; "Fab@Home" isn't so much a 3D printer as it is a "standard." Their ultimate goal (and ours as well) is to bring 3D printing into the home in much the same way PC's are: with interchangeable parts and a diverse marketplace.
Conclusion
Our final decision was to combine the RepRap control system with a Fab@Home-based Cartesian bot and tool carriage. Although it runs on a Sanguino, it will be able to mechanically accept any tools Cornell has on hand and (hopefully) work with Fab@Home's own software. We will adapt existing Makerbot tools to work with the carriage where necessary, and/or make our own.
Design Criteria
- Affordable (produced within a budget of $500)
- Able to create solid plastic models with an accuracy better than .05 in
- Able to print using ABS plastic
- Can be produced with tools available in school district
- Made entirely from parts & supplies from known, trustworthy suppliers
- Has accommodations for potential future 3D printing standards
- Modular design for electronics and toolheads
- Able to electrically and mechanically withstand moderate abuse (thrown screwdriver)
Design
Any CAD files talked about here or attached below were made in Autodesk Inventor. Final drawings for the original version are laid out in 2 foot by 1 foot DXF files, optimal for laser cutting. Pieces which must be manufactured with machine tools have their own annotated Inventor IDW, with all dimensions necessary to machine by hand. Such drawings have not been made for MK2, but they are a cinch if you are comfortable with Inventor.
Limitations
- Our only precision tools are a laser cutter and a small CNC mill. The laser cutter's bed is 1' X 2'.
- Most of our tools and on-hand parts are in English.
- We have a starting budget of $150; an additional $500 grant is pending has been approved.
- We have 45 minute work sessions every day during the week.
Principles
- Use metric where possible.
- Use the laser cutter where possible.
- Cut down on price where doing so isn't catastrophic.
- Use acrylic for the body with captive nut assembly.
- KISS - Keep it Simple, Stupid
- Try to source from known suppliers such as SDP-SI, Makerbot, and McMaster.
Control System
We're using the good 'ol $200 pre-assembled Generation 3 Electronics from Makerbot. Not enough time to risk bad surface-mount soldering operations, and it makes it easy for future generations. Since our dimensions are radically different from the CupCake's, we'll have to adjust the steps per MM values in ReplicatorG's "Machines" XML file for our printer.
We are mounting all the elex on a separate board, which will in turn be mounted/hung on the main assembly. This will facilitate mounting new electronics and/or switching between different boards, as might be the case with future toolheads. Turns out this was a wise decision, since our Generation 3 Electronics are already outdated.
We're using the same NEMA 17 motors the CupCake uses, although in different ways/orientations. The X and Y will be on belts, and the Z will use a leadscrew.
We're still working out endstops; we have a few options:
- Optical: Like they sell. Not great to have to design around.
- Switch-based: like they use in the next Makerbot, or similiar.
- Frame-based: Line parts of the frame with conductor, have that be the switch.
- None at all: Requires software, probably. Has anyone done this?
Edit: We've ordered the new Mechanical Endstops from Makerbot. Using pinouts for these endstops and for the RJ45(?) connectors on the stepper control boards, we can cut and splice a head from an old Ethernet cable onto the endstops such that they are compatible with Gen3 electronics. Would anyone like to give me a hint as to where the envelope dimensions are specified in firmware? Or is it best that we have max as well as min datum? We'll have to assume that operators (high school students) are properly trained in usage, since there's nothing preventing a collision on the max side. As long as the device is homed before the job, the student will be able to see that their part is to big if it goes over the build box in ReplicatorG. Perhaps ReplicatorG alerts you? Haven't gotten a chance to test that.
Cartesian System
Steppers manipulate the X and Y at the top of the printer; a third stepper lowers the build platform along the Z with a leadscrew as the part is getting built. 1/4" MXL timing belts will be used with all-aluminum pulleys. The frame, profiles, and dimensions are roughly based off the Fab@Home.
We've tested the captive nut profile used by Fab@Home and Makerbot (which turned out to be identical) on our laser cutter and 6mm thick acrylic. It was a tight fit with a #8 screw and bolt; it would have been just snug, except for a hairline crack. #6 behaved much better. Since we have English hardware on hand, we'll be assembling with #6 nuts and bolts; from the looks of it, M3 would work just as well.
We're trying to replace the translational bearings with a Delrin bushing. We've also looked at Turcite, but opted for Delrin (we're on a budget here). The tricky part is making a 1cm clearance hole on our English lathe+tools; our options so far are to use a drill bit, use a slightly oversize ream, or buy the perfect ream. Outside will be done in the ballpark, and we'll adjust the acrylic pattern to accommodate for our lathe's atrocious error.
All that business with Delrin bushings was a terrible idea. Pieces cracked, we couldn't machine the diameters reliably, and we could never buy quite the right ream. In the end, we went with Makerbot's strategy and ordered a few self-aligning brass linear press bushings from SDP-SI. We've already installed them on our Z-axis, and they work like a charm after you give them a little grease.
Extruder
Using a Paxtruder adapted to work with a Fab@Home carriage. Toyed with the idea of a Bowden cable filament drive for extra speed+less load on the XY motors, but stored it as a research alternative after we have something that works. The current extruder will be made out of acrylic, and uses the traditional Kysan gearmotor. The extruder control board will be located remotely on the electronics panel so as to again reduce weight+inertia. Still working out the wire guide- shouldn't be much of an issue. The extruder control board will be mounted on the back of the carriage; it's awfully convenient to only have to route that one RJ45(?) cable and have it provide signal and power. After initial construction, it was decided weight wasn't going to be much of an issue- those Paxtruder designs are tiny!Building
With the entire design functional in CAD, we whipped up a few DXF's to cut sheets of 1' x 2' 6mm acrylic. There was only one small piece that had to be cut out of 4.5mm for the extruder; the rest only uses this size acrylic. By extension, the machining process is simple- load the DXFs onto the laser cutter and let it do the work for you. However, a lathe is necessary to turn the leadscrew. A few spots in the design also require you to tap the acrylic; this isn't much of an issue for most humble school shops, but if it were, we could provide an alternate design that makes use of thermoplastic inserts. Although the final design could conceivably be cut in one shot, we're doing it bit by bit.
Extruder
Pieces were cut and fit just about right. As mentioned, one piece had to be 4.5mm in order for the plastic/pulley/shaft/bearing to line up right in the filament drive assembly. We tapped a few holes where bolting or captive nuts weren't easy/feasible. Very few adjustment were made to the acrylic; we'll call that portion done. The Delrin pusher was easily fabricated with classic machine tools here. If there were a need for it, we could have conceivably made an NC file and let our CNC mill take care of it. The hot end assembly instructions were followed according to the classic Makerbot documentation, since that portion of the extruder doesn't really change (and since it's a little sensitive, we don't want it to, either). We hooked her up to the control electronics, did some calibrate, and got it running. The sensitivity of the pressure thumbscrew is pretty high; it's got to be just right (pretty tight) to deal with the plastic properly. Also, we found that the ideal temperature is about 220 C. Other than that, it works great! In the end, everything fit together right in the extruder- let's see if it fits on the rest of the printer!
Frame
Not the most exciting part of the printer; as such, we ran into few errors. Missing captive nut profile here, missing hole there. Other than that, the frame fit together remarkably well. We have begun designing a control panel, which will house the power button, and E-stop, and potentially a display LCD powered by a minimalistic Arduino setup.
Z Table
Much of the strife around the Z-table originated from our Delrin bushing plan, which was... a terrible plan. Once we moved to brass bushings, everything moved along much smoother (literally). However, the original table required bandsaw, drilling, and tapping, and was very "jumpy" as it moved along the guides- the result of torque and drag as the leadscrew pulled up the center but the sides failed to follow. In addition, there was no way of calibrating the table to make sure it was level. Fortunately, I dropped it on the floor and broke it. We took the opportunity to design a new Z table. This one had bracing all along the back and front, and sides... everywhere. The sides had no choice but to move with the center. We also placed a few tapped holes here and there with which we could calibrate the table with screws until it was level. All in all, the new Z table performs much, much better than the first. It was done before the X and Y axis, so we were able to hook it up to the control electronics and move it around with the ReplicatorG control panel. We took a few readings with a digital caliper, adjusted some values in our machine's xml configuration file, and ended up with a table that was accurate to about .5mm over 50mm. Not bad! We'll see how that accuracy scales down when we try and print something.
Operation
| <videoflash type="youtube">gCUwwuU-w_0</videoflash> | 
|
On May 28th, 2011, the Rap@Home awoke. Translation motion on 3 axis and full extruder operation was achieved, after overcoming some initial problems with friction (which we solved with careful alignment and redesigning the belt tensioner mechanism). The printer began printing a raft for a small piece, but ran out of plastic. It was triumphant. The squeaking in the video below is due to the X tensioner bearings not having arrived yet.
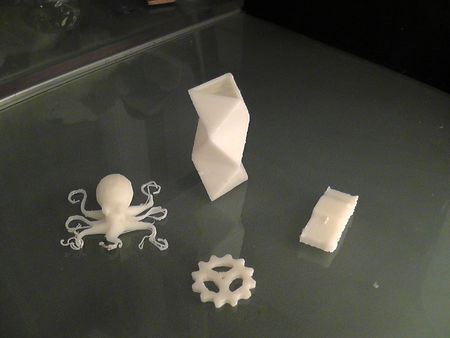
We got back to school on the 31st, and printed the parts you see at right. We noticed lots of "burps" which caused bumps along the otherwise pleasantly smooth surfaces. These are due to points where the toolhead hesitates, but does not stop extruding. It is either a communication issue with the extruder, or a calibration issue with Skeinforge, either of which can be fixed. We're currently looking into it.
MK 2 Revisions
Over the summer, we got a chance to clean up our files, and make a few revisions to our designs. Special thanks to the Fab@Home team for a few pointers. Our improvements consisted of:- Changed all rotational ball bearings to brass pressbearings
- Simplified Y drive shaft
- Reduced diversity of hardware
- Changed guide shaft, drive shaft diameters
- Streamlined tensioners
- Took out extra holes, added useful holes (like for zipties)
- Works completely well with Generation 4 electronics and motors
- More well-sourced, more legible, complete BOM
Source
The files for the original version are much to messy and out of order to be made public. However, the very neat and tidy CAD/BOM/notes for the MK2 are finally here!


