Hardware
|
English • العربية • български • català • čeština • Deutsch • Ελληνικά • español • فارسی • français • hrvatski • magyar • italiano • română • 日本語 • 한국어 • lietuvių • Nederlands • norsk • polski • português • русский • Türkçe • українська • 中文(中国大陆) • 中文(台灣) • עברית • azərbaycanca • |
About | Getting Started | RepRap Projects | Hardware | Software | Community
Contents
Hardware
Components
The following is a list of the main components of a RepRap 3D printer. The list is not exhaustive, but it should give you a good idea of what you're getting into.
Controller
A controller serves as the intelligence behind a RepRap, overseeing motion and material deposition. It interprets instructions, typically in the form of gcode, and translates them into electrical signals or commands for the motion control system. In essence, the controller functions as the brain of the 3D printing process by taking prepared print files in the form of gcode and guiding the intricate movements of the machine to layer materials .
The history of RepRap controllers is notably shaped by the Atmel microcontroller, particularly the Arduino, which played a pivotal role in democratizing access to 3D printing. The Atmel microcontroller, with its open-source nature, facilitated widespread adoption and innovation within the RepRap community. The Arduino microcontroller with the RAMPS shield, in various forms, became a standard in RepRap controllers, providing a versatile and accessible platform for enthusiasts and developers alike.
As time progressed and the adoption of 3d printing progressed the function of the ramps shields were incorporated into specialises 3d printing control boards. The atmel 8bit processor has largely been replaced my faster 32 bit processors, much of the core functionality has remained the same despite the addition of many ease of use features.
See a list of Control Boards for more information
Stepper Motors
A stepper motor is a type of electric motor that can be accurately controlled with the controller. Most RepRaps use four or five stepper motors. Three or four motors control the x/y/z axis movement (sometimes the z axis is controlled by two motors) and one motor is used per extruder.
Stepper Drivers
A stepper driver is a chip that acts as a kind of middle-man between a stepper motor and the controller. It simplifies the signals that need to be sent to the stepper motor in order to get it to move.
Sometimes the stepper drivers are on separate circuit boards that are linked to the controller via cables.
Sometimes the stepper drivers are on small circuit boards that plug directly into the controller itself. In this case, the controller will have space for at least 4 of these small circuit boards (one for each stepper motor).
Finally, sometimes the stepper drivers are soldered right onto the controller itself.
End stops
An end stop is a very small and simple circuit board with a switch of some sort on it that tells the RepRap when it has moved too far in one direction. Thus, there's normally six of these: two for each axis (most firmware include software settings for max position, which allows for only the minimum position end stops to be required). A single end stop connects via wires to either:
- The controller.
- A stepper driver board.
Mp X/Y/Z
Axis Motion
Linear Constraint
Some common methods of linear constraint include:
- Hardened Linear rails with ball screw carriages - Aluminium extrusion with plastic rollers - Linear rod with linear bearing or bush
Belts and Pulleys
Belts and pulleys are good for fast/lightweight movement and threaded rods are good for slow but forceful movement. Most RepRaps use a combination of belts for X/Y axis movement and threaded rod for Z axis movement.
When it comes to accuracy, the most important part of your RepRap is your belt/pulley combination. Current state of the art is the GT2 belt, along with a machined pulley that matches the exact bore size of your stepper motors (normally this is 5 mm).
For more info see Choosing Belts and Pulleys.
Threaded rod and leadscrews
Most RepRaps use threaded rod for the Z axis. The Z axis doesn't have to move fast (but it is better if it can move quickly) because it generally only goes up tenths of a mm at a time. Threaded rod is ok for accuracy and force. Repraps don't require force but some CNC machines, use threaded rod for all 3 axes. Since the Z axis threaded rods support the weight of the x-carriage it's a good idea to use high-strength stainless steel for the rod and nut, otherwise they will suffer greater wear on the threads and experience premature failure.
Print Bed
The print bed is what parts get printed on. The print bed may be stationary, like with the original RepRap Darwin, or it may move along one of the x/y/z axes. Most RepRaps have the bed move along the Y axis but some will also move along the Z axis.
The bed usually consists of two plates: the upper plate and the lower plate.
- Upper Plate*
The upper plate is mounted to the lower plate on springs. The springs allow it to be levelled using adjusting screws. It also (I think) was designed this way because it gives a little if you accidentally ram the print head down into it.
The upper plate may or may not be heated. It's usually made of a PCB board or of metal. If the plate is heated, it will usually have a piece of glass held on top of it by bulldog clips.
Tape is usually applied to the upper plate to act as a print surface. It helps the extruded plastic stick to the bed and it also makes it easier to remove the part once it's done. The two most common tape types used are blue painter's tape and kapton tape.
- Lower Plate*
Sometimes the lower plate is called the frog plate because the original mendel's lower plate kind of looked like a frog.
It provides a sturdy base that the upper plate can be connected to. If the bed moves along one of the axes, then the lower plate is directly connected to the mechanism that moves the bed. For the Y axis, this usually means belts or for the Z axis, this usually means threaded rod.
- Heated Bed*
The print bed is what the RepRap extrudes plastic onto, where the plastic parts are built up.
While a heated bed is considered to be an optional component of a RepRap, it often becomes a necessary and integral part of operating a RepRap over the long-term because, without a heated bed, parts have a tendency to cool down too quickly. This results in warping of corners (as the plastic shrinks while cooling) or the part physically detaching from the print bed too early, ruining the print.
Heated beds operate on the same principle as a kitchen toaster. They're just giant resistors with a temperature sensor. See also:
- PCB Heatbed
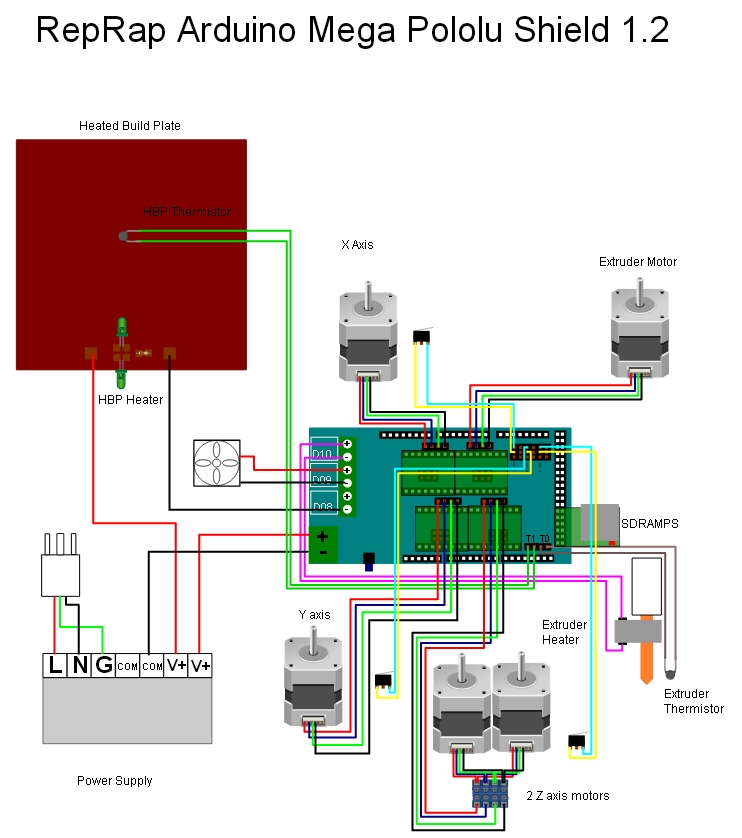
- RAMPS 1.2 Wiring Diagram.
- The Prusa Mendel Heatbed Assembly Article
- PCB hot bed use guide
Extruder
- main article: Category:Extruders
The extruder is responsible for feeding filament through a nozzle and melting it as it's deposited onto the bed where the part is made. Historically some people reffered to the extruder as the "cold end" but this has fallen out of favor. The extruder is the part that is responsible for feeding the filament into the hot end. The hot end is the part that melts the filament and deposits it onto the bed.
Normally, the extuder is connected to the "Hot End" across a thermal break, insulator or bowden tube. This has to be rigid and accurate enough to reliably pass the filament from one side to the other, but still prevent much of the heat transfer. The materials of choice are usually PEEK plastic with PTFE liners or PTFE with stainless steel mechanical supports or a combination of all three.
However, there also exist Bowden Extruders which separate the hot end from the cold end by a long tube. Bowden extruders are much faster because they are much lighter.
This can get a bit confusing here People tend to refer to the cold end as an "extruder" also. In reality, it's only half of the entire extruder mechanism. The cold end is the part that mechanically feeds material to the hot end, which in turn melts it.
Popular cold ends are:
Hot End
- See also Hot End Design Theory
The hot end is arguably the most complex aspect of 3d printers as it deals with the tricky business of melting and extruding plastic filament. In general, the hot end is a metal case with
- A resistor or heater cartridge that heats up so it melts the plastic (usually around 200C)
- A thermistor or a thermocouple which measures the temperature
The electronics basically monitor the temperature via the thermistor, then raise or lower the temperature by varying the amount of power supplied usually by some form of PWM
see Hotend comparison: Hot End Comparison and Hot End
Materials
Filament
Generally, people use one of two types of filament: ABS or PLA. ABS is strongly scented when melted and warps but is relatively strong whereas PLA is said to smell like waffles and is biodegradable. ABS fumes are detrimental to one's health. ABS will bend before it breaks whereas PLA is relatively brittle. Consequently, for delicate structural roles, PLA should be used, however, for other purposes, ABS can be ideal.