Andi's Metal Hot End
Release status: Working
| Description | All metal hotend by Andi
|
| License | |
| Author | |
| Contributors | |
| Based-on | |
| Categories | |
| CAD Models | |
| External Link |
Contents
Summary
- everything is metal (no PTFE or PEEK)
- stainless steel insulator
- tested with ABS with up to 40mm/s for several hours, higher speeds not tested yet, parts came out nicely
- some tests also done with pla
- no fan
- combines ideas from North90's_hot-end and the Organ Pipe Hotend
- Required tools: small blowtorch, drill press, 3.3mm 4mm (or 4.1mm), 5mm and 0.5 mm drill, M6 tap, vice, metal saw, file
 Meterial summary: Pipe from Organ pipe hotend (prepared m6x8 screw and 4mm tube), heater block, heatsink,
 additional M6 brass screws or threaded rod, 10x60x10 alumninium, 2 m6 nuts
- Weight 70g (50g heatsink)
Idea
North90's_hot-end has a detailed calculation about the thermal conducting stuff. It does not use active cooling. Organ Pipe Hotend on the other hand uses active cooling and a smaller tube without PTFE. A smaller tube should conduct less heat up. So why not using a Pipe like the one in the Organ Pipe Hotend and passive cooling like in the North 90 Hotend? So should it really be that simple?
First tries
I tried that, mounted the pipe in a 10x60x10 aluminium piece with a grub screw. Result: X-carriage was not damaged by heat . But it jams easily. So I added another 10x60x10 alu piece near the nozzle. Keywords: transition zone/chewing gum zone. And here is no PTFE to reduce friction. That let me print ABS for around one hour and then I had a jam. Absolutely no chance with PLA. The grub screw began to slide on the tube so the tube was deformed. But I knew that I was on a promising path. I added some more cooling near the nozzle (10mm distance) and I had better reliability.
Build instructions
Build the nozzle according to the instructions in the Organ Pipe Hotend. Before soldering the nozzle to the pipe, you need to add some more threads to it.
For the heatsink attachment
Drill a 4mm or 4.1mm hole through another m6 brass screw (the same kind as you use for the nozzle). Use the saw to cut off the screw head and eventually the area without thread. Put that screw at 10mm distance from the nozzle onto the tube and solder both using L-Ag55 solder paste. Keep the other side of the nozzle cool.
Attachment at the extruder
Prepare another threaded rod for putting it on the tube. Here I use around 15mm length so that the alumninium barrel and a nut fits on it. Constraints on placement of the thread: Place it far enouth away from the end so that the tube can be put into the extruder (>xcarriage thickness+hotend mounting hole depth). On the other hand there should be enough space between heatsink and the xcarriage to have some air circulation.
Solder the thread onto the tube.
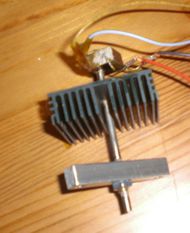
Here is a picture with the finished pipe
alu mounting barrel
Take one piece 60x10x10 of aluminium. Drill three holes into it, one in the middle and the other two 25mm apart from the middle. Use a 5mm drill for the middle hole and use the m6 tap to create a tap in the middle. If your extruder has no 16mm immersion but a hole for the m6 thread, you can probably put the tube directly into the extruder without the barrel
Heatsink
I do not know the minimal size for it yet. I have taken a heat sink from an old mainboard. Some considerations: Most structures should be vertical and for easier mounting it should have a certain thickness and no structures in the middle so a 5mm hole can be drilled and a m6 thread can be created.
Heater block
I use a 15x15x9mm brass piece with a thermistor and a single 8.2 ohm resistor in it.
Assembly of the parts
Put the heater block onto the tube. The next pieces are the m6 nut, the heatsink, the barrel and another m6 nut. Fasten the heatsink and the barrel using the nuts. Attach the hotend to the extruder using the outer holes in the barrel and the screws which are already in use to mount the extruder to the xcarriage.
Thermal stuff
The heat sink reaches 45 to 50 °C when the extruder temperatur is set to 180°C and the nozzle is near a heated bed at 60°C. This was after an hour of operation. With ABS settings (some hours) (nozzle to 240°C, bed to 95°C) the temperature of the heat sink is at 60 to 65°C. Estimates are that 1W of heat power are lost across the stainless steel. More details follow. Besides that there is also convection from the hotend and the heated bed.


