Budaschnozzle/1.0
|
English • العربية • български • català • čeština • Deutsch • Ελληνικά • español • فارسی • français • hrvatski • magyar • italiano • română • 日本語 • 한국어 • lietuvių • Nederlands • norsk • polski • português • русский • Türkçe • українська • 中文(中国大陆) • 中文(台灣) • עברית • azərbaycanca • |
Release status: Working

| Description | Truly free/libre hot end
|
| License | GPLv3
|
| Author | |
| Contributors | |
| Based-on | |
| Categories | |
| CAD Models | |
| External Link |
- The BudaSchnozzle 1.0 is a free/libre hot end.
- Inspired by the Arcol.hu_Hot-End_Version_3.0
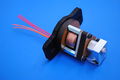
Assembled Budaschnozzle v1.0
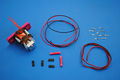
Budaschnozzle parts

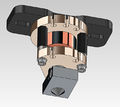
Cross-section Image
3D CAD Rendering


Features
- Aluminum Block Resistor Hotend
- Easily assembled and torn down with no glue or ceramic
- Wire Strain Relief
- Includes machined aluminum and steel parts, and laser cut wooden parts
- Compatible with Wade's and Greg's accessible extruder (Greg's Hinged Extruder?)
- Currently compatible with:
- The standard Prusa Mendel carriage
- Our Supa-Flat carriage
- Mendel OpenX Bling carriage
- Shapercube 2.x carriage
Specs
- Size: (H,W,L) 55mm, 40mm, 40mm
- Aluminum block resistor
- Machined aluminum heat block: 18.4mm x 25mm x 8.3mm
- Machined aluminum nozzle
- NTC Thermistor temperature reading: Honeywell 135-104LAG-J01
- Resistor heating element: Vishay RWM06226R80JA15E1
- Aluminum and copper heatsink
- PEEK GF30 insulator
- PTFE inner sleeve
- Laser cut hard wood plates
- Machined stainless steel back-up plate
Mounting
Mounting the Budaschnozzle is SUPER easy. Once your carriage is mounted and ready to go, place the Budaschnozzle into the carriage hotend hole. Line up the holes in the Budaschnozzle mount plate with the extruder mounting holes in the carriage. Put your extruder on top of the Budaschnozzle mount plate lining up the extruder mount holes with the holes in the mount plate and carriage. Push in the the screws that are compatible with your carriage (generally M4 screws). Screw on the nuts and tighten the screws. Bam, done.
Tip: Put a scrap piece of plastic filament through the extruder and into the hot-end before you tighten down the extruder. You do not need to heat the Budaschnozzle, just lightly push the filament down until it reaches the nozzle. This will align the filament travel space to give a nice smooth movement of the filament through the extruder and hot-end.
Empty X-carriage
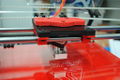
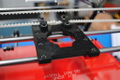
Budaschnozzle placed into the carriage
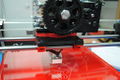
Budaschnozzle mounted and tightened onto the carriage


Cautions
We have found some limits to the current Budaschnozzle design. These limitation are specifically because of the PEEK insulator. To prevent any breaks or melting of the PEEK insulator please follow these guidelines:
- Never heat the hot-end over 230C
- Never allow the nozzle to drag on the print bed when printing the first layer. This can put stress on the hotend and crack the PEEK insulator
- If you have a clog in the nozzle it is best to clean out the nozzle rather than continuing to push plastic into the hot-end.
- We suggest running your filament through a piece of foam or sponge to clean any dust off of the filament.
- Do not extrude faster than 90mm/min. If you do extrude faster than this speed you take the chance of blowing out the PEEK insulator.
Maintenance
- Changing A Broken PEEK Insulator
<videoflash type="youtube">Xl8VK9ulFJE</videoflash>
Thermistor
A thermal table has been created for the Honeywell 135-104LAG-J01 thermistor for use with the Buddhaschnozzle. The thermal table is included in the Sprinter firmware and is used by selecting thermistor 7 in the Configuration.h file in Sprinter. Change the line "#define THERMISTORHEATER 1" to "#define THERMISTORHEATER 7"
The sprinter firmware table (in thermistortables.h) has the following values:
{46, 270}, {50, 265}, {54, 260}, {58, 255}, {62, 250}, {67, 245}, {72, 240}, {79, 235},
{85, 230}, {91, 225}, {99, 220}, {107, 215}, {116, 210}, {126, 205}, {136, 200}, {149, 195},
{160, 190}, {175, 185}, {191, 180}, {209, 175}, {224, 170}, {246, 165}, {267, 160}, {293, 155},
{316, 150}, {340, 145}, {364, 140}, {396, 135}, {425, 130}, {460, 125}, {489, 120}, {526, 115},
{558, 110}, {591, 105}, {628, 100}, {660, 95}, {696, 90}, {733, 85}, {761, 80}, {794, 75},
{819, 70}, {847, 65}, {870, 60}, {892, 55}, {911, 50}, {929, 45}, {944, 40}, {959, 35},
{971, 30}, {981, 25}, {989, 20}, {994, 15}, {1001, 10}, {1005, 5}
The repetier-firmware table should have the following values (first value multiplied by 4 and the second value multiplied by 8, see documentation repetier firmware):
{46*4, 270*8}, {50*4, 265*8}, {54*, 260*8}, {58*4, 255*8}, {62*4, 250*8}, {67*4, 245*8},
{72*4, 240*8}, {79*4, 235*8}, {85*4, 230*8}, {91*4, 225*8}, {99*4, 220*8}, {107*4, 215*8},
{116*4, 210*8}, {126*4, 205*8}, {136*4, 200*8}, {149*4, 195*8}, {160*4, 190*8}, {175*4, 185*8},
{191*4, 180*8}, {209*4, 175*8}, {224*4, 170*8}, {246*4, 165*8}, {267*4, 160*8}, {293*4, 155*8},
{316*4, 150*8}, {340*4, 145*8}, {364*4, 140*8}, {396*4, 135*8}, {425*4, 130*8}, {460*4, 125*8},
{489*4, 120*8}, {526*4, 115*8}, {558*4, 110*8}, {591*4, 105*8}, {628*4, 100*8}, {660*4, 95*8},
{696*4, 90*8}, {733*4, 85*8}, {761*4, 80*8}, {794*4, 75*8}, {819*4, 70*8}, {847*4, 65*8},
{870*4, 60*8}, {892*4, 55*8}, {911*4, 50*8}, {929*4, 45*8}, {944*4, 40*8}, {959*4, 35*8},
{971*4, 30*8}, {981*4, 25*8}, {989*4, 20*8}, {994*4, 15*8}, {1001*4, 10*8}, {1005*4, 5*8}
Source
| FILE | TYPE | DESCRIPTION | DOWNLOAD |
|---|---|---|---|
| Bill of Materials | Spread sheet | Spread sheet of bill of materials | .ods |
| Heater Block | 2D & 3D CAD drawings | CAD drawing for the heater block | .pdf, .SLDDRW, .SLDPRT |
| Nozzle | 2D & 3D CAD drawing | CAD drawing for the nozzle | .pdf, .SLDDRW, .SLDPRT |
| Peek Isolator | 2D & 3D CAD drawing | CAD drawing for the PEEK isolator | .pdf, .SLDDRW, .SLDPRT |
| Upper Plate | 2D & 3D CAD drawing | CAD drawing for the Upper Plate | .pdf, .SLDDRW, .SLDPRT |
| Lower Plate | 3D CAD drawing | CAD drawing for the Lower Plate | .SLDPRT |
| Backup Plate | 2D & 3D CAD drawing | CAD drawing for the Backup Plate | .pdf, .SLDDRW, .SLDPRT |
| Copper Heatsink | 2D & 3D CAD drawing | CAD drawing for the Copper heatsink | .pdf, .SLDDRW, .SLDPRT |
| Budaschnozzle Mount | 3D CAD model and drawing | 3D CAD model for the Budaschnozzle mount | .stl, .SLDPRT |
Suppliers
This design is now obsolete. Please see the Budaschnozzle 1.1