Electrochemical Machining
The electrochemical machining (ECM) process electrochemically dissolves material -- "reverse electroplating" -- until only the desired shape remains. Similar processes are Electrical Discharge Machining (EDM) and Electrochemical Discharge Machining.
A RepRap has the potential to make metal parts or even its own circuit boards. The process has no forces on the tool head, requires only well available "chemicals" and voltages, so it's well suited for the not so rigid RepRap machines.
Contents
Forum/Mailing List
The Process in a Nutshell
It's simple. Connect the work piece to the positive voltage of an electric power source, the tool head to the negative one. Submerge both in a bath containing an electrolyte and make sure they don't touch each other. As you switch on the voltage supply, bubbles appear on the tool electrode, the machining has already begun. It also works well to have the voltage supply switched on all the time, but to retract the tool electrode from the bath for stopping the machining.
An indirect requirement of the process is to constantly flush clear electrolyte between tool head and work piece. The process generates some slurry, which can hinder the electrolysis to happen or even create a short circuit between both electrodes.
From the practical point of view, one of the best electrolytes is table salt (NaCl), which is dissolved in tap water. Typical voltages are between 2 V and 25 V, so the 5 V or 12 V from a PC PSU work fine. Required currents are proportional to the surface area of the tool, so small tool tips (needles) get away with one or two Ampére. The tool head can be made of any conductive material, e.g. steel, copper or solder tin. The tool head experiences no tool wear.
A Study on Suitability for PCB Manufacturing
by Markus "Traumflug" Hitter, May 2011.
Target of the Study
Find out wether manufacturing of Printed Circuit Boards (PCBs) can be done with Electrochemical Machining. The idea has surfaced a number of times, but apparently nobody has actually tried. Electrochemical Drilling is a process know to work and used in the industry, and PCB isolation milling can be seen as a series of drills through the copper of PCB raw material, so chances are good.
First Tests
Before hooking up something to the RepRap - actually not a RepRap, but a WolfStrap - an even simpler test was carried out.
Setup
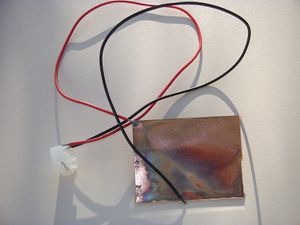
As there is almost no tooling required, first tests were done in a old, simple soup plate. Power source was the 5 V outlet of a PC power supply:
As you can see, the positive voltage (red wire) was soldered onto the raw material's copper. The "tool head" is the open end of the black wire. That simple. The photo was done after the tests, so the board shows the results already.
The soup plate was filled with tap water and approx. 0.5 grams of table salt dissolved there in. Moving the tool head was done by hand, which works out pretty well. There's no need to keep a distance exactly; just make sure you don't short-circuit.
Results
All sorts of short circuits and different distances happened, of course. The PSU with 20 amps specified at 5 V switched off several times due to overload. Nevertheless, after some time, holes in the copper appeared:
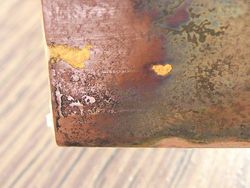
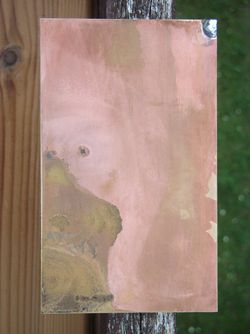
The left picture shows the result after washing and slightly sanding the board. Clearly, the copper is removed, what we ultimately want to happen. The removals aren't exactly thin, but that's apparently due to the thick "tool head" electrode.
The picture to the right shows the same board with light shining from the bottom, partly through the base material (Pertinax). The copper removal can be seen even better.
So far, so promising.
Tests on a WolfStrap
After these successful tests, the setup was hooked up to a WolfStrap. The WolfStrap moves axes with a M8 threaded rod, so very slow movement speeds, like 0.1 mm/min are possible.
Setup
For the purpose of cooling a milling head the WolfStrap was already equipped with a small bathtub, just big enough to hold a Gen7 board PCB. This came in handily, I just had to replace the soap water with salted water.
The series 1 tests were done with water salted to the maximum, which is about 60 g/kg. Series 2 tests were done with a much lower salt concentration, at about 3 g/kg. With raising salt concentration the ohmic resistance of the electrolyte drops. Given the constant voltage power source, a low salt concentration accordingly results in a low current concentration between tool head and work piece.
For the tool head material stainless steel was tried as well as copper coated with solder tin. Both materials work equally well, no difference could be observed.
Common to both tool heads was an insulation down to just over the tip of the wire. Purpose of this insulation is to concentrate the active part of the electrode to just the tip. This matches literature recommendations for electrochemical drilling.
Results Series 1
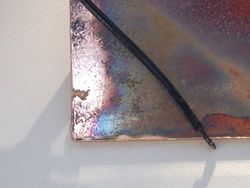
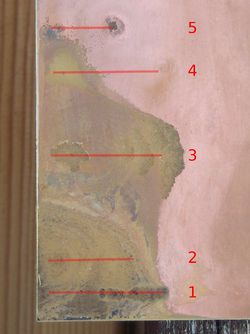
As you can see, the results were very disappointing. The copper dissolved about everywhere. The machining is so unsharp you can't even recognize where the tool head moved. On the right picture, the approximate movements are marked with a line. The parameters were:
1: Distance tool head to copper 0.1 mm, feedrate 3 mm/min. Black slurry appeared and as this became stuck between copper and tool head, an electric arc was observed, yet the PSU didn't switch off. Unfortunately, the abrasion is totally inprecise, with an electrode of 0.7 mm diameter, the isolation gap came out at 1 to 2.5 mm at a non-regular shape.
2: Distance tool head to copper 0.15 mm, feedrate 0.1 mm/min, constant flushing of electrolyte. The copper disappeared at a width of about 30 mm.
3: Same again, feedrate 0.5 mm/min, no rinsing. Still no observable isolation path.
4: Tool head distance 0.5 mm, three times with 0.5 mm/min feedrate. With the third movement the break through the copper finally appeared, yet still no recognizable "path".
5: 0.5 mm distance, 1 mm/min feedrate. Due to poor rinsing, black slurry appeared again, resulting in an electric arc. Given up here.
Overall, slurries of many colors appeared. Most of the appearing slurry was yellow, but also black, white and green slurries were clearly visible. On path 3 black slurry appeared pretty widely and bubbles appeared almost all over the black slurry. Obviously the black slurry is conducting, even if there are no carbon molecules in the (intended) chemical reaction are involved.
Results Series 2
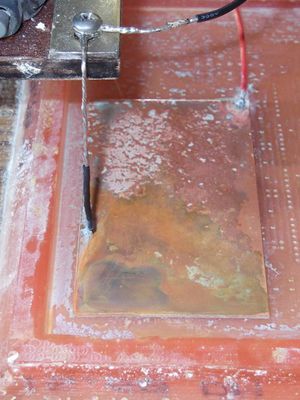
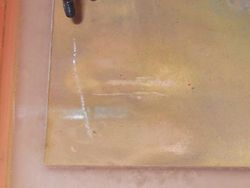
As mentioned, the salt concentration was much lower this time, resulting in a lower current density. Now one can at least recognize where the tool head moved. One can see two horizontal paths, one in the lower half of the picture, on about at the center.
The almost vertical line in this picture is an optical reflection of the electrode on the water's surface. The more sharp line right below the center was not created by the machining.
Both movements were done at 0.5 mm/min. The lower one at 0.2 mm distance, the upper one at 0.1 mm distance. Constant flushing was ensured, so no arc appeared.
Only the white and black slurries remained this time. No yellow, no green one, and the overall amount of slurries was much lower, like 2% of what appeared with the higher salt concentration.
Conclusion and Try of Explanation
Electrochemical machining isn't usable for crafting PCBs. The machining isn't local at all, but also takes place far away from the tool head. All sorts of unwanted chemical reactions can take place and, because the tool's surface is so small, it's also very very slow.
Electrochemical machining should make a good replacement for etching with acids, though. The disappearance of the copper is similarly fast to using acids. Yet, only harmless "chemicals" (tap water and table salt) are involved, there's not even a need for goggles. To compensate for the fact the machining stops when an area of copper disconnects electrically from the power supply, the board to be machined should be submerged very slowly into the bath, so the parts far away from the voltage supply get machined first.
Theoretical Explanation
Now, the machining is very unsharp. There's probably a correlation why most industry applications of electrochemical machining try to smooth out the work piece's surface, like polishing or deburring.
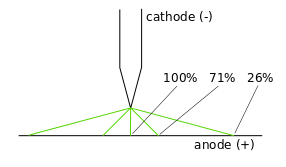
Looking at the scientific explanation how the process works, the machining amount is proportional to the square root of the distance from the tool electrode to the particular point of the work piece area. Let's look what we get when we bring a sharp tip close to a flat surface:
At the center, we get 100% work effectivity. Going at an angle of 45 deg from the tool tip, we still have 71% work effectivity, so still 71% of the material removal experienced at the center. Even far away from the tool electrode, we have still substantial amounts of machining.
Now assume three paths close to each other. The first path is machined fine, but also removes 50% at where the copper trace should be. When the second isolation path is machined, it also removes 50% from the track, as it's equally close, but from the other side. The copper track's thickness is now -- zero.
Even if one whould put more distance between the tracks, the copper traces are machined, let's say, 20% from the left, 20% from the right, 10% from the next track right, 9% from the next track left, and so on. As PCBs require really a lot of isolation paths, you inevitably end up with no copper for the traces left.
This Electric Arc Thing
These arcs weren't intended and, as the bath's fluid is a conductor, they can't be the same arcs seen at Electric Discharce Machining. Probably they show the effect seen at Electrochemical Discharge Machining, which usually requires higher voltages (35 to 60 volts). In this case however, the black slurry kept the gas bubbles somewhat together, forming a gas film, allowing discharges to take place earlier.
Whatever the explanation is, these arcs removed the copper, and some of the non-conductive base material below, pretty reliable and reasonably quick.
Further Thoughts
The idea to use ECM isn't that young, quite a number of thoughts have been expressed. Most of this chapter is a collection of older bits collected in the Wiki.
Forum discussion
There is a thread on mentioning electrochemical board milling at: http://blog.reprap.org/2006/11/universal-pcb-test.html
From that thread, Adrian mentioned that:
The Reprappers had an alternative idea: put a (bunch of) electrode(s) in a RepRap head and use electrochemical machining to make the PCB. Best electrolyte, according to my colleague Tony Mileham who's a world authority, would be sodium chlorate. Bit dodgy as it's
- Horribly Poisonous, and
- A fierce oxidsing agent...
Vik mentioned: I'm,er, familiar with sodium chlorate. I've been accidentally poisoned by it and to be honest it wasn't a big deal. I wasn't even really sick after accidentally consuming a teaspoonful or so of the stuff. Wouldn't recommend it though, even if the LD50 is a few hundred grams (1200mg/kg in rabbits,apparently).
I must say, it's very easy to produce though. Fire 12V into salty water through a couple of old carbon battery rods and there she is.
The proximity of clorates and finely divided long-chain ketones would be a problem, however.
-- Main.EnriquePerez - 04 Dec 2008
Is it possible to make PCBs using electrochemical machining (ECM)? With this method, you move the tool head over the isolation gaps near (but not touching) the copper clad board, immersed in a shallow pan of saltwater. A positive voltage wired to the copper clad board and a negative voltage wired to the tool head drives a current through the saltwater that dissolves the workpiece near the tool head.
Perhaps: Use the extruder board's current-limited stepper motor driver to, instead, drive a constant current. Perhaps: use the thermistor ADC to, instead, measure the analog voltage from the PCB (positive) to the stiff wire tool head (negative).
- wire touching PCB gives zero volts: too close, drive the Z axis to pull the wire away from the PCB
- wire far from the PCB gives high voltage: too far away, drive the Z axis to push the wire closer to the PCB.
(Once an isolation gap is cut completely around a region, it's impossible to ECM inside that region. How to avoid painting yourself into a corner?) (Is it possible to use the ECM tip as a probe to detect holes already drilled in the PCB, and semi-automatically compensate for any small misalignment to make perfectly centered pads and fan-out traces?)
Electrochemical Milling Drilling Head
A RepRap has the potential to be converted to an electrochemical machine by equipping it with an electrochemical machining (ECM) tool head. With this tool head, it could machine any conductive material, regardless of how hard it is or how high its melting point. In electrochemical machining, the tool head is the cathode, with a negative voltage, and the workpiece is the positive anode. The workpiece is immersed in an electrolyte and the filtered electrolyte flows through or around the tool head. There is very little tool wear and the objects milled in this way are not distorted. This would allow the RepRap project to produce its own custom metal parts.
In particular, it may be possible for a RepRap to fabricate PCBs with a Electrochemical Printed Circuit Board Head.
It is described at the "Electrochemical Machining" page of the "Manufacturing Engineer on a Disk" at: http://engineeronadisk.com/V3/engineeronadisk-87.html#50641044_pgfId-514320
older versions:
http://engineeronadisk.com/V2/notes_manufacturing/engineeronadisk-142.html ;
http://engineeronadisk.com/notes_manufact/electrica6.html ;
which was: http://www.eod.gvsu.edu/eod/manufact/manufact-281.html (No longer valid)
and at the Electrochemistry Encylclopedia, at: http://electrochem.cwru.edu/encycl/art-m03-machining.htm
Do it yourself, home electrochemical machining is described at:
http://www.indoor.flyer.co.uk/ecm.htm
A 24 gauge blunt tip stainless steel dispensing needle coated with high temperature lacquer up to just the tip should make a good machining head. You could use a smaller diameter needle for better accuracy, but smaller diameter needles tend to require higher pressures to push water through them(~20-50 psi). http://www.zeph.com/applicator_tips.htm
Electrochemical milling uses about three kWhr/in^3. When machining iron, with a density of 7,870 kg/m^3 (7.87 g/cm^3): http://hypertextbook.com/physics/matter/density/
That works out to: 3 kWhr/in^3 / (2.54cm/in)^3 / 7.87g/cm^3 * 1,000g/kg =~ 23 kWhr/kg. At a high electricity price of 0.3$/kWhr, that works out to: 0.3$/kWhr * 23 kWhr/kg =~ 7$/kg. Seven $/kg is in the ballpark of plastic filament, assuming that you remove a similar amount of metal as you keep, which would be the case for a sphere for instance.
-- Main.EnriquePerez - 13 Aug 2008
Comparison ECM vs EDM
The electric discharge machining (EDM) process cuts away material using dielectric breakdown (sparks) until only the desired shape remains.
In 2008, Forrest Higgs considered "Going for an EDM toolhead".
Wikipedia: electric discharge machining
The equipment for EDM milling appears similar to the equipment for ECM milling -- a high-power electric power supply, a submersed block of raw material in a water-tight tray, and a tool head focusing the electric current on the unwanted material to be eroded away. Both systems are non-contact -- the machine maintains a small but nonzero gap between the tool and the workpiece. (And therefore puts much less stress on the positioning system than mechanical milling). Both system require electrically conductive raw material.
The differences are less obvious:
- ECM requires a conductive fluid (typically salt water), while EDM requires non-conductive fluid (typically kerosene or distilled water).
- ECM requires the tool head to have a negative voltage, while EDM works with positive, negative, or AC voltage.
- ECM has no tool head wear, while EDM has heavy tool head erosion.
- ECM pulls a more or less continuous current from the power supply, while EDM pulls a pulse of current for each spark.
Recommended Reading
- Article on Wikipedia
- Carve Steel with Saltwater, Electricity and a Tin Earring (Popsci)
- Lecture on ECM from the Indian National Programme on Technology Enhanced Learning.
- Estimation of Material Removal Rate Using U-Shape Electrode in Electrochemical Machining - Umasankar Mallic 2009.
