How to Create a Heat Tip From Scratch
|
English • العربية • български • català • čeština • Deutsch • Ελληνικά • español • فارسی • français • hrvatski • magyar • italiano • română • 日本語 • 한국어 • lietuvių • Nederlands • norsk • polski • português • русский • Türkçe • українська • 中文(中国大陆) • 中文(台灣) • עברית • azərbaycanca • |
After many trial and errors, creating a heat tip can often seem difficult. See the steps below to understand what to do to create a heat tip from the bare minimum of materials.
Contents
Set Up
1. Strip the metal extruder bare
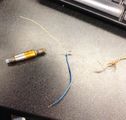
Bare Heat Tip and wires twisted

2. Twist the heat protective wire to the end of a regular wire and solder them together (as seen in the youtube video below)
3. Connect the ends of the regular wires to the thermocouple wires
<videoflash type="youtube">Q9G9gaokqvM</videoflash>
Wrapping
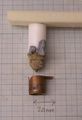
3. Start wrapping the heat protective wire around the metal tip
a. Start with the middle of the heat protective wire
b. Wrap wire from the bottom to the top of the tip
c. Make sure the wire is tight

Wrapped Heat Tip Tight

Heating
4. Add wet cement on top
5. Connect the heat tip to the printer
6. Connect the printer to the computer
7. Hold the metal base with rubber or thermally protective pliers
8. Heat the metal using the computer slowly and starting at 50 degrees
9. Gradually increase the temperature by 10 degrees once there is no smoke
a. The cement will heat and harden as it is desired
Final Heat Tip Ready to Be Used

Materials
| Material | Importance Level | DESCRIPTION | When Used | Where to Buy |
|---|---|---|---|---|
| Regular wire | HIGH | To connect thermocouple to heating wire | Beginning | Online |
| Thermo resistant Wire | HIGH | To heat the extruder | Beginning | Online[1] |
| Bored Metal Extruder | HIGH | To heat the extruder | Beginning | Manufacturer: Darwin/Thermoplast_Extruder |
| Thermo couple | HIGH | To read the temperature | Beginning | Manufacturer: [2] |
| Pliers | MID | To hot tip metal when getting hot | Middle | Hardware store |
| Cement | HIGH | To hot tip metal when getting hot | End | Hardware store |