RepRapDiscount Smart Controller
Release status: working
| Description | Run your RAMPS without a computer just with a SD card!
|
| License | GPL
|
| Author | |
| Contributors | |
| Based-on | [[bkubicek idea]]
|
| Categories | |
| CAD Models | |
| External Link |
Contents
Smart Controller
Based on bkubicek idea, we realized this smart controller.
Description
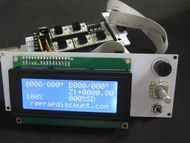
This Smart Controller contains a SD-Card reader, a rotary encoder and a 20 Character x 4 Line LCD display. You can easy connect it to your Ramps board using the "smart adapter" included.
After connecting this panel to your Ramps you don't need your pc any more, the Smart Controller supplies power for your SD card. Further more all actions like calibration, axes movements can be done by just using the rotary encoder on the Smart Controller. Print your 3D designs without PC, just with a g-code design stored on the SD card.
Schematics
RepRapDiscount Controller Final Schematics (pdf)
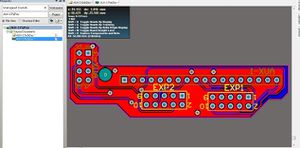
Smart Adapter Gerber Files (rar)
Smart Controller Gerber Files (rar)
As firmware we used Marlins' sources, to update the firmware in the future you just need an Arduino board, so you are good to go ;)
See here for instruction to wire to a Smoothieboard
Pictures of a Smart Controller made by RepRapDiscount.com
Hookup
There are two identical connectors on the display board, which take ribbon cables to connect to RAMPS. If you switch them you'll just get beeping to let you know it's wrong.
The connector nearest the wider end of the L-shaped "smart adaptor" is #2; the other is #1. Looking at the bottom face of the display card, with the ribbon cables going away from you (so the encoder, buzzer, and reset switch are to your right), the left socket is #1, and the right socket is #2.
- Change line 1532 to
#define REPRAP_DISCOUNT_SMART_CONTROLLER(just remove the // at the beginning) - Change line 1429 to
#define SDSUPPORT(just remove the // at the beginning)
Upload the firmware, power off the Arduino, connect the panel, reapply power, and everything should work.
Contrast adjustment
On the back of the panel in the top right corner is a tiny trimpot labelled "Contr". This is a fragile part, so be very gentle when turning it. The ideal tool is a plastic "TV alignment tool".
Marlin V2.0
Settings for RAMPS1.4 in "Configuration.h" search for "REPRAP_DISCOUNT_SMART_CONTROLLER" and activate the define (remove the leading "//")
#define REPRAP_DISCOUNT_SMART_CONTROLLER
Marlin V1 RC2 (old)
Settings for RAMPS1.4 in "Configuration.h" search for "ULTIPANEL" and activate the define (remove the leading "//")
#define ULTIPANEL
and
#define NEWPANEL //enable this if you have a click-encoder panel
Also change the value on define MOTHERBOARD to 33
in "pins.h" go to section for RAMPS configuration (search for MOTHERBOARD == 33)
 //STOP / KILL button
#define KILL_PIN 41 //[RAMPS14-SMART-ADAPTER]

 //lcd pins
#define LCD_PINS_RS 16 //[RAMPS14-SMART-ADAPTER]
#define LCD_PINS_ENABLE 17 //[RAMPS14-SMART-ADAPTER]
#define LCD_PINS_D4 23 //[RAMPS14-SMART-ADAPTER]
#define LCD_PINS_D5 25 //[RAMPS14-SMART-ADAPTER]
#define LCD_PINS_D6 27 //[RAMPS14-SMART-ADAPTER]
#define LCD_PINS_D7 29 //[RAMPS14-SMART-ADAPTER]

 //encoder pins
#define BTN_EN1 31 //[RAMPS14-SMART-ADAPTER]
#define BTN_EN2 33 //[RAMPS14-SMART-ADAPTER]
#define BTN_ENC 35 //[RAMPS14-SMART-ADAPTER]

 //beeper
#define BEEPER 37 //[RAMPS14-SMART-ADAPTER] / 37 = enabled; -1 = dissabled / (if you don't like the beep sound ;-)

 //SD card detect pin
#define SDCARDDETECT 49 //[RAMPS14-SMART-ADAPTER]
Open Source Files
You can find the open source files here: https://web.archive.org/web/20191230213925/http://forum.reprapdiscount.com:80/forums/oss/
Where to get it?
If you don't have the mood to build it yourself you can just buy direct from our ReprapDiscount Online Shop
- in the US here
- in Europe you can get one Austrian Reprap or here... or here... or here... or here... or here... or here... or here...
- in France you can get one Funreprap
- in Australia Robotronics.com.au or Aus3D.com.au
All parts are licensed under Attribution - ShareAlike.


