Z axis calibration getting so hard (Please help)
Posted by shaolin30
|
Z axis calibration getting so hard (Please help) July 24, 2016 09:30PM |
Registered: 7 years ago Posts: 16 |
Hi guys,
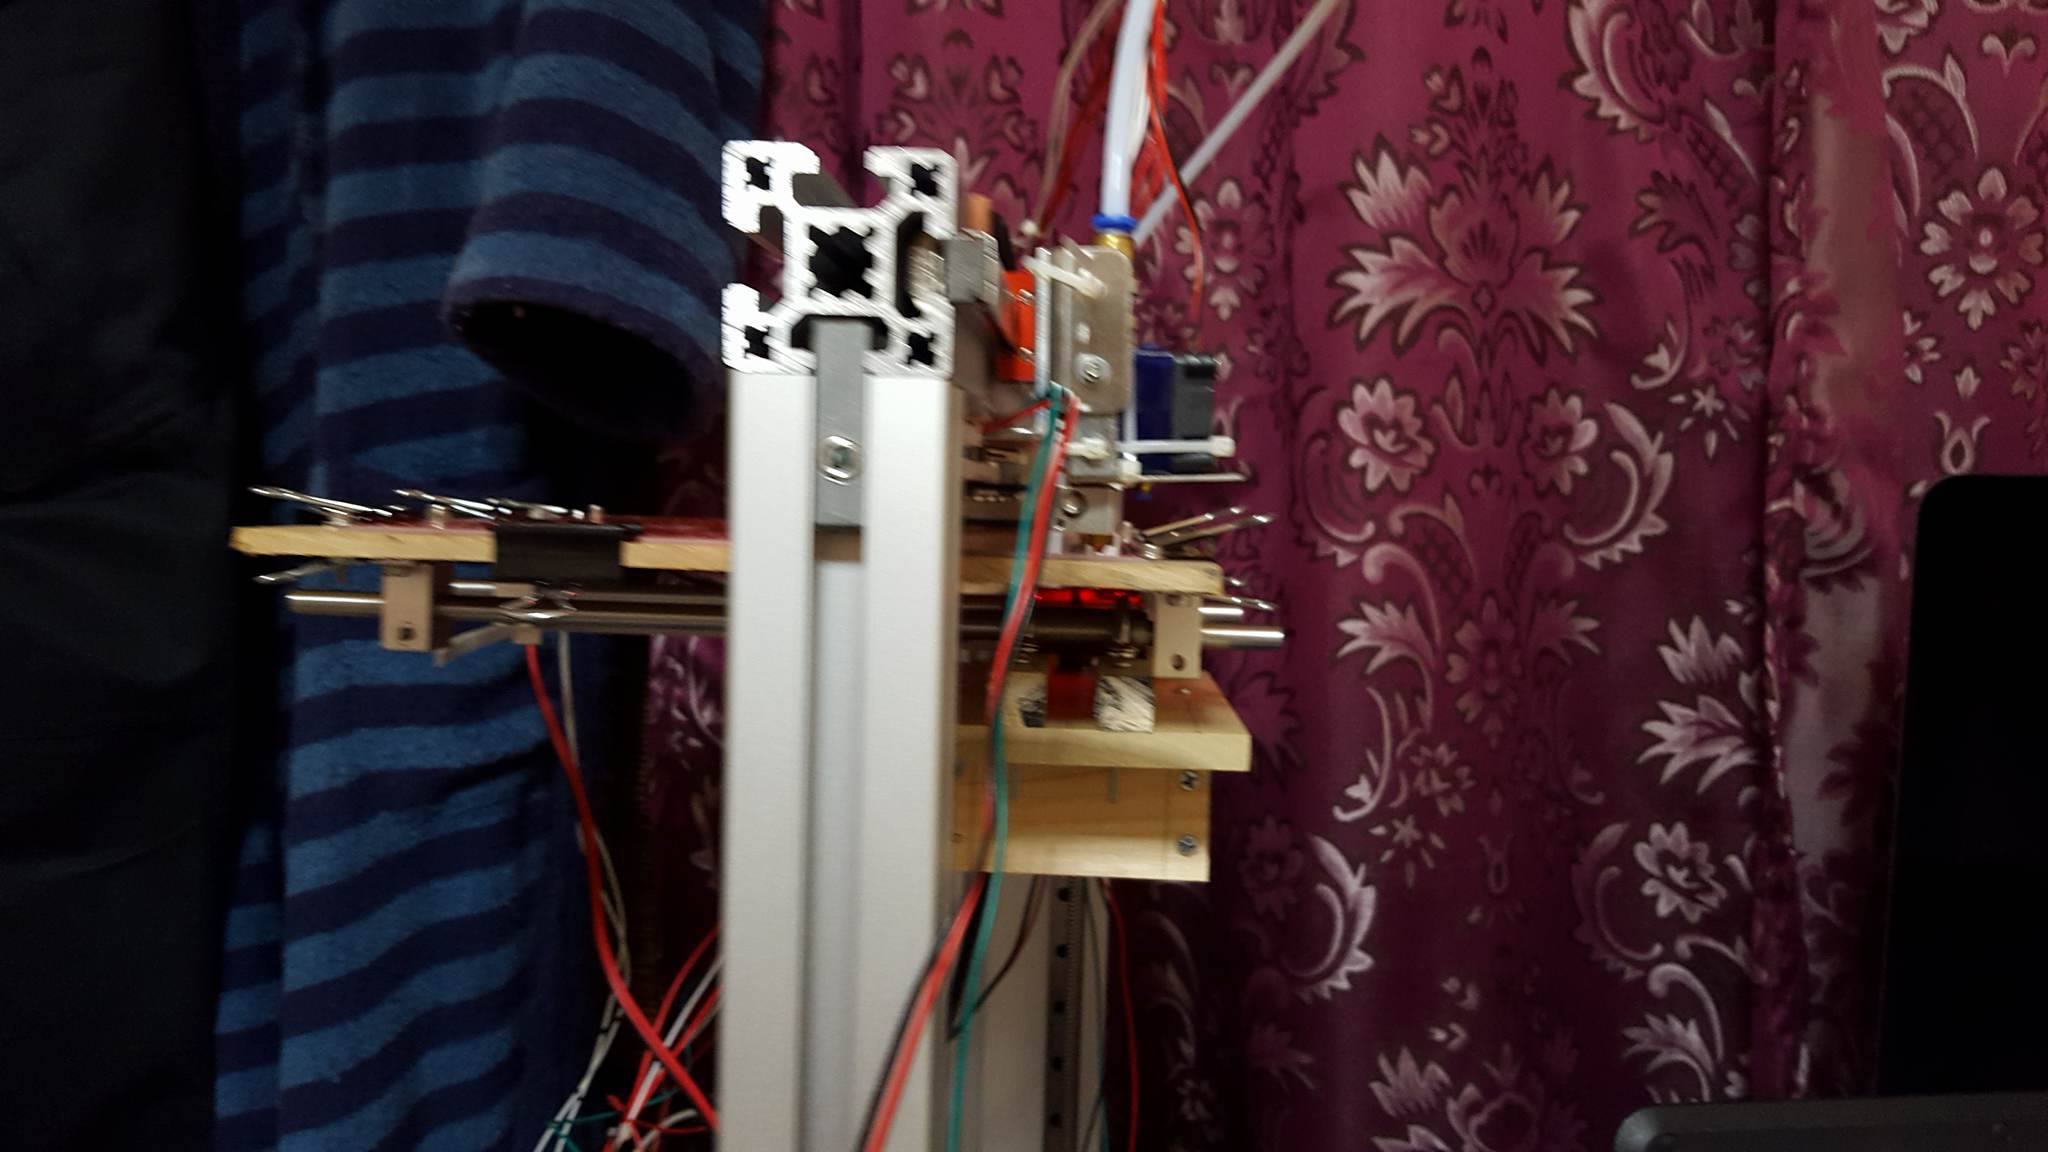
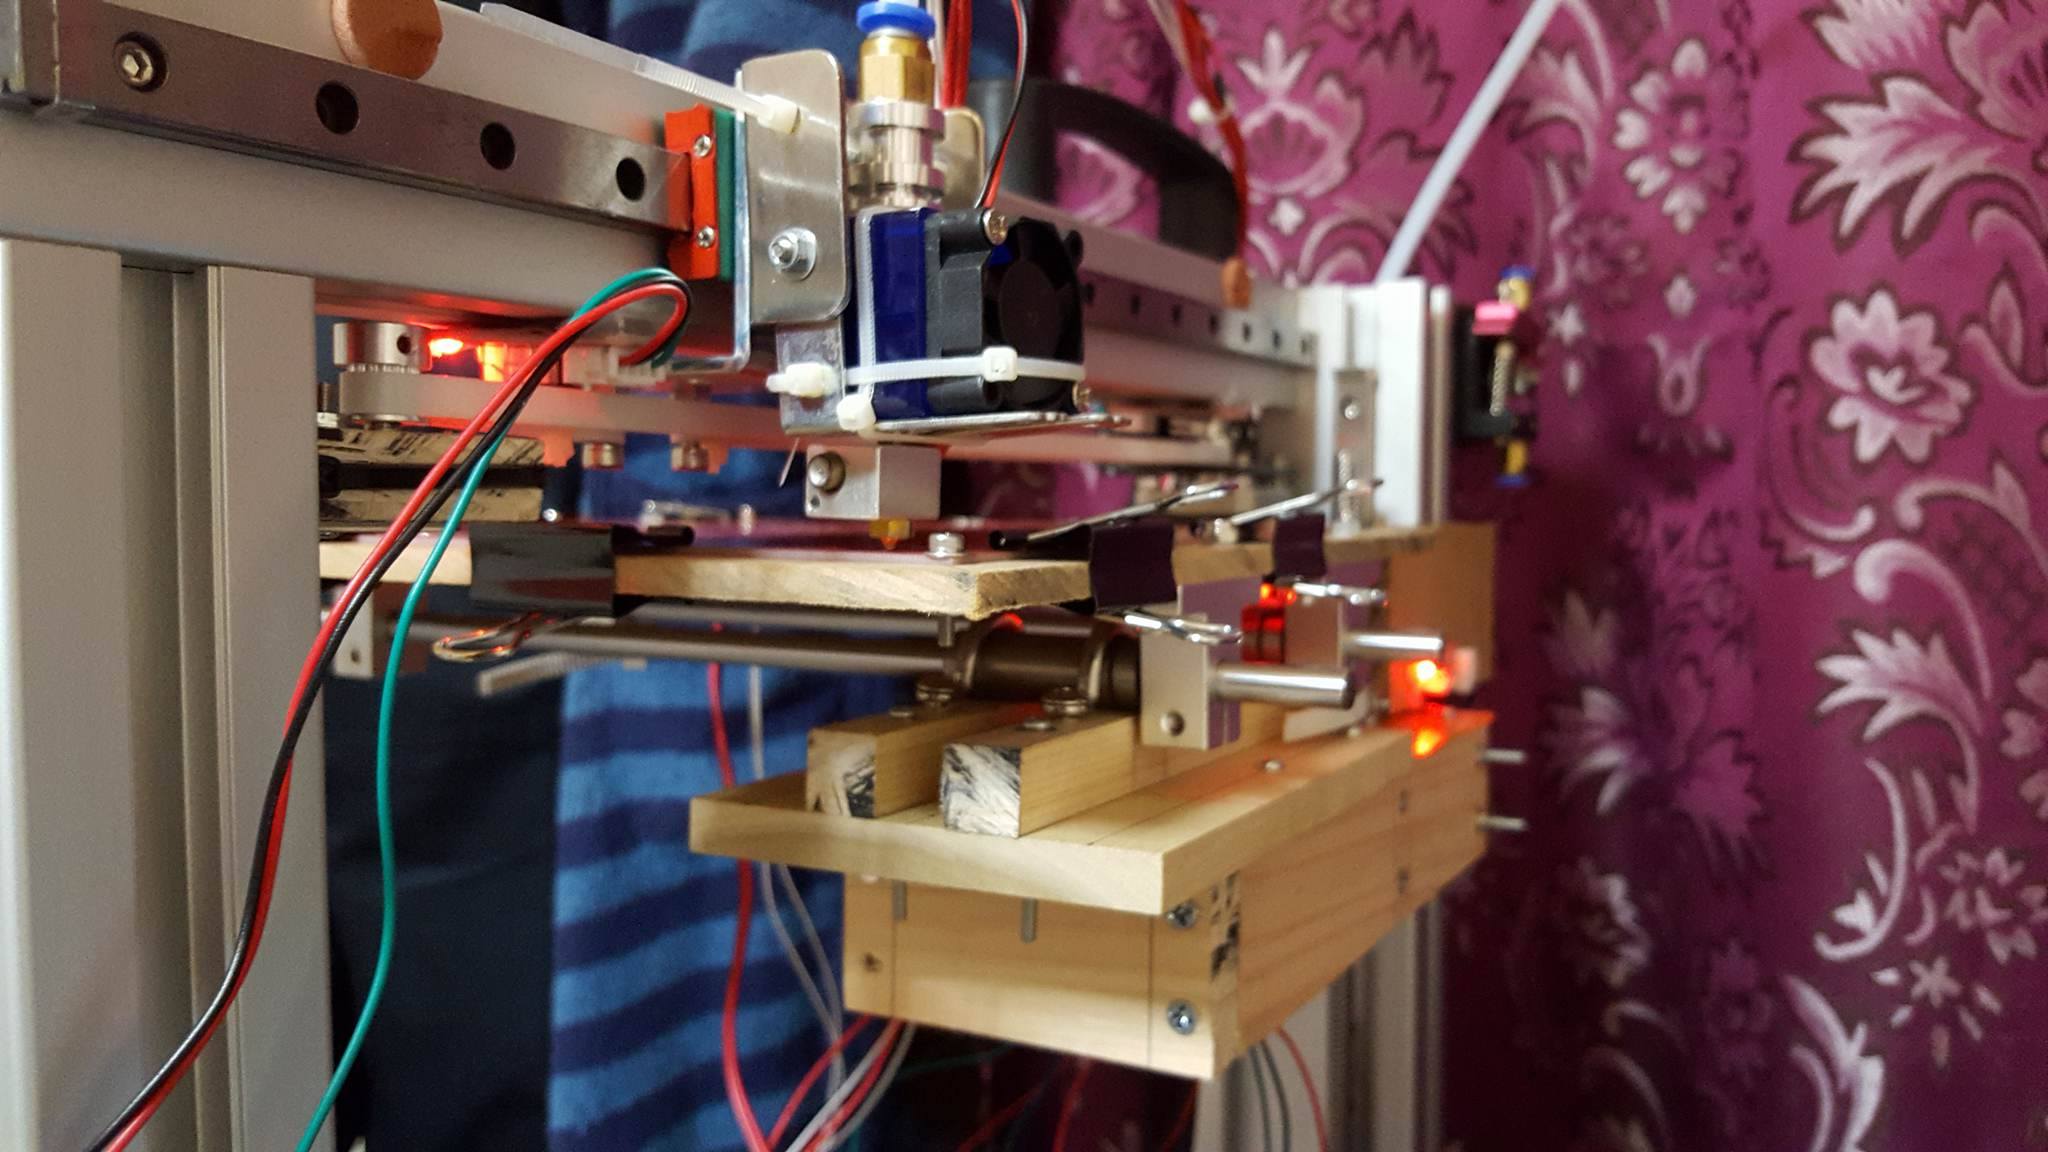
I have a DIY 3d printer and I'm having trouble for 3 weeks now getting my z axis properly calibrate. Please see my attachment to have a look to what my printer looks like.
I have 3 endstop which is assigned in different settings, X is set to min same with Y, then I set the Z endstop to max because my bed will start from the top going down. I'm having trouble how to calibrate the Z since my endstop for Z axis is located at the top. The X axis is fix to its position so it doesn't go up and up, It's the bed that goes up and down. I'm using the latest Repetier Firmware and Repetier Host 1.6.2 version.
this is my endstop configuration so far:
// ##########################################################################################
// ## Endstop configuration ##
// ##########################################################################################
/* By default all endstops are pulled up to HIGH. You need a pull-up if you
use a mechanical endstop connected with GND. Set value to false for no pull-up
on this endstop.
*/
#define ENDSTOP_PULLUP_X_MIN true
#define ENDSTOP_PULLUP_Y_MIN true
#define ENDSTOP_PULLUP_Z_MIN true
#define ENDSTOP_PULLUP_X_MAX true
#define ENDSTOP_PULLUP_Y_MAX true
#define ENDSTOP_PULLUP_Z_MAX true
//set to true to invert the logic of the endstops
#define ENDSTOP_X_MIN_INVERTING true
#define ENDSTOP_Y_MIN_INVERTING true
#define ENDSTOP_Z_MIN_INVERTING false
#define ENDSTOP_X_MAX_INVERTING false
#define ENDSTOP_Y_MAX_INVERTING false
#define ENDSTOP_Z_MAX_INVERTING true
// Set the values true where you have a hardware endstop. The Pin number is taken from pins.h.
#define MIN_HARDWARE_ENDSTOP_X true
#define MIN_HARDWARE_ENDSTOP_Y true
#define MIN_HARDWARE_ENDSTOP_Z false
#define MAX_HARDWARE_ENDSTOP_X false
#define MAX_HARDWARE_ENDSTOP_Y false
#define MAX_HARDWARE_ENDSTOP_Z true
//If your axes are only moving in one direction, make sure the endstops are connected properly.
//If your axes move in one direction ONLY when the endstops are triggered, set ENDSTOPS_INVERTING to true here
//// ADVANCED SETTINGS - to tweak parameters
// For Inverting Stepper Enable Pins (Active Low) use 0, Non Inverting (Active High) use 1
#define X_ENABLE_ON 0
#define Y_ENABLE_ON 0
#define Z_ENABLE_ON 0
// Disables axis when it's not being used.
#define DISABLE_X false
#define DISABLE_Y false
#define DISABLE_Z false
#define DISABLE_E false
/* If you want to keep z motor running on stepper timeout, remove comments below.
This may be useful if your z bed moves when motors are disabled. Will still
turn z off when heaters get also disabled.
*/
//#define PREVENT_Z_DISABLE_ON_STEPPER_TIMEOUT
// Inverting motor direction. Only in case of pure cartesian printers, this
// is also the axis you invert!
#define INVERT_X_DIR true
#define INVERT_Y_DIR true
#define INVERT_Z_DIR true
//// ENDSTOP SETTINGS:
// Sets direction of endstops when homing; 1=MAX, -1=MIN
#define X_HOME_DIR -1
#define Y_HOME_DIR -1
#define Z_HOME_DIR 1
// Delta robot radius endstop
#define max_software_endstop_r true
//If true, axis won't move to coordinates less than zero.
#define min_software_endstop_x false
#define min_software_endstop_y false
#define min_software_endstop_z false
//If true, axis won't move to coordinates greater than the defined lengths below.
#define max_software_endstop_x true
#define max_software_endstop_y true
#define max_software_endstop_z true
// If during homing the endstop is reached, how many mm should the printer move back for the second try
#define ENDSTOP_X_BACK_MOVE 5
#define ENDSTOP_Y_BACK_MOVE 5
#define ENDSTOP_Z_BACK_MOVE 0.01
// For higher precision you can reduce the speed for the second test on the endstop
// during homing operation. The homing speed is divided by the value. 1 = same speed, 2 = half speed
#define ENDSTOP_X_RETEST_REDUCTION_FACTOR 2
#define ENDSTOP_Y_RETEST_REDUCTION_FACTOR 2
#define ENDSTOP_Z_RETEST_REDUCTION_FACTOR 2
// When you have several endstops in one circuit you need to disable it after homing by moving a
// small amount back. This is also the case with H-belt systems.
#define ENDSTOP_X_BACK_ON_HOME 1
#define ENDSTOP_Y_BACK_ON_HOME 2
#define ENDSTOP_Z_BACK_ON_HOME 0.01
// You can disable endstop checking for print moves. This is needed, if you get sometimes
// false signals from your endstops. If your endstops don't give false signals, you
// can set it on for safety.
#define ALWAYS_CHECK_ENDSTOPS 1
// maximum positions in mm - only fixed numbers!
// For delta robot Z_MAX_LENGTH is the maximum travel of the towers and should be set to the distance between the hotend
// and the platform when the printer is at its home position.
// If EEPROM is enabled these values will be overridden with the values in the EEPROM
#define X_MAX_LENGTH 200
#define Y_MAX_LENGTH 200
#define Z_MAX_LENGTH 235
// Coordinates for the minimum axis. Can also be negative if you want to have the bed start at 0 and the printer can go to the left side
// of the bed. Maximum coordinate is given by adding the above X_MAX_LENGTH values.
#define X_MIN_POS 0
#define Y_MIN_POS 0
#define Z_MIN_POS 0
and this is EEPROM settings:
EPR:0 1028 255 Language
EPR:2 75 250000 Baudrate
EPR:3 129 0.510 Filament printed [m]
EPR:2 125 2863 Printer active
EPR:2 79 0 Max. inactive time [ms,0=off]
EPR:2 83 360000 Stop stepper after inactivity [ms,0=off]
EPR:3 3 6.3000 X-axis steps per mm
EPR:3 7 6.3000 Y-axis steps per mm
EPR:3 11 2560.0000 Z-axis steps per mm
EPR:3 15 120.000 X-axis max. feedrate [mm/s]
EPR:3 19 120.000 Y-axis max. feedrate [mm/s]
EPR:3 23 1.500 Z-axis max. feedrate [mm/s]
EPR:3 27 120.000 X-axis homing feedrate [mm/s]
EPR:3 31 120.000 Y-axis homing feedrate [mm/s]
EPR:3 35 1.500 Z-axis homing feedrate [mm/s]
EPR:3 39 10.000 Max. jerk [mm/s]
EPR:3 47 0.200 Max. Z-jerk [mm/s]
EPR:3 133 0.000 X min pos [mm]
EPR:3 137 0.000 Y min pos [mm]
EPR:3 141 0.000 Z min pos [mm]
EPR:3 145 200.000 X max length [mm]
EPR:3 149 170.000 Y max length [mm]
EPR:3 153 235.000 Z max length [mm]
EPR:3 51 1750.000 X-axis acceleration [mm/s^2]
EPR:3 55 1750.000 Y-axis acceleration [mm/s^2]
EPR:3 59 12.500 Z-axis acceleration [mm/s^2]
EPR:3 63 1750.000 X-axis travel acceleration [mm/s^2]
EPR:3 67 1750.000 Y-axis travel acceleration [mm/s^2]
EPR:3 71 12.500 Z-axis travel acceleration [mm/s^2]
EPR:3 1024 0.000 Coating thickness [mm]
EPR:3 808 39.910 Z-probe height [mm]
EPR:3 929 5.000 Max. z-probe - bed dist. [mm]
EPR:3 812 2.000 Z-probe speed [mm/s]
EPR:3 840 150.000 Z-probe x-y-speed [mm/s]
EPR:3 800 0.000 Z-probe offset x [mm]
EPR:3 804 0.000 Z-probe offset y [mm]
EPR:3 816 100.000 Z-probe X1 [mm]
EPR:3 820 20.000 Z-probe Y1 [mm]
EPR:3 824 160.000 Z-probe X2 [mm]
EPR:3 828 170.000 Z-probe Y2 [mm]
EPR:3 832 20.000 Z-probe X3 [mm]
EPR:3 836 170.000 Z-probe Y3 [mm]
EPR:3 1036 0.000 Z-probe bending correction A [mm]
EPR:3 1040 0.000 Z-probe bending correction B [mm]
EPR:3 1044 0.000 Z-probe bending correction C [mm]
EPR:0 106 1 Bed Heat Manager [0-3]
EPR:0 107 255 Bed PID drive max
EPR:0 124 80 Bed PID drive min
EPR:3 108 196.000 Bed PID P-gain
EPR:3 112 33.020 Bed PID I-gain
EPR:3 116 290.000 Bed PID D-gain
EPR:0 120 255 Bed PID max value [0-255]
EPR:0 1020 0 Enable retraction conversion [0/1]
EPR:3 992 3.000 Retraction length [mm]
EPR:3 1000 40.000 Retraction speed [mm/s]
EPR:3 1004 0.000 Retraction z-lift [mm]
EPR:3 1008 0.000 Extra extrusion on undo retract [mm]
EPR:3 1016 20.000 Retraction undo speed
EPR:3 200 413.000 Extr.1 steps per mm
EPR:3 204 30.000 Extr.1 max. feedrate [mm/s]
EPR:3 208 10.000 Extr.1 start feedrate [mm/s]
EPR:3 212 4000.000 Extr.1 acceleration [mm/s^2]
EPR:0 216 1 Extr.1 heat manager [0-3]
EPR:0 217 140 Extr.1 PID drive max
EPR:0 245 60 Extr.1 PID drive min
EPR:3 218 24.0000 Extr.1 PID P-gain/dead-time
EPR:3 222 0.8800 Extr.1 PID I-gain
EPR:3 226 80.0000 Extr.1 PID D-gain
EPR:0 230 255 Extr.1 PID max value [0-255]
EPR:2 231 0 Extr.1 X-offset [steps]
EPR:2 235 0 Extr.1 Y-offset [steps]
EPR:2 290 0 Extr.1 Z-offset [steps]
EPR:1 239 1 Extr.1 temp. stabilize time
EPR:1 250 150 Extr.1 temp. for retraction when heating [C]
EPR:1 252 0 Extr.1 distance to retract when heating [mm]
EPR:0 254 255 Extr.1 extruder cooler speed [0-255]
EPR:3 246 0.000 Extr.1 advance L [0=off]
Please help. Any kind of advice or help will be much appreciated. Thanks...
Edited 1 time(s). Last edit at 07/26/2016 05:03AM by shaolin30.
Attachments:
open | download - 13692198_10208752990333500_1806788153_o.jpg (158 KB)
open | download - 13702372_10208752991333525_1236153407_o.jpg (282.5 KB)
open | download - 13709748_10208753073855588_664409529_o.jpg (300.5 KB)
open | download - 13718072_10208752990813512_1074400740_o.jpg (166.2 KB)
open | download - 13718072_10208752990813512_1074400740_o.jpg (166.2 KB)
open | download - 13720617_10208752990173496_26705300_o.jpg (205.3 KB)
open | download - 13728319_10208752990533505_1662000383_o.jpg (161 KB)
|
Re: Z axis calibration being so hard (Please help) July 24, 2016 10:13PM |
Admin Registered: 13 years ago Posts: 7,005 |
Your Z endstop should still be min. Plug it into the min endstop and set #define Z_HOME_DIR -1
Then check you direction of Z movement
When you click Z+ your bed needs to move down, and when you click Z- the bed needs to move up. Change #define INVERT_Z_DIR true to #define INVERT_Z_DIR false if you need to change this.
The controls are in relation to the head, since you head is fixed in the Z direction the bed should move in the opposite direction.
Now when you hit Z home, it will home towards the Z min endstop and the bed will move up
Edited 1 time(s). Last edit at 07/24/2016 10:17PM by Dust.
|
Re: Z axis calibration being so hard (Please help) July 25, 2016 12:02AM |
Registered: 7 years ago Posts: 16 |
|
Re: Z axis calibration being so hard (Please help) July 25, 2016 12:30AM |
Registered: 7 years ago Posts: 16 |
Hi, so I did your instructions and my x, y and z is set to 0.00 when homed, the Z axis is inverted also. However when I try to print, the bed will go all the way down until it reaches the bottom and it thinks there's more space to move down so I have to press the Emergency Stop button. My Z height is limited only to 235mm. In Manual Control, when I press Z+ 1, the bed will go down a 100mm move. What do you think causing this kind of Z axis movement? My steps/mm is correct based on the Leadscrew Calculator which is 2560. I'm using M8 threaded rod 1.25mm per rotation and Gear ratio is set to 1:1. Thanks again
Edited 3 time(s). Last edit at 07/25/2016 12:35AM by shaolin30.
Edited 3 time(s). Last edit at 07/25/2016 12:35AM by shaolin30.
|
Re: Z axis calibration being so hard (Please help) July 25, 2016 12:46AM |
Admin Registered: 13 years ago Posts: 7,005 |
Do you have micro stepping jumpers installed under your stepper drivers?
Also do a M503 (Print settings) and verify your steps/mm setting. As eeprom setting take precedence over firmware settings
(actuly I see your eeprom setting... and they look ok... but verify they haven’t changed since you posted them)
Edited 1 time(s). Last edit at 07/25/2016 03:46AM by Dust.
Also do a M503 (Print settings) and verify your steps/mm setting. As eeprom setting take precedence over firmware settings
(actuly I see your eeprom setting... and they look ok... but verify they haven’t changed since you posted them)
Edited 1 time(s). Last edit at 07/25/2016 03:46AM by Dust.
|
Re: Z axis calibration being so hard (Please help) July 25, 2016 03:58AM |
Admin Registered: 13 years ago Posts: 7,005 |
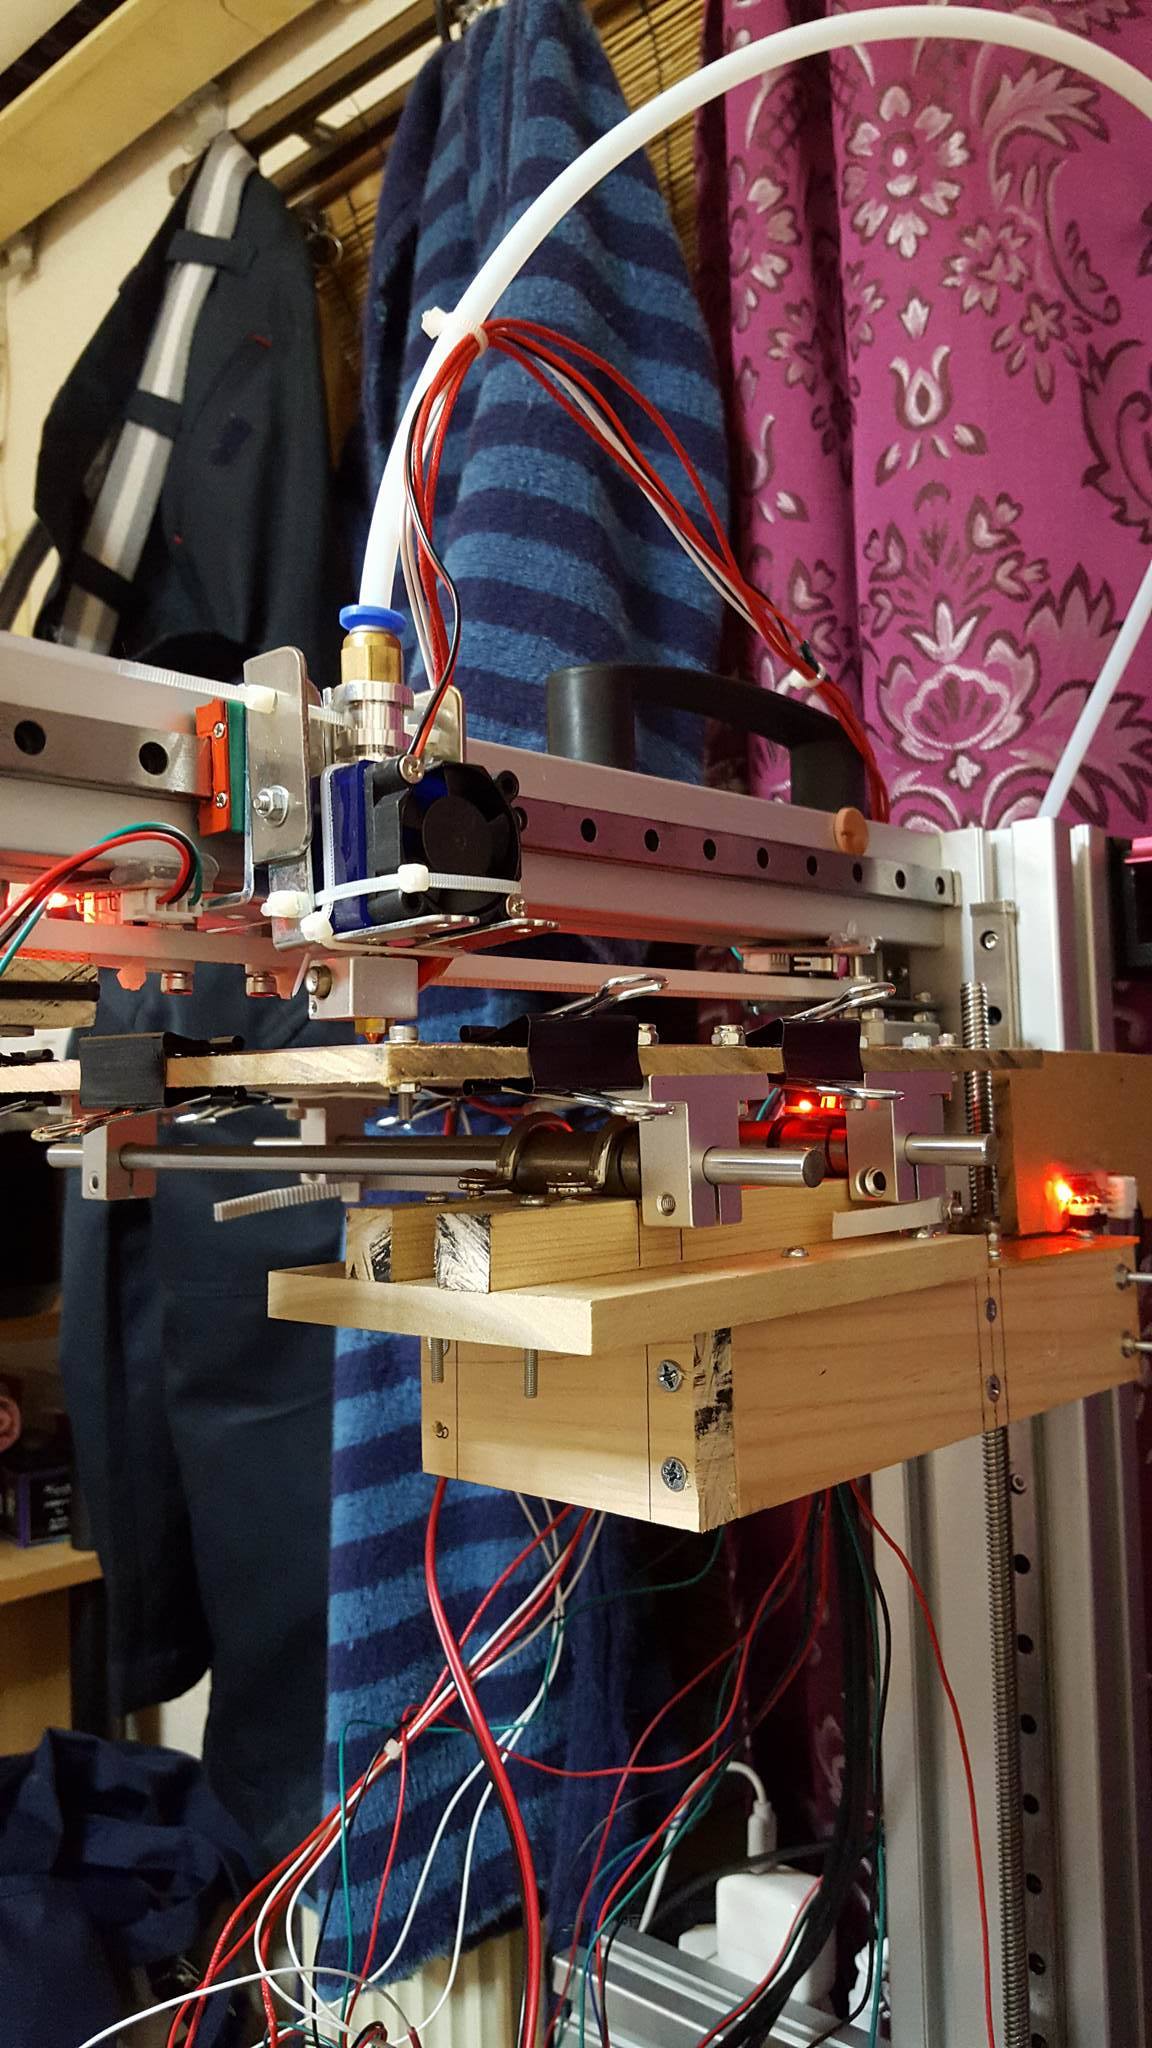
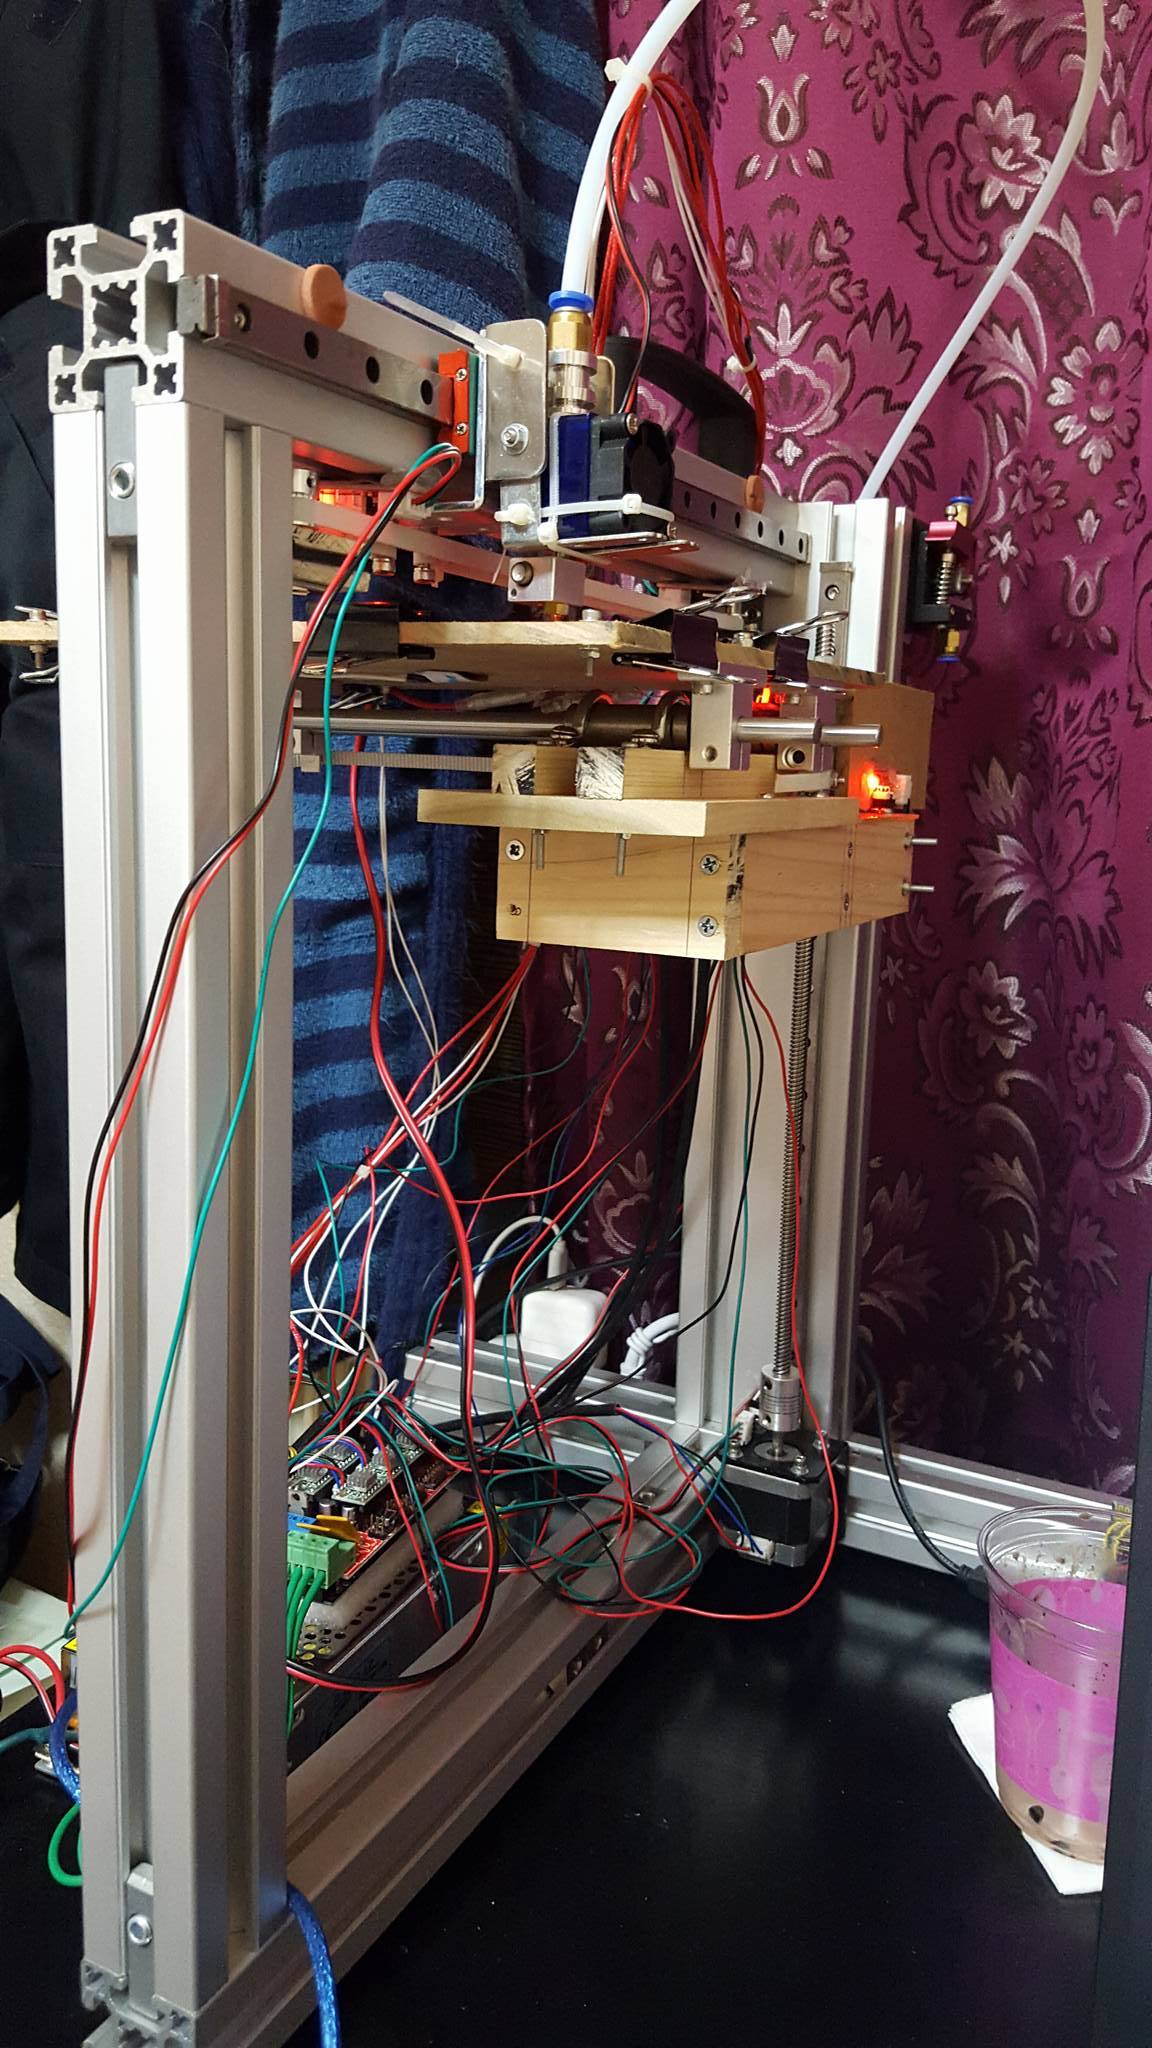
Are you sure your using m8 threaded rod, those don’t look like m8 threaded rod in your images on the Z axis....
eg [forums.reprap.org]
Got a url of where you got them from?
eg [forums.reprap.org]
Got a url of where you got them from?
|
Re: Z axis calibration being so hard (Please help) July 25, 2016 11:28AM |
Registered: 7 years ago Posts: 16 |
This is where I bought the threaded rod: [m.ebay.ph]
I have no knowledge about the microstepping jampers yet, is it the poplulo A4988 driver? If you have one can you please post some pic or a step by step on how to do that?
I will do M503 for verification of the new settings. Thanks again.
Edited 2 time(s). Last edit at 07/25/2016 04:03PM by shaolin30.
|
Re: Z axis calibration being so hard (Please help) July 25, 2016 05:04PM |
Admin Registered: 13 years ago Posts: 7,005 |
Looking at the url those have a 8mm Screw Pitch which means they go up 8mm per turn
Change your z steps/mm to 400.00
re microstepping jumpers. Under each pololu module is 3 jumpers pins, this sets the micro stepping
This table show the settings
Most people have everything set to 1/16th micro stepping, ie all jumpers on
Change your z steps/mm to 400.00
re microstepping jumpers. Under each pololu module is 3 jumpers pins, this sets the micro stepping

This table show the settings

Most people have everything set to 1/16th micro stepping, ie all jumpers on
|
Re: Z axis calibration being so hard (Please help) July 25, 2016 08:11PM |
Registered: 7 years ago Posts: 16 |

Sorry, only registered users may post in this forum.