RepRap Samuel - A variation on the Mendel
Posted by silpstream
|
RepRap Samuel - A variation on the Mendel October 11, 2014 03:35PM |
Registered: 9 years ago Posts: 43 |
Hi guys,
I just wanted to start a thread for a Mendel upgrade that I built. you can find it here at:
http://www.reprap.org/wiki/RepRap_Samuel
Basically I had a Mendel i2, and would have really liked to get a new i3. However cost is an issue, so I figured I could redesign a set of parts to get my Mendel close to the i3 (i2a???).
Samuel has a comparable build volume, and reuses the vitamins from the Mendel. I basically printed a new set of parts with my Mendel, then rebuilt it into this. Had to add a few things and I borrowed some of the design ideas from the i3 and other great projects that everyone has shared.
If someone else does try to build this, just shout out here for help cause I know my documentation isn't up to par. Also if you can, do help to photograph/video/document your process, so that we can improve on the documentation in the wiki.
Comments and feedback are welcome.
Thanks everyone!
R.
Chris
|
Re: RepRap Samuel - A variation on the Mendel December 03, 2014 10:06PM |
Registered: 10 years ago Posts: 62 |
Nice idea. I had an i2 originally, and then built an i3. I did miss the fact that the i2 (for all it's faults) could be built with nothing more than threaded rod and printed plastics. No laser cut frame, or (in my case) bashed together wooden box to mount everything to. I doubt I'll pull my i3 apart to build on of these, but I think the method of construction using just threaded rods deserves more credit.
|
Re: RepRap Samuel - A variation on the Mendel December 04, 2014 02:36AM |
Registered: 9 years ago Posts: 43 |
Thanks for the encouragement!
All the laser cut parts are probably more precise, but I too like the simplicity of being able to build stuff with parts from a hardware store and a hand saw to cut things to size.
I wouldn't take apart an i3 to build this either. However if you have your old i2 vitamins around, you may want to consider building to this with the parts you have lying around. After all 2 printers are better than 1. LOL.
|
Re: RepRap Samuel - A variation on the Mendel December 04, 2014 05:00PM |
Registered: 10 years ago Posts: 581 |
I've been gradually upgrading an old i2 with a vertical X axis and bottom-mount Z axis motors; looks like this is the next thing I'll be doing to it, to get the print height back.
[3DKarma.com] - suppliers of quality, affordable 3D printer kits and filament for the UK market.
[3DKarma.com] - suppliers of quality, affordable 3D printer kits and filament for the UK market.
|
Re: RepRap Samuel - A variation on the Mendel December 16, 2014 02:09AM |
Registered: 9 years ago Posts: 1 |
|
Re: RepRap Samuel - A variation on the Mendel December 16, 2014 02:23AM |
Registered: 9 years ago Posts: 43 |
|
Re: RepRap Samuel - A variation on the Mendel December 26, 2014 07:12PM |
Registered: 9 years ago Posts: 32 |
So glad you made this thank you so much. I will also be printing these parts on my i2 and then building. I am a little confused, do I need any new rods screws bolts etc or just the printed parts? I'd hate to get my i2 all apart and then not be able to put it back together.
Considering the bracing and all I don't see how this is any less than a prusa i3. In fact I think it may be superior. Since you can convert an i2 to i3 this should be more popular.
Has anyone tried building one larger? I'd love to Crack the 200 mm x 200 mm bed size, I've heard you can get a 300x300 hip. Thoughts everyone
|
Re: RepRap Samuel - A variation on the Mendel December 26, 2014 11:15PM |
Registered: 9 years ago Posts: 32 |
|
Re: RepRap Samuel - A variation on the Mendel December 27, 2014 12:54AM |
Registered: 9 years ago Posts: 43 |
Hi mcmasterp,
If you already have an i2, then you have almost everything. Here's a breakdown:
Printed parts:
1) Front vertex can be reused from the i2 if you don't want to have levelling screws.
2) Y-motor mount from i2 can be used. If you reuse your i2 y-motor mount, you don't need the 625zz bearing.
3) Belt clamp/mounting parts for the bed can be reused from the i2.
4) LM8UU mounts for the bed can be reused from the i2.
5) The part "sam_y-bed-support" is not needed unless you have a 2mm aluminium plate (too soft) supporting your heat bed.
6) Bar clamps from the i2 can be reused.
7) The part "sam_x-end-pulley" can be omitted (I found it useless after assembling so removed it).
8) The part "x-end-rod-spacer" is optional depending on the length of the rods you have for the x-axis (I don't use them as I have long rods).
9) The direct drive extruder parts can be omitted if you are using a different extruder.
10) The part "third_party/Thumb_wheel_slim" is optional and you can reuse the levelling parts you use on your current i2 bed.
Bearings:
1) 625zz is optional as you can choose to reuse the i2 y-motor mount. If you use my design, you can still leave this out as it only provides support for the shaft (I like it, but the original i2 never supported the shaft)
2) 623z (2x) is required for the belt on the x-axis
3) F8-19M trust bearings are recommended but optional, they take the weight off your z stepper motors. You can always build first and add them later.
Bolts/Washers/Screws:
1) You'll need more of these for sure so stock up on your M8 nuts and washers as well as have different length M3 screws and lots of M3 bolts and washers (Sorry I don't have an exact list yet)
2) M4 bolts/nuts/washers were used for the levelling feet (8 feet in total, look at pictures). The feet are optional but I prefer them.
That should get you going. Hopefully I didn't forget anything.
As for going to a 300x300 hot bed, I believe it can be done if you have long enough rods, however I would be worried about the M8 smooth rods on the x and y axis as the extra length may mean a bit of bending as the extruder/bed passes over the center (I can't confirm that this will happen as I haven't done it). If you want to do this I would recommend swapping out to M10 smooth rods and bearings. I've been thinking of doing this also, but haven't had the time for it as it requires some redesign of the x-carriage and bearing/rod holders. I believe that if you use all the rods from the i2, ou can fit a 300x300 bed, but you won't be able to print to the full 300x300 (the traversing over the x and y axis is not long enough to give full print although the bed will fit). Probably still larger than 200x200 though.
The carriage for the extruder will accept i3 extruders with mounting holes from 24mm to 30mm so choose whatever you prefer.
I do believe that this can get more popular if I had better build documentation. My bad for rushing to build (some trial and error as well as various iterations were involved) and not take enough pictures. I don't really want to take it apart again.
Good luck! If you get the time as you build, maybe you can help out with some extra pictures and documentation of the build.
|
Re: RepRap Samuel - A variation on the Mendel December 27, 2014 02:24PM |
Registered: 9 years ago Posts: 32 |
thanks for the details! I'll probably have more questions as I go along
I understand the rush to build, I'm terrible at documenting the things I do except for some after pics and disjointed commenting haha.
I'm gonna try to build the samuel next to my i2 as much as possible. I have rods shipping from mcmaster-carr and I starting the printing now. I plan on using extra long rods anywhere I can to allow a bed size upgrade later. At the very least the x will be wider in case I decide to add a 2nd extruder, that way they can both reach across the whole bed. I might even buy a package of electronics, hbp, etc from amazon or ebay and try to keep the i2 running.
I am adding things to print right now and I noticed that it doesn't say in the wiki how much of each I need though the pics sometimes show multiples. is that how many of each part I need?
|
Re: RepRap Samuel - A variation on the Mendel December 27, 2014 02:26PM |
Registered: 9 years ago Posts: 32 |
|
Re: RepRap Samuel - A variation on the Mendel December 29, 2014 12:17AM |
Registered: 9 years ago Posts: 43 |
I added some comments on parts to the wiki. Hopefully it is clearer now.
The spring vs no-spring version for the LM8UU mounts is to allow for one smooth rod to have play so that both rods do not fight for control of the print bed. It helps with print quality. So one rod should only use 2 no-spring variants, while the other rod would use 1 or 2 springed variants. I use a 3 point support so have 2x no-spring and 1x spring.
You should be able to increase all the rod lengths without problem, as it was designed with this in mind. Just make sure you square everything up, especially the diagonally mounted rod that supports the z-axis. My current setup using the original rods will not allow 2 extruders to clear in the x direction, so you would need to extend this if you want to use 2 extruders.
Let me know if the pictures I have are not detailed enough to help figure out how pieces go together. I'll take close-ups of what you need to help along.
Edited 2 time(s). Last edit at 12/29/2014 12:27AM by silpstream.
|
Re: RepRap Samuel - A variation on the Mendel December 29, 2014 12:49AM |
Registered: 9 years ago Posts: 32 |
Sweet. Yes much clearer. I went ahead and got a parts kit with everything i need to build a 2nd machine (hopefully). I'll try to take some pics and send them your way in case they're useful. It'll probably be multi colored so i don't use up all of one color. So far I've printed with purple because i have so much and no one ever orders things printed in purple (except my 3yr old daughter). Pink for some parts then who knows.
I think we should be calling this an i3 Sam. It's your baby so your call but it seems to have everything an i3 does and it sticks with the reprap build spirit to boot. I ordered threaded rod for the z motion and smooth rods of course but my plan is to buy 5/16 threaded rod at hardware store for the frame to build with local/printed parts as much as possible.
I think we should be calling this an i3 Sam. It's your baby so your call but it seems to have everything an i3 does and it sticks with the reprap build spirit to boot. I ordered threaded rod for the z motion and smooth rods of course but my plan is to buy 5/16 threaded rod at hardware store for the frame to build with local/printed parts as much as possible.
|
Re: RepRap Samuel - A variation on the Mendel January 14, 2015 03:26PM |
Registered: 9 years ago Posts: 43 |
|
Re: RepRap Samuel - A variation on the Mendel January 14, 2015 07:48PM |
Registered: 9 years ago Posts: 32 |
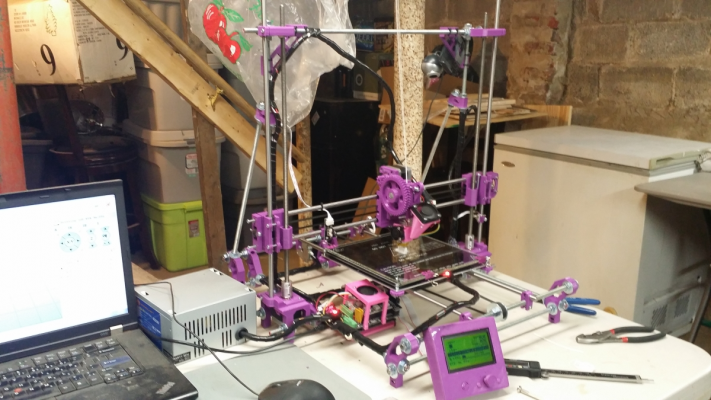
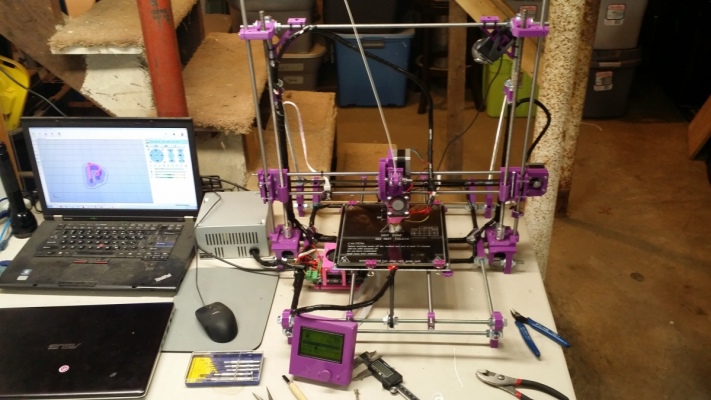
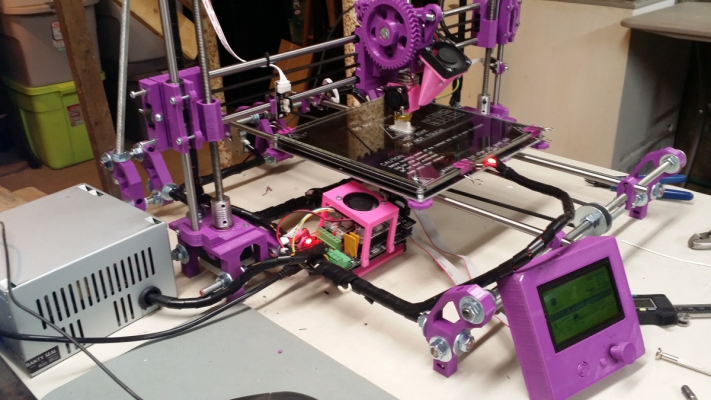
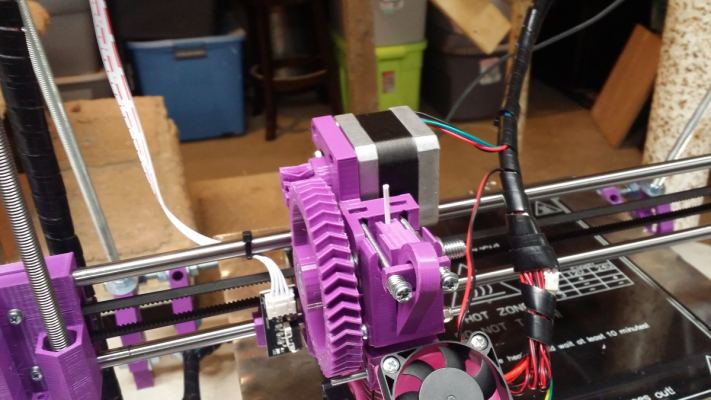
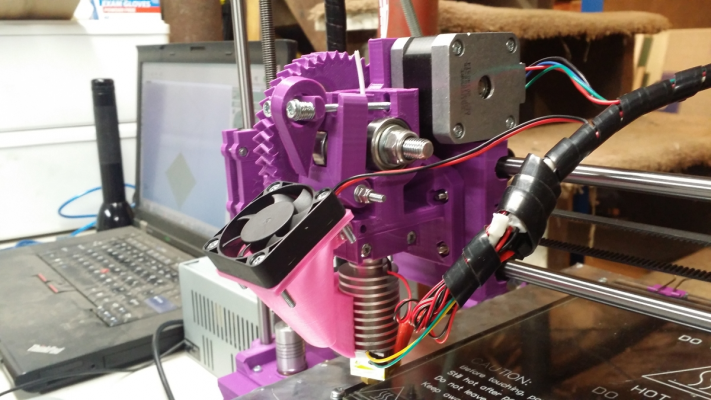
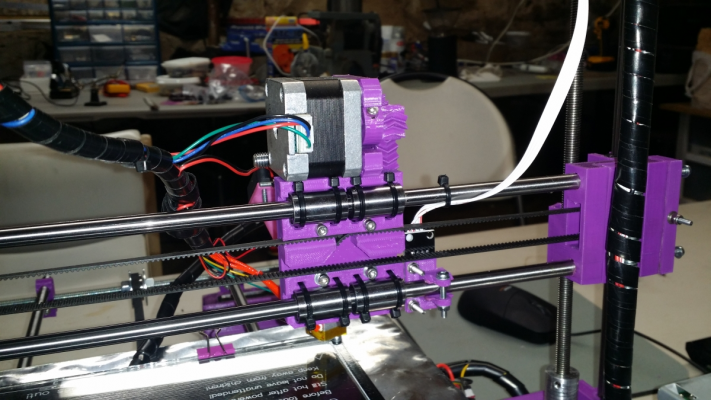
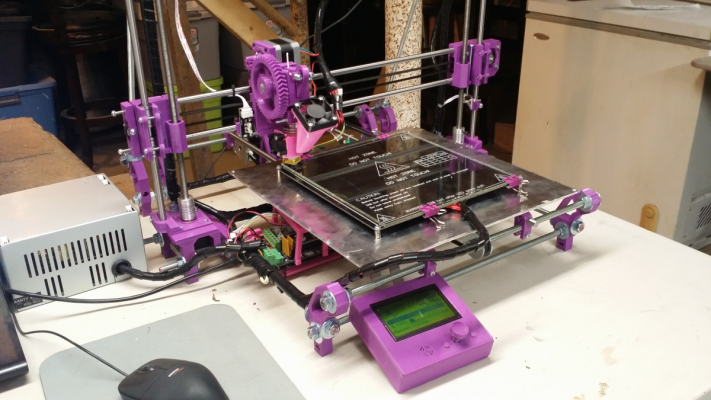
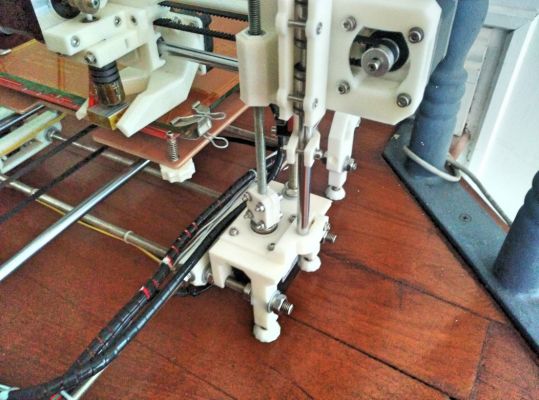
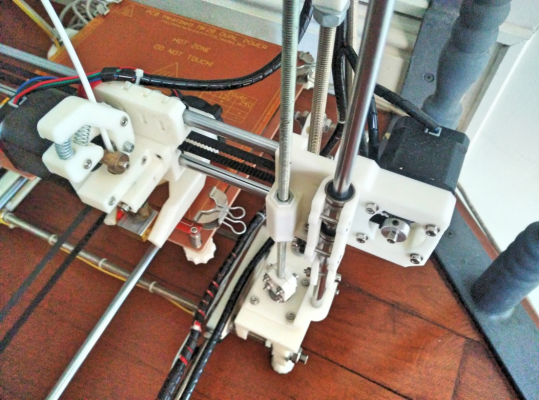
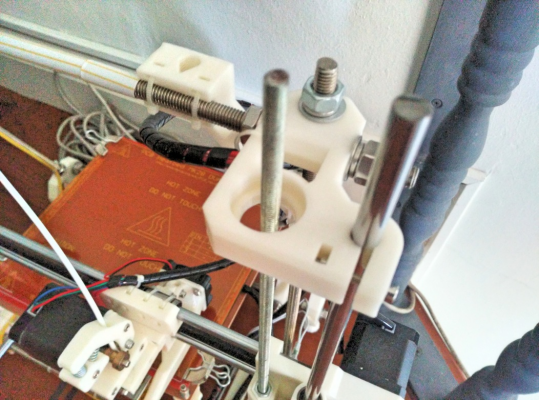
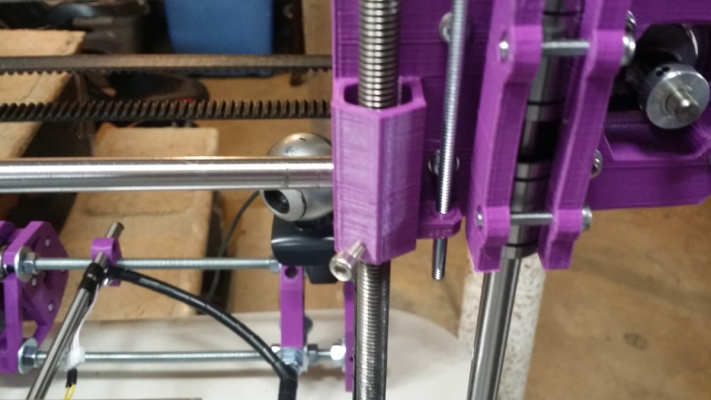
Admirable of you. If you don't mind I'll be refering to it as the I3 samuel since it describes the design better. Since the one I built is larger I was gonna call it the i3 Samuel "L" variant but instead maybe "I3 Jackson" is funnier. I made all rods larger by 100mm, used a different extruder design, added a few tiny pieces like endstop mounts,a diffeent x carriage for gt2 belts and parts cooling fan. I also used 5/16" rod for everything except z rods to make it cheaper and easier to get where I am. Here's some pics of the printer. It prints but needs a bit of calibrating. Right now I just have a standard 200mm x 200mm bed on there but I have parts to build a 300mm x 300mm bed, I just need to order the silicon heating pad from aliexpress
I know purple and pink is an interesting color choice but it was the one color I use the least.
Edited 1 time(s). Last edit at 01/14/2015 07:49PM by mcmasterp.
I know purple and pink is an interesting color choice but it was the one color I use the least.
Edited 1 time(s). Last edit at 01/14/2015 07:49PM by mcmasterp.
|
Re: RepRap Samuel - A variation on the Mendel January 14, 2015 09:42PM |
Registered: 9 years ago Posts: 43 |
Wow! That looks awesome! Name it what you want, Diector Fury!
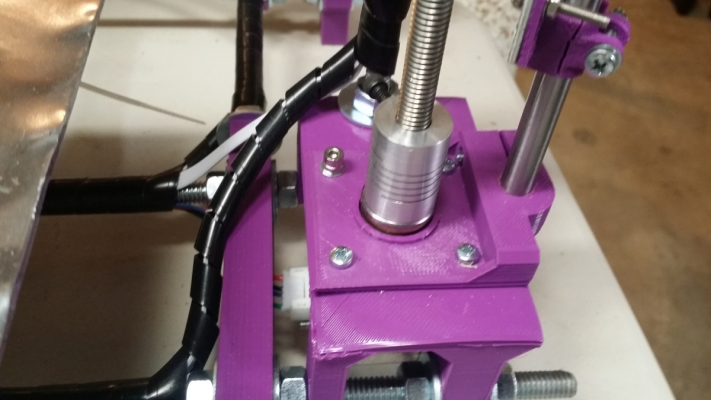
Let us know how it prints. If you get trouble on the z-axis front, you might want to try looking at the m5/m6 mods I added. I found the aluminum couplers didn't work well in a compressed state as opposed to hanging on the original mendal, anf moving to thinner rods and a plastic coupler, based on nophead's design, helped a lot.
I like the Wade's style extruder you have on there, and have been meaning to try one out. I'm guessing the gearing allows you to use a smaller stepper, which in turn allows you more z movement. Could you share the design extruder and also specs of the stepper? I'd like to try it out.
Thanks and again 'wow'!
|
Re: RepRap Samuel - A variation on the Mendel January 14, 2015 11:53PM |
Registered: 9 years ago Posts: 32 |
Thanks!
What problems did you have with the z? what do you mean by m5/m6 mods? thinner z rods?
the extruder is great, it is rotated from normal wades to allow more x movement. I actually didn't choose it for the stepper sizing,I just use it with great success on my i2 and wanted it again (I even hobbed my own bolt after building "the little bolt hobber" from thingiverse). i attached a zip with the files, I got it on thingiverse. the steppers, ramps, hbp, lcd, and more came from a kit off ebay from sainsmart. they sell the same kits on amazon for around US$220. ebay was US$175. it's a bit of a pain to setup stepper drivers and firmware etc but working so far.
I just expanded the bottom plate on the bed for my eventual larger hbp. here's some more pics of it and the extruder.
|
Re: RepRap Samuel - A variation on the Mendel January 15, 2015 01:23AM |
Registered: 9 years ago Posts: 43 |
The z-axis on my prints didn't stack up nicely when I had the m8 rods with the aluminium couplers. I didn't have this problem when it was an i2 and the steppers were on top. Since I had reused the parts from my i2, I figured that it might have been a design issue, and further reading seemed to tell the same story.
I decided to swap to thinner threaded rods and a printed coupler. The m5/m6 parts are to allow for the use of a thinner threaded m5/m6 rod. I am using m6, since that's what I could find easily. Since doing the mod, the z layers stack nicely.
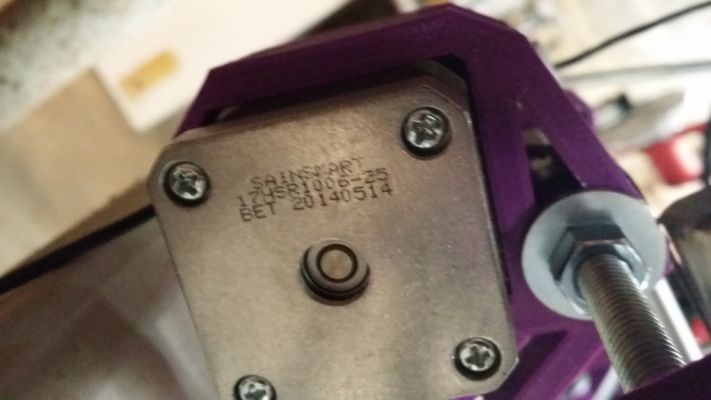
Could you also post the specs of your stepper (if available, there is sometimes a sticker on it with the torque and voltage/amp ratings) or possibly the model number of it? I like the compact size, and want to buy something that I know is powerful enough (I assume you've used it thus far with no problem).
Thanks for the files, I can't wait to try it!
|
Re: RepRap Samuel - A variation on the Mendel January 15, 2015 04:33PM |
Registered: 9 years ago Posts: 32 |
interesting. I wonder what advantage thinner rod and printed couplers have? do the nuts for the m6 fit in the traps on idle and motor parts? do you have a good link to the m5/m6 mod I could look at?
The steppers don't have stickers but are stamped. heres a pic. I found a link to the only steppers listed on sainsmarts website, it looks the same accept black wire instead of yellow. sainsmart stepper. the kit i got can be seen on amazon sainsmart kit
The steppers don't have stickers but are stamped. heres a pic. I found a link to the only steppers listed on sainsmarts website, it looks the same accept black wire instead of yellow. sainsmart stepper. the kit i got can be seen on amazon sainsmart kit
|
Re: RepRap Samuel - A variation on the Mendel January 22, 2015 07:24AM |
Registered: 9 years ago Posts: 43 |
Sorry I took so long to reply. I was away on business and couldn't take pictures for you. Here are some picks of the M5/M6 modifications. Essentially only adapters and couplers.
The thinner rods don't fight the M8 smooth rods as much for control (the newer i3 and other recent printer designs have been using a smaller diameter threaded rod for this reason). The coupler I used here is based on hophead's design at [hydraraptor.blogspot.sg]. Personally I found it worked better than the aluminum couplings that I had. I also read up a bit more about it here [www.printrbottalk.com], and that convinced me to try a new coupling.
Thanks for the pics and links to the stepper motors. BTW, hows printing going?
Edited 1 time(s). Last edit at 01/22/2015 07:27AM by silpstream.
|
Re: RepRap Samuel - A variation on the Mendel January 22, 2015 09:21AM |
Registered: 9 years ago Posts: 32 |
thanks for the coupler info and pics. where did you get the nut adapters for the rod? I guess ill look on thingiverse. is nut adapter the right search term?
Printing has been very good first a new printer. I got rid of the top bearing like you did, took out the higher nut of the two and drilled through the parts and into the bottom nuts a little to add a set screw to make up for the lost upper nut. so far no wobble or banding. my z rods aren't the straightest so I'm actually surprised it's not causing issues
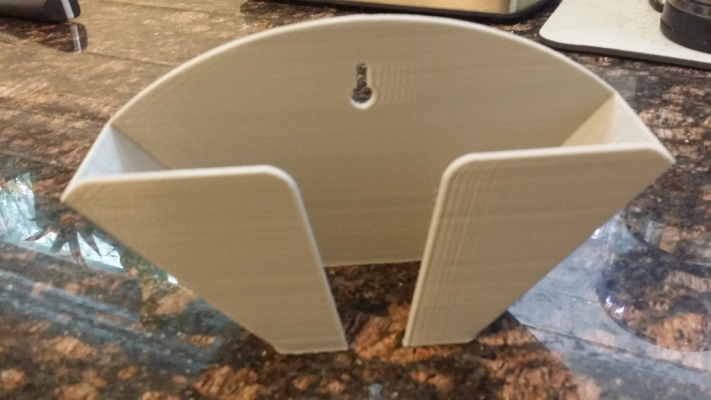
I printed a #4 coffee filter holder overnight. I think it came out pretty well.
I ordered a ss relay, a 30amp power supply, some 11"x12" glass, 12"x12" cork sheets from amazon, got a to 12"x12" of alum from lowes, and a 300x300mm silicon heater from china. soon I'll have my larger heated bed!
|
Re: RepRap Samuel - A variation on the Mendel January 22, 2015 09:34AM |
Registered: 9 years ago Posts: 43 |
The nut adapters are on the Github repository for this printer. They are part of the m5/m6 updates that I added, along with the couplers and some other bits. After printing the adapters, you may want to sand them a bit for a smoother fit.
Why did you choose to remove the upper nut? It was put in there together with a spring to allow for anti backlash (similar to the original i2 design).
However your prints do indeed look good. Possibly the m5/m6 adapters + couplers may help a bit with but I can't really say how much, especially if your z smooth rod is slightly off as this mod give more control to the smooth rod.
Can't wait to see your new heat bed in place. I was looking at the silicone heaters also, but haven't made the jump cause I'm also contemplating the mk3 aluminium heat bed. So many things to try... lol...
|
Re: RepRap Samuel - A variation on the Mendel January 22, 2015 02:30PM |
Registered: 9 years ago Posts: 32 |
I removed the upper nut to allow wobble in the threaded rod to be less transmitted to the carriage...and because I can't find any springs to fit! lol. I bought different ones from 2 different hardware stores but they were all not close enough in size for whats needed. I was getting issues without the screw so figured why not just remove the upper nut and use a set screw on the lower one. let gravity do the antibacklash work, hopefully.
I like the idea of m5 threaded rod. It of course makes sense with the not fighting the smooth rods as much. I have to order metric threaded rod from mcmaster-carr so I may hold off but who knows.
I didn't see the gt2 etc. parts in the github till now. I wonder if my choosen extruder mounting screws would line up with the x carriage? Do you have a pic of the electronics mounts in action? I can't visualize it.
|
Re: RepRap Samuel - A variation on the Mendel January 23, 2015 08:00AM |
Registered: 9 years ago Posts: 43 |
Looking at your prints, gravity does seem to work. I guess since you are always moving z up it should be fine. If you ever get into auto-leveling and z needs to move in both directions, then some error may occur. The original Prusa i3 seems to not have any anti-backlash and uses only one nut, so for all I know, anti-backlash may be over-rated.
The gt2 parts were just added as part of the update. The mounting allows for 22mm - 30mm spacing (seems to be the spacing used by most i3 extruders), but only 2 screws not 4.
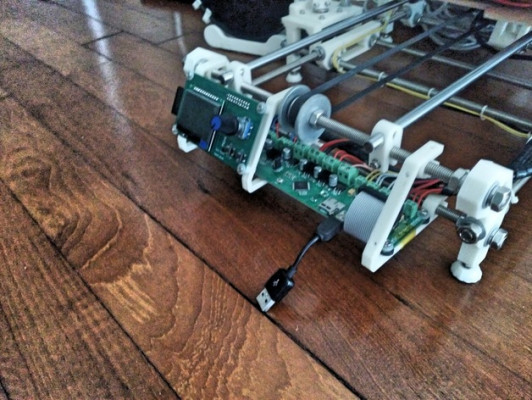
I doubt the electronics holders will work for you. They were designed based on the Melzi board not RAMPS. They do not have holes, so those have to be drilled based on what you want to add. I use it now for the Melzi and a MiniPanel. I intend to print for more for mounting some switches. Heres a picture of it.
|
Re: RepRap Samuel - A variation on the Mendel January 23, 2015 12:26PM |
Registered: 9 years ago Posts: 32 |
I also use z lift of .3mm in my printing, I found it allows for better finished prints especially if they have a lot of separate little parts like spikes etc. The set screw on the single nut probably helps with z lift too.
Oh I see with the mount, makes sense now. I may in the future convert my i2 with a melzi to an i3 Samuel then they will come in handy.
Oh I see with the mount, makes sense now. I may in the future convert my i2 with a melzi to an i3 Samuel then they will come in handy.
|
Re: RepRap Samuel - A variation on the Mendel January 23, 2015 05:54PM |
Registered: 10 years ago Posts: 651 |
|
Re: RepRap Samuel - A variation on the Mendel January 23, 2015 07:16PM |
Registered: 9 years ago Posts: 32 |
|
Re: RepRap Samuel - A variation on the Mendel January 23, 2015 11:16PM |
Registered: 9 years ago Posts: 43 |
|
Re: RepRap Samuel - A variation on the Mendel March 10, 2015 02:05AM |
Registered: 9 years ago Posts: 1 |
Hello
I was looking for a way to recycle my i2 into an i3 and then I found this design, which seems to be a 100% match for what I want. I will be trying to print the parts (with the wade extruder shown in this thread and [www.thingiverse.com] for y bed).
While I am researching the parts to see where they should all go I could not find a Y tensioner. Is this correct or did I miss something ? (found a couple on thingyverse that work from the idler: [www.thingiverse.com] for instance)
Edit: I also wonder why there is stress relieve on the y and z stepper axles but not on x
Edited 2 time(s). Last edit at 03/10/2015 09:43AM by invultri.
|
Re: RepRap Samuel - A variation on the Mendel March 10, 2015 09:58AM |
Registered: 9 years ago Posts: 32 |
I'm sure the OP will have more insight, he did an incredible job creating this design which in my opinion is a superior progression from i2 to i3.
From my experience I can tell you I've never found the need for a belt tensioner on the y. I have always just pulled really hard before the final tighten down of the clamps on the bed. If I really thought one was necessary I've seen printable ones on thingiverse.com that you attach to the belt and turn a screw, simple and quick.
I actually skipped the stress relieves on all axis. My i2 doesn't have them with no ill effects and I didn't feel like buying the bearings. Steppers usually have pretty good bearings in them and the lateral stresses shouldn't be exceeding a decent ones limits. But to each his own. Some would say better safe than sorry.
Edited 2 time(s). Last edit at 03/10/2015 10:00AM by mcmasterp.
Sorry, only registered users may post in this forum.
