Best print i have ever done
Posted by g1r9a6d8y
|
Best print i have ever done July 11, 2012 07:23PM |
Registered: 12 years ago Posts: 27 |
Good print but still needs a few tweaks i think ......
too much clean up on the other 3

too much clean up on the other 3
|
Re: Best print i have ever done July 21, 2012 08:33PM |
Registered: 11 years ago Posts: 7 |
|
Re: Best print i have ever done April 18, 2013 02:42AM |
Registered: 11 years ago Posts: 186 |
|
Re: Best print i have ever done May 25, 2013 09:06PM |
Registered: 11 years ago Posts: 256 |

|
Re: Best print i have ever done June 09, 2013 08:25PM |
Registered: 10 years ago Posts: 5 |
|
Re: Best print i have ever done June 10, 2013 06:09AM |
Admin Registered: 11 years ago Posts: 3,096 |

|
Re: Best print i have ever done July 06, 2013 08:16PM |
Registered: 10 years ago Posts: 35 |
rsilvers Wrote:
-------------------------------------------------------
> There seems to be very few 3d printer owners who
> can take a decent photo.
Jeah
It seams major problem for them.
When you look at RepRapPro images for Huxley assembly you can barely recognize color of wire in fuzziness, shakeness or other 'ness what not to do during taken shots.
But all of providers/merchants spoke something about microns, layer heights, nozzle diameters...
When I first see this I was thinking that Im dinosaur and they are In space age, then I see they tok images in garage from low light without tripod and with shaky hands.
And yes yes we can provide you precision of micron...
Haw haw
|
Re: Best print i have ever done August 02, 2013 04:21AM |
Registered: 10 years ago Posts: 5 |
I think it's more to do with the equipment than the photographer. You really want a DSLR or mirrorless interchangeable lens camera plus flash with a bounce flash capability in order to be able to get focus where you want it, and even flash lighting and/or high enough ISO that you get decent shutter speed without flash. With most compacts and phone cameras, you end up with a sharp back wall, while the printed object is a blur. Or the shutter is too slow and it's all a blur. Or you use the on-camera flash and it's all reflection 
If you don't have a camera with reliable close focus and/or a bounce flash, it helps to put a large lightly colored card right behind the object you are trying to image, or put it right next to the wall, so the camera has something solid on which to lock focus. Then put the camera on something so you are not hand holding it to reduce shake. Turn the room lights up, flash off, and hope for the best.
Mark
|
Re: Best print i have ever done November 27, 2013 11:15PM |
Registered: 10 years ago Posts: 9 |
|
Re: Best print i have ever done November 30, 2013 01:57AM |
Registered: 10 years ago Posts: 5 |
|
Re: Best print i have ever done December 20, 2013 07:26AM |
Registered: 10 years ago Posts: 6 |
|
Re: Best print i have ever done December 29, 2013 05:48PM |
Registered: 10 years ago Posts: 12 |
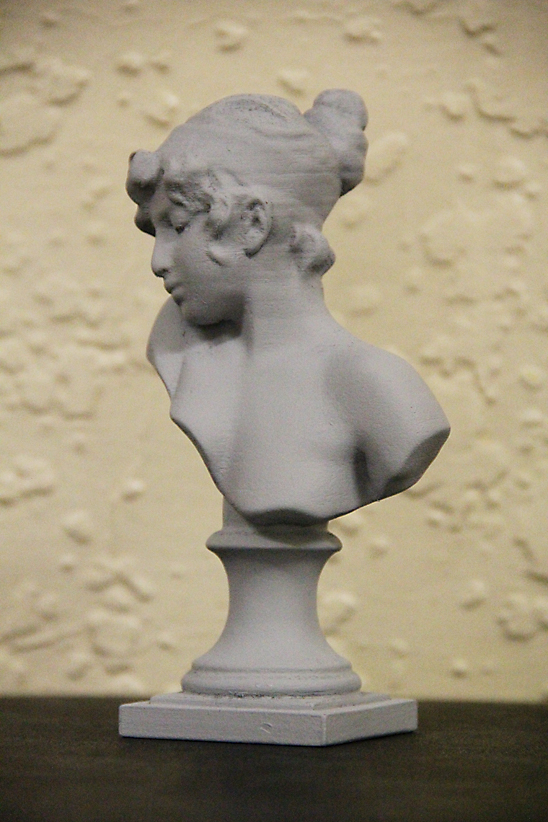
I've added a pic or two (taken with Canon 60D DSLR) of my 2nd test print (the same Sappho bust as made by g1r9a6d8y) made with my brand spanking new Replicator2.
I tilted the model 5 degrees backwards, added a raft and supports. I used the sample PLA (a transparentish blue with metallic infusion) to make the build.
I've lightly filed/sanded the build shown in the pics since the pics were taken, in preparation for painting. I'll be contacting a local fine art acrylic paint manufacturer regarding what sort of products he has (or is prepared to develop!!) that will give finishes that can pass as marble/bronze/pewter, etc. etc. so I can evaluate the whole process of making PLA 'objet d'art'...
My Rep2 is currently churning out a pencil case + sliding lid pre-production piece with 'Art Nouveau' relief designwork that I designed...
These RepRap's offer so much possibilty!!
|
Re: Best print i have ever done January 01, 2014 03:17AM |
Registered: 10 years ago Posts: 12 |
Here's a few pics of the Sappho bust print sanded and primed... Still some imperfections that need sorting, but I don't want to get too carried away, given even original marbles/bronzes etc often have their more 'hidden'/'shadowed' surfaces a bit courser as a contrast to the more smoothly finished surfaces the sculptor wants the viewer to really notice.
I'll figure out the look of the finishing coats... Maybe try a few things given this piece is a test/experiment on piece.
I'd like to know what's happening with the finishes that Cosmo Wenman uses. I'll try and source something similar here in Australia given his catalogue/sales web page is a bit of a 'dead end'...
|
Re: Best print i have ever done March 31, 2014 01:29AM |
Registered: 10 years ago Posts: 51 |
Quote
mlewus
I think it's more to do with the equipment than the photographer. You really want a DSLR or mirrorless interchangeable lens camera plus flash with a bounce flash capability in order to be able to get focus where you want it, and even flash lighting and/or high enough ISO that you get decent shutter speed without flash. With most compacts and phone cameras, you end up with a sharp back wall, while the printed object is a blur. Or the shutter is too slow and it's all a blur. Or you use the on-camera flash and it's all reflection
If you don't have a camera with reliable close focus and/or a bounce flash, it helps to put a large lightly colored card right behind the object you are trying to image, or put it right next to the wall, so the camera has something solid on which to lock focus. Then put the camera on something so you are not hand holding it to reduce shake. Turn the room lights up, flash off, and hope for the best.
Mark
Holy word salad. Pretty sure any half-decent camera these days should have the capabilities to take a decent photo of any normal sized print. Has nothing do do with your intergalactic hyperdrive mirrorless lenses.
Edited 1 time(s). Last edit at 03/31/2014 01:30AM by Istale.
|
Re: Best print i have ever done April 01, 2014 06:16PM |
Registered: 10 years ago Posts: 91 |

|
Re: Best print i have ever done April 17, 2014 01:44AM |
Registered: 10 years ago Posts: 12 |
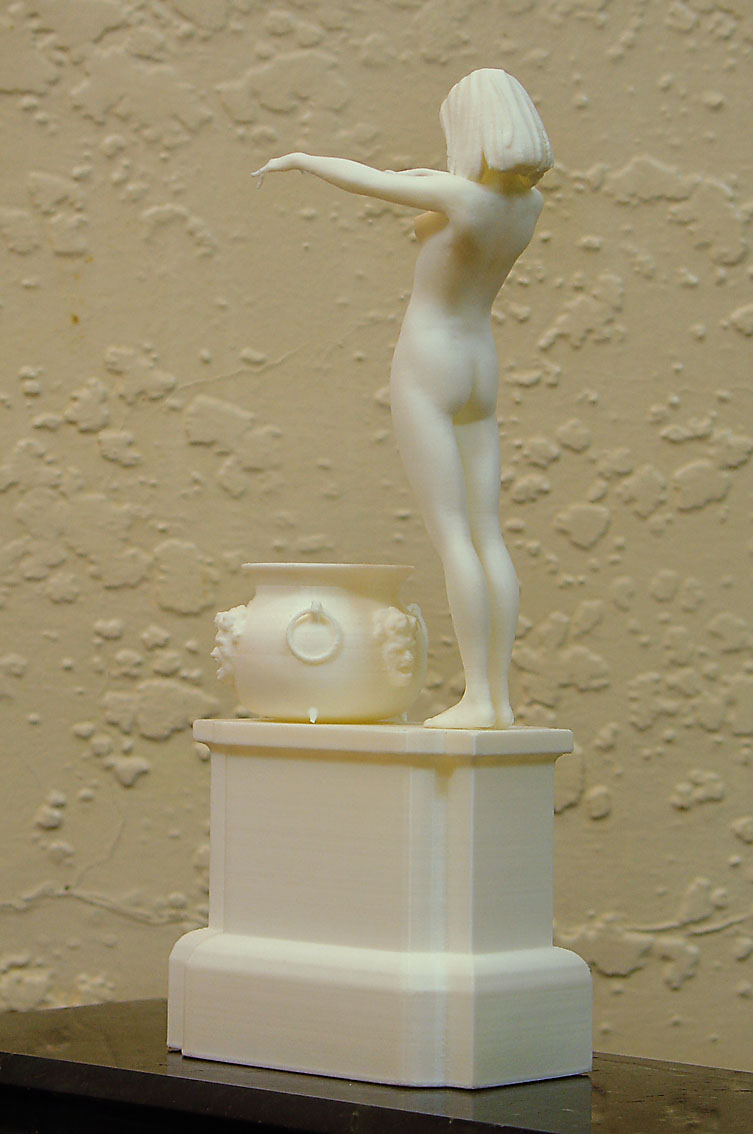
My latest sculptural piece...
It's printed in three parts - figure, urn/pot and plinth.
It's rare for me to feel that something I've designed/produced is good enough to make me happy, but I'm very happy with the way this piece has turned out!
It's printed in three parts - figure, urn/pot and plinth.
It's rare for me to feel that something I've designed/produced is good enough to make me happy, but I'm very happy with the way this piece has turned out!
|
Re: Best print i have ever done April 17, 2014 02:13AM |
Registered: 10 years ago Posts: 1,381 |
|
Re: Best print i have ever done April 18, 2014 02:06AM |
Registered: 10 years ago Posts: 12 |
Thanks A2!
I have to say the whole thing was very challenging to print!
It was fun; if frustrating at times, to create and satisfying to see being made by the printer even if there were moments where I had my fingers and toes crossed as the extruder got closer and closer to that last 1% of each piece!
My 3D printer is a MBI Replicator2, running pretty much standard stuff apart from a custom glass build plate and the updated/upgraded extruder. I also added a 'lubricating' solution that coated the filament as it left the filament roll with a very, very minute amount of canola oil.
The print was done with the 'sorceress' in the standing position at maximum build size. I used Autodesk Meshmixer to remove any errors in my 3D model by using the "Make Solid" command; then selected "Print", then "Support Structure" and once Meshmixer had added it's supports, I added some reinforcing supports myself that would prevent any of Meshmixer's supports from being 'knocked' over by the extruder when it makes rapid moves... Once that was done, I selected "Send to Makerware" (Makerware MBI's printer app that Meshmixer identifies if you have a MBI printer installed!) and checked scale/orientation was correct, the model was centred on the build platform. Then it's just a simple matter to select the print options - in this case I dropped the default extrusion temp from 230C to 210C and added a 'raft' to give Meshmixer's supports a bit more 'bite' on the build platform. (My build platform is covered BTW in the tape used by automotive resprayers, then a thin film of Uhu magic stik glue over that and finally a thinnish spray of 'extra hold' hairspray!! All done to prevent warping of the build.) The 'fineness' setting was 'medium' - so effectively 0.2mm per layer, 10% infill with 2 layers for the shell.
The estimated build time Makerware calculated was 4.5hrs; which turned out to be really accurate. (The vat in front of her took 2.5hrs and the plinth 7hrs. All were done using the settings and procedure I've outlined)
I then exported/saved to file (in this case *.x3g in a hard drive folder created for only *.x3g's), before transferring the resultant file/s to an SD card, which the prints were made from via the printer's SD card slot.
The reason I've changed to Meshmixer rather than Netfabb or some of the other solutions I used previously, is the model files that result from "Make Solid" ARE "rock" solid... Sometimes a few odd things could still slip through the sieve of the other 'error correcting' software solutions. Not only that but Meshmixer has modelling features of it's own - and best of all "It's FREE!!"
And last but no means least; Meshmixer's supports are a lot easier to remove than MBI's own Makerware supports are!!
That's how the amazingly delicate fingers survived the removal of the support process in such pristine condition!! Even I am amazed at how well those fingers came out! They've even stood up to subsequent sanding with a medium/fine grit sandpaper after some light Dremel removal of any unevenness left behind by Meshmixer's supports.
Even more surprising was how well the vat she's casting her spell over came out, with the detail of the ring handles passing through their positioning lugs caught to a tee!!
I hope I've covered all you wished to know...
P.S. It occurred to me to mention that the more of this 3D printing stuff that I do, the more apparent it is that there's more to getting fine detail out of 3D printers other than the specs of their finest printing resolution - much like digital photographersvideographers know that mere pixel count doesn't always guarantee a great digital image with lots of detail. I have only printed a few items at the 0.1mm "finest" quality setting the Rep2 can achieve - though I do believe it's possible to get even more... like 0.05 by customizing a print profile; but you have to weigh the detail you believe you'll get against what you actually get and the amazing amount of extra time your printer will spend in attmpting to get it!! i.e. halve the layer height and you double - at least; the print time... and you may still end up needing to 'work' on the item once it's finished. Just some food for thought.
Cheers and Happy Printing!!!
|
Re: Best print i have ever done April 18, 2014 02:29AM |
Registered: 10 years ago Posts: 1,381 |
Tks for the background details, very interesting how you processed the data file.
Q.
Was it because you were working with a surface model that you process your model in Autodesk Meshmixer.
What hot end were you using. If it's a stock MBI Replicator2 hot end, got a pic that I can review.
After watching a video of melting Nylon in mineral oil, and seeing that the Nylon still adhered to it's self while immersed in a vat of mineral oil, I've wondered if mineral oil would be superior to the plant based ones.
What do you think, care to test it.
Testing the melting point of Shapeways WSF
[www.youtube.com]
|
Re: Best print i have ever done April 25, 2014 01:35AM |
Registered: 10 years ago Posts: 14 |
Sorry, only registered users may post in this forum.