Ramps 1.4 macht schwierigkeiten
geschrieben von mrc
|
Ramps 1.4 macht schwierigkeiten 05. February 2013 20:28 |
Registrierungsdatum: 11 Jahre zuvor Beiträge: 118 |
Hey,
das ist mein erster Post hier und gleich bräuchte ich eure Hilfe
Ich baue gerade einen 3D Drucker auf Mendelmax Basis mit Ramps 1.4 Elektronik.
Bin aber nicht ganz neu dabei da ich schon einen Printrbot mein eigen nenne...
Das Board läuft ganz gut(Als Firmware setze ich die letzte Sprinter version ein) allerdings habe ich ein paar Probleme
1. Die Abfrage in Pronterface mit m501 gibt keine Rückmeldung
2. E lässt sich nicht Kalibrieren, habe g-codes von 20-300 getestet, er Extrudiert
eigentlich immer um die 60-80mm statt den geforderten 20. Da ich über m501 die
spm nicht Abfragen kann weis ich natürlich auch nicht ob es gespeichert wurde.
Bei allen anderen Achsen hats aber wunderbar geklappt.
3. Die Extruder Temparatur schwankt immer so um 10°, wie als gäbe es nur heater an oder aus
(Ich benutze einen Heizwiederstand) Der Lüfter hängt mit am Heater, ich weiss nicht ob
das vlt. ein Problem ist.
hier die Configuration H:
Wäre toll wenn jemand wüsste wo der Haken liegt!
1-mal bearbeitet. Zuletzt am 05.02.13 20:31.
das ist mein erster Post hier und gleich bräuchte ich eure Hilfe
Ich baue gerade einen 3D Drucker auf Mendelmax Basis mit Ramps 1.4 Elektronik.
Bin aber nicht ganz neu dabei da ich schon einen Printrbot mein eigen nenne...
Das Board läuft ganz gut(Als Firmware setze ich die letzte Sprinter version ein) allerdings habe ich ein paar Probleme
1. Die Abfrage in Pronterface mit m501 gibt keine Rückmeldung
2. E lässt sich nicht Kalibrieren, habe g-codes von 20-300 getestet, er Extrudiert
eigentlich immer um die 60-80mm statt den geforderten 20. Da ich über m501 die
spm nicht Abfragen kann weis ich natürlich auch nicht ob es gespeichert wurde.
Bei allen anderen Achsen hats aber wunderbar geklappt.
3. Die Extruder Temparatur schwankt immer so um 10°, wie als gäbe es nur heater an oder aus
(Ich benutze einen Heizwiederstand) Der Lüfter hängt mit am Heater, ich weiss nicht ob
das vlt. ein Problem ist.
hier die Configuration H:
#ifndef CONFIGURATION_H
#define CONFIGURATION_H
// BASIC SETTINGS: select your board type, thermistor type, axis scaling, and endstop configuration
//// The following define selects which electronics board you have. Please choose the one that matches your setup
// MEGA/RAMPS up to 1.2  = 3,
// RAMPS 1.3/1.4 = 33
// Gen6 = 5,
// Gen6 deluxe = 51
// Sanguinololu up to 1.1 = 6
// Sanguinololu 1.2 and above = 62
// Gen 7 @ 16MHZ only= 7
// Gen 7 @ 20MHZ only= 71
// Teensylu (at90usb) = 8
// Printrboard Rev. B (ATMEGA90USB1286) = 9
// Gen 3 Plus = 21
// gen 3  Monolithic Electronics = 22
// Gen3 PLUS for TechZone Gen3 Remix Motherboard = 23
#define MOTHERBOARD 33
//// Thermistor settings:
// 1 is 100k thermistor
// 2 is 200k thermistor
// 3 is mendel-parts thermistor
// 4 is 10k thermistor
// 5 is ParCan supplied 104GT-2 100K
// 6 is EPCOS 100k
// 7 is 100k Honeywell thermistor 135-104LAG-J01
#define THERMISTORHEATER 1
#define THERMISTORBED 1
//// Calibration variables
// X, Y, Z, E steps per unit - Metric Prusa Mendel with Wade extruder:
#define _AXIS_STEP_PER_UNIT {80, 80, 3200/1.25,700}
// Metric Prusa Mendel with Makergear geared stepper extruder:
//#define _AXIS_STEP_PER_UNIT {80,80,3200/1.25,1380}
// MakerGear Hybrid Prusa Mendel:
// Z axis value is for .9 stepper(if you have 1.8 steppers for Z, you need to use 2272.7272)
//#define _AXIS_STEP_PER_UNIT {104.987, 104.987, 4545.4544, 1487}
//// Endstop Settings
#define ENDSTOPPULLUPS // Comment this out (using // at the start of the line) to disable the endstop pullup resistors
// The pullups are needed if you directly connect a mechanical endswitch between the signal and ground pins.
//If your axes are only moving in one direction, make sure the endstops are connected properly.
//If your axes move in one direction ONLY when the endstops are triggered, set [XYZ]_ENDSTOP_INVERT to true here:
const bool X_ENDSTOP_INVERT = true;
const bool Y_ENDSTOP_INVERT = true;
const bool Z_ENDSTOP_INVERT = true;
// This determines the communication speed of the printer
//#define BAUDRATE 115200
#define BAUDRATE 250000
// Comment out (using // at the start of the line) to disable SD support:
#define SDSUPPORT
// Uncomment to make run init.g from SD on boot
//#define SDINITFILE
//Only work with Atmega1284 you need +1 kb ram
//#define SD_FAST_XFER_AKTIV
//-----------------------------------------------------------------------
//// STORE SETTINGS TO EEPROM
//-----------------------------------------------------------------------
// the microcontroller can store settings in the EEPROM
// M500 - stores paramters in EEPROM
// M501 - reads parameters from EEPROM (if you need reset them after you changed them temporarily).
// M502 - reverts to the default "factory settings". You still need to store them in EEPROM afterwards if you want to.
// M503 - Print settings
// define this to enable eeprom support
//#define USE_EEPROM_SETTINGS
// to disable EEPROM Serial responses and decrease program space by ~1000 byte: comment this out:
// please keep turned on if you can.
//#define PRINT_EEPROM_SETTING
//-----------------------------------------------------------------------
//// ARC Function (G2/G3 Command)
//-----------------------------------------------------------------------
//Uncomment to aktivate the arc (circle) function (G2/G3 Command)
//Without SD function an ARC function the used Flash is smaller 31 kb
#define USE_ARC_FUNCTION
//-----------------------------------------------------------------------
//// ADVANCED SETTINGS - to tweak parameters
//-----------------------------------------------------------------------
#ifdef SDSUPPORT
        #ifdef SD_FAST_XFER_AKTIV
                //Fast transfer chunk size (> 1024 is unstable, change at your own risk).
                #define SD_FAST_XFER_CHUNK_SIZE 1024
        #endif
#endif
//-----------------------------------------------------------------------
// For Inverting Stepper Enable Pins (Active Low) use 0, Non Inverting (Active High) use 1
//-----------------------------------------------------------------------
#define X_ENABLE_ON 0
#define Y_ENABLE_ON 0
#define Z_ENABLE_ON 0
#define E_ENABLE_ON 0
//Uncomment if you have problems with a stepper driver enabeling too late, this will also set how many microseconds delay there will be after enabeling the driver
//#define DELAY_ENABLE 15
//-----------------------------------------------------------------------
// Disables axis when it's not being used.
//-----------------------------------------------------------------------
const bool DISABLE_X = false;
const bool DISABLE_Y = false;
const bool DISABLE_Z = true;
const bool DISABLE_E = false;
//-----------------------------------------------------------------------
// Inverting axis direction
//-----------------------------------------------------------------------
const bool INVERT_X_DIR = false;
const bool INVERT_Y_DIR = false;
const bool INVERT_Z_DIR = true;
const bool INVERT_E_DIR = false;
//-----------------------------------------------------------------------
//// ENDSTOP SETTINGS:
//-----------------------------------------------------------------------
// Sets direction of endstops when homing; 1=MAX, -1=MIN
#define X_HOME_DIR -1
#define Y_HOME_DIR -1
#define Z_HOME_DIR -1
//#define ENDSTOPS_ONLY_FOR_HOMING // If defined the endstops will only be used for homing
const bool min_software_endstops = false; //If true, axis won't move to coordinates less than zero.
const bool max_software_endstops = true; //If true, axis won't move to coordinates greater than the defined lengths below.
//-----------------------------------------------------------------------
//Max Length for Prusa Mendel, check the ways of your axis and set this Values
//-----------------------------------------------------------------------
const int X_MAX_LENGTH = 200;
const int Y_MAX_LENGTH = 200;
const int Z_MAX_LENGTH = 100;
//-----------------------------------------------------------------------
//// MOVEMENT SETTINGS
//-----------------------------------------------------------------------
const int NUM_AXIS = 4; // The axis order in all axis related arrays is X, Y, Z, E
#define _MAX_FEEDRATE {400, 400, 2, 45}       // (mm/sec)
#define _HOMING_FEEDRATE {1500,1500,120}      // (mm/min) !!
#define _AXIS_RELATIVE_MODES {false, false, false, false}
#define MAX_STEP_FREQUENCY 30000 // Max step frequency
//For the retract (negative Extruder) move this maxiumum Limit of Feedrate is used
//The next positive Extruder move use also this Limit,
//then for the next (second after retract) move the original Maximum (_MAX_FEEDRATE) Limit is used
#define MAX_RETRACT_FEEDRATE 100    //mm/sec
//-----------------------------------------------------------------------
//// Not used at the Moment
//-----------------------------------------------------------------------
// Min step delay in microseconds. If you are experiencing missing steps, try to raise the delay microseconds, but be aware this
// If you enable this, make sure STEP_DELAY_RATIO is disabled.
//#define STEP_DELAY_MICROS 1
// Step delay over interval ratio. If you are still experiencing missing steps, try to uncomment the following line, but be aware this
// If you enable this, make sure STEP_DELAY_MICROS is disabled. (except for Gen6: both need to be enabled.)
//#define STEP_DELAY_RATIO 0.25
///Oscillation reduction.  Forces x,y,or z axis to be stationary for ## ms before allowing axis to switch direcitons.  Alternative method to prevent skipping steps.  Uncomment the line below to activate.
// At this Version with Planner this Function ist not used
//#define RAPID_OSCILLATION_REDUCTION
#ifdef RAPID_OSCILLATION_REDUCTION
const long min_time_before_dir_change = 30; //milliseconds
#endif
//-----------------------------------------------------------------------
//// Acceleration settings
//-----------------------------------------------------------------------
// X, Y, Z, E maximum start speed for accelerated moves. E default values are good for skeinforge 40+, for older versions raise them a lot.
#define _ACCELERATION 1000         // Axis Normal acceleration mm/s^2
#define _RETRACT_ACCELERATION 2000 // Extruder Normal acceleration mm/s^2
#define _MAX_XY_JERK 20.0
#define _MAX_Z_JERK 0.4
#define _MAX_E_JERK 5.0    // (mm/sec)
//#define _MAX_START_SPEED_UNITS_PER_SECOND {25.0,25.0,0.2,10.0}
#define _MAX_ACCELERATION_UNITS_PER_SQ_SECOND {5000,5000,50,5000}    // X, Y, Z and E max acceleration in mm/s^2 for printing moves or retracts
// Minimum planner junction speed. Sets the default minimum speed the planner plans for at the end
// of the buffer and all stops. This should not be much greater than zero and should only be changed
// if unwanted behavior is observed on a user's machine when running at very slow speeds.
#define MINIMUM_PLANNER_SPEED 0.05 // (mm/sec)
#define DEFAULT_MINIMUMFEEDRATE       0.0     // minimum feedrate
#define DEFAULT_MINTRAVELFEEDRATE     0.0
#define _MIN_SEG_TIME 20000
// If defined the movements slow down when the look ahead buffer is only half full
#define SLOWDOWN
const int dropsegments=5; //everything with less than this number of steps will be ignored as move and joined with the next movement
//-----------------------------------------------------------------------
// Machine UUID
//-----------------------------------------------------------------------
// This may be useful if you have multiple machines and wish to identify them by using the M115 command.
// By default we set it to zeros.
#define _DEF_CHAR_UUID "00000000-0000-0000-0000-000000000000"
//-----------------------------------------------------------------------
//// Planner buffer Size
//-----------------------------------------------------------------------
// The number of linear motions that can be in the plan at any give time
// if the SD Card need to much memory reduce the Values for Plannerpuffer (base of 2)
#ifdef SDSUPPORT
  #define BLOCK_BUFFER_SIZE 16
  #define BLOCK_BUFFER_MASK 0x0f
#else
  #define BLOCK_BUFFER_SIZE 16
  #define BLOCK_BUFFER_MASK 0x0f
#endif
//-----------------------------------------------------------------------
//// SETTINGS FOR ARC FUNCTION (Command G2/G2)
//-----------------------------------------------------------------------
// Arc interpretation settings:
//Step to split a cirrcle in small Lines
#define MM_PER_ARC_SEGMENT 1
//After this count of steps a new SIN / COS caluclation is startet to correct the circle interpolation
#define N_ARC_CORRECTION 25
//-----------------------------------------------------------------------
//// FANCONTROL WITH SOFT PWM
//-----------------------------------------------------------------------
//With this option its possible to drive the fan with SOFT PWM (500hz) and use
//every Digital output for it, main usage for Sanguinololu
#define FAN_SOFT_PWM
//-----------------------------------------------------------------------
//// MINIMUM START SPEED FOR FAN
//-----------------------------------------------------------------------
//Minimum start speed for FAN when the last speed was zero
//Set to 0 to deaktivate
//If value is set the fan will drive with this minimum speed for MINIMUM_FAN_START_TIME
#define MINIMUM_FAN_START_SPEED  0
//This is the time how long the minimum FAN speed is set
#define MINIMUM_FAN_START_TIME  6000    //6sec
//-----------------------------------------------------------------------
//// HEATERCONTROL AND PID PARAMETERS
//-----------------------------------------------------------------------
//Testfunction to adjust the Hotend temperatur in case of Printingspeed
//If the Printer print slow the Temp is going to AUTO_TEMP_MIN
//At the moment this Value dont change the targettemp from the Hotend
//The result of this function is only send with the Temperaturerequest to the host
//#define AUTOTEMP
#ifdef AUTOTEMP
    #define AUTO_TEMP_MAX 240
    #define AUTO_TEMP_MIN 205
    #define AUTO_TEMP_FACTOR 0.025
    #define AUTOTEMP_OLDWEIGHT 0.98
#endif
//// AD595 THERMOCOUPLE SUPPORT UNTESTED... USE WITH CAUTION!!!!
//// PID settings:
// Uncomment the following line to enable PID support. This is untested and could be disastrous. Be careful.
#define PIDTEMP 1
#ifdef PIDTEMP
//Sanguinololu 1.2 and above, the PWM Output Hotend Timer 1 is used for the Hardware PWM
//but in this Software use Timer1 for the Stepperfunction so it is not possible to use the "analogWrite" function.
//This Soft PWM use Timer 2 with 400 Hz to drive the PWM for the hotend
#define PID_SOFT_PWM
//Measure the MIN/MAX Value of the Hotend Temp and show it with
//Command M601 / Command M602 Reset the MIN/MAX Value
//#define DEBUG_HEATER_TEMP
// M303 - PID relay autotune S sets the target temperature.
// (default target temperature = 150C)
#define PID_AUTOTUNE
//PID Controler Settings
#define PID_INTEGRAL_DRIVE_MAX 80 // too big, and heater will lag after changing temperature, too small and it might not compensate enough for long-term errors
#define PID_PGAIN 2560 //256 is 1.0  // value of X means that error of 1 degree is changing PWM duty by X, probably no need to go over 25
#define PID_IGAIN 64 //256 is 1.0  // value of X (e.g 0.25) means that each degree error over 1 sec (2 measurements) changes duty cycle by 2X (=0.5) units (verify?)
#define PID_DGAIN 4096 //256 is 1.0  // value of X means that around reached setpoint, each degree change over one measurement (half second) adjusts PWM by X units to compensate
// magic formula 1, to get approximate "zero error" PWM duty. Take few measurements with low PWM duty and make linear fit to get the formula
// for my makergear hot-end: linear fit {50,10},{60,20},{80,30},{105,50},{176,100},{128,64},{208,128}
#define HEATER_DUTY_FOR_SETPOINT(setpoint) ((int)((187L*(long)setpoint)>>8)-27)
// magic formula 2, to make led brightness approximately linear
#define LED_PWM_FOR_BRIGHTNESS(brightness) ((64*brightness-1384)/(300-brightness))
#endif
// Change this value (range 30-255) to limit the current to the nozzle
#define HEATER_CURRENT 255
// How often should the heater check for new temp readings, in milliseconds
#define HEATER_CHECK_INTERVAL 500
#define BED_CHECK_INTERVAL 5000
// Comment the following line to enable heat management during acceleration
#define DISABLE_CHECK_DURING_ACC
#ifndef DISABLE_CHECK_DURING_ACC
  // Uncomment the following line to disable heat management during moves
  //#define DISABLE_CHECK_DURING_MOVE
#endif
// Uncomment the following line to disable heat management during travel moves (and extruder-only moves, eg: retracts), strongly recommended if you are missing steps mid print.
// Probably this should remain commented if are using PID.
// It also defines the max milliseconds interval after which a travel move is not considered so for the sake of this feature.
#define DISABLE_CHECK_DURING_TRAVEL 1000
//// Temperature smoothing - only uncomment this if your temp readings are noisy (Gen6 without EvdZ's 5V hack)
//#define SMOOTHING
//#define SMOOTHFACTOR 16 //best to use a power of two here - determines how many values are averaged together by the smoothing algorithm
//// Experimental watchdog and minimal temp
// The watchdog waits for the watchperiod in milliseconds whenever an M104 or M109 increases the target temperature
// If the temperature has not increased at the end of that period, the target temperature is set to zero. It can be reset with another M104/M109
//#define WATCHPERIOD 5000 //5 seconds
// Actual temperature must be close to target for this long before M109 returns success
//#define TEMP_RESIDENCY_TIME 20  // (seconds)
//#define TEMP_HYSTERESIS 5       // (C°) range of +/- temperatures considered "close" to the target one
//// The minimal temperature defines the temperature below which the heater will not be enabled
#define MINTEMP 5
//// Experimental max temp
// When temperature exceeds max temp, your heater will be switched off.
// This feature exists to protect your hotend from overheating accidentally, but *NOT* from thermistor short/failure!
// You should use MINTEMP for thermistor short/failure protection.
#define MAXTEMP 275
// Select one of these only to define how the nozzle temp is read.
#define HEATER_USES_THERMISTOR
//#define HEATER_USES_AD595
//#define HEATER_USES_MAX6675
// Select one of these only to define how the bed temp is read.
#define BED_USES_THERMISTOR
//#define BED_USES_AD595
//This is for controlling a fan to cool down the stepper drivers
//it will turn on when any driver is enabled
//and turn off after the set amount of seconds from last driver being disabled again
//#define CONTROLLERFAN_PIN 23 //Pin used for the fan to cool controller, comment out to disable this function
#define CONTROLLERFAN_SEC 60 //How many seconds, after all motors were disabled, the fan should run
//This is for controlling a fan that will keep the extruder cool.
//#define EXTRUDERFAN_PIN 66 //Pin used to control the fan, comment out to disable this function
#define EXTRUDERFAN_DEC 50 //Hotend temperature from where the fan will be turned on
//#define CHAIN_OF_COMMAND 1 //Finish buffered moves before executing M42, fan speed, heater target, and so...
//-----------------------------------------------------------------------
// DEBUGING
//-----------------------------------------------------------------------
//Uncomment this to see on the host if a wrong or unknown Command is recived
//Only for Testing !!!
//#define SEND_WRONG_CMD_INFO
// Uncomment the following line to enable debugging. You can better control debugging below the following line
//#define DEBUG
#ifdef DEBUG
  //#define DEBUG_PREPARE_MOVE //Enable this to debug prepare_move() function
  //#define DEBUG_MOVE_TIME //Enable this to time each move and print the result
  //#define DEBUG_HEAT_MGMT //Enable this to debug heat management. WARNING, this will cause axes to jitter!
  //#define DEBUG_DISABLE_CHECK_DURING_TRAVEL //Debug the namesake feature, see above in this file
#endif
#endif
Wäre toll wenn jemand wüsste wo der Haken liegt!
1-mal bearbeitet. Zuletzt am 05.02.13 20:31.
|
Re: Ramps 1.4 macht schwierigkeiten 06. February 2013 08:17 |
Registrierungsdatum: 11 Jahre zuvor Beiträge: 118 |
|
Re: Ramps 1.4 macht schwierigkeiten 11. February 2013 19:21 |
Registrierungsdatum: 11 Jahre zuvor Beiträge: 118 |
|
Re: Ramps 1.4 macht schwierigkeiten 12. February 2013 05:39 |
Registrierungsdatum: 11 Jahre zuvor Beiträge: 258 |
|
Re: Ramps 1.4 macht schwierigkeiten 12. February 2013 07:23 |
Registrierungsdatum: 11 Jahre zuvor Beiträge: 118 |
Ich habe den qu-bd Extruder der einen Kühler an der Kältebrücke hat (ähnlich wie Makerbot)
Den lasse ich momentan noch über den Heateranschluss mit Strom versorgen.
(Ist allerdings nicht das Problem, habs ohne getestet - die Schwankungen sind genauso hoch)
Ich benutze diese Heizpatrone [fabber-parts.de]
zusammen mit einem 100k Thermistor.
Den lasse ich momentan noch über den Heateranschluss mit Strom versorgen.
(Ist allerdings nicht das Problem, habs ohne getestet - die Schwankungen sind genauso hoch)
Ich benutze diese Heizpatrone [fabber-parts.de]
zusammen mit einem 100k Thermistor.
|
Re: Ramps 1.4 macht schwierigkeiten 12. February 2013 10:24 |
Registrierungsdatum: 11 Jahre zuvor Beiträge: 258 |
|
Re: Ramps 1.4 macht schwierigkeiten 12. February 2013 20:32 |
Registrierungsdatum: 11 Jahre zuvor Beiträge: 118 |
Die Schwankungen sind immer gleich.
Bei 200° Zieltemperatur schaltet der Heater
ab 190° aus, die Temperatur steigt dann bis auf 210°.
Anschließend springt der Heater erst wieder
an wenn die Temperatur auf 190° gefallen ist und
heizt dann so lange bis er eben wieder 210° erreicht hat.
Das ganze geht ständig hin und her wie bei einer Parabel, beim Drucken ist er
etwas Stabiler aber lange nicht genug (+/- 7°) trotz Keramikisolierung.
Ich hab hier und da was von PID gelesen aber nirgends ne Formel
oder näheres dazu gefunden...
Ein weiteres Rätsel hat sich mit der X-Achse aufgetan,
aus irgendeinem Grund sind gedruckte Objekte gespiegelt.
In Pronterface fährt er aber richtig sowohl beim Fahren als auch
beim Homen.
2-mal bearbeitet. Zuletzt am 12.02.13 20:34.
|
Re: Ramps 1.4 macht schwierigkeiten 13. February 2013 06:21 |
Registrierungsdatum: 11 Jahre zuvor Beiträge: 258 |
Achso, jetzt hab ich es endlich auch kapiert. Das Problem ist eigentlich, dass der Thermistor viel zu träge ist und die Heizung quasi überschwingt.
Was hast du denn für ein Hotend? Möchtest du mal einen Screenshot vom Temperaturverlauf machen?
Das Problem mit der X-Achse lässt sich evtl. wie folgt lösen:
Wenn der Endstop bei dir rechts ist:
const bool INVERT_X_DIR = true;
#define X_HOME_DIR 1
Wenn er links ist, wäre was komisch.
Und immer aufpassen, dass die Hand am Notaus ist
|
Re: Ramps 1.4 macht schwierigkeiten 13. February 2013 09:08 |
Registrierungsdatum: 11 Jahre zuvor Beiträge: 118 |
Der Endstop hängt am Extruder und ist damit quasi links...
Allerdings ist der Endstop von Y vorne ich weiß nicht ob das so üblich ist...
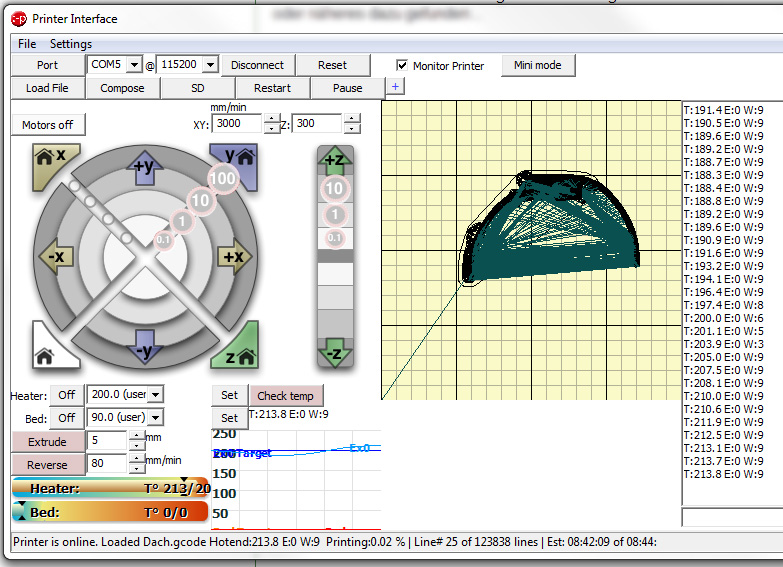
Ich hab mal ein Bild vom Aufbau des Printers und vom Temperaturverlauf angehängt.
Allerdings ist der Endstop von Y vorne ich weiß nicht ob das so üblich ist...
Ich hab mal ein Bild vom Aufbau des Printers und vom Temperaturverlauf angehängt.
|
Re: Ramps 1.4 macht schwierigkeiten 15. February 2013 12:18 |
Registrierungsdatum: 11 Jahre zuvor Beiträge: 118 |
Ich hab die temps jetzt unter Kontrolle.
in der configuration h war der PID_MAX Wert zu hoch eingestellt (256),
nachdem ich den reduziert hab konnte ich mit M303 150 in der lage
das Autotune script zu starten. Anschließend noch die Kp Ki und Kd werte übertragen
und schon hats geklappt.
Die Temperaturen sind jetzt auf +/-2° Stabil so wie es sein soll.
Er braucht jetzt aber deutlich länger bis er die Zieltemperatur erreicht hat,
aber das bekom ich noch hin.
In diesem Forum dürfen leider nur registrierte Teilnehmer schreiben.