Calibration Help
Posted by jeffff
|
Calibration Help May 16, 2013 01:37PM |
Registered: 10 years ago Posts: 12 |
I've just completed my first print. I'm pretty happy that it wasn't a total disaster and that nothing broke! But improvement is needed.
I leveled the bed using a 10mm allen key. There was a small amount of variance, so now I can print, my plan to to product one of the gauge dial clamps to mount in place of the extruder and do a really good bed levelling job. I am right in thinking that this clamp isn't included in the kit? I'm hoping my current quality of printing will be good enough to produce the clamp!
I measured the extruder speed. Coincidentally, extruding 100mm moved the fillament 100mm - so no change was made to the firmware.
The z home point (using the 10mm allen key as a measure) needed to be reduced by 0.9mm. It really did look like it was right on the glass. Is this the correct position? It looks like from my print that the print head was dragging a tiny bit as the plastic outline was smudged, which instinctively tells me it should be a smidgen higher.
Incidentally, this outline, especially the smudged bits was really tricky to remove. I had to get a bit of plastic and really scrape it from the glass bed. Is this normal?
There are various wiggles and non-uniform parts that can be seen in the Android print. I'm not sure if its possible by sight, but can any experts suggest what might be the cause of it?
Thanks!
|
Re: Calibration Help May 16, 2013 06:29PM |
Admin Registered: 17 years ago Posts: 7,879 |
jeffff Wrote:
-------------------------------------------------------
> I am right in
> thinking that this clamp isn't included in the
> kit? I'm hoping my current quality of printing
> will be good enough to produce the clamp!
Yes it isn't in the kit because dial gauges are not a standard size. Also you don't need one to get it level, it is just quicker and easier with one.
>
> The z home point (using the 10mm allen key as a
> measure) needed to be reduced by 0.9mm. It really
> did look like it was right on the glass. Is this
> the correct position? It looks like from my print
> that the print head was dragging a tiny bit as the
> plastic outline was smudged, which instinctively
> tells me it should be a smidgen higher.
Looks like you missed the second stage of the Z calibration, which is to measure how thick the outline loop is and correct it to be 0.3mm. It is needed because the hot ends expands about 0.25mm when hot.
>
> Incidentally, this outline, especially the smudged
> bits was really tricky to remove. I had to get a
> bit of plastic and really scrape it from the glass
> bed. Is this normal?
Yes it is with PLA. It sticks solid to glass but the object contracts when it cools so releases itself. The outline doesn't exert enough force when it contracts to break free.
>
> There are various wiggles and non-uniform parts
> that can be seen in the Android print. I'm not
> sure if its possible by sight, but can any experts
> suggest what might be the cause of it?
Not sure. Are you printing from the SD card or USB?
Can you measure the diameter of the plastic when extruded into free air. Looks like it might be coming out too small for 0.3 layers.
[www.hydraraptor.blogspot.com]
|
Re: Calibration Help May 17, 2013 12:15PM |
Registered: 10 years ago Posts: 12 |
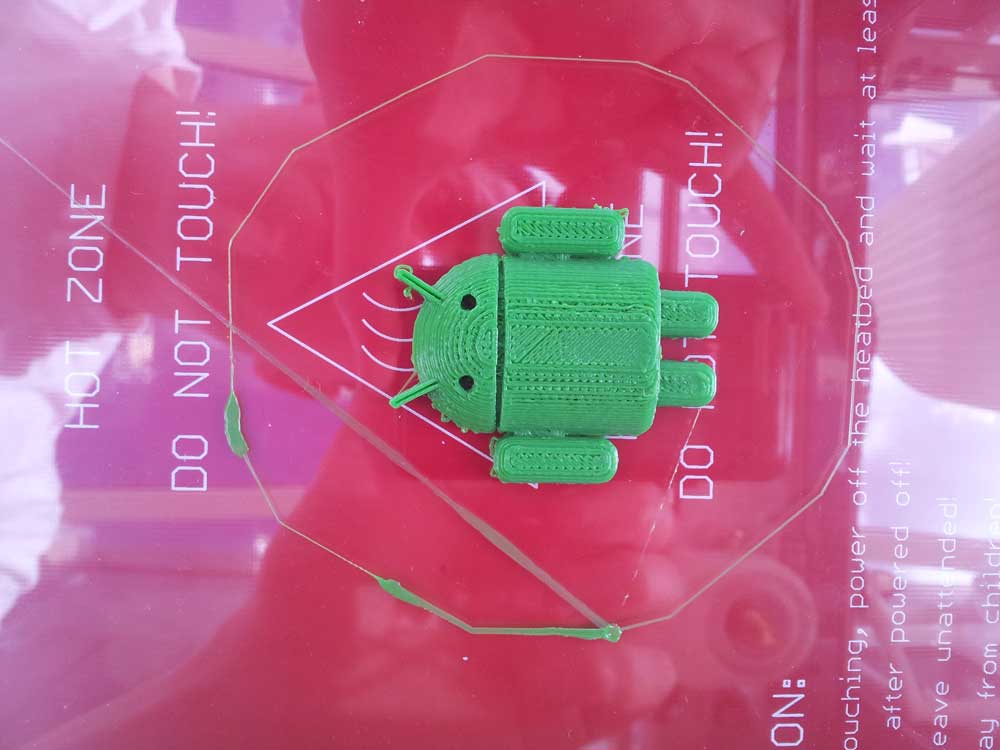
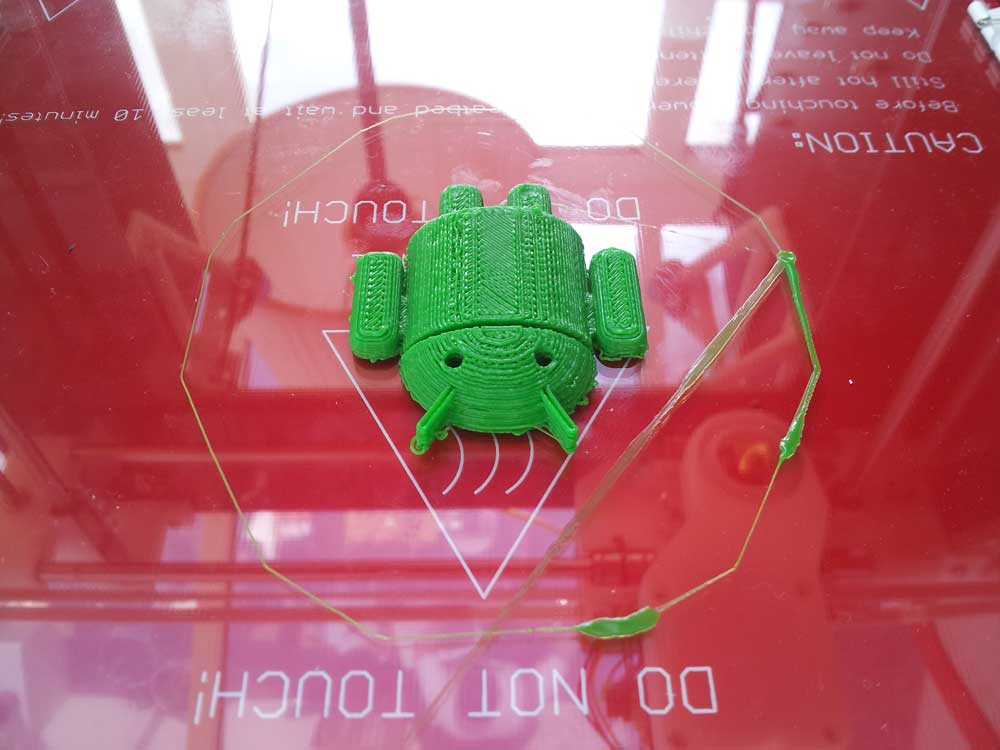
I printed the dial gauge clamp and used it to level my bed. There was less than 0.03mm difference between the back corners. This seemed to be as accurate as I could get it with a the smallest increment turn with the lead nuts. Similar across the front corners - but the middle of the glass seems higher by about 0.07mm.
After leveling the bed like this and re-editing the z_home_pos, I printed the Android bot again. Results were pretty ropey, but I measured the height of the outline layer. It was only 0.14mm, so I adjusted z_home_pos by 0.16 - the next print was considerably better, but there was still a bit of smudging with the outline. I'm guessing this isn't unusual, and that the outline serves partly to get a clear uniform flow from the nozzle after heating up?
There was still one significant problem with this second Android bot print - the outline for what looks to be the 4th layer up was totally wobbly. You can see in the picture attached that all but that layer seems to have printed pretty perfectly - but for some reason, that layer in particular went wobbly - seemingly for the entire layer. All the stringy material on the left foot and 'ear' area of the bot comes from that one layer.
The earlier prints are a little more difficult to see, but it looks like that specific layer also had a problem there.
All the prints I've made have been from SD card. I copy the file onto the card via the card reader, then insert it into the machine and start the print from pronterface. "Monitor Printer" is turned off. For the most recent print, I also disconnected after starting the print and unplugged the USB cable.
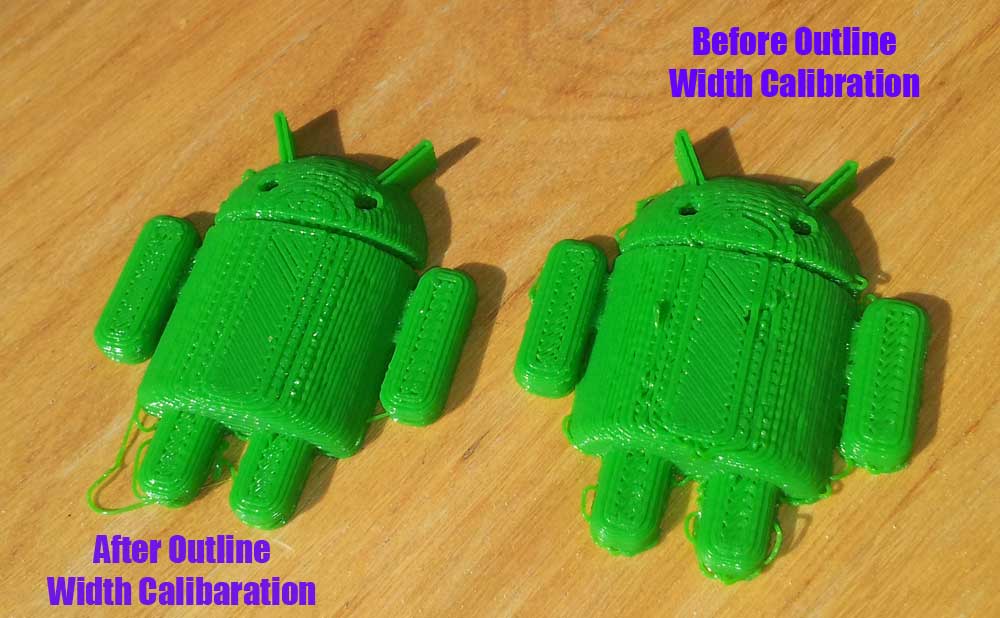
The width of extrusion into thin air averages around 0.41 (range 0.39-0.44 it seems).
b
Any ideas? Many thanks!
After leveling the bed like this and re-editing the z_home_pos, I printed the Android bot again. Results were pretty ropey, but I measured the height of the outline layer. It was only 0.14mm, so I adjusted z_home_pos by 0.16 - the next print was considerably better, but there was still a bit of smudging with the outline. I'm guessing this isn't unusual, and that the outline serves partly to get a clear uniform flow from the nozzle after heating up?
There was still one significant problem with this second Android bot print - the outline for what looks to be the 4th layer up was totally wobbly. You can see in the picture attached that all but that layer seems to have printed pretty perfectly - but for some reason, that layer in particular went wobbly - seemingly for the entire layer. All the stringy material on the left foot and 'ear' area of the bot comes from that one layer.
The earlier prints are a little more difficult to see, but it looks like that specific layer also had a problem there.
All the prints I've made have been from SD card. I copy the file onto the card via the card reader, then insert it into the machine and start the print from pronterface. "Monitor Printer" is turned off. For the most recent print, I also disconnected after starting the print and unplugged the USB cable.
The width of extrusion into thin air averages around 0.41 (range 0.39-0.44 it seems).
b
Any ideas? Many thanks!
|
Re: Calibration Help May 17, 2013 02:16PM |
Admin Registered: 17 years ago Posts: 7,879 |
jeffff Wrote:
-------------------------------------------------------
> I printed the dial gauge clamp and used it to
> level my bed. There was less than 0.03mm
> difference between the back corners. This seemed
> to be as accurate as I could get it with a the
> smallest increment turn with the lead nuts.
> Similar across the front corners - but the middle
> of the glass seems higher by about 0.07mm.
I think one click is four full steps, which is 1/50th of a revolution i.e. 0.025mm at the motor. At the bed it would be somewhat less.
Odd the middle seems higher. Other people have reported it seems lower due to the dial gauge spring bending the bed.
>
> After leveling the bed like this and re-editing
> the z_home_pos, I printed the Android bot again.
> Results were pretty ropey, but I measured the
> height of the outline layer. It was only 0.14mm,
> so I adjusted z_home_pos by 0.16 - the next print
> was considerably better, but there was still a bit
> of smudging with the outline. I'm guessing this
> isn't unusual, and that the outline serves partly
> to get a clear uniform flow from the nozzle after
> heating up?
Yes the skirt is messy, particularly with PLA. It seems difficult to get an initial smooth flow after the extruder has heated. The PLA seems to liquefy a lot more when it is sitting in the extruder than it does at normal extrusion speed.
>
> There was still one significant problem with this
> second Android bot print - the outline for what
> looks to be the 4th layer up was totally wobbly.
> You can see in the picture attached that all but
> that layer seems to have printed pretty perfectly
> - but for some reason, that layer in particular
> went wobbly - seemingly for the entire layer. All
> the stringy material on the left foot and 'ear'
> area of the bot comes from that one layer.
>
> The earlier prints are a little more difficult to
> see, but it looks like that specific layer also
> had a problem there.
>
> All the prints I've made have been from SD card. I
> copy the file onto the card via the card reader,
> then insert it into the machine and start the
> print from pronterface. "Monitor Printer" is
> turned off. For the most recent print, I also
> disconnected after starting the print and
> unplugged the USB cable.
>
> The width of extrusion into thin air averages
> around 0.41 (range 0.39-0.44 it seems).
> b
> Any ideas? Many thanks!
0.41 is right on the limit for 0.3 layers. Maybe the extruder bore is a bit smaller than usual. Try re-slicing in skeinforge with 0.25 layer height, everything else the same. That will pull the filament a bit tighter.
[www.hydraraptor.blogspot.com]
|
Re: Calibration Help May 17, 2013 03:39PM |
Registered: 10 years ago Posts: 12 |
How do I see the settings that were used to slice the android STL file that produced the supplied gcode file?
I just used the skeinforge from the memory stick to try slicing the STL file. Under "carve" I selected 0.25 as the layer height I didn't change anything else.
When I come to print the .G file, the Mendel90 moves really slowly. Like 1/10th, or even 1/50th the speed I saw when I printed the file you made. I'm guessing somewhere I've got to adjust the speed. Whatever the actual settings (including speed) used for the supplied .G file would presumably be a good place to start future slicings.
I had this problem when trying to slice the depth gauge clamp and so ended up doing it in slic3r.
Thanks
|
Re: Calibration Help May 17, 2013 03:57PM |
Admin Registered: 17 years ago Posts: 7,879 |
Follow the instructions in the manual to copy the settings off the SD card. Don't change the profile from ABS and you get exactly what made the android gcode.
[www.hydraraptor.blogspot.com]
[www.hydraraptor.blogspot.com]
|
Re: Calibration Help May 17, 2013 04:25PM |
Registered: 10 years ago Posts: 12 |
Sorry, only registered users may post in this forum.