My smartrap build and easy Z offset adjustment
Posted by MelT
|
My smartrap build and easy Z offset adjustment June 01, 2014 01:57AM |
Registered: 9 years ago Posts: 80 |
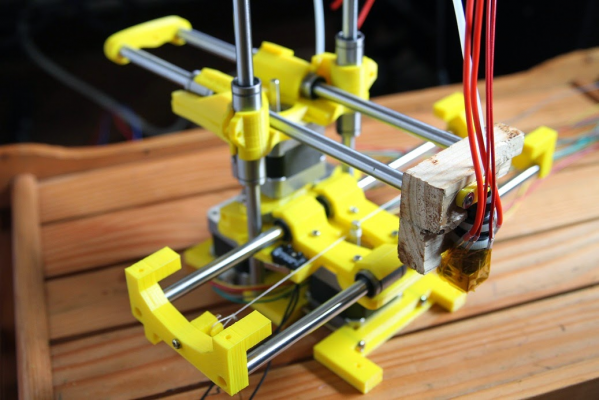
Wow! Why haven't I seen this forum before? I could have gotten help and ideas while I was building my poor man's smartrap. Please check it out here.
My smartrap won't win any beauty pageant but it prints!
Anyway, I just want to share this little piece of information especially to those having a hard time fine tuning their z offset.
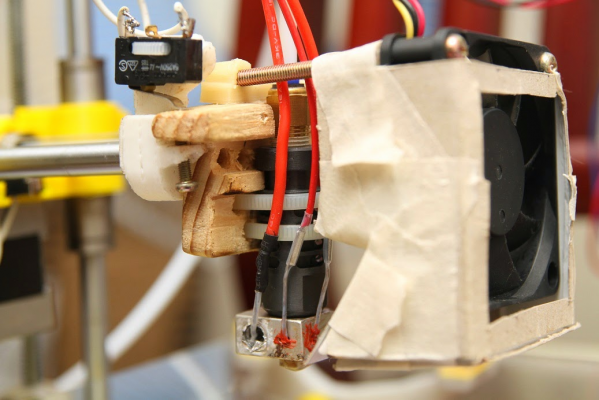
I'm not sure if the hole on the arm stopper was meant for this but I found it to be a very effective way to fine tune the z offset without changing any firmware configuration or slicer settings. You still need to get the offset to be within the 1.5mm range first. After that, all it takes is a turn of the screw to adjust the z-offset
My smartrap won't win any beauty pageant but it prints!

Anyway, I just want to share this little piece of information especially to those having a hard time fine tuning their z offset.
I'm not sure if the hole on the arm stopper was meant for this but I found it to be a very effective way to fine tune the z offset without changing any firmware configuration or slicer settings. You still need to get the offset to be within the 1.5mm range first. After that, all it takes is a turn of the screw to adjust the z-offset

|
Re: My smartrap build and easy Z offset adjustment June 01, 2014 02:26AM |
Registered: 10 years ago Posts: 229 |
|
Re: My smartrap build and easy Z offset adjustment June 01, 2014 02:37AM |
Registered: 9 years ago Posts: 80 |
|
Re: My smartrap build and easy Z offset adjustment June 01, 2014 02:44AM |
Registered: 10 years ago Posts: 229 |
|
Re: My smartrap build and easy Z offset adjustment June 01, 2014 12:30PM |
Registered: 10 years ago Posts: 814 |
I think Mark made a version for the standard Jhead? Anyways I'm glad your here. I'm sorry you had such a problem sourcing parts. I wish you would have found us sooner as we could have helped with some of that.
I haven't tried a Servoless version yet, as I've been pretty happy with the servo version. The next one I build will be Servoless though. Then a rack version... Lol...
Someone said the only constant was change... And in the Smartrap community that's really true...
I haven't tried a Servoless version yet, as I've been pretty happy with the servo version. The next one I build will be Servoless though. Then a rack version... Lol...
Someone said the only constant was change... And in the Smartrap community that's really true...
|
Re: My smartrap build and easy Z offset adjustment June 01, 2014 12:59PM |
Registered: 10 years ago Posts: 814 |
|
Re: My smartrap build and easy Z offset adjustment June 01, 2014 07:25PM |
Registered: 9 years ago Posts: 80 |
|
Re: My smartrap build and easy Z offset adjustment June 23, 2014 07:16PM |
Registered: 9 years ago Posts: 80 |
Don't you care about fan blowing on your prints?
I shared this with duranza on this thread but I'm wondering why there's not too many people here caring about fan blowing on their prints. Don't you even have a need?
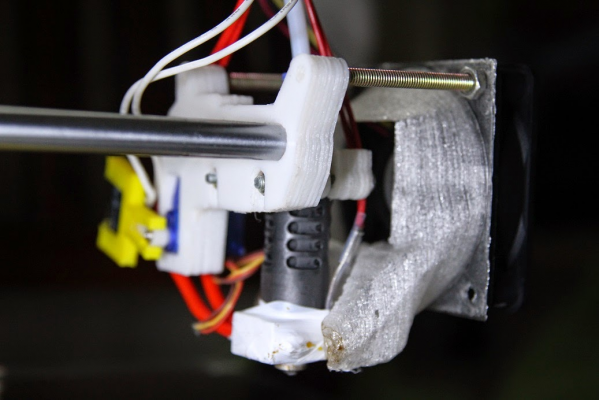
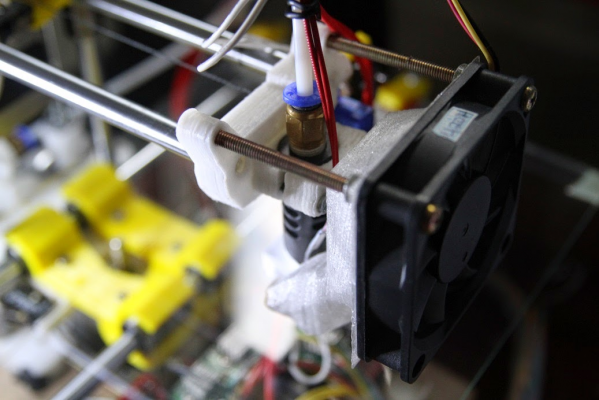
Well, I did and here's what I came up with. I'm redirecting about a third of the fan's airflow toward the print. This is so that I don't have to use two fans (one for cold end, and the other for the print) and keep the carriage light.
Does anyone have a better idea I could try? I'm willing to try even a two fan configuration if it will allow me to print something like batman ears well.
I shared this with duranza on this thread but I'm wondering why there's not too many people here caring about fan blowing on their prints.
 Don't you even have a need?
 Well, I did and here's what I came up with. I'm redirecting about a third of the fan's airflow toward the print. This is so that I don't have to use two fans (one for cold end, and the other for the print) and keep the carriage light.
Does anyone have a better idea I could try? I'm willing to try even a two fan configuration if it will allow me to print something like batman ears well.
|
Re: My smartrap build and easy Z offset adjustment June 23, 2014 09:12PM |
Registered: 11 years ago Posts: 791 |
I use only a 30mm fan for the hotend that is running full speed and powered directly from the 12 volt supply, and if needed for cooling prints I use a separate fan on a stand that I can place where I need it and run it from the automatic fan pins on the RAMPS board.
Not all prints need a fan on the prints and being as the SmartRap is a little hard to mount a big fan on for cooling the prints, I find this is the best option (for now)
[regpye.com.au]
"Experience is the mother of all knowledge." --Leonardo da Vinci
Not all prints need a fan on the prints and being as the SmartRap is a little hard to mount a big fan on for cooling the prints, I find this is the best option (for now)
[regpye.com.au]
"Experience is the mother of all knowledge." --Leonardo da Vinci
|
Re: My smartrap build and easy Z offset adjustment June 23, 2014 10:06PM |
Registered: 9 years ago Posts: 80 |
|
Re: My smartrap build and easy Z offset adjustment June 24, 2014 02:39AM |
Registered: 10 years ago Posts: 349 |
Will also try,
What is the effect on the prints?
when do i blow to much air on the print?
Would be nice to know the philosophy as well. I suspect some 'shrink' issues with a fan blowing on the print?
Please avoid Freudian or Hegelian philosophies, (My mom and dad cannot be blamed, and it would be nice if the philosophy is not to cryptic)
Also i wonder if it is better to let the fan suck hot are away from the hotend instead of blowing air on to it. These little fans kinda 'suck' by design.
I mean, on a CPU or amplifier it also works better, more efficient, to suck the hot air away.
Hot air also goes up by design.
And then there is this contradiction of the heated bed, vs the cooling fan. .
|
Re: My smartrap build and easy Z offset adjustment June 24, 2014 05:34AM |
Registered: 11 years ago Posts: 791 |
Quote
BackEMF
Will also try,
What is the effect on the prints?
when do i blow to much air on the print?
Would be nice to know the philosophy as well. I suspect some 'shrink' issues with a fan blowing on the print?
Please avoid Freudian or Hegelian philosophies, (My mom and dad cannot be blamed, and it would be nice if the philosophy is not to cryptic)
Also i wonder if it is better to let the fan suck hot are away from the hotend instead of blowing air on to it. These little fans kinda 'suck' by design.
I mean, on a CPU or amplifier it also works better, more efficient, to suck the hot air away.
Hot air also goes up by design.
And then there is this contradiction of the heated bed, vs the cooling fan. .
The slicing program works all of that out, it is all automatic and the fan comes on when needed and off to start with, etc.
[regpye.com.au]
"Experience is the mother of all knowledge." --Leonardo da Vinci
|
Re: My smartrap build and easy Z offset adjustment June 24, 2014 07:03AM |
Registered: 9 years ago Posts: 80 |
In my experience, I needed to blow air on the print where it is thin and tall and where there is overhang/bridge.
Cooling is needed because whenever the nozzle stays in one place for a long time, it melts that part of the print ruining the finish. I gave the example of batman ears because that's what I had problem last.
I was wondering why not many people mention cooling. Maybe it also has to do with the quality of filament but I hope more people can share how they get around this.
Blowing rather rather than sucking air seem to work better but there are people reporting that blowers work best compared to fans.
|
Re: My smartrap build and easy Z offset adjustment June 24, 2014 07:31AM |
Registered: 10 years ago Posts: 349 |
Quote
regpye
The slicing program works all of that out, it is all automatic and the fan comes on when needed and off to start with, etc.
Ok then i get it.
So the hotend needs a continuous stream of air.
And the print a controlled stream..
So the best way is then to use 2 fans to keep reliable hotend temperatures.
Going to add one right now :-)
|
Re: My smartrap build and easy Z offset adjustment June 24, 2014 01:33PM |
Registered: 11 years ago Posts: 791 |
Quote
BackEMF
Quote
regpye
The slicing program works all of that out, it is all automatic and the fan comes on when needed and off to start with, etc.
Ok then i get it.
So the hotend needs a continuous stream of air.
And the print a controlled stream..
So the best way is then to use 2 fans to keep reliable hotend temperatures.
Going to add one right now :-)
You got it.
[regpye.com.au]
"Experience is the mother of all knowledge." --Leonardo da Vinci
|
Re: My smartrap build and easy Z offset adjustment June 25, 2014 12:40AM |
Registered: 10 years ago Posts: 236 |
|
Re: My smartrap build and easy Z offset adjustment June 26, 2014 09:53PM |
Registered: 9 years ago Posts: 80 |
|
Re: My smartrap build and easy Z offset adjustment June 27, 2014 12:37AM |
Registered: 11 years ago Posts: 791 |
Quote
MelT
Aaah...
On a separate note, I wonder if Serge will move his stuff from thingiverse to youmagine. You know, after the makerbot was accused of stealing the designs of people.
I would agree with that, anyone wondered why I haven't put anything up on thingiverse? The parent company is out to do us all, trying to patent our ideas and stop us using them. Real corrupt ideas in my book, I wont support them in any way.
[regpye.com.au]
"Experience is the mother of all knowledge." --Leonardo da Vinci
|
Re: My smartrap build and easy Z offset adjustment June 27, 2014 03:19AM |
Registered: 10 years ago Posts: 992 |
I agree regpye, I've put the smartrap in the first place there but i'm not very happy with their behavior either, so i'm going to switch to youmagine maybe . It's also a company repository, but ultimaker have prove they where far more open and nice than makerbot. They still open everything and prove both business models are compatible.
the Smartrap project
[smartfriendz.com]
[www.thingiverse.com]
[reprap.org]
[github.com]
doc assemblage: [reprap.org]
NEW: Forum smartfriendz: [smartraptalk.smartfriendz.com]
the Smartrap project
[smartfriendz.com]
[www.thingiverse.com]
[reprap.org]
[github.com]
doc assemblage: [reprap.org]
NEW: Forum smartfriendz: [smartraptalk.smartfriendz.com]
|
Re: My smartrap build and easy Z offset adjustment June 27, 2014 03:36AM |
Registered: 11 years ago Posts: 791 |
How do you control the first layer that shouldn't have a fan blowing on the work piece?
If you turn the fan off the hotend doesn't get any cooling.
Also the hotend should have continuous cooling and the work piece should have controlled cooling, sometimes blowing faster when needed and slower or even off when not needed.
Too much air on the work piece can lead to de-lamination, too little can lead to deformed parts.
I prefer to use two fans where possible to be safe, the extra cost is very small, the automatic cooling is built-in the system, especially if you are using RAMPS, and it is set by your slicing program.
So why not use it?
[regpye.com.au]
"Experience is the mother of all knowledge." --Leonardo da Vinci
|
Re: My smartrap build and easy Z offset adjustment June 27, 2014 05:11AM |
Registered: 10 years ago Posts: 236 |
|
Re: My smartrap build and easy Z offset adjustment June 29, 2014 02:17AM |
Registered: 10 years ago Posts: 349 |
|
Re: My smartrap build and easy Z offset adjustment June 29, 2014 02:21AM |
Registered: 11 years ago Posts: 791 |
Quote
BackEMF
I'm still experimenting with 2 fans though i have the feeling the regulated fan is a bit to big (4CM) since my prints are getting worse somehow.
How far do i have to place the fan away from the print?
Are you using automatic cooling? With a fan of that capacity you could have it outside of the print bed area.
Are you using Slic3r or Cura or something else? The fan can be controlled with settings within the program.
[regpye.com.au]
"Experience is the mother of all knowledge." --Leonardo da Vinci
|
Re: My smartrap build and easy Z offset adjustment June 29, 2014 03:23AM |
Registered: 10 years ago Posts: 349 |
|
Re: My smartrap build and easy Z offset adjustment June 29, 2014 03:28AM |
Registered: 11 years ago Posts: 791 |
Quote
BackEMF
OK, my fan is way to close.
I'm jumping between Slicer and Cura every now and then, i like the simplicity of Cura.
I have played with the Fan speed settings though i'm sure the fan is just to close
You can also print a cowl for the fan so that the breeze is directed to where you need it.
I have done that on a few of my i3 machines and it works well.
The photo shows two 80mm fans and they follow the printed part as it is being printed. Also the creed LEDs follow the part as well.
Edited 1 time(s). Last edit at 06/29/2014 03:32AM by regpye.
[regpye.com.au]
"Experience is the mother of all knowledge." --Leonardo da Vinci
Sorry, only registered users may post in this forum.


 Print! Print! Print! Hahaha


