Home
>
RepRap User Groups
>
Europe
>
Italy RepRap User Group - Gruppo RepRap Italia
>
Estrusori, Hotends, Heated bed, Filamenti, etc.
>
Topic
Configurazione hotend IEC, è corretta?
Posted by sepp974
|
Configurazione hotend IEC, è corretta? October 19, 2015 10:41AM |
Registered: 9 years ago Posts: 132 |
Io ho sempre l'impressione che la temperatura a cui estrudo non sia quella settata nello slicer e che vedo su repetier-host. Ma non ho modo di misurarla fisicamente. Per esempio, ho comprato delle bobine di PLA (nuove, tenute sotto vuoto e appena sballate, marca 3dprima), che dovrebbero (secondo l'etichetta) fondere a 190/210°. Allora comincio a fare le mie prove per trovare la temperatura adatta, parto da 190 e estrudo, poi aumento la temperatura 200, 210, 220, fino a quando non vedo il filo estrudere libero senza arricciamenti e farmi dei bei cerchi concentrici sul piatto. Il problema è che sono arrivato ad estrudere fino a 250 gradi (il PLA!) prima di ottenere un risultato decente, senza bruciarlo e senza farlo "scoppiettare".
A questo punto mi viene il dubbio di avere configurato male il termistore sul marlin..
Io ho un Hotend IEC che dovrebbe avere come termistore un epcos 100k (Davide se leggi, correggimi). Sul configuration TEMP_SENSOR_0 1 come da tabella allegata:
//--NORMAL IS 4.7kohm PULLUP!-- 1kohm pullup can be used on hotend sensor, using correct resistor and table
//
//// Temperature sensor settings:
// -2 is thermocouple with MAX6675 (only for sensor 0)
// -1 is thermocouple with AD595
// 0 is not used
// 1 is 100k thermistor - best choice for EPCOS 100k (4.7k pullup)
// 2 is 200k thermistor - ATC Semitec 204GT-2 (4.7k pullup)
// 3 is Mendel-parts thermistor (4.7k pullup)
// 4 is 10k thermistor !! do not use it for a hotend. It gives bad resolution at high temp. !!
// 5 is 100K thermistor - ATC Semitec 104GT-2 (Used in ParCan & J-Head) (4.7k pullup)
// 6 is 100k EPCOS - Not as accurate as table 1 (created using a fluke thermocouple) (4.7k pullup)
// 7 is 100k Honeywell thermistor 135-104LAG-J01 (4.7k pullup)
// 71 is 100k Honeywell thermistor 135-104LAF-J01 (4.7k pullup)
// 8 is 100k 0603 SMD Vishay NTCS0603E3104FXT (4.7k pullup)
// 9 is 100k GE Sensing AL03006-58.2K-97-G1 (4.7k pullup)
// 10 is 100k RS thermistor 198-961 (4.7k pullup)
// 11 is 100k beta 3950 1% thermistor (4.7k pullup)
// 12 is 100k 0603 SMD Vishay NTCS0603E3104FXT (4.7k pullup) (calibrated for Makibox hot bed)
// 20 is the PT100 circuit found in the Ultimainboard V2.x
// 60 is 100k Maker's Tool Works Kapton Bed Thermistor beta=3950
//
// 1k ohm pullup tables - This is not normal, you would have to have changed out your 4.7k for 1k
// (but gives greater accuracy and more stable PID)
// 51 is 100k thermistor - EPCOS (1k pullup)
// 52 is 200k thermistor - ATC Semitec 204GT-2 (1k pullup)
// 55 is 100k thermistor - ATC Semitec 104GT-2 (Used in ParCan & J-Head) (1k pullup)
//
// 1047 is Pt1000 with 4k7 pullup
// 1010 is Pt1000 with 1k pullup (non standard)
// 147 is Pt100 with 4k7 pullup
// 110 is Pt100 with 1k pullup (non standard)
// 70 is 500C thermistor for Pico hot end
#define TEMP_SENSOR_0 1
#define TEMP_SENSOR_1 0
#define TEMP_SENSOR_2 0
#define TEMP_SENSOR_BED 1
Ho sbagliato?
Prusa I3 Rework
Arduino Mega 2560 compatibile - Ramps 1.4 - Driver A4988 - Hotend IeC 1,75 mm 0.4 - Estrusore R2 by NicolaP - Firmware Marlin - Repetier Host - Cura engine
|
Re: Configurazione hotend IEC, è corretta? October 19, 2015 11:26AM |
Registered: 12 years ago Posts: 4,555 |
In primo luogo dimmi se hai una cartuccia in alluminio o in ottone......
Se è alluminio mandami un pm che risolviamo in fretta, se è d'ottone invece smontala a caldo, prendi una tela smeriglia fine e cerca di ripulire l'osido che si è formato tra il nozzle e la cartuccia... ovviamente per il foro occorre una limetta tonda fine (foro 6 mm).
Mi raccomando fai una cosina "leggera" in modo da rimuovere solo parte dell'ossido e non ridurre il diametro del nozzle o allargare il foro della cartuccia.
Una volta fatto ciò, procurati della pasta termoconduttiva bianca possibilmente ceramica (ma va bene qualsiasi), reperibile con facilità dove vendono materiale per pc o elettronica, serve in genere per accoppiare i dissipatori ai chip vedi processore del pc e similari.....
Metti una piccola quantità di pasta termoconduttiva atorno al nozzle e rimonti la cartuccia in modo che la pasta termoconduttiva accoppi correttamente nozzle e cartuccia e ripulisci gli eventuali "sbrodolamenti" sulla punta ma non crea nessun problema.... fissi la cartuccia e riprovi a fondere... se il termistore non ha dei problemi di suo dovrebbe tornare a leggere correttamente le temperature......
Prova e sappimi dire
Davide
Immagina e Crea
Progetto Flusso canalizzatore 4 vie
My Thingiverse
Se è alluminio mandami un pm che risolviamo in fretta, se è d'ottone invece smontala a caldo, prendi una tela smeriglia fine e cerca di ripulire l'osido che si è formato tra il nozzle e la cartuccia... ovviamente per il foro occorre una limetta tonda fine (foro 6 mm).
Mi raccomando fai una cosina "leggera" in modo da rimuovere solo parte dell'ossido e non ridurre il diametro del nozzle o allargare il foro della cartuccia.
Una volta fatto ciò, procurati della pasta termoconduttiva bianca possibilmente ceramica (ma va bene qualsiasi), reperibile con facilità dove vendono materiale per pc o elettronica, serve in genere per accoppiare i dissipatori ai chip vedi processore del pc e similari.....
Metti una piccola quantità di pasta termoconduttiva atorno al nozzle e rimonti la cartuccia in modo che la pasta termoconduttiva accoppi correttamente nozzle e cartuccia e ripulisci gli eventuali "sbrodolamenti" sulla punta ma non crea nessun problema.... fissi la cartuccia e riprovi a fondere... se il termistore non ha dei problemi di suo dovrebbe tornare a leggere correttamente le temperature......
Prova e sappimi dire

Davide
Immagina e Crea
Progetto Flusso canalizzatore 4 vie
My Thingiverse
|
Re: Configurazione hotend IEC, è corretta? October 19, 2015 11:38AM |
Registered: 9 years ago Posts: 132 |
Ciao Davide,
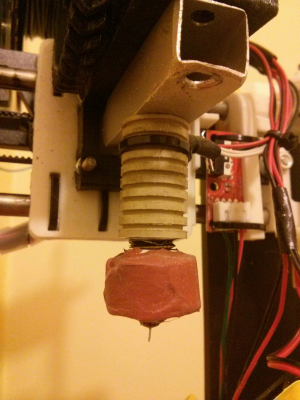
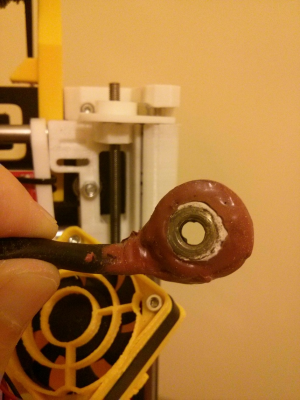
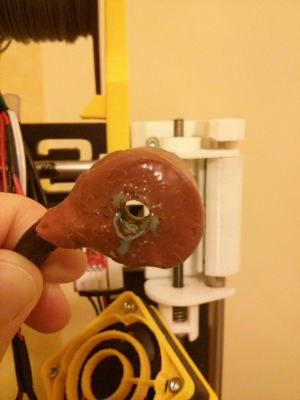
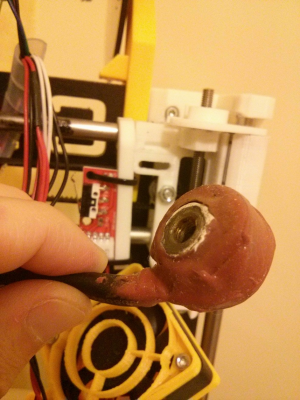
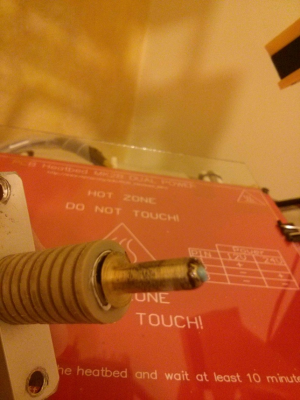
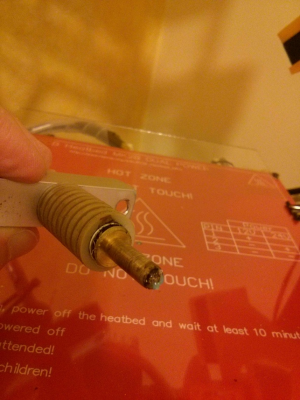
non ti arrabbiare ma.. come lo capisco se è ottone o alluminio ? So che cos'è l'ottone e so cos'è l'alluminio ma la cartuccia è ricoperta da una pasta marrone (vado a memoria, controllo non appena sono a casa), se invio una foto è di aiuto?
Prusa I3 Rework
Arduino Mega 2560 compatibile - Ramps 1.4 - Driver A4988 - Hotend IeC 1,75 mm 0.4 - Estrusore R2 by NicolaP - Firmware Marlin - Repetier Host - Cura engine
non ti arrabbiare ma.. come lo capisco se è ottone o alluminio
 ? So che cos'è l'ottone e so cos'è l'alluminio ma la cartuccia è ricoperta da una pasta marrone (vado a memoria, controllo non appena sono a casa), se invio una foto è di aiuto?
Prusa I3 Rework
Arduino Mega 2560 compatibile - Ramps 1.4 - Driver A4988 - Hotend IeC 1,75 mm 0.4 - Estrusore R2 by NicolaP - Firmware Marlin - Repetier Host - Cura engine
|
Re: Configurazione hotend IEC, è corretta? October 19, 2015 12:44PM |
Registered: 9 years ago Posts: 132 |
A me sembra ottone, confermi?
Prusa I3 Rework
Arduino Mega 2560 compatibile - Ramps 1.4 - Driver A4988 - Hotend IeC 1,75 mm 0.4 - Estrusore R2 by NicolaP - Firmware Marlin - Repetier Host - Cura engine
Prusa I3 Rework
Arduino Mega 2560 compatibile - Ramps 1.4 - Driver A4988 - Hotend IeC 1,75 mm 0.4 - Estrusore R2 by NicolaP - Firmware Marlin - Repetier Host - Cura engine
|
Re: Configurazione hotend IEC, è corretta? October 19, 2015 01:31PM |
Registered: 12 years ago Posts: 4,555 |
ok è d'ottone..... vai con la tela smeriglia e la pasta termica....
Davide
Immagina e Crea
Progetto Flusso canalizzatore 4 vie
My Thingiverse
Davide
Immagina e Crea
Progetto Flusso canalizzatore 4 vie
My Thingiverse
Sorry, only registered users may post in this forum.
