Home
>
Reprappers
>
Topic
Help installing marlin properly
Posted by davedavedave
|
Help installing marlin properly April 12, 2016 02:43AM |
Registered: 8 years ago Posts: 78 |
OK! so this is gonna be a tough one. well for me, not for the experienced folk here of course  .
.
ok so this is the low down. I am building a printer, and some problems have arisen and I am trying my best to google answers with no luck. ive watched and rewatched tons of vids to see what I am doing wrong but to no avail.
I downloaded the Arduino ide and bought a Arduino 2560 as well as ramps 1.4 about 1 year ago and have not used until now. I unpacked them and installed the marlin fw into the Arduino board and then mounted ramps. I also installed a stepper driver while it was connected to the usb and then the motor and then I turned on the psu and opened pronterface, (arduino was fdetected). I had no endstopped hooked up but I tried everything from disabling endstops to hooking it up physically. and the 1 motor I hooked up will not move at all. and this saddens me greatly. please help. i may or may not be desperate.
thanks for your time guys.
Edit: just attached the marlin config.h file
Edited 2 time(s). Last edit at 04/12/2016 02:48AM by davedavedave.
 .
.ok so this is the low down. I am building a printer, and some problems have arisen and I am trying my best to google answers with no luck. ive watched and rewatched tons of vids to see what I am doing wrong but to no avail.
I downloaded the Arduino ide and bought a Arduino 2560 as well as ramps 1.4 about 1 year ago and have not used until now. I unpacked them and installed the marlin fw into the Arduino board and then mounted ramps. I also installed a stepper driver while it was connected to the usb and then the motor and then I turned on the psu and opened pronterface, (arduino was fdetected). I had no endstopped hooked up but I tried everything from disabling endstops to hooking it up physically. and the 1 motor I hooked up will not move at all. and this saddens me greatly. please help. i may or may not be desperate.
thanks for your time guys.
Edit: just attached the marlin config.h file
Edited 2 time(s). Last edit at 04/12/2016 02:48AM by davedavedave.
|
Re: Help installing marlin properly April 12, 2016 06:14AM |
Admin Registered: 13 years ago Posts: 7,008 |
how did you connect the power supply?
There two power supplies
The 12v 5amp circuit, this powers the hotend, the mega and the stepper motors
The 12v 11amp circuit is just for the heated bed.
Check what the controller thinks of the endstops, ie send M119 to the printer, they should be "open" and that are triggered, you cant move in that direction.
Did you install 3 jumpers under each of the stepper drivers?
Edited 2 time(s). Last edit at 04/12/2016 06:23AM by Dust.
|
Re: Help installing marlin properly April 12, 2016 06:32AM |
Registered: 8 years ago Posts: 78 |
hey ther thanks for the reply. I powered both. though the only things connected are the 1 stepper driver and the 1 motor. the end stop was connected. this was the x axis.
do I have to have all the things connected for the motors to move? what is the requirement for the motors to move?
I have all the things to make a printer work but mine isn't moving. I have the X axis lead connected btw. and the jumers too. oh and it says "triggered" when given that command. nothing else.
do I have to have all the things connected for the motors to move? what is the requirement for the motors to move?
I have all the things to make a printer work but mine isn't moving.
 I have the X axis lead connected btw. and the jumers too. oh and it says "triggered" when given that command. nothing else.
|
Re: Help installing marlin properly April 12, 2016 05:33PM |
Registered: 9 years ago Posts: 569 |
Dust is more knowledgeable then me, but I wonder if you accidentally fried the stepper driver. You never want to plug the motors in or remove them while the board has power. That said, there is a test script on the RepRap website (try Google) that you can upload to your Arduino / RAMPS board. It will move the motors back and forth, flash LEDs, and so on to give you an indication that the board is working and wired correctly.
|
Re: Help installing marlin properly April 12, 2016 06:07PM |
Registered: 8 years ago Posts: 78 |
the Arduino connects and uploads as well as when ramps is on it. so I don't thinkn its fried. at least I hope it isn't. well this is the second Arduino ive tried it on. the first is the same thing. so I doubt its the Arduino. maybe I'm doing something wrong. I will look up the code in a bit. is it possible to just use it with 1 single pololu and motor? without any other axes or hot end/heat end attached?
|
Re: Help installing marlin properly April 12, 2016 06:15PM |
Admin Registered: 13 years ago Posts: 7,008 |
With a standard firmware
Without a hot end thermistor you will be fighting with the boards safety features, It needs to be connected so it can read room temp or it panics and just errors
Since the endstops are saying triggered, you can't move.
I would use the test firmware at this stage, as you have to many missing parts and safety features to by pass
see [reprap.org]
This will move the motors backwards and forwards, turn on the leds, turn on the mosfets (so don't have heaters plugged in)
|
Re: Help installing marlin properly April 12, 2016 06:28PM |
Registered: 8 years ago Posts: 78 |
|
Re: Help installing marlin properly April 12, 2016 07:39PM |
Registered: 8 years ago Posts: 78 |
it says that Arduino only opens .pde or .ino files. the file is in pde hah so I'm stumped.
EDIT: ok I successfully uploaded the firmware. lights blinking but no moving motor. the stepper is connected and the motor is too. blk grn blu red. with black facing the powersupply etc
Edited 1 time(s). Last edit at 04/12/2016 08:48PM by davedavedave.
EDIT: ok I successfully uploaded the firmware. lights blinking but no moving motor. the stepper is connected and the motor is too. blk grn blu red. with black facing the powersupply etc
Edited 1 time(s). Last edit at 04/12/2016 08:48PM by davedavedave.
|
Re: Help installing marlin properly April 12, 2016 10:09PM |
Registered: 8 years ago Posts: 78 |
I fried a stepper motor driver****** lol! I think its because I turned the potentiometer and did it without the multimeter. so 1 min later BZZZT and a tuft of smoke. I was reading something and it freaked me out. I switched off the psu and looked at the driver. it had a black smudge on a pin. maybe where it fried? anyways. the motor is still not moving. I only have the motor, step driver, ramps and Arduino plugged in. oh and only the 5v and ground are plugged in. I had it with the 12v as well but still the same. also, its with the test software, so it sucks that the motor isn't moving. at all.
Edited 1 time(s). Last edit at 04/12/2016 10:19PM by davedavedave.
Edited 1 time(s). Last edit at 04/12/2016 10:19PM by davedavedave.
|
Re: Help installing marlin properly April 12, 2016 10:19PM |
Admin Registered: 13 years ago Posts: 7,008 |
picture please, to make sure the driver module is in the correct way
Another common issue is stepper wiring, what ever color coded wiring guide you used, take it to the trash and dispose of it
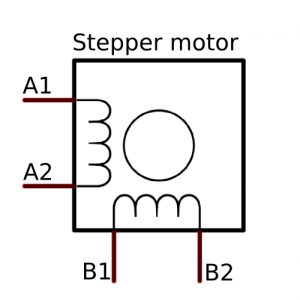
Stepper motors are two coils at 90 degrees from each other. You need to identify which two wires makes one coil
Ignore the labeling on this diagram, its just an over view
On the ramps is a 4 pin stepper motor connector, first two pins are coil 1 and last two pins are coil 2, its doesn't matter which coil is coil 1 or coil 2. the motor just spins in the opposite direction if you flip them.
You need 12v to move the steppers
Nb if you don't have a multi meter, here are several tricks to help you identify which wires are connected in a pair
[reprap.org]
Also what steppers do you have, as many are just not suitable for pololu type drivers
Edited 3 time(s). Last edit at 04/12/2016 10:38PM by Dust.
|
Re: Help installing marlin properly April 12, 2016 11:09PM |
Registered: 8 years ago Posts: 78 |
So here they are. let me know what you think is wrong. also, I did check the wirings to see if they paired. using the continuity option on the DMM. I just don't know if it matters what order they go too. I do know the pairs though for each of my motors. thanks
also, I have nema 17's. is that what your asking? or for the drivers? because its been almost a year since I bought them so I cant remember the number. it started with a D or something around that. theyre the 32 steps per sec as opposed to the A******'s 16 steps per sec or something like that. correct me if I'm wrong.
Edited 1 time(s). Last edit at 04/12/2016 11:12PM by davedavedave.
|
Re: Help installing marlin properly April 13, 2016 06:02AM |
Admin Registered: 13 years ago Posts: 7,008 |
Ah..
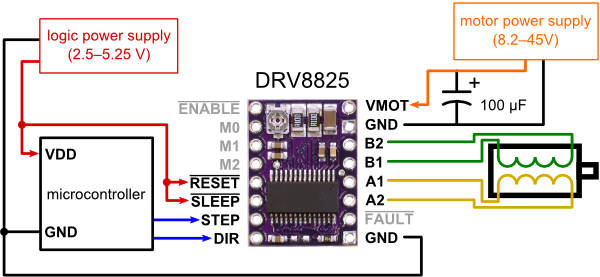
You seem to have drv8825 drivers
ie these
These go in the other way from standard A4988 Stepper Motor drivers
On the diagram above you see the 4 pins that go to the stepper motor? these should be right next to the stepper plugs when plugged in
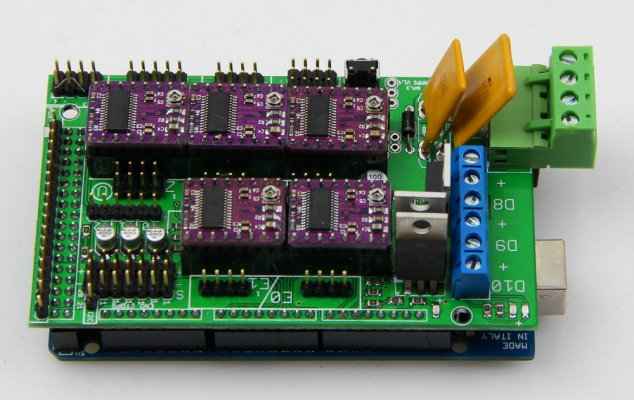
Ie
Sadly you have applied 12v where it was never meant to go... I would try a new stepper driver on a axis position you haven’t tried before around the correct way and see if you can get movement working on that axis.
Once you have movement you can swap stepper drivers to test them. Then once you know you have good stepper drivers move on to testing the other axis positions (you may have damaged the mega so that some axis no longer work)
Edited 3 time(s). Last edit at 04/13/2016 06:20AM by Dust.
|
Re: Help installing marlin properly April 14, 2016 02:35PM |
Registered: 8 years ago Posts: 78 |
oh man! wow. I probably fried 2 trying this. oh well. man I will test this now. thanks so much for saving me from frying my last board. I will get back as soon as i test this
Edit: Ok I tested the board again, with the same stepper driver (despite you telling me to switch) my apologies. but since I may have fried the board and the stepp. I was like what the hey! why not, luckily it worked. the stepper driver is relaying the power and turning the motor.
I will definitely keep you updated. tell me what you think? could it still be fried?
EDIT 2: ok I still have yet to test the other axes like you mentioned I started hearing some static'y noises from the board I'm using. maybe the stepper driver? anyway, I decided to touch the heatsink to see if it was warm, and found it to be extremely hot to the point where as soon as I placed my finger on it, my reaction was to pull it off immediately. should it get that hot? also the stepper motor was warm which I assume is normal. it wasn't under any kind of stress, is this heat normal? thanks
Edited 3 time(s). Last edit at 04/14/2016 02:44PM by davedavedave.
|
Re: Help installing marlin properly April 14, 2016 03:01PM |
Registered: 9 years ago Posts: 569 |
Quote
EDIT 2: ok I still have yet to test the other axes like you mentioned I started hearing some static'y noises from the board I'm using. maybe the stepper driver? anyway, I decided to touch the heatsink to see if it was warm, and found it to be extremely hot to the point where as soon as I placed my finger on it, my reaction was to pull it off immediately. should it get that hot? also the stepper motor was warm which I assume is normal. it wasn't under any kind of stress, is this heat normal? thanks
My guess is that the current on the stepper driver (drv8825) is too high. Try turning the potentiometer (the silver screw on the board) to the left a quarter to a third of the way. Ideally you would have a multimeter so you could measure the voltage from the screw to ground (at least on A4988 stepper motor drivers) allowing you to more accurately set the voltage. But just turning the pot counter clockwise some should reduce the current and thus the heat of the driver.
EDIT: No clue what is causing the static from the motor.
Edited 1 time(s). Last edit at 04/14/2016 03:02PM by Kurzaa.
|
Re: Help installing marlin properly April 14, 2016 03:05PM |
Registered: 8 years ago Posts: 78 |
|
Re: Help installing marlin properly April 14, 2016 03:07PM |
Registered: 9 years ago Posts: 569 |
|
Re: Help installing marlin properly April 14, 2016 03:21PM |
Registered: 8 years ago Posts: 78 |
|
Re: Help installing marlin properly April 14, 2016 03:29PM |
Registered: 8 years ago Posts: 78 |
they were at like 2.5V :O wow.
well now theyre set to ~.57 that seems like the norm for most drivers. once I begin calibration I will probably adjust according. anything I should know? this is going to be a corexy from the ground up. I want to learn Arduino, and will but for now I am using marlin until I can better grasp it. even then, I probably wont be able to write that much code anytime soon.
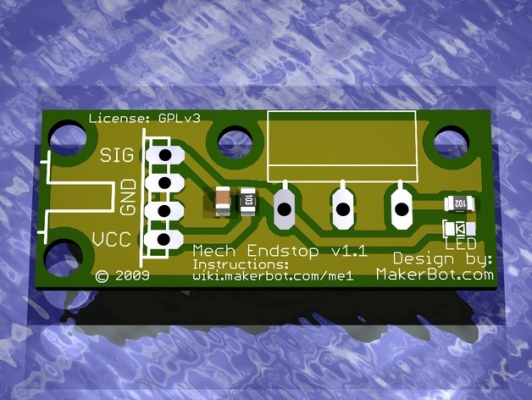
EDIT: Ok there is an issue I have not been able to figure. the way the end stops are supposed to be wired. I have these types of end stops and the board has 3 pins, Signla, ground, load. so if I were to connect it to the board. would I need the GRN BLK RED wires connected? or just the GRN and BLK as most people have suggested in videos?
Edited 1 time(s). Last edit at 04/14/2016 03:36PM by davedavedave.
|
Re: Help installing marlin properly April 14, 2016 08:50PM |
Admin Registered: 13 years ago Posts: 7,008 |
Those endstops are a concern.
If you plug them in backwards you kill the voltage regulator on the mega. As the switch shorts +5v to Gnd.
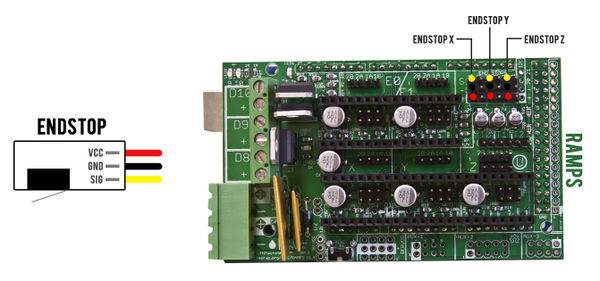
3 wires is fine, as long as you make sure that the switch is connecting Signal to GND or Signal to +5, but never +5v to GND on the ramps.
NB this picture is for minimum endstops on x,y and z
The people who like to only use 2 pins on these are just being paranoid, but 2 wire mode also works fine
(NB when in two wire mode the LED's on the endstops do not work)
Edited 2 time(s). Last edit at 04/14/2016 08:53PM by Dust.
|
Re: Help installing marlin properly April 14, 2016 09:57PM |
Registered: 8 years ago Posts: 78 |
thanks, glad to hear a definite answer to a question that's been worrying me for some time. I'm one step closer to finishing all the wiring. just need to solder up a few more things, create a few connections here and there and it will be ready for calibration tests. that will probably take hours to since this is my first build. at least I have you guys to count on. 

|
Re: Help installing marlin properly April 14, 2016 10:38PM |
Registered: 8 years ago Posts: 78 |
|
Re: Help installing marlin properly April 15, 2016 02:47AM |
Admin Registered: 13 years ago Posts: 7,008 |
|
Re: Help installing marlin properly April 15, 2016 05:06AM |
Registered: 8 years ago Posts: 78 |
|
Re: Help installing marlin properly April 16, 2016 05:18AM |
Registered: 8 years ago Posts: 78 |
Hi again dust. so I'm pretty much finished with basic wiring but have come across a problem with the XY speeds. since I am using the DRV8825 I used the numbers in the reprap calculator which were 160 for Xand Y. the thing is that whenever I tell the printer to move 10 or 100mm In a certai direction, it takes forever to reach the destination. it does manage to get there give or take 1 or 2mm extra. but the speed and time it takes is an annoyance I would like to correct. I input G1 X120 Y120 F15000 and bam it moved fast and really smooth. i then clicked the homing button and everything went normal. but i click the command to move 10mm and its slow as a snail. so i know that the motors are capable of moving quick after seeing them move using the G1 command. why does it take forever when i tell it to move normally without commands? in the FW i have it set like this (what could be the cause of this?) thanks for your time guys
#define HOMING_FEEDRATE {50*60,50*60,2.5*60, 0}  // set the homing speeds (mm/min)

// default settings

#define DEFAULT_AXIS_STEPS_PER_UNIT   {160, 160, 5120, 250}  // default steps per unit for Ultimaker
#define DEFAULT_MAX_FEEDRATE          {200, 200, 3, 25}    // (mm/sec)
#define DEFAULT_MAX_ACCELERATION      {3000, 3000, 100, 1000}    // X, Y, Z, E maximum start speed for accelerated moves. E default values are good for Skeinforge 40+, for older versions raise them a lot.

#define DEFAULT_ACCELERATION          3000    // X, Y, Z and E acceleration in mm/s^2 for printing moves
#define DEFAULT_RETRACT_ACCELERATION  3000    // E acceleration in mm/s^2 for retracts
#define DEFAULT_TRAVEL_ACCELERATION   3000    // X, Y, Z acceleration in mm/s^2 for travel (non printing) moves

// The speed change that does not require acceleration (i.e. the software might assume it can be done instantaneously)
#define DEFAULT_XYJERK                15.0    // (mm/sec)
#define DEFAULT_ZJERK                 0.4     // (mm/sec)
#define DEFAULT_EJERK                 5.0    // (mm/sec)
|
Re: Help installing marlin properly April 16, 2016 06:41AM |
Admin Registered: 13 years ago Posts: 7,008 |
This more sounds like a issue with your control program having a very slow feed rate set.
When you say "click the command to move 10mm" click on what?
You mentioned pronterface a long time back so ill presume your still using that
Up the top above the control circle is "Motors Off" then XY: {feedrate} (mm/min) The latter is the feed rate for the interface. So changing this to 15000 should make it the same as the gcode example.
NB 15000 is actually truncated to 12000 by your firmware settings
ie #define DEFAULT_MAX_FEEDRATE {200, 200, 3, 25} // (mm/sec) (this is for X,Y,Z and E)
ie 200mm/second x60 seconds = 12000 mm/minute (this is the units feed rate is in)
Edited 1 time(s). Last edit at 04/16/2016 07:02AM by Dust.
|
Re: Help installing marlin properly April 16, 2016 06:57AM |
Registered: 8 years ago Posts: 78 |
If that is indeed the issue then man have i wasted hours of time looking for a solution. I will definately do all that in a few hours when i wake up. Also, what worries me is that the printer was also slow during the RampsTest. Hopefully youre right with the software being slow. Youve been right the whole time so i wont doubt what youve said
Thanks!
Thanks!
Sorry, only registered users may post in this forum.
