Home
>
Reprappers
>
Topic
Starting a Prusa Mendel build 
Posted by hardtoe
|
Starting a Prusa Mendel build September 15, 2011 12:32PM |
Registered: 12 years ago Posts: 74 |
Hello All!
I've been reading various blogs of RepRap builds and some builds listed here on the forums and they have inspired me to share my Prusa Mendel build.
I'm currently sourcing the parts I need, I think i have most of it covered:
I am getting the big order from UltiMachine on Friday. Won't be able to do anything with it though as I'll be out for the weekend. Next weekend I will be stopping by my brother's place to pick up my plastic parts. I will have the MakerGear hotend and a stepper motor to bring, so I may put together the extruder at that point. Either way, I'll being assembling the entire machine once i get back from his place (we live ~1700 miles apart).
Once I can print usable stuff, I'll print an extra set of gears for the extruder and some sort of spool holder...but that's a ways off.
So far I only have the MakerGear hotend. It really looks great though...hope it works as well as it looks Will post some pictures of the hotend tonight and if i have time i'll post pics of the UltiMachine shipment tomorrow.
I've been reading various blogs of RepRap builds and some builds listed here on the forums and they have inspired me to share my Prusa Mendel build.
I'm currently sourcing the parts I need, I think i have most of it covered:
- Prusa Mendel Frame
  * Plastic Parts: Sourced from my brother who is printing the Prusa Mendel parts from the CupCake-sized plates.
  * Vitamins: Sourced from UltiMachine
  * Belts: Sourced from UltiMachine
  * Heated Build Plate: Sourced from UltiMachine
  * 4x Stepper Motor: NEMA 17 Sourced from UltiMachine
  * Bushings: two options...
    + My brother is printing some of the new bushings that can hold felt, i would need to glue them on the standard prusa parts...will that work?
    + I can also order some PLA bushings from ebay
- Extruder
  * Plastic Parts: Sourced from my brother who is printing Greg's Hinged Accessible Extruder
    + I modified the holes to fit the MakerGear hot end mount according to the comment by "hbs" on the thingiverse page
  * Vitamins: Sourced from MakerGear (Wade Hardware Kit)
  * Hot End: Sourced from MakerGear
    + 0.35mm nozzle
    + Fully assembled
    + Wade wooden mounting plate
  * Stepper Motor: NEMA 17 Sourced from UltiMachine
  * Hobbed Bolt: Sourced from ebay user :RTQ:US:1123" target="_blank"  rel="nofollow">dude_146
- Electronics
  * RAMPS Fully Assembled w/Arduino Mega: Sourced from UltiMachine
- Power Supply
  * I'm sure i have an ATX power supply somewhere around here...
I am getting the big order from UltiMachine on Friday. Won't be able to do anything with it though as I'll be out for the weekend. Next weekend I will be stopping by my brother's place to pick up my plastic parts. I will have the MakerGear hotend and a stepper motor to bring, so I may put together the extruder at that point. Either way, I'll being assembling the entire machine once i get back from his place (we live ~1700 miles apart).
Once I can print usable stuff, I'll print an extra set of gears for the extruder and some sort of spool holder...but that's a ways off.
So far I only have the MakerGear hotend. It really looks great though...hope it works as well as it looks
Will post some pictures of the hotend tonight and if i have time i'll post pics of the UltiMachine shipment tomorrow.
|
Re: Starting a Prusa Mendel build September 15, 2011 12:52PM |
Registered: 12 years ago Posts: 74 |
Some of these pictures are big...looks like the forum is cutting off the right side of them, you may want to open in a new window or tab. Also, i'll shrink my photos next time!
My brother's first attempt at printing Prusa parts at the bottom of this photo, at the top of the photo are two gears he printed after fixing backlash in his x and y axis:
The rest of the Prusa parts my brother printed:
The MakerGear hotend with insulation:
My brother's first attempt at printing Prusa parts at the bottom of this photo, at the top of the photo are two gears he printed after fixing backlash in his x and y axis:

The rest of the Prusa parts my brother printed:


The MakerGear hotend with insulation:


|
Re: Starting a Prusa Mendel build September 16, 2011 07:44PM |
Registered: 12 years ago Posts: 74 |
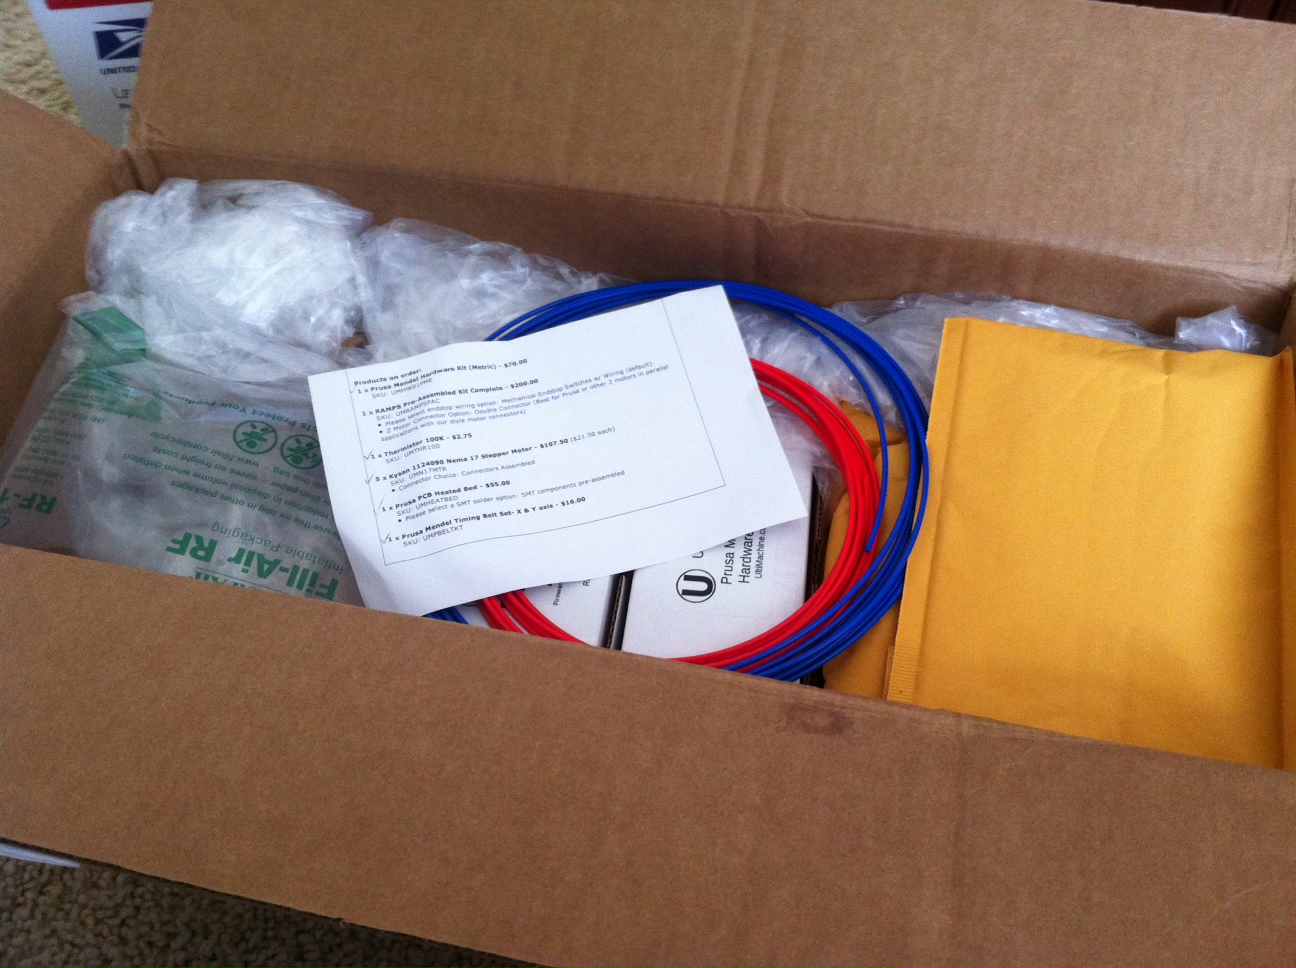
the ultimachine package came in today!
i hooked up the stepper motors to the RAMPS board and gave them a spin. i ended up loading the sprinter firmware.
all of the stepper motors and drivers work just fine. i can exercise each one by manually sending the appropriate gcodes over a serial terminal. i can also connect to RAMPS using ReplicatorG, Pronterface and RepSnapper.
One problem...during a "print" the extruder stepper never turns. When i manually execute a gcode for the extruder, it works. It seems that the generated gcode is wrong or my firmware isn't configured properly.
I think it might be the generated gcode because i see this message from pronterface after i load an STL file:
That last bit says 0 mm of filament will be used...i didn't change any of the extrusion settings in Skeinforge. Is this why my extruder motor never turns during a "print", or is that message just a meaningless quirk?
Any ideas?
i hooked up the stepper motors to the RAMPS board and gave them a spin. i ended up loading the sprinter firmware.
all of the stepper motors and drivers work just fine. i can exercise each one by manually sending the appropriate gcodes over a serial terminal. i can also connect to RAMPS using ReplicatorG, Pronterface and RepSnapper.
One problem...during a "print" the extruder stepper never turns. When i manually execute a gcode for the extruder, it works. It seems that the generated gcode is wrong or my firmware isn't configured properly.
I think it might be the generated gcode because i see this message from pronterface after i load an STL file:
The exported file is saved as D:\3dPrinting\gregsHingedAccessibleExtruder\small_gear_export.gcode
It took 31 seconds to export the file.
0 mm of filament used in this print
That last bit says 0 mm of filament will be used...i didn't change any of the extrusion settings in Skeinforge. Is this why my extruder motor never turns during a "print", or is that message just a meaningless quirk?
Any ideas?
|
Re: Starting a Prusa Mendel build September 16, 2011 08:25PM |
Registered: 12 years ago Posts: 74 |
here's the first few lines of the gcode. it looks like it's telling the extruder to go, but i'm no expert:
(<alteration> )
(**** beginning of start.txt ****)
(This file is for a MakerBot Thing-O-Matic)
(**** begin initilization commands ****)
G21 (set units to mm)
G90 (set positioning to absolute)
M108 S255 (set extruder speed to maximum)
M103 (Make sure extruder is off)
M104 S225 T0 (set extruder temperature)
M109 S110 T0 (set heated-build-platform temperature)
(**** end initilization commands ****)
(**** begin homing ****)
G162 Z F500 (home Z axis maximum)
G161 X Y F2500 (home XY axes minimum)
G92 Z80 ( ---=== Set Z axis maximum ===--- )
G92 X-57.5 Y-57 (set zero for X and Y)
(**** end homing ****)
(**** begin pre-wipe commands ****)
G1 X52.0 Y-57.0 Z10.0 F3300.0 (move to waiting position)
M6 T0 (wait for toolhead parts, nozzle, HBP, etc., to reach temperature)
M101 (Extruder on, forward)
G04 P5000 (Wait t/1000 seconds)
M103 (Extruder off)
(**** end pre-wipe commands ****)
(**** end of start.txt ****)
(</alteration> )
(<creation> skeinforge </creation> )
(<version> 11.02.23 </version> )
(<extruderInitialization> )
(<craftTypeName> extrusion </craftTypeName> )
M105
(<bridgeWidthMultiplier> 1.0 </bridgeWidthMultiplier> )
(<decimalPlacesCarried> 3 </decimalPlacesCarried> )
(<infillWidth> 0.6 </infillWidth> )
(<layerThickness> 0.4 </layerThickness> )
(<threadSequenceString> loops perimeter infill </threadSequenceString> )
(<operatingFeedRatePerSecond> 32.0 </operatingFeedRatePerSecond> )
(<operatingFlowRate> 255.0 </operatingFlowRate> )
(<orbitalFeedRatePerSecond> 16.0 </orbitalFeedRatePerSecond> )
(<travelFeedRatePerSecond> 32.0 </travelFeedRatePerSecond> )
(<coolingRate> 3.0 </coolingRate> )
(<heatingRate> 10.0 </heatingRate> )
(<baseTemperature> 225.0 </baseTemperature> )
(<interfaceTemperature> 225.0 </interfaceTemperature> )
(<objectFirstLayerInfillTemperature> 225.0 </objectFirstLayerInfillTemperature> )
(<objectFirstLayerPerimeterTemperature> 225.0 </objectFirstLayerPerimeterTemperature> )
(<objectNextLayersTemperature> 225.0 </objectNextLayersTemperature> )
(<supportLayersTemperature> 225.0 </supportLayersTemperature> )
(<supportedLayersTemperature> 225.0 </supportedLayersTemperature> )
(<perimeterWidth> 0.58 </perimeterWidth> )
(<profileName> ABS </profileName> )
(<procedureName> carve </procedureName> )
(<procedureName> bottom </procedureName> )
(<procedureName> preface </procedureName> )
(<procedureName> inset </procedureName> )
(<procedureName> fill </procedureName> )
(<procedureName> speed </procedureName> )
(<procedureName> temperature </procedureName> )
(<procedureName> raft </procedureName> )
(<procedureName> comb </procedureName> )
(<procedureName> wipe </procedureName> )
(<procedureName> export </procedureName> )
(</extruderInitialization> )
(<crafting> )
M113 S1.0
M108 S255.0
M104 S225.0
(<layer> 0.5 )
(<nestedRing> )
(<boundaryPerimeter> )
(<boundaryPoint> X-43.942 Y-30.13 Z0.5 </boundaryPoint> )
(<boundaryPoint> X-42.861 Y-30.302 Z0.5 </boundaryPoint> )
(<boundaryPoint> X27.14 Y-30.302 Z0.5 </boundaryPoint> )
(<boundaryPoint> X28.221 Y-30.13 Z0.5 </boundaryPoint> )
(<boundaryPoint> X29.197 Y-29.633 Z0.5 </boundaryPoint> )
(<boundaryPoint> X29.959 Y-28.871 Z0.5 </boundaryPoint> )
(<boundaryPoint> X30.102 Y-28.656 Z0.5 </boundaryPoint> )
(<boundaryPoint> X30.469 Y-27.882 Z0.5 </boundaryPoint> )
(<boundaryPoint> X30.7 Y-26.341 Z0.5 </boundaryPoint> )
(<boundaryPoint> X30.857 Y-22.741 Z0.5 </boundaryPoint> )
(<boundaryPoint> X31.458 Y-18.171 Z0.5 </boundaryPoint> )
(<boundaryPoint> X31.448 Y-17.634 Z0.5 </boundaryPoint> )
(<boundaryPoint> X31.619 Y-16.555 Z0.5 </boundaryPoint> )
(<boundaryPoint> X31.308 Y-14.592 Z0.5 </boundaryPoint> )
(<boundaryPoint> X30.405 Y-12.822 Z0.5 </boundaryPoint> )
(<boundaryPoint> X29.0 Y-11.418 Z0.5 </boundaryPoint> )
(<boundaryPoint> X28.376 Y-11.099 Z0.5 </boundaryPoint> )
(<boundaryPoint> X27.969 Y-10.747 Z0.5 </boundaryPoint> )
(<boundaryPoint> X26.634 Y-9.896 Z0.5 </boundaryPoint> )
(<boundaryPoint> X25.076 Y-8.653 Z0.5 </boundaryPoint> )
(<boundaryPoint> X23.648 Y-7.261 Z0.5 </boundaryPoint> )
(<boundaryPoint> X22.366 Y-5.734 Z0.5 </boundaryPoint> )
(<boundaryPoint> X21.244 Y-4.087 Z0.5 </boundaryPoint> )
(<boundaryPoint> X20.291 Y-2.336 Z0.5 </boundaryPoint> )
(<boundaryPoint> X19.515 Y-0.497 Z0.5 </boundaryPoint> )
(<boundaryPoint> X18.927 Y1.407 Z0.5 </boundaryPoint> )
(<boundaryPoint> X18.532 Y3.361 Z0.5 </boundaryPoint> )
(<boundaryPoint> X18.334 Y5.345 Z0.5 </boundaryPoint> )
(<boundaryPoint> X18.334 Y7.339 Z0.5 </boundaryPoint> )
(<boundaryPoint> X18.485 Y8.851 Z0.5 </boundaryPoint> )
(<boundaryPoint> X19.34 Y10.104 Z0.5 </boundaryPoint> )
(<boundaryPoint> X20.622 Y11.632 Z0.5 </boundaryPoint> )
(<boundaryPoint> X22.049 Y13.024 Z0.5 </boundaryPoint> )
(<boundaryPoint> X23.608 Y14.268 Z0.5 </boundaryPoint> )
(<boundaryPoint> X25.284 Y15.35 Z0.5 </boundaryPoint> )
(<boundaryPoint> X27.058 Y16.259 Z0.5 </boundaryPoint> )
(<boundaryPoint> X28.913 Y16.988 Z0.5 </boundaryPoint> )
(<boundaryPoint> X30.834 Y17.527 Z0.5 </boundaryPoint> )
(<boundaryPoint> X32.797 Y17.873 Z0.5 </boundaryPoint> )
(<boundaryPoint> X34.785 Y18.023 Z0.5 </boundaryPoint> )
(<boundaryPoint> X36.779 Y17.973 Z0.5 </boundaryPoint> )
(<boundaryPoint> X38.375 Y17.764 Z0.5 </boundaryPoint> )
(<boundaryPoint> X38.912 Y17.775 Z0.5 </boundaryPoint> )
(<boundaryPoint> X40.011 Y17.602 Z0.5 </boundaryPoint> )
(<boundaryPoint> X41.972 Y17.913 Z0.5 </boundaryPoint> )
(<boundaryPoint> X43.742 Y18.814 Z0.5 </boundaryPoint> )
(<boundaryPoint> X45.148 Y20.22 Z0.5 </boundaryPoint> )
(<boundaryPoint> X46.05 Y21.989 Z0.5 </boundaryPoint> )
(<boundaryPoint> X46.361 Y23.951 Z0.5 </boundaryPoint> )
(<boundaryPoint> X46.05 Y25.913 Z0.5 </boundaryPoint> )
(<boundaryPoint> X45.148 Y27.683 Z0.5 </boundaryPoint> )
(<boundaryPoint> X43.742 Y29.088 Z0.5 </boundaryPoint> )
(<boundaryPoint> X41.972 Y29.991 Z0.5 </boundaryPoint> )
(<boundaryPoint> X40.011 Y30.302 Z0.5 </boundaryPoint> )
(<boundaryPoint> X38.048 Y29.991 Z0.5 </boundaryPoint> )
(<boundaryPoint> X37.98 Y29.956 Z0.5 </boundaryPoint> )
(<boundaryPoint> X37.45 Y29.879 Z0.5 </boundaryPoint> )
(<boundaryPoint> X31.828 Y28.105 Z0.5 </boundaryPoint> )
(<boundaryPoint> X23.311 Y26.218 Z0.5 </boundaryPoint> )
(<boundaryPoint> X14.662 Y25.079 Z0.5 </boundaryPoint> )
(<boundaryPoint> X6.132 Y24.698 Z0.5 </boundaryPoint> )
(<boundaryPoint> X-12.788 Y24.628 Z0.5 </boundaryPoint> )
(<boundaryPoint> X-13.715 Y24.405 Z0.5 </boundaryPoint> )
(<boundaryPoint> X-14.584 Y24.045 Z0.5 </boundaryPoint> )
(<boundaryPoint> X-15.387 Y23.553 Z0.5 </boundaryPoint> )
(<boundaryPoint> X-16.103 Y22.941 Z0.5 </boundaryPoint> )
(<boundaryPoint> X-16.715 Y22.225 Z0.5 </boundaryPoint> )
(<boundaryPoint> X-17.207 Y21.422 Z0.5 </boundaryPoint> )
(<boundaryPoint> X-17.567 Y20.553 Z0.5 </boundaryPoint> )
(<boundaryPoint> X-17.789 Y19.627 Z0.5 </boundaryPoint> )
(<boundaryPoint> X-17.861 Y8.553 Z0.5 </boundaryPoint> )
(<boundaryPoint> X-17.389 Y8.295 Z0.5 </boundaryPoint> )
(<boundaryPoint> X-16.852 Y9.349 Z0.5 </boundaryPoint> )
(<boundaryPoint> X-16.208 Y10.34 Z0.5 </boundaryPoint> )
(<boundaryPoint> X-15.464 Y11.26 Z0.5 </boundaryPoint> )
(<boundaryPoint> X-14.627 Y12.096 Z0.5 </boundaryPoint> )
(<boundaryPoint> X-13.708 Y12.84 Z0.5 </boundaryPoint> )
(<boundaryPoint> X-12.716 Y13.485 Z0.5 </boundaryPoint> )
(<boundaryPoint> X-11.662 Y14.022 Z0.5 </boundaryPoint> )
(<boundaryPoint> X-10.558 Y14.445 Z0.5 </boundaryPoint> )
(<boundaryPoint> X-9.415 Y14.752 Z0.5 </boundaryPoint> )
(<boundaryPoint> X-8.247 Y14.937 Z0.5 </boundaryPoint> )
(<boundaryPoint> X-7.066 Y14.998 Z0.5 </boundaryPoint> )
(<boundaryPoint> X-5.885 Y14.937 Z0.5 </boundaryPoint> )
(<boundaryPoint> X-4.717 Y14.752 Z0.5 </boundaryPoint> )
(<boundaryPoint> X-3.574 Y14.445 Z0.5 </boundaryPoint> )
(<boundaryPoint> X-2.47 Y14.022 Z0.5 </boundaryPoint> )
(<boundaryPoint> X-1.416 Y13.485 Z0.5 </boundaryPoint> )
(<boundaryPoint> X-0.424 Y12.84 Z0.5 </boundaryPoint> )
(<boundaryPoint> X0.495 Y12.096 Z0.5 </boundaryPoint> )
(<boundaryPoint> X1.332 Y11.26 Z0.5 </boundaryPoint> )
(<boundaryPoint> X2.076 Y10.34 Z0.5 </boundaryPoint> )
(<boundaryPoint> X2.72 Y9.349 Z0.5 </boundaryPoint> )
(<boundaryPoint> X3.257 Y8.295 Z0.5 </boundaryPoint> )
(<boundaryPoint> X3.681 Y7.19 Z0.5 </boundaryPoint> )
(<boundaryPoint> X3.987 Y6.048 Z0.5 </boundaryPoint> )
(<boundaryPoint> X4.172 Y4.88 Z0.5 </boundaryPoint> )
(<boundaryPoint> X4.234 Y3.699 Z0.5 </boundaryPoint> )
(<boundaryPoint> X4.172 Y2.517 Z0.5 </boundaryPoint> )
(<boundaryPoint> X3.987 Y1.349 Z0.5 </boundaryPoint> )
(<boundaryPoint> X3.681 Y0.207 Z0.5 </boundaryPoint> )
(<boundaryPoint> X3.257 Y-0.898 Z0.5 </boundaryPoint> )
(<boundaryPoint> X2.72 Y-1.952 Z0.5 </boundaryPoint> )
(<boundaryPoint> X2.076 Y-2.943 Z0.5 </boundaryPoint> )
(<boundaryPoint> X1.332 Y-3.863 Z0.5 </boundaryPoint> )
(<boundaryPoint> X0.495 Y-4.699 Z0.5 </boundaryPoint> )
(<boundaryPoint> X-0.424 Y-5.443 Z0.5 </boundaryPoint> )
(<boundaryPoint> X-1.416 Y-6.088 Z0.5 </boundaryPoint> )
(<boundaryPoint> X-2.47 Y-6.625 Z0.5 </boundaryPoint> )
(<boundaryPoint> X-3.574 Y-7.048 Z0.5 </boundaryPoint> )
(<boundaryPoint> X-4.717 Y-7.355 Z0.5 </boundaryPoint> )
(<boundaryPoint> X-5.885 Y-7.54 Z0.5 </boundaryPoint> )
(<boundaryPoint> X-7.066 Y-7.601 Z0.5 </boundaryPoint> )
(<boundaryPoint> X-8.247 Y-7.54 Z0.5 </boundaryPoint> )
(<boundaryPoint> X-9.415 Y-7.355 Z0.5 </boundaryPoint> )
(<boundaryPoint> X-10.558 Y-7.048 Z0.5 </boundaryPoint> )
(<boundaryPoint> X-11.662 Y-6.625 Z0.5 </boundaryPoint> )
(<boundaryPoint> X-12.716 Y-6.088 Z0.5 </boundaryPoint> )
(<boundaryPoint> X-13.708 Y-5.443 Z0.5 </boundaryPoint> )
(<boundaryPoint> X-14.627 Y-4.699 Z0.5 </boundaryPoint> )
(<boundaryPoint> X-15.464 Y-3.863 Z0.5 </boundaryPoint> )
(<boundaryPoint> X-16.208 Y-2.943 Z0.5 </boundaryPoint> )
(<boundaryPoint> X-16.852 Y-1.952 Z0.5 </boundaryPoint> )
(<boundaryPoint> X-17.389 Y-0.898 Z0.5 </boundaryPoint> )
(<boundaryPoint> X-17.863 Y-1.189 Z0.5 </boundaryPoint> )
(<boundaryPoint> X-17.893 Y-17.929 Z0.5 </boundaryPoint> )
(<boundaryPoint> X-17.992 Y-18.549 Z0.5 </boundaryPoint> )
(<boundaryPoint> X-18.154 Y-19.156 Z0.5 </boundaryPoint> )
(<boundaryPoint> X-18.379 Y-19.742 Z0.5 </boundaryPoint> )
(<boundaryPoint> X-18.664 Y-20.302 Z0.5 </boundaryPoint> )
(<boundaryPoint> X-19.006 Y-20.828 Z0.5 </boundaryPoint> )
(<boundaryPoint> X-19.402 Y-21.316 Z0.5 </boundaryPoint> )
(<boundaryPoint> X-19.846 Y-21.76 Z0.5 </boundaryPoint> )
(<boundaryPoint> X-20.334 Y-22.156 Z0.5 </boundaryPoint> )
(<boundaryPoint> X-20.86 Y-22.498 Z0.5 </boundaryPoint> )
(<boundaryPoint> X-21.42 Y-22.783 Z0.5 </boundaryPoint> )
(<boundaryPoint> X-22.006 Y-23.008 Z0.5 </boundaryPoint> )
(<boundaryPoint> X-22.613 Y-23.17 Z0.5 </boundaryPoint> )
(<boundaryPoint> X-23.233 Y-23.269 Z0.5 </boundaryPoint> )
(<boundaryPoint> X-42.861 Y-23.302 Z0.5 </boundaryPoint> )
(<boundaryPoint> X-43.942 Y-23.473 Z0.5 </boundaryPoint> )
(<boundaryPoint> X-44.902 Y-23.962 Z0.5 </boundaryPoint> )
(<boundaryPoint> X-44.902 Y-29.641 Z0.5 </boundaryPoint> )
(<perimeterPath> )
M108 S102.0
G1 X52.0 Y-57.0 Z10.0 F1920.0
G1 X52.0 Y-55.0 Z10.0 F1920.0
G1 X52.0 Y-30.0 Z10.0 F1920.0
G1 X51.93 Y-29.43 Z0.5 F1920.0
G1 X45.38 Y26.16 Z0.5 F1920.0
G1 X45.31 Y26.73 Z0.5 F1440.0
M101
G1 X44.91 Y27.51 Z0.5 F1440.0
G1 X43.57 Y28.85 Z0.5 F1440.0
G1 X41.88 Y29.71 Z0.5 F1440.0
G1 X40.01 Y30.01 Z0.5 F1440.0
G1 X38.14 Y29.71 Z0.5 F1440.0
G1 X38.07 Y29.68 Z0.5 F1440.0
G1 X37.52 Y29.6 Z0.5 F1440.0
G1 X31.9 Y27.82 Z0.5 F1440.0
G1 X23.36 Y25.93 Z0.5 F1440.0
G1 X14.69 Y24.79 Z0.5 F1440.0
G1 X6.14 Y24.41 Z0.5 F1440.0
G1 X-12.75 Y24.34 Z0.5 F1440.0
G1 X-13.63 Y24.13 Z0.5 F1440.0
G1 X-14.45 Y23.79 Z0.5 F1440.0
G1 X-15.22 Y23.32 Z0.5 F1440.0
|
Re: Starting a Prusa Mendel build September 16, 2011 08:30PM |
Registered: 12 years ago Posts: 3 |
|
Re: Starting a Prusa Mendel build September 16, 2011 08:32PM |
Registered: 12 years ago Posts: 74 |

|
Re: Starting a Prusa Mendel build September 17, 2011 01:29AM |
Registered: 12 years ago Posts: 74 |
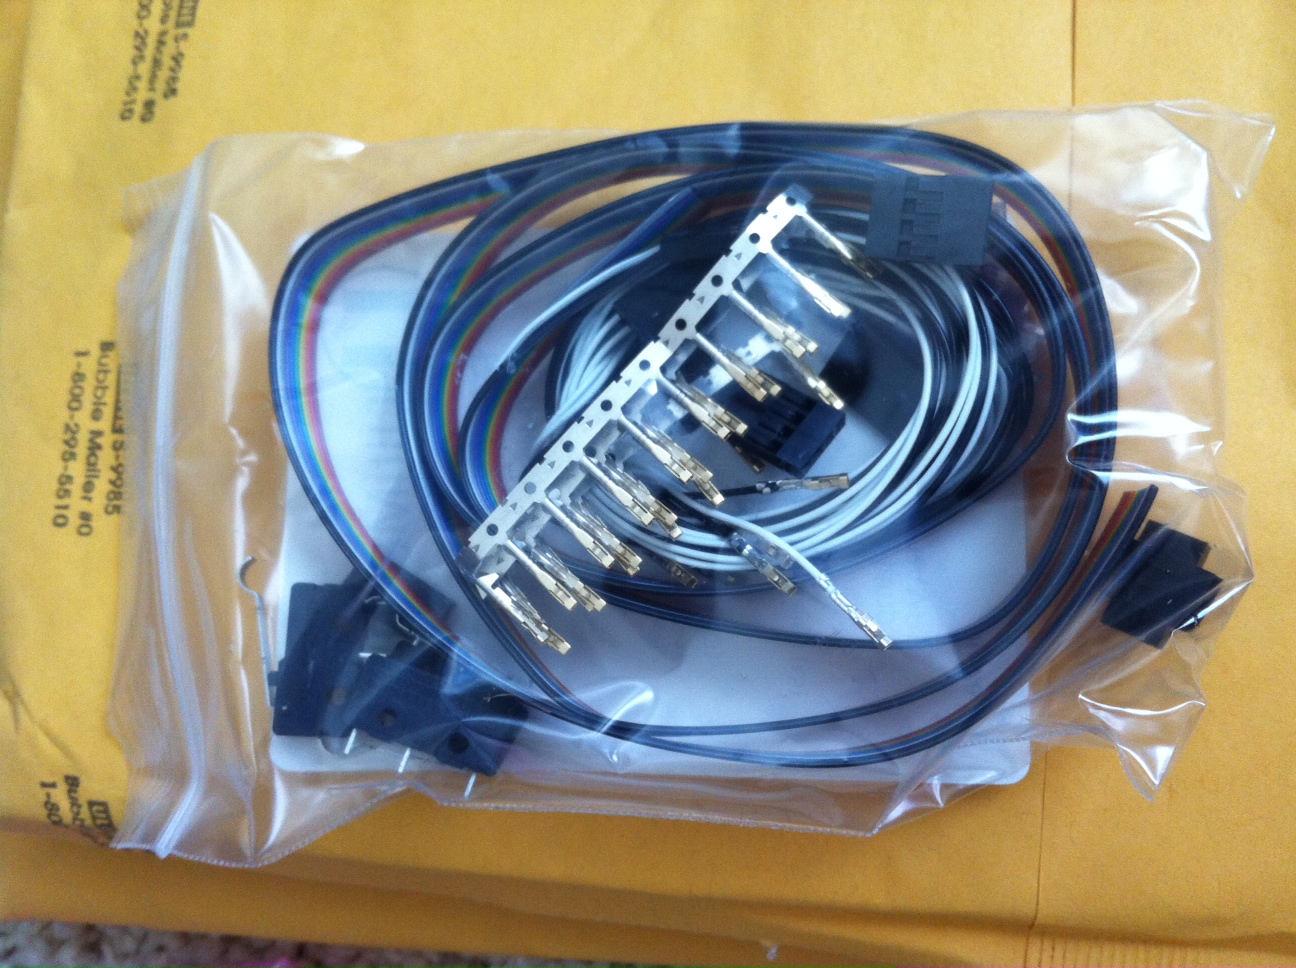
pictures of some of the stuff I got today > <
<
The right side of the pictures is getting cut off again...
<The right side of the pictures is getting cut off again...


|
Re: Starting a Prusa Mendel build September 17, 2011 04:01AM |
Registered: 14 years ago Posts: 3,742 |
You gcode has no E parameters in them which is why your extruder isn't working.
Turn on Dimension in Skeinforge.
Bob Morrison
Wörth am Rhein, Germany
"Luke, use the source!"
BLOG - PHOTOS - Thingiverse
Turn on Dimension in Skeinforge.
Bob Morrison
Wörth am Rhein, Germany
"Luke, use the source!"
BLOG - PHOTOS - Thingiverse
|
Re: Starting a Prusa Mendel build September 17, 2011 04:18AM |
Registered: 12 years ago Posts: 74 |
|
Re: Starting a Prusa Mendel build September 17, 2011 01:51PM |
Registered: 12 years ago Posts: 74 |

|
Re: Starting a Prusa Mendel build September 17, 2011 06:49PM |
Registered: 12 years ago Posts: 74 |
|
Re: Starting a Prusa Mendel build September 18, 2011 08:09PM |
Registered: 12 years ago Posts: 74 |
|
Re: Starting a Prusa Mendel build September 19, 2011 11:33PM |
Registered: 12 years ago Posts: 74 |


|
Re: Starting a Prusa Mendel build September 22, 2011 01:41PM |
Registered: 12 years ago Posts: 74 |
I've previously tried mocking some prints with the endstops and stepper motors connected to my RAMPS 1.4 board. Surprisingly it worked. Had an issue with the extruder stepper, but fixed that by enabling Dimension (don't know why that would have been disabled by default).
Printing with ReplicatorG 25, the steppers move at a fairly quick pace. When I execute the same print with Pronterface and SFACT, it is incredibly slow.
Can anyone point me to the right settings in SFACT to increase the print speed? Maybe I can just compare all the settings between ReplicatorG (Skeinforge) and SFACT and see what's different. But that might not pinpoint which settings are causing the slowdown.
This weekend I'm traveling to my brother's house. Going to get the plastic parts and assemble the extruder. Won't be able to do much with it until I get back though.
|
Re: Starting a Prusa Mendel build September 25, 2011 01:30AM |
Registered: 12 years ago Posts: 74 |
EDIT: I got the wrong hobbed bolt...doesn't fit my extruder. Need to find a different one...
Well, first thing i noticed was that the bolt head didn't grip the gear properly, there is a few degrees of movement that the gear can move in. The gear expects an M8, but the bolt is not metric.
Second problem, the hobbed part is way too close to the bolt head, it does not align to the filament hole even when no gear is attached. With a gear attached, it is completely hidden in the bearing.
Either of these issues makes the bolt pretty much unusable. Here's a picture of the bolt in a wades extruder base with no gear:
Edited 1 time(s). Last edit at 09/25/2011 01:34AM by hardtoe.
Well, first thing i noticed was that the bolt head didn't grip the gear properly, there is a few degrees of movement that the gear can move in. The gear expects an M8, but the bolt is not metric.
Second problem, the hobbed part is way too close to the bolt head, it does not align to the filament hole even when no gear is attached. With a gear attached, it is completely hidden in the bearing.
Either of these issues makes the bolt pretty much unusable. Here's a picture of the bolt in a wades extruder base with no gear:


Edited 1 time(s). Last edit at 09/25/2011 01:34AM by hardtoe.
|
Re: Starting a Prusa Mendel build September 25, 2011 08:48AM |
Registered: 13 years ago Posts: 1,780 |
I also found that the large driven gear that comes with the Prusa files from github has a very large hole which is very loose even on an 8 mm bolt. It doesn't seem to change with the configuration.scad file. I haven't had time to go through the scad file yet. Perhaps the hobbed bolt you got was made with a 5/16 bolt. That's what I used and it's working for me. Try removing the washer. It might light up with the filament hole without the washer.
|
Re: Starting a Prusa Mendel build September 25, 2011 10:59AM |
Registered: 12 years ago Posts: 30 |
|
Re: Starting a Prusa Mendel build September 25, 2011 12:50PM |
Registered: 13 years ago Posts: 1,780 |
The difference is so small between an 8 mm and a 5/16" bolt that I don't think it's necessary to make a special one. The standard Wade works well enough for me. One thing I found is that it's better to sandwich the gear with two nuts so that it doesn't have any play. Mine is set up in the order bolt head-washer-bearing-wade body-bearing-nut-gear-washer nut. The nut cavity in the gear faces in.
|
Re: Starting a Prusa Mendel build September 27, 2011 04:34PM |
Registered: 12 years ago Posts: 74 |
Thanks brnrd, you convinced me to try my hobbed bolt again and I was able to get it to work. I turned it around and put a nut on either end of the gear. I attached the hot-end and was able to extrude some plastic!
However, I made the mistake of assuming the sample plastic from Ultimachine was ABS...it's not. It's PLA. So I was extruding PLA at 230 degrees and it got messy fast. The PLA didn't seem to burn too much (though there was a steady stream of light smoke coming out...), instead it melted to a liquid and drip-dropped out of the nozzle.
After I realized my mistake I gingerly backed out the PLA and let the hot-end cool. Then I got some ABS fed in and warmed up the hot-end. I wasn't sure how to make the PLA -> ABS transition...it was pretty awkward. I tried to time it so I was pushing out the PLA before it got real hot. Not sure if it matters, I was mostly afraid of charred plastic blocking my hot-end.
The assembled extruder on the x-carriage:
Orange is the PLA...I made a bit of a mess with that. White is the ABS.
Ohh yeah, I was also able to assemble the frame! It was fun, the pieces went together easily. Didn't feel like it took any time at all. I don't have any epoxy for the bushings, so I'm going to get some today so I can get things moving! I also need to work the PLA bushings a little bit...they are really tight on the smooth rods. I'll probably heat up some smooth rod to loosen them up a little bit.
Edited 1 time(s). Last edit at 09/27/2011 04:38PM by hardtoe.
However, I made the mistake of assuming the sample plastic from Ultimachine was ABS...it's not. It's PLA. So I was extruding PLA at 230 degrees and it got messy fast. The PLA didn't seem to burn too much (though there was a steady stream of light smoke coming out...), instead it melted to a liquid and drip-dropped out of the nozzle.
After I realized my mistake I gingerly backed out the PLA and let the hot-end cool. Then I got some ABS fed in and warmed up the hot-end. I wasn't sure how to make the PLA -> ABS transition...it was pretty awkward. I tried to time it so I was pushing out the PLA before it got real hot. Not sure if it matters, I was mostly afraid of charred plastic blocking my hot-end.
The assembled extruder on the x-carriage:

Orange is the PLA...I made a bit of a mess with that. White is the ABS.

Ohh yeah, I was also able to assemble the frame! It was fun, the pieces went together easily. Didn't feel like it took any time at all. I don't have any epoxy for the bushings, so I'm going to get some today so I can get things moving! I also need to work the PLA bushings a little bit...they are really tight on the smooth rods. I'll probably heat up some smooth rod to loosen them up a little bit.

Edited 1 time(s). Last edit at 09/27/2011 04:38PM by hardtoe.
|
Re: Starting a Prusa Mendel build September 28, 2011 09:36AM |
Registered: 13 years ago Posts: 134 |
I've heard people run the PLA bushings on the threaded rods to loosen them up.
__________________________________________________________________________
"I like to be, what I like to see, in you and me.
I am the Stallion, Mang."
ISTAR Scope Club
__________________________________________________________________________
"I like to be, what I like to see, in you and me.
I am the Stallion, Mang."
ISTAR Scope Club
|
Re: Starting a Prusa Mendel build September 28, 2011 09:45AM |
Registered: 12 years ago Posts: 2 |
Hey Hardtoe,
This thread is really fantastic - thanks! I'm just starting to really look at details on getting/making a 3D printer, and it's great to watch your progress.
A couple questions if you have the chance...
- About how much do you think you'll have spent once you are up and running?
- What kinds of technical knowledge did you find yourself using, besides coding?
Thanks.
|
Re: Starting a Prusa Mendel build September 28, 2011 09:51AM |
Admin Registered: 12 years ago Posts: 2,569 |
|
Re: Starting a Prusa Mendel build September 28, 2011 11:21AM |
Registered: 12 years ago Posts: 74 |
Thanks for the tips guys!
I used my hot air gun to heat up one end of a smooth rod, then I placed the PLA bushings on the hot end of the rod and let it sit for a little bit before moving the bushing to the cool end. It definitely made the bushings run smoother, but I don't think it was enough...
Last night I glued the bushings to the bottom print plate using some epoxy. Then I attached the motor and belt according to the instructions. The platform does not move smoothly. I used pronterface to move the y-axis back and forth, it has jerky motions. I noticed that the y motor bracket flexes a bit; supporting the bracket with my hand helped a little bit, but the movement was still not smooth. I added generous amounts of lithium grease to the smooth rods, still didn't help.
Tonight I'm going to try to get the platform to run smooth by using the heated smooth rod again. I think I'll use boiling water this time to ensure that I'm getting the right temperature. If the boiling water isn't enough, I'll try running the bushings through some threaded rod, that should help out.
To answer Macguffin's questions:
- By the time this printer is running, I'll probably have spent 600-700 USD. I've needed to buy some tools like a decent wrench set and will probably need to get some more things that I haven't yet thought of.
- So far I haven't needed any specialized skills. I haven't needed to code anything. My hot-end was pre-assembled. My electronics came assembled and preloaded with firmware. I have since flashed a different version, but I didn't need to write any code for that. You'll need to be able to work through problems installing software on your computer...that's not too bad. I'm sure I will run into many more build problems as I try to get the y-axis running then the x and z-axis.
I think the most important aspect will be identifying problems, tracing them back to their root, then identifying a solution (finding it online or creating my own). Putting the bits and pieces together is easy...solving the issues that pop up is where I will spend a lot of time.
|
Re: Starting a Prusa Mendel build September 28, 2011 11:26AM |
Admin Registered: 12 years ago Posts: 2,569 |
|
Re: Starting a Prusa Mendel build September 28, 2011 11:00PM |
Registered: 12 years ago Posts: 74 |
Got the y-axis to slide smoothly  I tightened the belt, heated the PLA bushings and added a zip-tie to the y-motor mount. Now the build plate moves every time i tell it to move 0.1 mm in Pronterface.
I was also able to get the z-axis up and running. Things are moving very smoothly right now! I just glued the PLA bushings to the x-carriage, waiting for that to set before I move on to the next step.
Maybe I can make a test print tonight or tomorrow! If I do it will probably look the the stuff I naturally extrude every day....on the can. I don't yet have my kapton tape...we'll see.
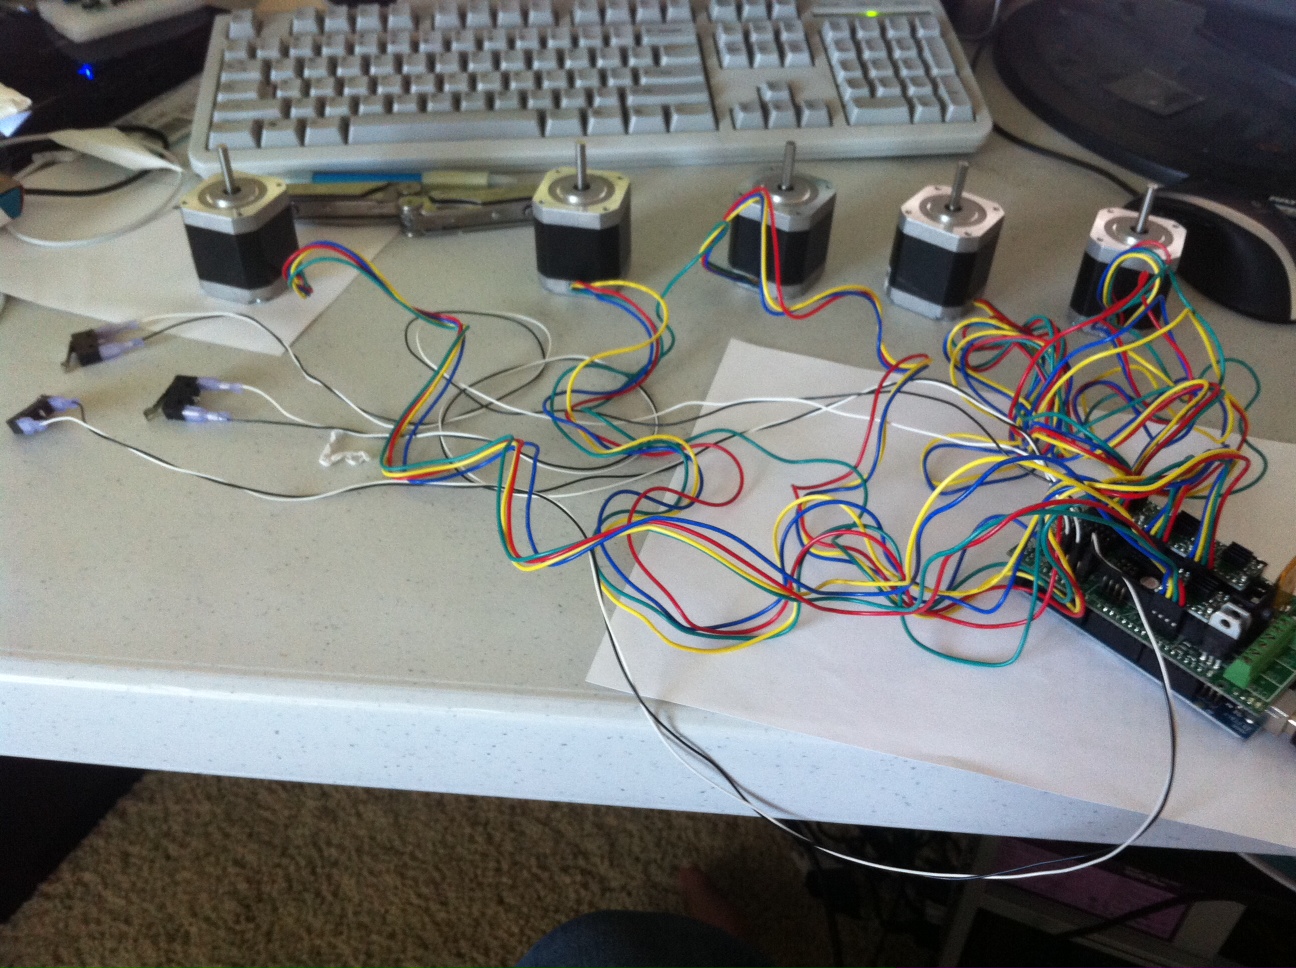
Here's the current state of the machine (on my messy workbench):
Time for dinner! Complements to my wife:
I tightened the belt, heated the PLA bushings and added a zip-tie to the y-motor mount. Now the build plate moves every time i tell it to move 0.1 mm in Pronterface.I was also able to get the z-axis up and running. Things are moving very smoothly right now! I just glued the PLA bushings to the x-carriage, waiting for that to set before I move on to the next step.
Maybe I can make a test print tonight or tomorrow! If I do it will probably look the the stuff I naturally extrude every day....on the can. I don't yet have my kapton tape...we'll see.
Here's the current state of the machine (on my messy workbench):

Time for dinner! Complements to my wife:

|
Re: Starting a Prusa Mendel build September 29, 2011 09:24AM |
Registered: 12 years ago Posts: 2 |
|
Re: Starting a Prusa Mendel build September 29, 2011 11:26AM |
Registered: 12 years ago Posts: 74 |
Well, I tried to print last night and this morning.
It went just as I expected, horribly
At first the extruder was trying to push the filament way too fast; this caused the bolt to grind the filament and get the teeth full of plastic bits. I slowed the feed rate down in SFACT to 10mm/s. It seems that that would have helped, except my extruder has a nasty habit of reversing the filament all the way out every time a print is initiated or resumed.
So I've been trying this with Pronterface host software and Sprinter firmware. Any idea why the filament would reverse like this? It will reverse again if I pause the print and resume it.
Going to give it another try tonight.
|
Re: Starting a Prusa Mendel build September 29, 2011 11:33AM |
Registered: 14 years ago Posts: 3,742 |
Set extrusion to Absolute and in your startup zero your extruder "G92 E0".
Bob Morrison
Wörth am Rhein, Germany
"Luke, use the source!"
BLOG - PHOTOS - Thingiverse
Bob Morrison
Wörth am Rhein, Germany
"Luke, use the source!"
BLOG - PHOTOS - Thingiverse
|
Re: Starting a Prusa Mendel build September 29, 2011 12:04PM |
Registered: 12 years ago Posts: 74 |
Well that explains a lot, thanks Bob!
I took a look at the Sprinter "Configuration.h" file and saw this:
Just as Bob implied, Sprinter was expecting absolute values for the extruder. I might just configure Sprinter to use relative coordinates for that axis by setting "axis_relative_modes[3]" to "true" and see if that works. Otherwise I will follow Bob's recommendation.
Anyone know of an advantage of one or the other? Seems like it shouldn't make a difference as long as the firmware and GCode are using the same mode.
Edited 1 time(s). Last edit at 09/29/2011 12:05PM by hardtoe.
I took a look at the Sprinter "Configuration.h" file and saw this:
//// MOVEMENT SETTINGS
const int NUM_AXIS = 4; // The axis order in all axis related arrays is X, Y, Z, E
float max_feedrate[] = {200000, 200000, 240, 500000};
float homing_feedrate[] = {1500,1500,120};
bool axis_relative_modes[] = {false, false, false, false};
Just as Bob implied, Sprinter was expecting absolute values for the extruder. I might just configure Sprinter to use relative coordinates for that axis by setting "axis_relative_modes[3]" to "true" and see if that works. Otherwise I will follow Bob's recommendation.
Anyone know of an advantage of one or the other? Seems like it shouldn't make a difference as long as the firmware and GCode are using the same mode.
Edited 1 time(s). Last edit at 09/29/2011 12:05PM by hardtoe.
|
Re: Starting a Prusa Mendel build September 29, 2011 04:53PM |
Registered: 12 years ago Posts: 74 |

Sorry, only registered users may post in this forum.