Structure reinforcment and enlargment of belt idler carriages
Posted by PRZ
|
Structure reinforcment and enlargment of belt idler carriages August 22, 2015 02:26PM |
Registered: 8 years ago Posts: 475 |
The acrylic panels are not quite stable, they tend to bend and warp.
Also, as the support tend to slide on the rods, that compress the panels which buckles.
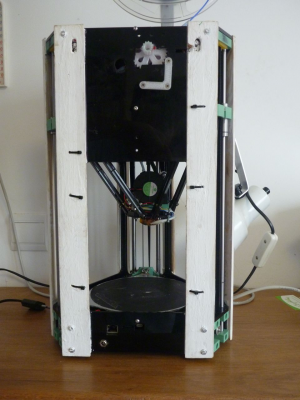
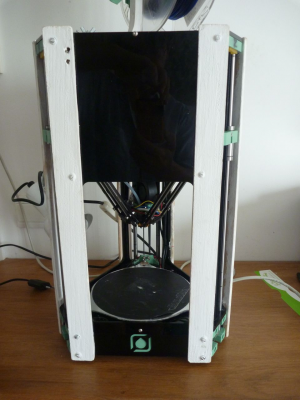
After a few resetting of the machine and as the side panel nuts were beginning to freely rotate in the supports, I decided that something shall be done quickly before I won't be able to tighten the nuts, so I reinforced simply with wood lath the side panels.
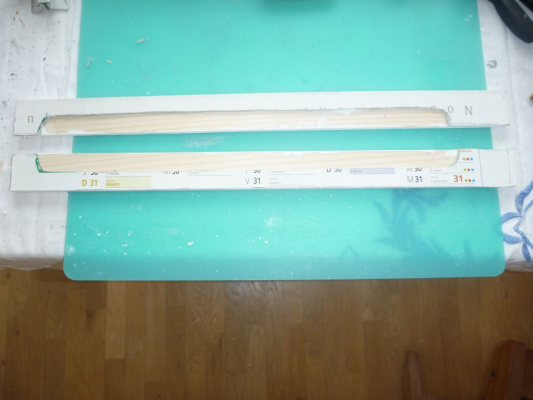
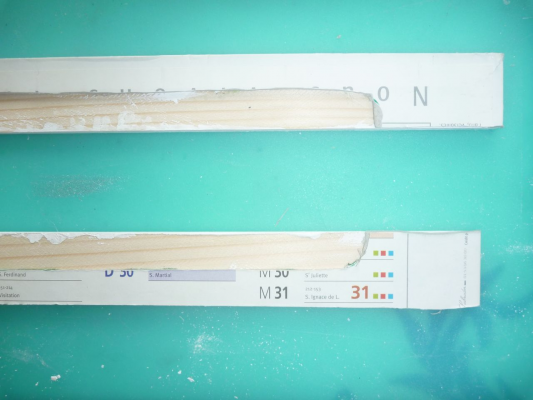
The wood laths are pine wood or equivalent 5mmx30mm. This is a modest section, but the stiffness added is really significant and the machine is now completely stable.
This is fairly less classy than the polycarbonate reinforcment done by another member (in this forum topic [forums.reprap.org]), but it is low cost and simple. The paintjob could be better, also, but that was paint I had at hand.
You shall note something very important to avoid clearance problems, the 'knots' of the zip-tie shall be OUTSIDE.
To clear the carriage, I added thick cardboard (~2mm) made of old calendar.
You shall drill all the lath ensemble (the stack is only 30 mm) on a press drill, in order to have good accuracy. Dimensions are better taken from the DXF files [github.com] than direct measurement.
This reinforcment allow something important: a proper belt tensioning.
good belt tensioning may give better accuracy to your printer, but the most important point is that increase the belt stiffness and improve significantly the calibration. With proper belt tension, the difference in Z-offset between the center and the side of the bed became less than 0.05mm. You shall not overtigthen the belts, as it may creates friction and you can loose steps. Your carriages shall still move freely on the rods.
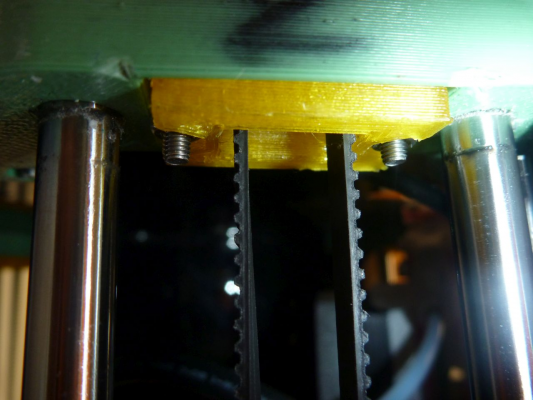
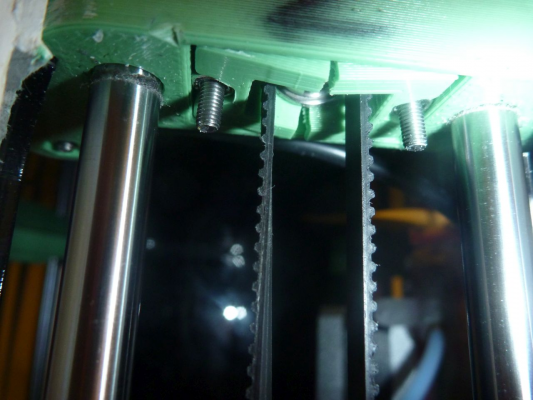
That aggravates the problem of stability experienced on the idler carriages. Being supported by the bolt head below the load point, the idler carriages tend to flip sideways and the belt rub on the idler carriage. Also, this side displacment tend to aggravate the bending moment and increase the flip. One forum member have installed 4 screws (see this topic [forums.reprap.org], which is a clever solution, but I don't think he had given the stl file of the modified supports.
What I have done is simply enlarge and increase the height of the idler carriage in order to have a very tight fit in the support and maintain the carriage straight. The height increase is for reinforcment.
Also, due to higher tension, I have broken all the idler carriage, that I recommend to print in PETG or ABS instead of PLA.
I also replaced the bearings with flanged ones, but the idler carriage shall be stabilised first.
Find the STL file Idler_carriage_larger.zip, and the somewhat barbarian Openscad module I write to build it (you may modify the scale to fit your own support) is below:
//RepRapPro Fisher larger and higher idler carriage
scale([1,1.07,1]) { // enlarged
translate ([0,-8.5,0]) {
import("1243-Idler.STL");
translate ([0,0,1.5]) // stack to increase height
import("1243-Idler.STL");
}
}
translate ([0,-8.5,1.5]) // re-stack for good idler width
import("1243-Idler.STL");
translate ([0,-8.5,0]) // re-stack for good nut width
import("1243-Idler.STL");
//cube ([2,18.2,2]); // width check
Edited 2 time(s). Last edit at 08/22/2015 02:50PM by PRZ.
|
Re: Structure reinforcment and enlargment of belt idler carriages August 22, 2015 06:04PM |
Registered: 8 years ago Posts: 443 |
Some interesting mods, but im wondering if your actually over tightening the belt and creating more problems than you are solving, the next potential failure you may have to deal with could be excessive wear in your motors that may now have too much radial force on them.
The idea of modifying the lower motor mounts to prevent slippage I like, but isnt the top plate supposed to use the rails to brace the belt tension in much the same way? The instructions are very clear about slackening belts before removing top for this reason.
.... Id be looking at better ways of using the rails to brace the belt tension before stiffening the pannels, maybe extend your idea for the feet to the idler suports?
Im not convinced by your higher belt stiffness argument, I'll have to give that some thought.
RepRapPro Mendel 3 Tricolour
RepRapPro Fisher
-Carbon Arms
-Easy adjust Carriage+effector
-axis stiffness mods
HE3D -600 delta
-Duet 0.8.5
-PanelDue
-DC42 Height probe
-RobotDigg metal components
Simplyfy3D
RS Design Spark CAD
|
Re: Structure reinforcment and enlargment of belt idler carriages August 23, 2015 06:53AM |
Registered: 8 years ago Posts: 475 |
I agree that overtightening the belts could create problems. I try to be reasonnable. This machine doesn't need as much tension as larger machine because the belts are shorter. But there is a minimum tension which is difficult to reach yet.
Using the slippage of the structure on the rods to limit the belts tension is not ok. That varies depending the oiling of the rods and other uncontrolled parameters. That makes the machine quite unstable, panels buckling and requires frequent panel retightening. The slippage occurs also while printing due to the dynamic loads and temperature increase. If a controlled force is desired, a spring could be used but that adds complexity.
And as I experienced, a good belt tension gives better and more reproducible calibration, which is important.
I think that the rods shall go through the top plate to gives accuracy in the machine dimensions, using the bolts for positioning is not sufficiently precise, hence the idea to have a counter plate to link through the top plate .
|
Re: Structure reinforcment and enlargment of belt idler carriages August 23, 2015 07:50AM |
Registered: 8 years ago Posts: 68 |
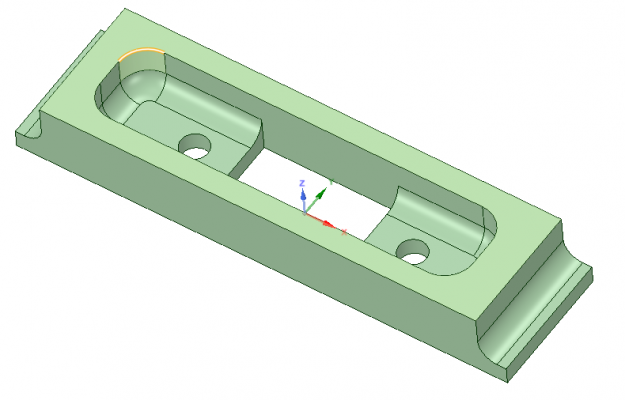
That's exactly what I've done on my test machine. I've merged the bottom two motor mounts into one and added a 2mm stop at the bottom - the STL is attached, if you're interested.Quote
bgkdavis
The idea of modifying the lower motor mounts to prevent slippage I like, but isnt the top plate supposed to use the rails to brace the belt tension in much the same way? The instructions are very clear about slackening belts before removing top for this reason.
.... Id be looking at better ways of using the rails to brace the belt tension before stiffening the pannels, maybe extend your idea for the feet to the idler suports?
I also agree that the force of the belt tension should go directly down the rods rather than through some dubious clamping method. In my opinion, to get the side panel screws tight enough to adequately prevent the idler bracket from moving you'd probably crack the acrylic side panel. As such, I've machined the rods down and added an acrylic stop above the idler (where the lid was). The idler tension screws are then moved to push against the acrylic, which then pushes directly on the rods. The idler bracket then has no vertical force on it and is simply used to hold the sides on and to keep the sides square.
|
Re: Structure reinforcment and enlargment of belt idler carriages August 23, 2015 08:17AM |
Registered: 8 years ago Posts: 83 |
|
Re: Structure reinforcment and enlargment of belt idler carriages August 23, 2015 08:28AM |
Registered: 8 years ago Posts: 443 |
I've got a very similar plate in mind, but it will sit on top of the top plate, this way I maintain the positional keying feature of the top plate, and get to transfer the force to the rods.
I've got a further idea where I can use some screws acting on the ends of the rods to do the belt tension function, but that may end up make dismantling very difficult
would you care to share the file your lower motor mounts
RepRapPro Mendel 3 Tricolour
RepRapPro Fisher
-Carbon Arms
-Easy adjust Carriage+effector
-axis stiffness mods
HE3D -600 delta
-Duet 0.8.5
-PanelDue
-DC42 Height probe
-RobotDigg metal components
Simplyfy3D
RS Design Spark CAD
|
Re: Structure reinforcment and enlargment of belt idler carriages August 23, 2015 08:42AM |
Registered: 8 years ago Posts: 443 |
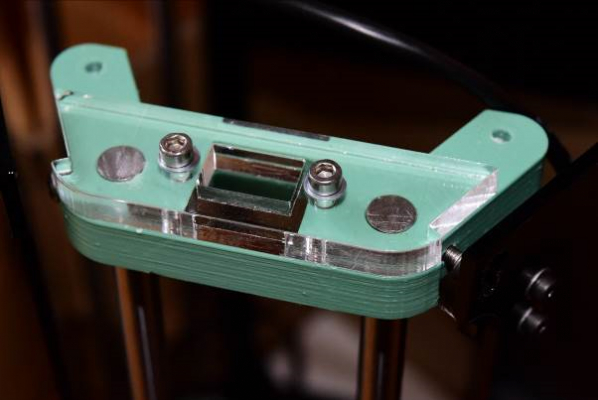
This is what I had in mind, this should sit on the top plate with the tension screws going through everything, Ill probably need much longer screws but I think it should do the job
RepRapPro Mendel 3 Tricolour
RepRapPro Fisher
-Carbon Arms
-Easy adjust Carriage+effector
-axis stiffness mods
HE3D -600 delta
-Duet 0.8.5
-PanelDue
-DC42 Height probe
-RobotDigg metal components
Simplyfy3D
RS Design Spark CAD
RepRapPro Mendel 3 Tricolour
RepRapPro Fisher
-Carbon Arms
-Easy adjust Carriage+effector
-axis stiffness mods
HE3D -600 delta
-Duet 0.8.5
-PanelDue
-DC42 Height probe
-RobotDigg metal components
Simplyfy3D
RS Design Spark CAD
|
Re: Structure reinforcment and enlargment of belt idler carriages August 23, 2015 09:10AM |
Registered: 8 years ago Posts: 68 |
I personally wouldn't bother trying putting screws pushing against the ends of the rods. I had that setup on the x axis of my MendelMax (among others that I can't think of right now), and it really doesn't work very well. I guess if you can manage to make it work then great, but it seems to be a more complicated way of doing things.Quote
bgkdavis
I've got a very similar plate in mind, but it will sit on top of the top plate, this way I maintain the positional keying feature of the top plate, and get to transfer the force to the rods.
I've got a further idea where I can use some screws acting on the ends of the rods to do the belt tension function, but that may end up make dismantling very difficult
would you care to share the file your lower motor mounts
The STL for the lower motor mount (1246) was an attachment in my post... or were you after the SW (or STEP) file?
Having had a play wit the acrylic top, it's a solution that seems to work well, but I'm still not completely sold on it. I considered doing it the way you mentioned but at the time I decided against it as you'd have to slacken and remove the idler every tome you wanted to get the lid off - I thought this may be a regular occurrence. However, having had a few of these printing every day over the past weeks, I've never needed to remove the lid... so maybe I'd suggest your method. I can't do this now as I've milled the rods shorter. What I'm now considering is to do the same at the top as I did with the motor mounts and just re-printing some idler brackets that are slightly thicker but have capped holes for rods. At the time, chucking some acrylic in the laser cutter and milling the rods was a much quicker solution than re-designing/printing some new parts.
|
Re: Structure reinforcment and enlargment of belt idler carriages August 23, 2015 09:15AM |
Registered: 8 years ago Posts: 443 |
its OK, I found the STL now, Ill print up a set of parts tomorrow and try them out
RepRapPro Mendel 3 Tricolour
RepRapPro Fisher
-Carbon Arms
-Easy adjust Carriage+effector
-axis stiffness mods
HE3D -600 delta
-Duet 0.8.5
-PanelDue
-DC42 Height probe
-RobotDigg metal components
Simplyfy3D
RS Design Spark CAD
RepRapPro Mendel 3 Tricolour
RepRapPro Fisher
-Carbon Arms
-Easy adjust Carriage+effector
-axis stiffness mods
HE3D -600 delta
-Duet 0.8.5
-PanelDue
-DC42 Height probe
-RobotDigg metal components
Simplyfy3D
RS Design Spark CAD
|
Re: Structure reinforcment and enlargment of belt idler carriages August 23, 2015 12:58PM |
Registered: 9 years ago Posts: 58 |
I like the idea of adjusting for the length of the rods with a simple screw. If you order stuff like this you usually get a tolerance of 1mm, having it milled/lathed to length adds a lot of cost. The idled holder could have a little more Z to it to hold a captive nut with an adjustment screw in it. The problem of that is that you introduce another point where careless tightening might break the machine. 5mm panels instead of 3 may also help, but that adds more to the cost.
|
Re: Structure reinforcment and enlargment of belt idler carriages September 03, 2015 03:23AM |
Registered: 8 years ago Posts: 7 |
I also have had recurrent problems with the acrylic plates buckling due to the idler arm slipping down. The degree of tightening of the belt must come into play here but if the belt isn't tight I have problems with slippage.
I agree totally that tightening the screw firmly will crack the acylic plate. I added a wide washer between the head of the screw and the acrylic plate and this helped minimize the cracking tendency but the slippage still has occurred although not as easily. The allen key hole on the screw is not very strong and I have nearly dethreaded (or whatever you call it ) one or two when tightening these more firmly.
Hence other options are welcome. The addition of a plate above the idler arm bracket that sits on the rods seems very good. I have considered adding additional supports to the acrylic plates too but not done it yet.
|
Re: Structure reinforcment and enlargment of belt idler carriages September 03, 2015 03:25AM |
Registered: 8 years ago Posts: 443 |
have a look at this thread
[forums.reprap.org]
you can see the rail mods I made, note the top tension bar and the bottom motor mounts
RepRapPro Mendel 3 Tricolour
RepRapPro Fisher
-Carbon Arms
-Easy adjust Carriage+effector
-axis stiffness mods
HE3D -600 delta
-Duet 0.8.5
-PanelDue
-DC42 Height probe
-RobotDigg metal components
Simplyfy3D
RS Design Spark CAD
|
Re: Structure reinforcment and enlargment of belt idler carriages September 05, 2015 01:35PM |
Registered: 10 years ago Posts: 91 |
Hey,
How about if the top and bottom idler brackets were designed so that the holes for the smooth rods were not fully through but only like 1/3? Then the brackets would naturally push down on the rods without needing additional pieces. Though one issue is that the plate dimensions would not match then, they would need to be made higher, or the rods would need to be shortened. On the other side the side panels do have slack in the screw holes so with proper dimensions parts they should just fit without being stressed vertically.
So while it's not an easy mod on an existing machine, maybe it would be better if applied to the original design?
|
Re: Structure reinforcment and enlargment of belt idler carriages September 05, 2015 01:42PM |
Registered: 8 years ago Posts: 475 |
This was the suggestion for the bottom bracket, and some have done that.
However, for the top bracket, you shall go through the acrylic plate to have an accurate build, as going directly through the laser cut parts will give better accuracy than printed part bolted on the plate.
The solution proposed by bgkdavis to have a top stop plate atop the acrylic plate, but not linked with it, is good, as it can cope with the fact that the rods cuts are not machined so their length is variable.
|
Re: Structure reinforcment and enlargment of belt idler carriages September 05, 2015 07:21PM |
Registered: 8 years ago Posts: 443 |
My belt tensioner works great, has the slight disadvantage of making it hard to remove the top, but it's easy to work round that, you can see more info and pics here
[forums.reprap.org]
RepRapPro Mendel 3 Tricolour
RepRapPro Fisher
-Carbon Arms
-Easy adjust Carriage+effector
-axis stiffness mods
HE3D -600 delta
-Duet 0.8.5
-PanelDue
-DC42 Height probe
-RobotDigg metal components
Simplyfy3D
RS Design Spark CAD
[forums.reprap.org]
RepRapPro Mendel 3 Tricolour
RepRapPro Fisher
-Carbon Arms
-Easy adjust Carriage+effector
-axis stiffness mods
HE3D -600 delta
-Duet 0.8.5
-PanelDue
-DC42 Height probe
-RobotDigg metal components
Simplyfy3D
RS Design Spark CAD
|
Re: Structure reinforcment and enlargment of belt idler carriages September 06, 2015 02:38AM |
Registered: 10 years ago Posts: 91 |
Sorry, only registered users may post in this forum.
