Sjfw
Release status: working
| Description | Firmware for Atmega644p and greater processors.
|
| License | GNU GPL v3
|
| Author | |
| Contributors | |
| Based-on | [[]]
|
| Categories | Firmware
|
| CAD Models | |
| External Link |
SJFW is an advanced firmware for modern 3D printers.
Contents
- 1 Features
- 2 Media
- 3 Minimums and Requirements
- 4 Installing the Firmware
- 5 Current Issues and Notes
- 6 Printing with Compatible Host Software
- 7 Software Setup
- 8 Using Special Features
- 9 Customizing Hardware for Additional Features
- 10 Special Thanks
Features
- Bluetooth
- Control Panel
- LCD Display
- Hostless printing from SDcard
- Eeprom storage
- Full Runtime Configuration
- Temperature history graph
- Advanced Gcode Pipeline with lookahead
- ISR driven movement
- Acceleration
- Works well with Pronterface Reprap host
- Supports ReplicatorG 3d Printing host
- Easy binary install
- Support for Thing-O-Matic / Gen4 with Extruder Controller
Media
These videos are outdated almost as soon as they are uploaded!
There are typically photos of recent development on the author's flickr page:
Minimums and Requirements
Hardware Minimums
- An Atmel Atmega 1280 or 2560 based 3d printing motherboard
- Stepper-based extruder, no DC motors.
- UNTESTED: Atmega644p binaries have been released, but are completely untested. They do not include LCD or Keypad support.
Software Minimums
- ReplicatorG to load the firmware - or avrdude and the knowhow to use it.
Recommended
- Pronterface host software.
Installing the Firmware
Method 1: Source Code Distribution
This is the "usual" way of configuring and installing a firmware on a Reprap. It's also only for the technically-savvy types, so if you're going to try it, you should already know what to do. In general, we recommend using ReplicatorG to load the generic firmware, under Method 2.
https://github.com/ScribbleJ/sjfw
Method 2: Load the Binaries
If you use the precompiled binaries, YOU MUST FOLLOW THE INSTRUCTIONS UNDER THE SOFTWARE SETUP SECTION OF THIS PAGE AFTER YOU LOAD THE FIRMWARE, BUT BEFORE YOU CAN PRINT!!!!!
Using ReplicatorG (recommended method)
To install the firmware using ReplicatorG, start by downloading and installing the latest version of ReplicatorG for your operating system:
Run it, open the File menu, and choose Preferences. In the "Firmware update URL" put the following: http://scribblej.com/firmware.xml
Close the window to save your changes, then open the "Machine" menu and choose "Upload new firmware."
You should see choices for Atmega 1280 and 2560, for either Thing O Matic or RAMPS w/ 100k thermistor. Currenrtly, 100k is the only value supported.
Choose the one that is appropriate for your machine, and follow the prompts from there. Recently I have made available -blfix versions for some options, that bypass a bug in the Arduino Bootloader. If the normal firmware will not upload, and the -blfix firmware will upload, you have a bad bootloader that should be replaced.
If there is no option appropriate for you, then you must fall back on Method 1. The machines in parentheses are the provided configuration files, but if you want to set up your own configuration, they will work for any board with the proper temperature control and Atmega chip. If you do create a custom configuration, please contribute it for inclusion in sjfw! See the Software Setup section for details.
While RepG is uploading the firmware, it doesn't give any feedback, unless you are looking at the terminal you launched it from. It should take about 1 minute to upload the firmware.
If RepG Fails
RepG can fail for any number of reasons. If it happens to you, it sucks. Here's a few things to try short of abandoning sjfw or resorting to method 1.
SUPER IMPORTANT!!!! MANY USERS HAVE REPORTED THAT THE FIRMWARE UPLOAD TIMES OUT AT 99%. IF THIS HAPPENS TO YOU: It means you have a broken Arduino bootloader. Older versions included some bugs that would cause certain programs to fail. If you can replace your bootloader, I highly recommend it. You may also be able to apply the -blfix version of your firmware, if available this does not contain the code that triggers the bootloader, but also isn't tested like the other released binaries.
1) On some operating systems, ReplicatorG will output extra information to a terminal window, if it's started from the command line.
2) ReplicatorG preferences include an option to show you more logging information, turning this to ALL may show something interesting.
3) ReplicatorG and the Arduino environment both include a copy of avrdude to burn firmwares. You can attempt running it directly from the commandline. If you are using ReplicatorG, use the commandline to navigate to the tools directory, and make sure you've put a copy of the firmware binary you want in the same directory. Then try something like:
For 1280:
avrdude.exe -C avrdude.conf -D -P COM3 -b 57600 -p m1280 -V -c stk500v1 -U flash:w:1280-w-100k-v1.0.hex:i
For 2560:
avrdude.exe -C avrdude.conf -D -P COM3 -b 115200 -p m2560 -V -c stk500v2 -U flash:w:2560-w-100k-v1.0.hex:i
If you STILL have problems, PLEASE let the developer know!
VERY, VERY, VERY IMPORTANT!
YOU MUST FOLLOW THE INSTRUCTIONS UNDER THE SOFTWARE SETUP SECTION OF THIS PAGE AFTER YOU LOAD THE FIRMWARE, BUT BEFORE YOU CAN PRINT!!!!!
Current Issues and Notes
IMPORTANT THINGS
- This firmware is only heavily tested by the author, so far. Please help if you are daring, but it's important to note that the firmware comes with no promises or guarantees, and if it burns your house down or eats your babies, the author will not be held responsible.
- If you use the binary distribution, YOU MUST FOLLOW THE INSTRUCTIONS UNDER THE SOFTWARE SETUP SECTION OF THIS PAGE AFTER YOU LOAD THE FIRMWARE, BUT BEFORE YOU CAN PRINT!!!!!
- SJFW's behavior is suboptimal when the intra-step period is faster than about 16-18Khz. If this means nothing to you, you probably don't need to worry about it. In theory, a long move at a very fast speed on an axis with a lot of steps could cause the temperature to not be checked for the length of the move. In practice, a very long move at high speed with a lot of steps per mm doesn't take very long, so it may be academic.
- SJFW does not give priority to communications, and so there can be many comm errors during a print. This typically doesn't impact anything, as we work 10-20 gcodes in advance. The author worries though, that someday the suboptimal CRC on Repraps may cause a problem in someone's print, and would encourage host software writers to include support for advanced CRC or better (see the 'advanced crc' section of this page).
- There is no homing command. There probably never will be; it's unnecessary. Just make a move towards the endstops that is longer than the platform, then mark that spot with a G92 and carry on. Here's some examples:
Prusa start.gcode
M104 S190 (start heating up, but don't wait)
G92 X0 Y0 Z0 E0 (set current position)
G1 X-300 Y-300 F2000 (Move to X/Y endstops)
G92 X0 Y0 Z0 E0 (set current position)
G1 X5 Y5 (Move away from X/Y endstops)
G92 X0 Y0 Z0 E0 (set current position)
G1 X-10 Y-10 F800 (Move back to X/Y endstops)
G1 Z-200 F400 (Move to Z endstop)
G92 X0 Y0 Z0 E0 (set current position)
G1 Z5 F400 (Move away from Z endstop)
G92 X0 Y0 Z0 E0 (set current position)
G1 Z-10 F400 (Move to Z endstop)
G92 X0 Y0 Z-0.7 E0 (set current position - note endstop is .7 below platform height)
G1 X0 Y0 Z30 F2000 (move to waiting position)
M109 S190 (wait for extruder to reach temperature)
Thing o Matic start.gcode
M104 S180 (start heating extruder, but don't wait)
M140 S50  (start heating platform, but don't wait)
G92 X0 Y0 Z0 E0 (set current position)
G1 Z200 F800 (move to Z endstop)
G1 X-200 Y-200 F2000 (move to X,Y endstops)
G92 X0 Y0 Z0 E0 (set current position)
G1 Z-5 X5 Y5 F800 (move away from XYZ endstops)
G92 X0 Y0 Z0 E0 (set current positions)
G1 Z10 X-10 Y-10 F400 (move to XYZ endstops)
G92 X-5 Y-25 Z116.7 E0 (set current positions)
G1 X0 Y0 Z50 F6000 (move to waiting position)
M84 (disable motors)
M109 S180 (wait for extruder to reach temperature)
MINOR THINGS
- Config file for ramps13 includes everything; the others may need some love for control panel and lcd support.
- Gen4 EC support assumes you are running the standard Makerbot EC firmware on your Extruder Controller.
- Motors that are set to disable after a move only get disabled a few moves thereafter. This should work fine, but don't forget a M84 at the end of your gcode to turn off all motors.
- SD card support works in the firmware, but is not compatible with the Gcodes that Pronterface and ReplicatorG emit for SDcard access. This firmware presently has two Gcodes for SD access:
- M204 - fetch filename from SD
- M205 - print last fetched filename
- The 4-bit LCD display mode does not always initialize properly from poweron due to timing issues. If your LCD looks garbled, reset the motherboard while leaving the power to the LCD on, sometimes twice in a row. You can just hit the 'reset' button on the motherboard. It'll be fine foreverafter, 'till you power down.
- The SD code may only work properly for 8.3 filenames.
- The LCD may visibly flicker on the temperature screen. This is by design, and will be fixed.
Version Notes
1.3
This version of sjfw was the first to introduce saving settings to eeprom. It contains the same naieve exponential accel as 1.4.
1.4
This version of sjfw uses a naieve exponential acceleration, and has suboptimal handling of moves that include one slow axis (like Z moves).
1.5
This version has perfect linear acceleration. It includes lookahead code, but it is not recommended to enable it.
Printing with Compatible Host Software
sjfw has been tested to work with the following hosts, with varying levels of compatibility:
Printing with Pronterface (Recommended)
You can get it here:
https://github.com/kliment/Printrun
Pronterface should work right out of the box with sjfw. You will need to change the serial baudrate from the Pronterface default of 115200, to the sjfw value of 57600.
Pronterface's SD card buttons will not work with sjfw. You can initiate an SD card print manually using Pronterface's gcode input box. Just send M204 until you see the file you want to print, then M205.
I recommend the use of M211 P10000 to monitor temperatures during prints, rather than Pronterface's monitoring option.
Printing with ReplicatorG
You can get it here:
ReplicatorG requires modifying its configuration file to speak to sjfw. You need to edit machines/reprap.xml and add the following:
  <machine experimental="0">
    <name>sjfw</name>
    <geometry type="cartesian">
      <axis id="x" length="200" maxfeedrate="12000" stepspermm="1" endstops="min"/>
      <axis id="y" length="200" maxfeedrate="12000" stepspermm="1" endstops="min"/>
      <axis id="z" length="150" maxfeedrate="400" stepspermm="1" endstops="min"/>
    </geometry>
    <tools>
      <tool name="Stepper-based extruder" type="extruder" material="abs" motor="true" floodcoolant="false" mistcoolant="false" fan="true" valve="false" collet="false" heater="true" stepper_axis="a" motor_steps="1" heatedplatform="true" />
    </tools>
    <clamps></clamps>
    <firmware url="???" autoupgrade="false"></firmware>
    <help name="Sjfw Help" url="http://reprap.org/wiki/Sjfw"></help>
    <driver name="reprap5d">
        <okAfterResend>false</okAfterResend>
        <pulserts>false</pulserts>
        <waitforstart enabled="false"></waitforstart>
        <debugLevel>0</debugLevel>
        <fived>true</fived>
        <rate>57600</rate>
    </driver>
    <warmup>
    </warmup>
    <cooldown>
    </cooldown>
  </machine>
After this, you should be able to select 'sjfw' in the Machine->Drivers menu in ReplicatorG, and use it as normal. ReplicatorG has extensive documentation around the internet.
Presently, RepG does not report the correct bed temperature from sjfw. It may have other issues, as well.
sjfw perl host
This was mainly written as a test bed, but is perfectly useable for printing if you have perl and the Device::SerialPort perl library installed. This should be available for all operating systems. In addition, the sjfw perl host is the only host presently to support advanced CRC calculations. The advanced CRC is disabled in the precompiled binary (and by default in host.pl) so if you'd like to try advanced CRC, you'll need to compile your own.
Advanced CRC
Advanced CRC solves the problem inherent in the Reprap CRC algorithm; a gcode like 'G1 X10 Y10 Z10 F1000" can drop half it's characters and STILL be interpreted as valid using the normal Reprap CRC. If you ever have comms errors (who doesn't?) this can cause your head to spontaneously shoot a vast distance across the platform for no apparent reason, screwing your print for good. The Advanced SJFW CRC is not bulletproof, but is a simple change and vast improvement over the Reprap CRC.
Advanced CRC support has also been coded for ReplicatorG but is not in the current release.
Software Setup
sjfw supports setting all configuration and pins at runtime, using gcode. This is what enables us to provide a binary distribution, and is also really handy for trying out new configs, or making changes to your printer.
If you are using the binary distribution, you MUST configure your printer using these methods before you can print.
You can find sample configurations here:
If you create a custom configuration for your printer, please contribute it to sjfw with a push request, or email it to [email protected].
CONFIGURING YOUR PRINTER
IF YOU ARE USING THE BINARY DISTRIBUTION, YOU MUST DO THIS!
Here are the recommended steps for configuring the printer:
1) Choose the appropriate gcode from the samples linked above.
2) Examine it, make sure especially it sets speeds you are happy with, and steps per mm that match your printer.
3) Start one of the supported host softwares, and print the gcode configuration file as you normally would print any model.
4) Use the host - without rebooting! If you reboot the arduino at this point, all configuration will be lost and you need to repeat step 3
- Try using the control panel, or loading a different file and printing it. Make sure everything works to your satisfaction. If not, return to step 2.
5) ONCE YOU HAVE A CONFIGURATION .GCODE FILE YOU ARE HAPPY WITH, YOU HAVE THE FOLLOWING METHODS TO LOAD IT ON YOUR MACHINE "FOREVER":
STORING CONFIG ON EEPROM (RECOMMENDED)
(NECESSARY WARNING: The EEPROM has a limited number of writes. Please treat it kindly.)
(NECESSARY WARNING: If you use another firmware that stores things in EEPROM, this system WILL overwrite whatever it has stored. ToM users, this might mean YOU)
1) Take your happy gcode from step 5 above, and edit it by adding one new line to the top, and one to the bottom. On top, you will put M402 and on the bottom, you will put M400
2) Print the file. Just once! Keep an eye out on your host software for the lines that indicate the EEPROM write has begun and ended.
3) REMOVE THE LINES FROM YOUR FILE. You don't want them in there accidentally overwriting your EEPROM for no reason if you should print it.
4) Save your happy file from step 5 someplace safe. Upgrades to sjfw or other firmware /may/ overwrite your EEPROM and require you to re-perform the EEPROM loading. Otherwise, you only need to do this ONCE, and it's configured forever.
STORING CONFIG ON SD CARD
1) Name your happy file from step 5 "sjfwauto.gcd" and put it on an SD card. Leave the SD card in your printer and it will be run when the printer boots up.
NOTE: If you have a config in EEPROM, and a config on SD, the configuration on the SD card will take precedence.
Putting the config in your start.gcode
THIS METHOD IS /NOT/ RECOMMENDED.
1) Put the stuff from your happy file from step 5 into your start.gcode.
Keep a copy around; you'll need to print it or something else before you can use the control panel.
Runtime Configuration Gcodes
NOTE: This system of commands is not ideal, but it was quick to implement. It may change later to be more user-friendly and consistent.
sjfw introduces some new gcodes and new usage of gcodes for its own configuration. There is absolutely no intention to have these commands adopted by the community as they are presently.
Steps and Speed settings
- M200 - accepts XYZE parameters. Set steps per mm.
- M201 - accepts XYZE parameters. Set start speed in mm/min.
- M202 - accepts XYZE parameters. Set maximum speed in mm/min.
- M203 - accepts XYZE parameters. Set 'average' speed in mm/min. Currently, this can be ignored; it is not used.
NOTE! To avoid any possible issues, always send all four of the commands above together, and always set the steps per mm before the feedrates.
- M206 - accepts XYZE parameters. Set acceleration in mm/s/s.
Heating Elements Pin Settings
- M207 - accepts P and S parameters.
- P = Set hotend thermistor analog pin, using analog pin number. -1 to disable.
- S = Set hotend FET output pin, USING ARDUINO PIN NUMBERING.
- M208 - accepts P and S parameters
- P = Set platform thermistor analog pin, using analog pin number. -1 to disable.
- S = Set platform FET output pin, USING ARDUINO PIN NUMBERING.
Thermistor Table Settings
NOTE! If you are using an Extruder Controller binary, these codes have no effect.
NOTE! If you use a 100k Thermistor, the defaults included in the firmware should be fine for you and you should not need to set these.
NOTE! These options are not included in firmware versions previous to 1.6.
- M501 - M520 - accepts P and S parameters.
The MCode determines the table position you are replacing; there are 20 entries in the table and you should fill them all. The P parameter is the reading from the thermistor. The S parameter is the equivalent temperature.
See generic/100ktable.g for an example illustrating the default settings.
Axis Pin Settings
- M309 - accepts P and S parameters - THIS MUST HAPPEN BEFORE YOU CALL M304/M305 OR ELSE!
- P1 for endstops inverted
- S1 for endstop pullups
- M300 - accepts XYZE parameters - Set axis STEP pins USING ARDUINO PIN NUMBERS
- M301 - accepts XYZE parameters - Set axis DIR pins USING ARDUINO PIN NUMBERS
- M302 - accepts XYZE parameters - Set axis ENABLE pins USING ARDUINO PIN NUMBERS
- M304 - accepts XYZE parameters - Set axis MIN pins USING ARDUINO PIN NUMBERS
- M305 - accepts XYZE parameters - Set axis MAX pins USING ARDUINO PIN NUMBERS
- M307 - accepts XYZE parameters - Set axis inversion, 1=inverted, 0=not
- M308 - accepts XYZE parameters - Set axis disable after move, 1=disable, 0=not
- M310 - accepts no parameters - outputs a list of unset pins for all axis, as well as the value of the inversion, disable, and endstop flags
Fan/Lights Pin Settings
- M216 - accepts P parameter. Sets the fan pin that is toggled by M106/M107 to the specified Arduino pin number.
- M215 - accepts P, S parameters. IMMEDIATELY sets the state of the Arduino pin specified by P to output, and sets it high if S1, low if S0. This can be used to turn on/off lights, secondary fans, or anything. But use it with caution, the wrong pin can do terrible, terrible things.
Special Endstop Config
NOTE! This feature first available in version 1.6.
- M220 - accepts XYZE parameters - Set axis Minimum endstop position
- M221 - accepts XYZE parameters - Set axis Maximum endstop position
These super-useful codes can be added to your configuration, then your start.gcode only needs to hit the endstops, leaving out the G92 to tell the system where they are. If you set up your system this way, then (for e.g.) if your Z endstop should change position, you only need to change your stored config in the firmware and can still print all your old gcode without editing.
Random Sjfw-Specific Gcode
- M211 - accepts P parameter - P parameter sets number of milliseconds between automatic temperature reports. VALUES < 2000 NOT RECOMMENDED.
- M204 - no parameters - display next SD card filename.
- M205 - no parameters - print file last displayed by 204.
- M215 - accepts P, S parameters. IMMEDIATELY sets the state of the Arduino pin specified by P to output, and sets it high if S1, low if S0. This can be used to turn on/off lights, secondary fans, or anything. But use it with caution, the wrong pin can do terrible, terrible things.
- M350 - accepts P parameter - P1 = enable lookahead. P2 = disable lookahead. ENABLING LOOKAHEAD NOT RECOMMENDED.
- M400 - FINISH EEPROM WRITE - If you are currently writing to the EEPROM, this finishes the write.
- M401 - EXECUTE STORED EEPROM CODES - If you have used M402 to store gcode in EEPROM, this will execute it.
- M402 - WRITE GCODE TO EEPROM - Any gcode sent after this, up to an M400, will be written to the EEPROM. There is a limit of about 4000 characters.
"Special" Configuration Gcode
This section will be gone completely as soon as alternative methods for setting the LCD and Keypad pins are provided.
In addition to the above codes, there is a special format for setting pins on all subsystems (except SD card). To begin, you send the code M1 G1 as a single line of gcode, which in other circumstances would be illegal. Then you can add as much pin configuration to the line as you like.
Configuration strings are formatted beginning with a subsystem selector, and from there, configuration options in an arcane format described here:
SUBSYSTEMS:
- '^' - LCD Subsystem
- '&' - Keypad Subsystem
LCD Subsystem
Here are the options by example:
G1 M1 ^SK1 (Set LCD RS to Port K,7)
G1 M1 ^WL7 (Set LCD RW ...)
G1 M1 ^EK3 (Set LCD Enable)
G1 M1 ^4F5 (Set LCD D4)
G1 M1 ^5K2 (Set LCD D5)
G1 M1 ^6L5 (Set LCD D6)
G1 M1 ^7K4 (Set LCD D7 - always set D7 last, LCD activates automatically when D7 is set.)
Keypad Subsystem
G1 M1 &R0H1 (Set Keypad Row0 to Port H,1)
G1 M1 &R1H0 (Set Keypad Row1)
G1 M1 &R2A1 (Set Keypad Row2)
G1 M1 &R3A3 (Set Keypad Row3)
G1 M1 &C1A7 (Set Keypad Col1)
G1 M1 &C2C6 (Set Keypad Col2)
G1 M1 &C3C4 (Set Keypad Col3)
G1 M1 &C0A5 (Set Keypad Col0 - always set last, is flag for activation)
Subsystem Common Example
If you prefer, you may set multiple commands on one line:
G1 M1 ^SK1WL7EK34F55K26L57K4 &R0H1R1H0R2A1R3A3 &C1A7C2C6C3C4C0A5
Keep in mind sjfw currently presents a 'fragment' maximum size of 32 - the distance between spaces in the gcode line.
Using Special Features
EEPROM storage
Any commands you send to the printer between "M402" and "M400" will be spooled to the Atmega's internal EEPROM, and automatically played back AT EVERY BOOT. This is mostly useful for storing configuration gcode. Keep in mind the systems supported by sjfw have a limit of about 4000 characters of gcode they can store.
When writing to the eeprom, sjfw first looks to see if the same character is already written and does not write it unless there is a change. This means it's better to set up your config code like this:
M220 Z001.000
Than this:
M220 Z1
If you use the former style, then you can change your Zstop value to something like "M220 Z-000.500" without having to rewrite the entire rest of the eeprom because of the change in length if you were to use "M220 Z-.5"
Bluetooth
The bluetooth support is new, and needs new documentation to match.
Printing from bluetooth works just fine, but my real hope is that someone will use the support for something truly interesting, like an Android/iPad printer control panel, or even just a really nice wired-up control panel that is smart enough to speak gcode. Anything you can plug in to the port that speaks 9600 baud serial will work, so it's not really limited to Bluetooth.
You can have a USB host and a 'bluetooth' host connected at the same time without interference, so it is possible to use this feature to design a truly advanced control panel.
SD Card
PLEASE NOTE: GCode on the sdcard must be 'raw' gcode! No comments in the file, please!
PLEASE NOTE: Filenames must be 8.3
- M204 - display next filename.
- M205 - execute the last file displayed by M204.
SD Card Autorun
sjfw includes an option to look for a specially-named file on the sd card and run it at boot. This is especially useful to automatically configure the generic firmwares at boot; just put your configuration gcode in the magic file and it will always run first thing.
The magic filename is 'sjfwauto.gcd'
If you are connected with a host at boot, you will see output before the 'start' is sent by the printer, showing whether the sjfwauto.gcd has been/is being executed, or if it failed to read the file.
LCD and Keypad
Currently, the LCD system consists of 3 screens. You can switch between them anytime using the 'A','B','C' buttons on your pad.
Intra-Move Optimization/Lookahead
It is not recommended to use this feature until it is better conceived and implemented.
Lookahead is enabled with "M350 P1" and disabled with "M350 P0".
Temperature Display/Control
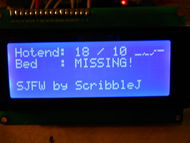
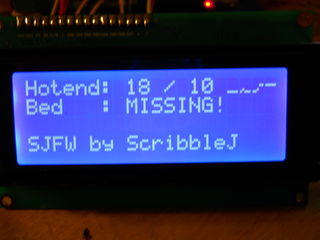 This is the default screen and is selected with 'A'.
The upper right includes a temperature history graph. The center of the graph is always the currently-set temperature.
Keypad controls for this screen:
- 1 = Raise hotend setpoint by 5deg.
- 4 = 0 hotend setpoint
- 7 = Lower hotend setpoint by 5deg.
- 3 = Raise platform setpoint by 5deg.
- 6 = 0 platform setpoint
- 9 = Lower platform setpoint by 5deg.
SD Card Printing
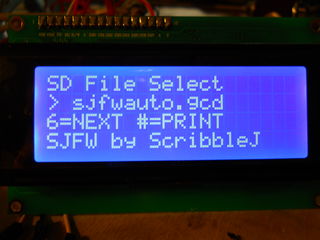 When an SD print is in progress, this screen will change to simply display it's filename.
Keypad controls for this screen:
- '6' = Next file.
- '#' = Print.
Position/Motor Control
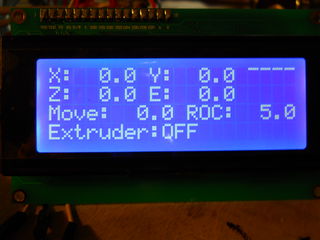 This screen is a bit complicated! Here's what it's showing:
- XYZE = current motor position (at end of parsed gcode, so may not be /current/)
- Upper Right = Temperature history graph.
- Move: When you click an axis move button, it will move this far.
- ROC: When you click the Move Increment/Decrement buttons, the "Move" values changes by this amount.
- Extruder: This /does not monitor the current extruder status/ it simply shows you whether the extruder will run when you move an axis using the pad.
And here are the keypad controls for this screen:
- 1/7 = Move increment/decrement
- '*' = Toggle extruder
- '#' = Next ROC
- '5' = Disable all motors.
- 2/8 = Move Y
- 4/6 = Move X
- 3/9 = Move Z
Customizing Hardware for Additional Features
At a minimum, you must have (LCD)7 + (KEYPAD)8 = (TOTAL)15 free pins on your motherboard to use the precompiled binary control panel support.
You can use just the LCD for temperature display without attaching a keypad, if you'd like to save pins. Or you can wait for other options to be included.
Below are examples on this for RAMPS 1.3; for other hardware, though this doesn't directly apply, it should help guide you in determining where to put things.
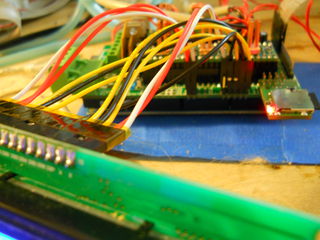
Connecting an LCD to RAMPS 1.3
The provided configuration assumes you will connect the LCD in 4-bit mode to AUX2.
- D63 = RS
- D42 = RW
- D65 = E
- D59 = Data4
- D64 = Data5
- D44 = Data6
- D66 = Data7
The Data0 - Data3 pins on the LCD are left disconnected. The contrast pin on the LCD can be wired to ground, or run through a pot between ground and +5v for adjustable contrast.
There are plans to add i2c support to sjfw as soon as I have an i2c LCD and/or keypad with which to test code. In the meantime, SJFW supports hitachi-protocol text-mode LCDs using a parallel interface. These are as common as dirt; basically any 16x2 or 20x4 character display with 16 pins is going to be the right thing. I recommend 20x4, but the firmware supports both sizes. It /does not/ support single-line displays. If you'd like that support, a patch would be simple.
WHY IS D48 THE UNUSED PIN ABOVE WHEN D65 WOULD MAKE MORE SENSE? Simply because D48 is burned out on my RAMPS board.
WHY CONNECT RW? SJFW uses RW to poll the LCD's busy state for fast, fast, fast access. It is required.
Connecting a keypad to RAMPS 1.3
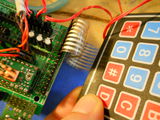 (Use pins shown in photo below, NOT these)
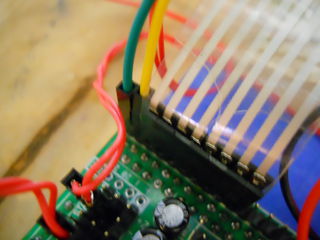 Shown here with Bluetooth connection as well.
The provided configuration assumes you will connect a 16-button keypad using 8 pins of AUX-4.
- D23 = ROW1
- D25 = ROW2
- D27 = ROW3
- D29 = ROW4
- D31 = COL1
- D33 = COL2
- D35 = COL3
- D37 = COL4
The top two pins, D16 and D17, are unusued for the pad because they expose a com port that can be used for Bluetooth or other backup serial comms.
Keypads are supported using a row/column scanning method. This is a very common style of keypad, and also easy to make yourself. You should expect to see 8 pins for a 4x4 button pad grid. If you have a datasheet, the pins will be labeled COLUMN1-4 and ROW1-4. While it is easy to change SJFW to support 9-button pads or any random number of buttons, currently the code rather assumes you have 16.
Connecting Bluetooth or other Serial Device to RAMPS 1.3
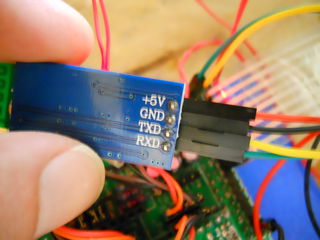 Bluetooth support is not presently included in the binary distribution, you must compile your own to access this functionality.
- D16 = RXD
- D17 = TXD
Any 5-volt Bluetooth dongle should do. The one in the photo is available for < $15 at mdfly.com. When I added this to my RAMPS13 it caused power fluctuations that made the thermistors readings go out of whack. I solved it by switching the power pins for the dongle to a separate power rail, however they MUST share a common ground or the dongle may not register the TXD/RXD signals properly.
The serial connection here is set to 9600. This is PLENTY FAST for sjfw, with the advanced gcode pipeline you can go almost arbitrarily slow on comms and still have a fast print.
Any device that can speak gcode at the printer over 9600 serial can be connected here. It is not limited to Bluetooth.
Special Thanks
- EVERYONE on #reprap on irc.freenode.net -- I could not have done it without your knowledge.
