Generation 6 Electronics
Release status: working
| Description | Generation 6 Electronics
|
| License | GPL v2
|
| Author | |
| Contributors | |
| Based-on | |
| Categories | |
| CAD Models | |
| External Link |
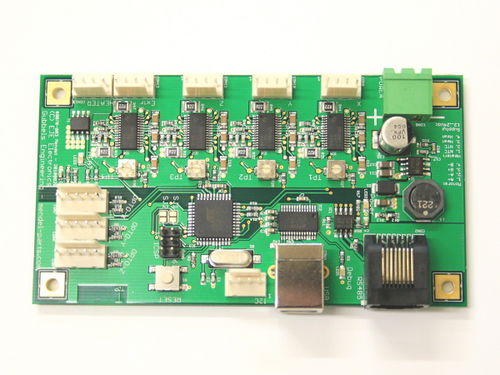
Generation 6, or Gen6, can be described as a dedicated, Plug-&-Play, single board solution for FFF/FDM 3D Printers. It is designed to be professionally manufactured, with many small surface mount components, as opposed to Generation 7 which is designed to be printed on a Mendel(among other design goals).
Another major difference with Gen6 electronics is that they use Texas Instruments DRV8811 chips to drive the stepper motors. This means they require firmware modifications from the normal Polulu-based electronics which use Allegro A4983 chips.
Contents
- 1 Nomenclature
- 2 Files
- 3 Benefits of this Design
- 4 Specifications
- 5 Setup
- 6 Spare pins for expansion
- 7 Suppliers
- 8 FAQ
Nomenclature
"Generation 6" was chosen because it was the next name on the list, after Gen3, Gen4, Gen5... Generation 7 should, hopefully*, be the last use of this naming convention . If you prefer, you can call this the Mendel-parts.com electronics, or Mendel-parts Gen6, etc. Gen6 is printed on the PCB, so we are stuck with it.
*it is a wiki, after all, so keep your fingers crossed.
Files
| FILE ID# | TYPE | DESCRIPTION | AVAILABLE FORMATS | CREATED/RESERVED BY |
|---|---|---|---|---|
| GEN6_FIRMWARE_v24082010 | PDE H | GEN6 - Firmware version: August 24 2010 | .zip | --Camiel 19:30, October 4, 2010 (UTC) |
| MARLIN FIRMWARE for GEN6 | PDE H | GEN6 - Firmware version: 2012-05-02 | ZIP | creators: Camiel Gubbels / Erik van der Zalm; adapted by:danithebest91 |
| GEN6_BOM_v1_04102010 | XLS ODS CSV | GEN6 - BOM in xls, ods, csv format | .zip | --Camiel 19:00, October 4, 2010 (UTC) |
| GEN6_COMPONENT_LAYOUT_13082010 | GEN6 component_layout in PDF (version: 20100813) | --Camiel 19:45, October 4, 2010 (UTC) | ||
| GEN6_CIRCUIT | GEN6 Circuit in PDF (version: ) | --Camiel 23:32, October 4, 2010 (UTC) | ||
| GEN6_EAGLE_FILES_v1 | ZIP | GEN6 Eagle Files (.brd, .sch in a .zip) (version: 04102010) | .zip | --Camiel 23.30, October 4, 2010 (UTC) |
| GEN6_PIN_SPECIFICATIONS | GEN6 Pin specifications in PDF (version: ) | --Camiel 13:44, October 23, 2010 (UTC) | ||
| GEN6_DRIVER USB WINDOWS FTDI | ZIP | driver USB for GEN6 - 13/09/2010 | ZIP | ftdichip.com |
Status
Version 2.0/"Deluxe" is the latest version of Gen6, but design files and documentation have not been released. Gen6 Deluxe adds heatbed control, and...?
Version 1.0, Released October 4th, 2010, is the latest version released to the community.
- Camiel is the lead developer for these new electronics dedicated to Mendel, Post-Mendels and RepStraps. He's often in the IRC channel, if you need to ask a question.
- Buback is an early adopter and is maintaining this page. (It's been a while since I've really watched this page so feel free to add/delete.--Buback 20:16, 1 August 2011 (UTC))
Benefits of this Design
- These electronics are a single board solution, so you don't need all those cables and one thick sheet and 4 reprap parts less.
However, the thick sheet does add a fair amount of rigidity. @$@#?? the bottom thick sheet (big one) doesnt add much rigidity, the front one is used for stiffness of the frame, not the bottom one.
- It has a standard USB connection (USB A>B cable needed)
- It uses micro-stepping (1/8) for quieter operation.
- It is cheaper than for example Makerbot's version of the RepRap Generation 3 electronics.
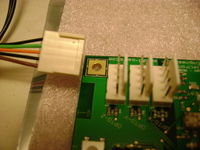
- It uses small standard Molex connectors for motors, heater, and optos.
- The pcb of the optos are integrated, so you only need the optos on cables with 5way Molex connectors
Hardware Features
- on-board USB-RS232 convertor
- Integrated hardware for driving one extruder (stepper, heater and thermistor)
- RS485 bus connector with the possibility to link through the extruder step and dir signals
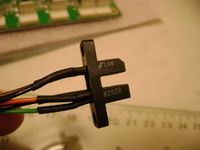
- Integrated hardware for driving H21LOB or TCST2103 slotted optosensors
- High input voltage range: 12-24Vdc
- Use of standard connectors with easy and clean installation
- Debug LEDs for power, communication and heater output
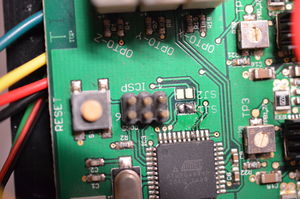
- Reset button
Specifications
- Dimensions 110x60mm
- Mounting grid: 100x50mm (4x M3)
- Input voltage 12-24Vdc
- On-board controller: ATmega 644p (Atmel Corp.)
- RS485 connector: RJ45
- Heat output: MOSFET output, 4A
- Thermistors input: 100K thermistor
Setup
Currently the only supplier is Mendel-parts.com, so instructions are based on their . If you want to make your own, you will, of course, need to load the bootloader and firmware onto the board before you can print.
How to crimp molex KK connectors by Nophead
Be Careful!
Since this a single board solution, if anything blows or shorts you will be stuck with a semi-functional board.
From all 750pc GEN6 sold, so far two had issues, one board was ok but customer had wiring wrong.
Other one was a small production error and customer got replacement GEN6.
If i think back of my time working with GEN3.. i broke more then 5 stepper drivers and 2 mainboards.. (printing production with 4x GEN3 printers)
While with GEN6 ive never broken any board (so far) (printing production with 14x GEN6 printers..)
So in my opinion a single board doesnt necessary mean more change of breaking it.. properly designing it is probably more important ;)
--Camiel Gubbels 22:11, 24 June 2011 (UTC)
Production of four 100 board runs of Gen6 in the USA, with standard HASL PCB finish and 2oz copper, resulted in 75-95% yields by multiple assembly firms.
Failed boards exhibited non-functional IC5-8 (stepper driver DRV8811). On some boards, IC5-8 exploded upon initial power-up.
Failure was examined by X-Ray and determined to be caused by excess solder paste beneath the faulty chips.
SOLUTION: Use ENIG PCB finish and inform assembly shop to reduce solder paste beneath IC5-8.
--Threedonuts 21:34, 8 February 2012 (UTC)
- NEVER unplug anything while the board is powered up.
- Take precautions for static electricity.
- Handle the board delicately. don't touch any exposed metal on the board.
Treat it just like you would any electronic component in your computer. In fact, it would be good to enclose the electronics after you have it all set up, just like a computer case or power supply, to prevent accidents.
Power
A modified PC Power supply will work fine. If you would prefer a power brick or 'wall wart' for the power supply 50W should be enough, but 60W is recommended.
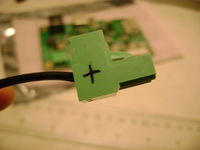
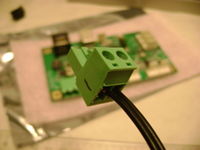
The design uses a Euro-style plug and connector, so just strip the wire ends and screw them in place. The board has a + and - label on it, and it's a good idea to use a marker to draw a + and - on the connector plug as well. 0V should go in the - and the other wire in the +.
About the input voltage: 12-24Volts is possible, but the nichrome wire length needs to be changed also if input voltage is not 12V!
please make sure to double check (i.e. CHECK IT TWICE) power input + and - when you connect it to your board.
USB
- One (1) USB A>B cable
Plug it into the board (B end), turn on the power, and plug the into the computer (A end). Windows should auto-detect the USB to serial interface and install the required drivers. If not, Download and install the drivers from here.
The 12V supply must be on for the USB to be active. The board will not run on computer power alone, even for programming.
End-Stop Sensors
Opto-endstop
The firmware sees a missing endstop as a tripped endstop. If you want to test your steppers prior to installing the endstops you still need to plug the endstops into the Gen6 board.
Without any endstops installed the stock firmware will refuse to move each axis in the direction that would be toward the endstop.
Inverting Optos Gen6 was originally designed for H21LOB optos. Header pinout for H21LOB optos is as follows:
- - Emitter Anode(E+)
- - Emitter Cathode (E-)
- - Detector Vcc (D+)
- - Detector Vo (D-)
- - Detector Ground (Gnd)
Non-Inverting Optos H21LOB optos have been discontinued. TCST2103 is a suitable replacement. Header pinout for TCST2103 optos is as follows:
- - Emitter Anode(E+)
- - Emitter Cathode(E-)
- - No Connection
- - Detector Vcc (D+)
- - Detector Vo (D-)
Mating Connector Part Numbers
- Three (3) 5 wire Molex housing, 2.54 mm, friction ramp, polarized (2659 series, Molex part# 0022013057)
- Fifteen (15) Molex crimp terminals (2759 series, Molex part# 0008550101)
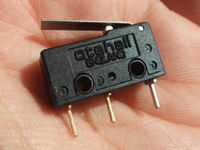
Microswitches
From 17-Dec-2010 Mendel-Parts changed the type of opto-end stops from inverting to non-inverting, so depending on which version opto's your firmware is configured for, you will need to wire the microswitches differently.
Microswitch Wiring for Inverting Firmware (prior to 17-Dec-2010)
A typical microswitch connection would be:
- - No Connection
- - No Connection
- - Switch NC
- - Switch Common
- - Switch NO
Microswitch Wiring for Non-Inverting Firmware (after 17-Dec-2010) A typical microswitch connection would be:
- - No Connection
- - No Connection
- - Switch NO
- - Switch Common
- - Switch NC
Hall-Θ
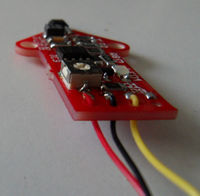
The Hall-Θ board is marked (from left to right) : 5v / Gnd / Stop
For inverting firmware (or replacing a H21LOB) :
- No Connection
- No Connection
- +5v
- Stop
- Gnd
For non-inverting firmware (or replacing a TCST2103) :
- No Connection
- No Connection
- Gnd
- Stop
- +5v
Heater and Thermistor
- One (1) 4 wire Molex housing, 2.54 mm, friction ramp, polarized (KK series, Molex part# 0022013047)
- Four (4) Molex crimp terminals (2759 series, Molex part# 0008550101)
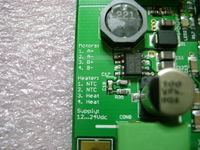
Pinouts listed on the PCB:
- NTC (Brown)
- NTC (Black)
- Heat (Yellow)
- Heat (Clear or gray)
Pin 1 is furthest from the power connector and closest to the edge of the board, Pin 4 is closest to the power connector.
Heated Bed
Gen6 doesn't support a heated bed as-is. If you want to connect one, you need an external switch like the SevenSwitch (for 12V heated beds) or a solid state relay (for 110V/220V heat mats).
Stepper Motors for X, Y, Z Axes and Extruder
- Four (4) 4 wire molex housing, 2.54 mm, friction ramp, polarized (KK series, Molex part# 0022013047)
- Sixteen (16) Molex crimp terminals (2759 series, Molex part# 0008550101)
Wire lengths listed by [User:Camiel|Camiel] are as follows:
- Two (2) @ 40 cm (X & E)
- Two (2) @ 75 cm (Y & Z)
Pinouts listed on the PCB
- A+ = A
- A- = B
- B+ = C
- B- = D
Adjusting the Stepper Current
The stepper motor current is set by the tiny trim pots next to each stepper driver (the chips with the heat sinks). An exposed pad next to each trim pot lets you measure the reference voltage. The test points are labelled TP1 for X through TP4 for E. Place the black multimeter probe on one of the gold squares around the mounting holes. Place the red probe on the test point. The peak motor current is 0.57 times the test point voltage. My board came pre-adjusted to approximately 2V (the indicator pips on the adjustment screw point at the test point) which equals about 1.14A.
Firmware
Backing up the Factory Firmware
You can back up the factory installed firmware using avrdude just in case. If you are on Windows substitute the right COM port for the -P option:
avrdude -c avrisp -b 38400 -i 10 -p m644p -P /dev/ttyUSB0 -F -U flash:r:factory_gen6.hex:i
Or, using a USBtinyISP in Windows, connect the ISP header and open a command prompt from the main directory of Arduino. Use the following command:
hardware\tools\avr\bin\avrdude -C hardware\tools\avr\etc\avrdude.conf -v -p m644p -c usbtiny -U flash:r:factory_gen6.hex:i
Restoring the Factory Firmware
Simply change "flash:r" to "flash:w" in the above commands.
Compiling new Firmware
The Gen6 boards come ready-to-print with FiveD, Sprinter, or Marlin firmware already installed. However, if you need to customize the firmware to fit your Reprap or Repstrap, it is easy to do so.
- (Non-Windows users) Download and install the Arduino software version 0018, not the latest
- Download & Extract the latest Arduino firmware from Mendel Parts.
- Windows users have a ready to run Arduino environment at this point.
- Linux - Copy the 1_arduino-0018-incl_sanguino/hardware folder, then locate and replace the hardware folder in the Arduino software you downloaded in step 1. Restart Arduino
- Mac - Copy the 1_arduino-0018-incl_sanguino/hardware folder, Right click on the Arduino application and 'show package contents', browse to Contents/Resources/Java and replace the hardware folder with the one you copied. Restart Arduino.
- Make your changes
- Save your changes
- Compile, Fix compile errors (make sure you select Sanguino from the tools>boards dropdown)
- Plug in the Gen6 and power it up, wait for your computer to detect the board
- Select the proper COM port for the Gen6 in the Arduino software
- Upload the firmware
- Close the Arduino software
- Hit the reset button on the Gen6
Once you are familiar with this process, you can experiment with alternative firmwares if you wish.
Common Configuration Modifications
The configuration of the firmware is controlled by defines in configuration.h. This file has options for supporting several different boards and Mendel options. When you change a define, search for the name and make sure you are changing the right one. The top of the file sets MOTHERBOARD to 2 (which later sets MENDEL) and defines GEN6 so look for those #ifdefs to know which setting to change.
- If you are experiencing pauses (the print head pauses for multiple seconds) you might want to try increasing the baud rate setting HOST_BAUD to 38400 or 250000.
- If one of your axes goes in the wrong direction toggle INVERT_X_DIR (substitute Y, Z as needed) by changing it from 1 to 0 (or back). Search for GRUB_PULLEYS to get the right set of defines.
- If the scale of one of your axes is wrong adjust X_STEPS_PER_MM (or Y or Z). There are tutorials on this you can Google. If you are using 5/16" threaded rod in an SAE Mendel you will want Z_STEPS_PER_MM set to 1133.858. Remember that the Gen6 is hardwired for 1/8 microstepping.
- If you are getting a wildly wrong flow rate from your extruder adjust E0_STEPS_PER_MM. The comments near the define describe setting it based on how much plastic comes out of the nozzle. If you are using Skeinforge 40 you will need to instead set it based on how much filament goes in to the extruder. See "Volumetric Dimension Settings" for more details.
- If your extruder motor runs backwards there is no INVERT_E0_DIR. You can swap the stepper pairs in your connector (as with any axis) or you can modify extruder::setDirection near line 287 of extruder.h. Note again that there are ifdefs in that file so get the right instance of that function.
Potential Hardware Fixes
There have been a couple of instances of dirty 5v power causing instability with the ftdi and atmega chips. If this affects you, a 1n 0805 cap soldered across R12 might help. See http://www.mendel-parts.com/new_forum/phpBB3/viewtopic.php?f=19&t=381 for details. --Pelrun 17:53, 5 July 2011 (UTC)
I wasn't having this problem, but did solder a 1nF ceramic cap across R12, and it reduced the amount of audible noise the stepper drivers made, and limited ranges of stepper actuation the noise would occur at. Meaning if I hit 0.1mm on my X and Y in pronterface, each operating point would make noise, whereas now, only some do. This mod also improved my thermistor readings, which previously would vary 20-30C, but are now pretty much dead stable. --Thav 00:46, 27 January 2012 (UTC)
Spare pins for expansion
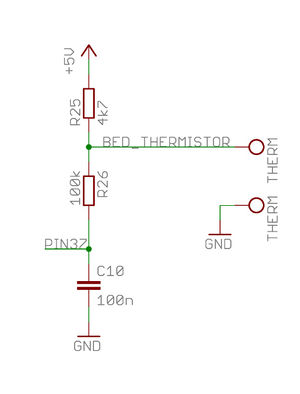
The board lacks heated bed (for non deluxe models) and fan support however spare pins are available which can allow for these to be added. The bed needs 1 digital and 1 analog pin and the fan needs one digital pin. The digital pins can be used to switch a bed/fan using a MOSFET solution such as the SevenSwitch. The temperature of the bed can be read with an analog pin using a thermistor voltage divider circuit like the one on Gen 6 or RAMPS circuit diagrams.
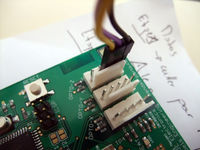
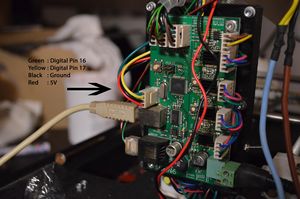
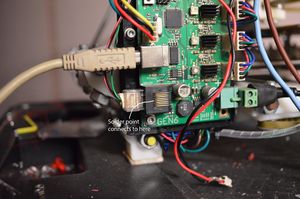
There are two easily accessible digital pins on the SDA plug, neither are PWM however it is not needed because software PWM can be used. Accessing these pins is shown in the picture below using the plug just above the USB port. These can be accessed in firmware using pin numbers 16 & 17.
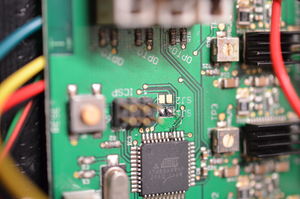
The analog pin needed for the bed temperature is not so easy to get. It is only accessible directly off the chip (top, 4th from the right) and thus a wire must be soldered onto one of the legs of the chip. This is quite difficult since you must avoid bridging the legs with solder. I made my soldering iron tip finer by wrapping it in thin copper plate with solder there to increase conduction. I did not find it that hard, just keep solder to a strict minimum, a solder sucker or compressed air would be useful if you make a mistake. Use a multimeter to make sure the pin does not have a connection to the ones beside it. I would recommend a stiff wire.
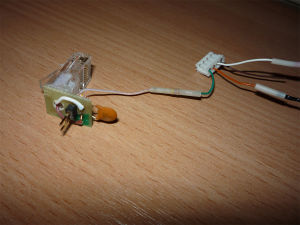
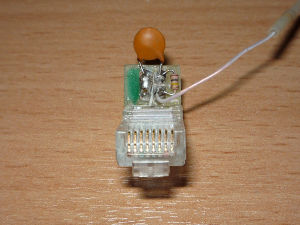
Once the wire is attached to the chip the other end can be soldered to the right hand solder pad a bit above. Make sure that you have not connected the left and right pad together, in the picture I have accidentally got a solder blob on the left hand pad but they are not connected. This pad conveniently connects to a pin on the RS485 plug, the pin is fourth from the bottom. You can use an Ethernet or phone plug to connect to it professionally. This pin can be accessed as pin 0 for analog and pin 31 for digital.
The thermistor is connected to this scheme:
Scheme developed jseaber (Forums).
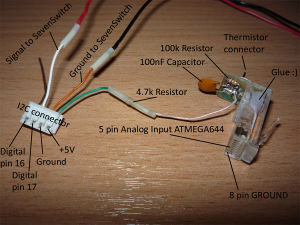
I have compiled a schema based connector RJ45:
Firmware
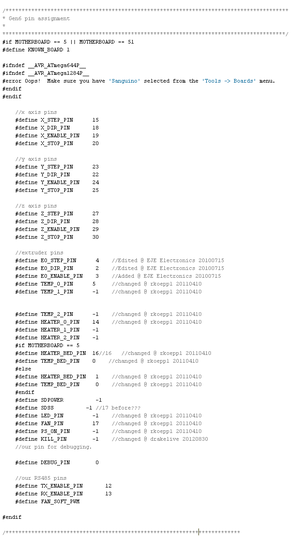
Once you have all the circuits setup to use the pins you can simply define them in the Gen 6 part of pins.h. For Marlin I made the following modifications, my pins.h is also shown below.
- Below "#if MOTHERBOARD == 5" (ie not deluxe), set HEATER_BED_PIN to 16 or 17 (depending on your choice) and TEMP_BED_PIN to 0
- Set #define SDSS to -1
- Set Fan_PIN to 17 or 16
- You must also specify to use software PWM for the fan otherwise the fan can only either be on or off, just call #define FAN_SOFT_PWM somewhere
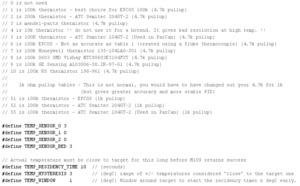
The type of thermistor you are using for the bed must also be defined in Configuration.h as shown below.
Suppliers
Camiel Gubbels is the lead developer for these boards, is documenting in this space below, and is currently the primary supplier via his webshop: Mendel-Parts.com. 3D Acessories Hub and RepRap-USA.com and Cubic-Print.deand MakeMendel and MakerFarm and 3D Printer Czar now manufacture Gen6 boards as well.
The Generation 6 Electronics are developed together with our electronics partner: EJE Electronics.
Together we will also continue to improve the electronics and firmware in the future, we already have many ideas..
This development has been made possible also thanks to our customers who previously bought products from mendel-parts.com, thanks to all you, we are at this point now.
So a BIG THANKS to the whole community for helping us.. so we can help you in the future :).
The electronics are being produced in The Netherlands.
Version 1.0
- October 4, 2010: The first GEN6 electronics shipped
- August 23, 2010: The first production has started
Version: 0.1
- August 18, 2010: Second video on youtube: video 2 of gen6 electronics in action and bit more zooming on electronics and opto's
- August 15, 2010: First video on youtube: video 1 of gen6 electronics in action
- August 14, 2010: We upgraded another Mendel (#1) now also to Gen6 electronics, because we couldn't hear our other machine with gen6 running because of the makerbot electronics on this one.. and for some more testing off course
- August 11, 2010: We upgraded one of our production Mendels (#3) to the gen6 electronics and are printing Mendel parts now with it.
(ps. its very quiet)
- August 05, 2010: First prints were printed successfully.
- July 15, 2010: First prototype has been successfully tested.
FAQ
Q: Why did you develop the new electronics called "Generation 6 Electronics" ?
A: Well this is a funny answer.. back in April, when i started rolling out our webshop plans. I also wanted to have our own electronics. Because in a few months (i thought back then..) I wanted to be able to offer full machines. So I went to an electronics partner (he has his own micro electronics company) I knew from University here and asked if he could help me produce these Gen3 electronics for a good price. And well the short answer is: he refused, he told me it was way too complicated, and also expensive because of that.. and well he mentioned a lot of more negative things about them, but a few things i remembered: bad components placement, interference possibilities etc. So he didn't want to cooperate on producing that, only if i really, really insisted. So then we started talking about a solution.. and well, 3months later I was printing with the first Gen6 prototype.. (yes it amazed me too, how fast it all went..).
Q: Why are your new electronics named "Generation 6" ?
A: While developing these electronics, my electronics partner at a certain point started asking me for a name for these electronics, which was needed for the firmware. Me personal i didn't care what they were named.. lol, i just want good quality and good priced electronics that work properly. But it happened to be the same day one person from reprap-dev and the reprap forums asked me why i wasnt writing about our electronics development on the Generation 6 pages.. because apparently Gen4 and Gen5 existed.. (in development). So for me one and one was two...
There was a proposal that we start calling boards "The Amp", or "The Volt".
This may not be a very good idea.  --Sebastien Bailard 06:17, 14 October 2010 (UTC)
Q: Why did you wait so long with publishing files etc?
A: Well two reasons here, I'm new to this wiki and well its bit more complicated then i thought.. and I didn't have much time lately. Other reason is also I'm personally investing a lot of money in the development of these electronics. And I need to get that investment out in the first production series, because this is open-source and anyone can reproduce. So we decided to wait with releasing files until we shipped the first GEN6 electronics, so we have a bit head start and hopefully get our investment out.. BTW: This also means if we sell enough and can start a 2nd batch.. prices can drop a bit...
