Mendel heated bed
Release status: Working
| Description | Mendel Dibond heated bed
|
| License | GPL
|
| Author | |
| Contributors | |
| Based-on | |
| Categories | |
| CAD Models | Heated-bed-design-files.zip
|
| External Link |
Contents
Introduction
If you build fused-filament-fabrication parts (the technology that RepRap uses) at room temperature, they have a tendency to curl as they cool from the bottom up. This is caused by higher layers shrinking as they cool and bending the already-set lower layers upwards.
Different plastics suffer from this problem to different extents. ABS warps more than most other materials. Polylactic acid (PLA) is quite good. Indeed, if you make a single PLA part in your RepRap, curling probably won't be a problem at all - the part will stay warm enough from one layer to the next to eliminate the problem almost completely.
But if you build whole trays of parts (as in the picture) then, even using PLA, you can get some curling. The cure for this is to build on a bed that is heated.
This heated bed is primarily for making polylactic acid (PLA) parts. It probably won't run hot enough for ABS. But that guess is subject to correction by experiment.
The CAD and other design files for this heated bed can be downloaded from here.
This device was from an idea by Nophead.
See also Heated_Bed page which have other alternatives materials (may be easier to source locally, more cheap, etc) for making the Mendel Heated Bed. That page have also more information about the Heated Bed, electronic circuits, firmware, Skeinforge configuration for Heated Bed, etc.
Cutting out
The main part of the heated bed is made from Dibond. This is a sandwich of LDPE between two sheets of aluminium. It is very light, very stiff and very flat - all required properties for a RepRap build bed. The bed is made from a sheet of Dibond with heating wires and insulation attached underneath.
The plastic in the sandwich is not the world's best thermal conductor, but the bed is thin enough that it seems to work well.
I bought my Dibond from these people who kindly cut it into rectangles of 232x260 mm for me. It is pretty widely available as it is used for making signs and exhibition stands and such like. It's also pretty cheap.
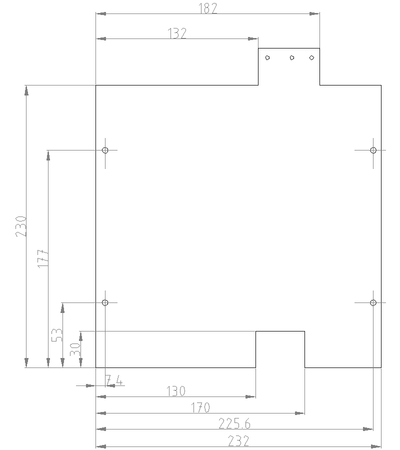
This shows the pattern to be cut from 3 mm thick Dibond (the .dxf file for this is in the CAD download). The shape is exactly the same as the standard Mendel build bed, but with the addition of the tab at the back for mounting electrical connections. The dimensions of the tab are not shown because you may have to change them a bit to accommodate the electrical connectors you use. My tab was 30 mm deep.
Two of the three holes in the tab are for mounting a three-way chocolate-block screw electrical connector - get a chunky one; it has to handle a significant current. The third is for a small right-angled bracket to mount a connector for a thermistor that will be used to measure the bed's temperature. Virtually any small two-way connector will do for that. Make sure that the connections (which will be on the underside when the bed is in use) do not foul the two reprapped parts and the M4 screws through them that hold the right-hand Y-axis bar at the back of your Mendel.
You could try cutting the Dibond in a laser cutter, but the aluminium may well give trouble if you do. I found that a bandsaw worked best. If you saw out the shape, gently clean the edges with a file afterwards to remove any lips and burrs.
Wiring up
The first electrical question that arises is obviously: how much power is needed to keep the bed at the right temperature? I run my bed at 55oC (though see below), and that seems to need a little under 100 W at a duty cycle of about 70%.
If you are going to run the bed at 12 volts, then this implies a bed resistance of 122/100, or about 1.5 ohms. This further implies a total current of 8A.
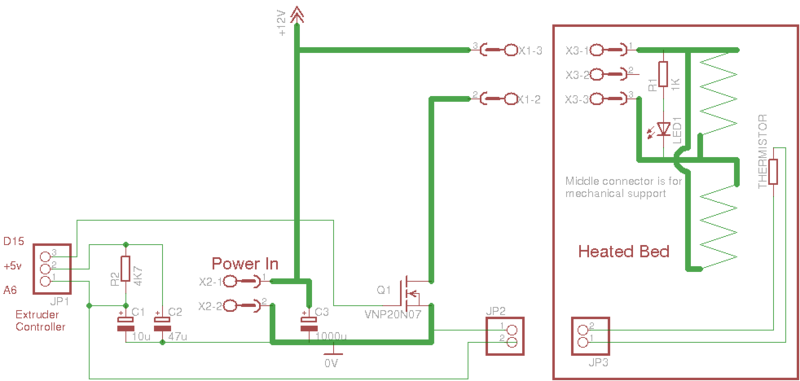
Here is the circuit diagram for the bed, together with its control circuit. Where it shows fat wires, use fat wires...
As you can see, I set it up so the bed was effectively two resistors wired in parallel, so each one needed to be 3 ohms. They in turn are made up of additional wires in parallel. The exact pattern you use will depend on the resistivity of the heating wire you use.
The heater wire I used was nichrome. It doesn't need to be insulated. Measure the resistance of a length (say 400 mm) of your nichrome, then work out a regular pattern of it covering the bed that will give the total resistance that you want. Make sure that all current paths are equal, so you get equal heating.
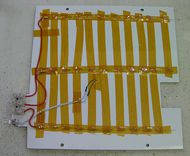
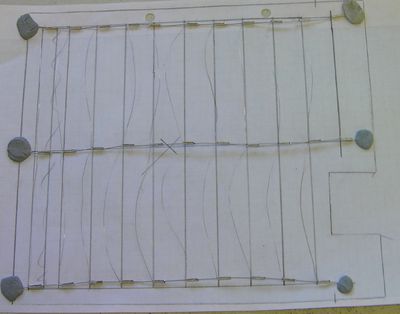
Here I have laid out the pattern on graph paper, which is quite a convenient way of setting it up. There are three copper wires, with two ladders of nichrome between them. I used Blu-tack to hold everything in place while I was making it. The connections are made using crimp connectors or bootlace ferrules - you can't solder nichrome.
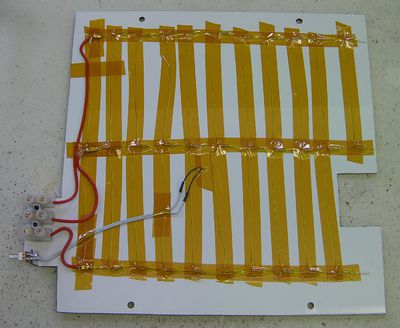
When you have the pattern right, make a grid of Kapton tape on the bed to sit underneath it. Dibond has an insulated covering on it, but there are reports of the hot wires shorting through it; the grid will give good electrical insulation. Then place your wire pattern on the bed and tack it down with short lengths of Kapton tape. Then use more Kapton to hold the entire pattern down completely.
It is convenient to put the indicator LED on the bed, then you can see when the heat is on. I soldered it and its 1K ballast resistor onto the power input wires where they join the chocolate block at the back. I insulated the leads with heat shrink, and I bent the leads so that the LED just poked above the back edge of the bed and pointed forwards.
Finally wire up the connectors using fat wires for the heater. These you can solder, because you can solder onto a ferrule. You can also see the thermistor in place here, also held down with Kapton. Put it somewhere near the middle as far away from the wires as you can. The photograph shows a wire going to the middle chocolate block connection - this was an old version; there should only be two power wires.
The thermistor I used was an Epcos B57550G103J. This has a resistance of 10K at 25oC, and a beta value of 3480.
Thermal Insulation
Clearly you want all the heat to go upwards where it will be useful, so you can insulate the underside of the bed. I used builder's crack-filler foam. You can run the bed with no insulation - it will easily hit 50oC even when losing heat downwards. Obviously it'll require less power if it is insulated, though. It's up to you.
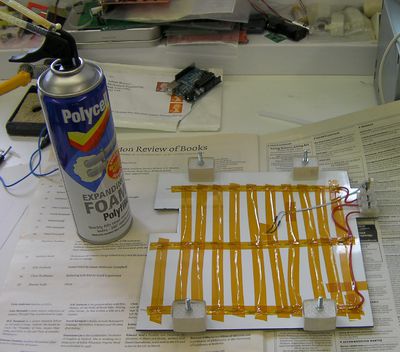
Start by printing four of the parts in the file foam-block.stl from the download in your RepRap. These are to bolt to the bed to prevent the foam getting in the way of the springs that support the bed. Print the parts using very coarse infill - they don't need to be strong. When they are done, wrap a rectangle of paper round each one and tape it tight. This is to stop the foam sticking. Bolt them hand-tight to the wiring side of the bed.
Place the bed on newspaper. Spray it with a small amount of water using something like a pot-plant mister to help the foam to set and stick. Then squirt the foam from the can on the back. Try to avoid clogging the electrical connectors.
Do not be tempted (as I was - see below) to try to even out the foam with a trowel. You will just mess it up. Try to get an even coating with no gaps, and don't bother how thick it is or where it goes over the edges.
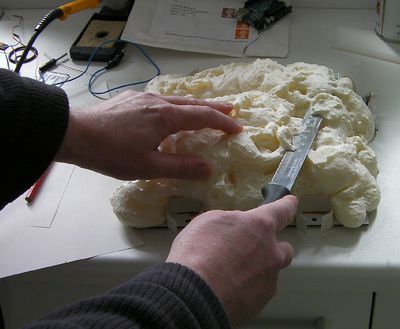
When the foam is fully set, cut it to size. I used a bread knife, which seemed to work well. Trim it so that it is about 10mm thick, and cut round the edges of the bed to neaten it up.
Installation
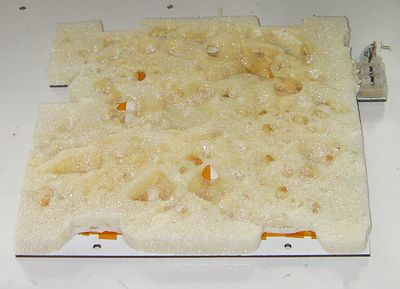
Here is the finished bed. The voids (which don't seem to matter) are the result of my trowel misadventure. If you just let the foam set on its own, you should avoid these.
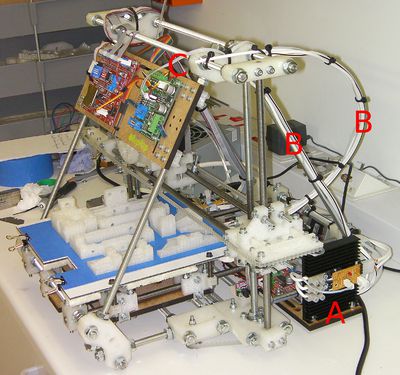
I wired up the control circuit on stripboard, with the power MOSFET on a meaty heatsink. Make sure that all the high-current paths are very chunky. I then mounted it on the right of my Mendel at the back (A). I ran a separate ground and 12 volt fat wire to it from the power connector. I then ran the power and control wires up the leg of the machine and down a loop of plastic filament (B) to the connector on the heated bed. I clamped the filament in the spare middle connector of the 3-way chocolate block connector on the bed (see the schematic); don't do the screws too tight - they will damage the filament.
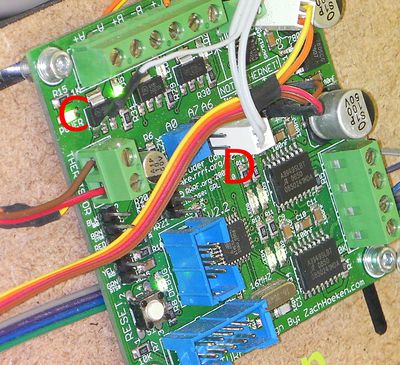
The control connections go to the extruder controller (A6, +5v and D15, as shown on the schematic). This is temporary - it makes more sense to control this from the Motherboard, but the Generation 3 one has no spare analogue inputs. To access D15 you need to solder a pin to the gate of the left-hand power MOSFET on the controller board as shown here at C:
The other two connections can go to a header (D) that is already on the board.
I replaced the four reprapped springs that support the bed with these steel springs. I don't know if this is strictly needed, but I suspected that the hot bed might soften the plastic springs. More experimenting is needed on this...
Testing
Your 12v power supply has to be tough enough to supply all the current you need. That is about 5A for the main RepRap machine, plus 8 A for the heated bed. Most PC supplies can push at least 15A down the 12v supply, so one of those should be fine. Do check though.
Start with the heater wires disconnected from the control circuit. Connect the RepRap machine to the computer and run the host control software. The XYZ tab now has an extra control panel for the heated bed. Check that when you turn the bed on and off the LED on the power MOSFET on the extruder controller board and the one on your new control circuit both go on and off too. When they are on they may flicker - the control is done by PID.
The temperature reading should be around your room temperature.
Shut everything down and disconnect the power.
Check the heater resistance. If you wired it as two parallel circuits as I did, each half should be 3 ohms. If you have done it as a single circuit it should be 1.5 ohms. Connect up the heater.
Re-run the test above. Now when you turn on the bed you should see the temperature start to rise. This will be slow - the bed is a lot bigger than the extruder nozzle. If you want to speed it up, lay some of the foam you cut off on top of it. Mine gets to 55oC in about four or five minutes.
Tips and improvements
I don't print directly on the bed.
I've found the best way to print PLA with this is to put some 4mm glass on it and print on that. See here.
Before I used glass, I cut out a rectangle of 1 mm thick aluminium sheet to fit on it, with a notch for where the extruder dumps. I hold it to the main bed with four bulldog clips. This sheet is quite flexible, but the Dibond holds it flat. I cover the aluminium with a layer of blue Scotch 2090 decorator's tape, which gives a good surface to lay down PLA on.
This detachable tray has two advantages:
- You can run several in rotation to do batch production, and
- Removing it applies no force to the bed, so the machine's Z zero position does not tend to get moved out of alignment.
8A is a lot of current. The VNP20N07 power transistor used to control the bed can switch 20A at up to 70V. Clearly the higher the voltage you use, the higher the resistance of the bed can be and the lower the current to get the same power. It may well be worth running the device at a higher voltage (say 48V) and about 2A if you have such a supply available. That would make things much more sensible in the current department.
The temperature difference between the bottom of the bed (where the thermistor is) through its 3 mm thickness to the top is about 5oC. I run my bed at 55oC, which means I'm laying down PLA on a 50oC surface. I can build entire trays of parts under those conditions with no warping.
Dibond is rated up to 80oC, so it may be OK for ABS (which should need about 70oC), but I haven't tried it. To get the bed that hot you'll probably need more power than the 100W that I was putting through it. I'd try 200 W.
