Teensylu
|
English • العربية • български • català • čeština • Deutsch • Ελληνικά • español • فارسی • français • hrvatski • magyar • italiano • română • 日本語 • 한국어 • lietuvių • Nederlands • norsk • polski • português • русский • Türkçe • українська • 中文(中国大陆) • 中文(台灣) • עברית • azərbaycanca • |
This page is a development stub. Please enhance this page by adding information, cad files, nice big images, and well structured data!
Release status: Experimental
| Description | Design Version 0.7
|
| License | unknown
|
| Author | |
| Contributors | |
| Based-on | |
| Categories | |
| CAD Models | Eagle
|
| External Link |
Contents
Introduction
This is a project that is based on Sanguinololu. The ATmega644P has been replaced with an Atmel AT90USB1286 MCU. This Microcontroller has on-chip USB, removing the need for the FTDI USB UART. All of the through hole resistors and capacitors have been replaced with 0805 SMT components (as of Ver 0.1). Like the Sanguinololu the Teensylu has expansion headers supporting I2C, SPI, UART, and ADC pins. All extra I/O ports of the AT90USB have been broken out to headers for prototyping.
Features
- Small design - board is 100mm x 60mm (4" x 2.4")
- Teensylu clone, Atmel's AT90USB1286 - AT90USB1287 drop-in compatible for 20mhz support
- Up to 4 Pololu stepper driver boards (or Pololu compatible) on-board (X,Y,Z,Extruder) (without voltage regulator)
- Supports multiple power configurations (Carried from Sanguinololu)
- -- Logic & Motors supplied by ATX power supply (needs molex harddrive connector, and optional 4pin atx connector for additional 12v)
- -- Motors supplied by 5mm screw terminal 7-35V
- -- Logic supplied by USB bus
- -- Logic supplied by optional on-board voltage regulator (molex harddrive connector cannot be installed at the same time)
- -- on-board USB connectivity
- 2 thermistor connectors with circuitry
- 2 N-MOSFETs for extruder/bed heaters
- 1 N-MOSFET for low power fan or motor
- Selectable 12v/5v endstop voltage
- -- 4 endstops including 4th stop called E-Stop to be used as an emergency stop, or extruder stop (to be added in firmware).
- Edge connectors enabling right-angle connections
- Silkscreen for connectors on both sides of the board, facilitating bottom cable connections
- 14 Extra pins available for expansion and development - 6 analog and 8 digital (Fully compatible with Sanguinololu), with the following capabilities
- -- UART1 (RX and TX)
- -- I2C (SDA and SCL)
- -- SPI (MOSI, MISO, SCK)
- -- PWM pin (1)
- -- Analog I/O (6)
- Additional 14 pin header with 11 I/O for prototyping
- SMT Components sized at 0805 for easier soldering.
Software
Compatible Firmwares
- Sprinter Sprinter
- Marlin Marlin: Supported, use MOTHERBOARD == 8. Works fine 2014/10/14
- Repetier List_of_Firmware#Repetier-Firmware: Supported, use MOTHERBOARD == 8.
- grbl List_of_Firmware#Grbl: No official support yet, but works with Lincomatic's fork.
- (Other firmwares are currently untested but any firmware for an arduino mega should work with proper pin setup.)
Building Firmware
Sprinter
- Download the arduino environment and install. http://arduino.cc/en/Main/Software
- Download the Teensyduino library from pjrc and install. The teensyduino libraries here: http://pjrc.com/teensy/td_download.html Be sure to select "all" when asked which additional libraries to install.
- If using the LUFA CDC bootloader, add the following to arduino/hardware/teensy/boards.txt file at the bottom:
- (use arduino/hardware/teensy/avr/boards.txt if you use 1.5 arduino IDE version)
teensylu.name=Teensylu
teensylu.upload.protocol=avr109
teensylu.upload.maximum_size=122880
teensylu.upload.speed=115200
teensylu.upload.disable_flushing=true
teensylu.serial.restart_cmd=true
teensylu.serial.safe_baud_rates_only=true
teensylu.upload.avrdude_wrapper=avrdude
teensylu.build.mcu=at90usb1286
teensylu.build.core=teensy
teensylu.build.dependency=true
teensylu.build.serial_number=true
teensylu.menu.usb.serial.name=Serial
teensylu.menu.usb.serial.build.define0=-DUSB_SERIAL
teensylu.menu.speed.16.name=16 MHz
teensylu.menu.speed.16.build.f_cpu=16000000L
teensylu.menu.keys.en-us.name=US English
teensylu.menu.keys.en-us.build.define1=-DLAYOUT_US_ENGLISH
teensylu.menu.keys.fr-ca.name=Canadian French
teensylu.menu.keys.fr-ca.build.define1=-DLAYOUT_CANADIAN_FRENCH
teensylu.menu.keys.da-da.name=Danish
teensylu.menu.keys.da-da.build.define1=-DLAYOUT_DANISH
teensylu.menu.keys.fi-fi.name=Finnish
teensylu.menu.keys.fi-fi.build.define1=-DLAYOUT_FINNISH
teensylu.menu.keys.fr-fr.name=French
teensylu.menu.keys.fr-fr.build.define1=-DLAYOUT_FRENCH
teensylu.menu.keys.fr-be.name=French Belgian
teensylu.menu.keys.fr-be.build.define1=-DLAYOUT_FRENCH_BELGIAN
teensylu.menu.keys.fr-ch.name=French Swiss
teensylu.menu.keys.fr-ch.build.define1=-DLAYOUT_FRENCH_SWISS
teensylu.menu.keys.de-de.name=German
teensylu.menu.keys.de-de.build.define1=-DLAYOUT_GERMAN
teensylu.menu.keys.de-ch.name=German Swiss
teensylu.menu.keys.de-ch.build.define1=-DLAYOUT_GERMAN_SWISS
teensylu.menu.keys.is-is.name=Icelandic
teensylu.menu.keys.is-is.build.define1=-DLAYOUT_ICELANDIC
teensylu.menu.keys.en-ie.name=Irish
teensylu.menu.keys.en-ie.build.define1=-DLAYOUT_IRISH
teensylu.menu.keys.it-it.name=Italian
teensylu.menu.keys.it-it.build.define1=-DLAYOUT_ITALIAN
teensylu.menu.keys.no-no.name=Norwegian
teensylu.menu.keys.no-no.build.define1=-DLAYOUT_NORWEGIAN
teensylu.menu.keys.pt-pt.name=Portuguese
teensylu.menu.keys.pt-pt.build.define1=-DLAYOUT_PORTUGUESE
teensylu.menu.keys.pt-br.name=Portuguese Brazilian
teensylu.menu.keys.pt-br.build.define1=-DLAYOUT_PORTUGUESE_BRAZILIAN
teensylu.menu.keys.es-es.name=Spanish
teensylu.menu.keys.es-es.build.define1=-DLAYOUT_SPANISH
teensylu.menu.keys.es-mx.name=Spanish Latin America
teensylu.menu.keys.es-mx.build.define1=-DLAYOUT_SPANISH_LATIN_AMERICA
teensylu.menu.keys.sv-se.name=Swedish
teensylu.menu.keys.sv-se.build.define1=-DLAYOUT_SWEDISH
teensylu.menu.keys.en-gb.name=United Kingdom
teensylu.menu.keys.en-gb.build.define1=-DLAYOUT_UNITED_KINGDOM
teensylu.menu.keys.usint.name=US International
teensylu.menu.keys.usint.build.define1=-DLAYOUT_US_INTERNATIONAL
- Download Sprinter firmware. https://github.com/kliment/Sprinter
- Open Sprinter in arduino and configure configuration.h file.
- Motherboard should be set to 8: #define MOTHERBOARD 8
- Turn off endstops if you didn't install endstops: const bool ENDSTOPS_INVERTING = true;
- Turn comment out SD card support, not working yet: //#define SDSUPPORT
- Go to Tools menu and set Board to Teensy++ 2.0, or Teensylu if using alternate bootloader.
- Go to Sketch menu and click "Verify/Compile" (in Arduino 22/Teensy++2, I had to change Serial.Print(float) to Serial.Print(double,int) in order to compile)
- A program will popup for the teensy programmer after sprinter is done compiling. We don't use that here. You can exit it.
- Find the hex file: the compiled hex is in a temporary directory.
- Windows: Find the hex file in the temp folder. c:\users\{currentuser}\appdata\temp\build1234567890\sprinter.cpp.hex copy this hex file into my documents or somewhere more accessible.
- Linux: The hex-file is generated by arduino and resides in a temporary build folder in /tmp. It is deleted as soon as the popup is closed. Search for it with
find /tmp -name \*.cpp.hex
Programming the Firmware
Atmel preloads the AT90USB128 with a bootloader that allows for programming of the firmware using the USB port. Once a firmware is installed, the board connects as a serial device. See below on how to get it back into programming mode.
Windows
This requires their software called FLIP to be installed. For more information, read the following documentation: http://www.atmel.com/dyn/resources/prod_documents/doc7618.pdf http://www.atmel.com/dyn/resources/prod_documents/doc7769.pdf
For Windows Users You will need to download FLIP FLIP: http://www.atmel.com/dyn/products/tools_card.asp?tool_id=3886
To start the bootloader:
- Press the reset button on the board
- Windows should say "found new hardware". the drivers for this hardware are in the "c:\program files\atmel\flip 3.4.3\usb" folder.
Flashing Firmware
- Start the FLIP program. select the target device: AT90USB1286. Select Communication medium as USB, and click Open.
- Open hex file, and choose the Sprinter.cpp.hex
- Make sure the Erase, Blank Check, Program, and Verify checkboxes are checked.
- Click the Run button
- To enter normal operation, unplug and replug the USB cable on the board.
- Congratulations, you're done!
Mac
For Mac users there's a custom version of the opensource programmer "dfu-programmer." Information on this software can be found on its homepage here: http://www.uriahbaalke.com/?p=106
dfu-programmer at90usb1286 erase
dfu-programmer at90usb1286 flash Sprinter.cpp.hex
TODO: Add mac instructions here.
Linux
For Linux users an opensource programmer called "dfu-programmer" has been found. Information on this software can be found on its homepage here: http://dfu-programmer.sourceforge.net/ If you are running Ubuntu you can simply install it from the universe repository (tested in 10.04 LTS). The programmer needs to run with root privileges, so either use sudo or run as root.
- dfu-programmer at90usb1286 erase
- dfu-programmer at90usb1286 flash sprinter.hex
Alternate Bootloader
If you have an ISP or JTAG cable, you can also program an alternate bootloader from the LUFA project that allows you to potentially program with the standard Arduino software.
- Download BootloaderCDC.zip
- Unzip to get
BootloaderCDC.hex - Program using your favorite ISP/JTAG cable. The command for avrdude is
avrdude -p at90usb1286 -c <your programmer here> -U flash:w:BootloaderCDC.hex
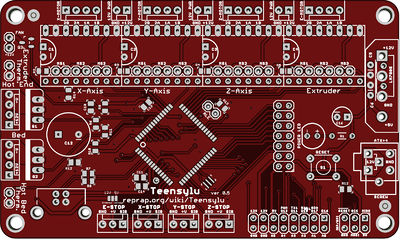
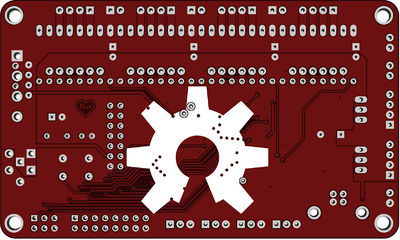
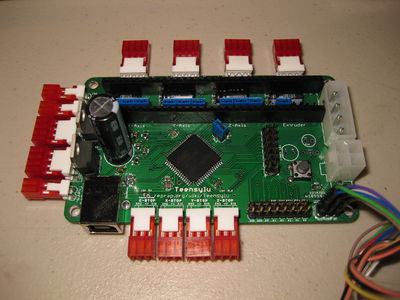
Board Images
Schematics
Board and schematic on Github: [[1]]
Mouser project: https://www.mouser.com/ProjectManager/ProjectDetail.aspx?AccessID=360523b45b
Mouser project TeensyLu 0.7: http://www.mouser.com:80/ProjectManager/ProjectDetail.aspx?AccessID=BEDA350D64 (Work in Progress - feel free to Help) Notes on the 0.7 BOM: Some smd resistors are too large, some smd caps are too small.
Parts not Available at Mouser: http://search.digikey.com/us/en/products/PPPC321LFBN-RC/S7065-ND/810204
Teensylu Bill of Materials 'working' version (* denotes included in 1.7 BOM)
- ATX1 ATX-4VERTICAL MINIFITJR-4-VERTICAL
- C1 - C4 100uf CPOL-RADIAL-100UF-35V
- C5 0.33uF CAP-PTH-SMALL2
- C6 0.1uF CAP-PTH-SMALL2
- C9,C10 10uF CAPC2012X145AN
- C11 1uf CAPC2012X145AN
- C7,C12 580uF CPOL-RADIAL-580UF-35V
- C13,C14 0.1uF CAPC2012X145AN
- C16 4.7uF CPOL-RADIAL-10UF-35V
- HDDPWR 5v/12v HDD-VERTICAL (No longer supported - see ATX1)
- IC1 LM7805 VREG-NOGND
- IC2 AT90USB1286 TQFP64 (Drop in replacement 1287 in BOM)
- J1 USB USB-B-PTH
- JP1,JP3,JP5,JP7 MOT-X, MOT-Y, MOT-Z, MOT-E MOLEX-1X4
- JP2,JP4,JP6,JP8 12VPWR MOLEX-1X2
- JP9 - JP20 Motor Selects 1X02
- JP8,JP21 HOTEND,HOTBED MOLEX-1X4
- JP22, JP24,JP25 Thermistors,FAN 1X02
- JP27,JP28,JP29,JP30 X-STOP,Y-STOP,Z-STOP,E-STOP MOLEX-1X3
- JP31 2x7 JP7Q
- JP32 ALE 1X02
- LED1 LED5MM
- P1 - P4 POLOLU POLOLU-ALLEGRO-PTH
- Q1,Q2 STP45NF06 TO220V
- Q3 PMV45EN SOT95P280X135-3N
- R1 1k RESC2012X70N
- R2 - R5, R12 100k RESC2012X70N
- R6, R11, R13, R14 10k RESC2012X70N
- R7, R8 22 Ohm RESC2012X70N
- R9, R10 4.7k RESC2012X70N
- S1 RESET TACTILE-PTH
- SJ100 5v/12v SJ_3
- XTAL 16MHZ RESONATOR PRQC_3.2X1.3_RESONATOR
Where to get it
Bare PCB
Complete Kit
Assembled Board
Known Variations
- Printrboard: Somebody is working on building a variation of the board that that integrates the stepper drivers on board and has sd support. (Printrbot board is at http://github.com/lwalkera/printrboard per http://printrbot.com/home/2012/1/1/the-end-the-beginning.html )
- KiCad based schematics (with added power LEDs, 12v and 5v) untested - https://github.com/simonantonio/Teensylu


