Ceramic Extrusion
This page is a development stub. Please enhance this page by adding information, cad files, nice big images, and well structured data!
Release status: Experimental

| Description | Unfold Ceramic Extrusion, extruders and materials
|
| License | |
| Author | |
| Contributors | |
| Based-on | |
| Categories | |
| CAD Models | |
| External Link |
This page describes the research done by Unfold on extruding ceramic materials with a RepRap. The development platform used is a Bits from Bytes Rapman so all extruder cad files are designed for this machine or machine independent. The CAD files or general principles should be easily adaptable to Mendel or other machines. This page describes experiments with various types of paste extruders, ceramic clay recipes and other related topics. We keep a blog about progress on ceramic 3d printing and other topics at [unfoldfab.blogspot.com].
Forum thread
http://forums.reprap.org/read.php?180,21047
Status
Experimental, documentation under construction, in fact I just lost half of my edits :(
Extruders
Claystruder 0.1 (Stepper Driven Plunger)
Description
This design never left the drawing board but was based on the principle of a plunger being driven down a syringe barrel using a (stepper) motor. This can be done either with an expensive linear stepper engine like on the Fab@Home Model 1 Syringe Tool or with a more standard rotational stepper. Examples of the later are the Fab@Home Model 2 Syringe Tool, a very early Syringe Pump Prototype by Adrian Bowyer, Zach Hoeken's Frostruder MK1 or Viktor's (VMX) Syringe Tool
Advantages
- Compatible with most software, firmware and electronics due to the use of a stepper engine
Disadvantages
- Paste oozing source
- Assembly height is at least double of syringe length making it rather impractical for larger volumes
- Inflexible in syringe size
Claystruder 1.0 (Time-Pressure Valve)
Retyping... 000
Claystruder 2.0 (Auger Valve)
Description
This is the current head under development and not based on previous RepRap developments but rather on extensive research of industrial dispensing solutions. The aim is to solve some of the issues observed during extensive testing of v1.0.
Print Materials
Preparing Clay
Filling a syringe
While I was going through the excellent documentation of the frostruder at Makerbot I found the following photo's of Zach filling a syringe:
I used this method exactly once :) Its totally unusably for getting a syringe filled with clay and trying to avoid any trapped air. So here's the method we hacked together in a few minutes.
The Syringe Transfer Tool!
The STT is a syringe from which the front is cut of and that is used to suck up material.
You still need a canister or lump of air free material but thats easier than to try and get the material compacted in every syringe individually. turns head-does not adjust speed-back to typing.
Next step is to fully insert the plunger in the syringe and suck up material. The trick is to pull the plunger while simultaneously pushing the syringe in the material. After 100 times you can do it one handed while taking a picture :)
Now you detach the plastic plunger stick from the silicone plunger cap without letting air in (tricky part). After that you smooth the clay and taper it a bit, I always put little pit in the top to make sure air escapes before the clay reaches the nozzle when transferring the clay in the print syringe.
Onto the magic transfer move.... You make a nice stack of pssst-turns head-perfect print finished. A nice stack of plunger stick - STT - empty syringe and you push the clay out of the STT into the empty syringe, et voila!
Porcelain
Images
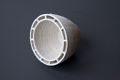
First printed ceramic vessel
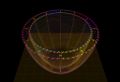
Gcode toolpath
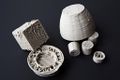
Various tests


Notes
- designboom: "unfold and tim knapen: l'artisan electronique" "Z33 art centre in hasselt, belgium ... on show until may 30, 2010. the installation enables exhibit visitors to make their own forms using the device."