Ceramic Extrusion
This page is a development stub. Please enhance this page by adding information, cad files, nice big images, and well structured data!
Release status: Experimental

| Description | Unfold Ceramic Extrusion, extruders and materials
|
| License | |
| Author | |
| Contributors | |
| Based-on | |
| Categories | |
| CAD Models | |
| External Link |
This page describes the research done by Unfold on extruding ceramic materials with a RepRap. The development platform used is a Bits from Bytes Rapman so all extruder cad files are designed for this machine or machine independent. The CAD files or general principles should be easily adaptable to Mendel or other machines. This page describes experiments with various types of paste extruders, ceramic clay recipes and other related topics.
Unfold keeps a blog about progress on ceramic 3d printing and other topics at Unfold ~fab.
Unfold has a summary page about Unfold ceramic 3d printing.
Contents
Forum thread
http://forums.reprap.org/read.php?180,21047
Status
Experimental, documentation under construction since dec 26, 2010
Extruders
Claystruder 0.1 (Stepper Driven Plunger)
Description
This design never left the drawing board but was based on the principle of a plunger being driven down a syringe barrel using a (stepper) motor. This can be done either with an expensive linear stepper engine like on the Fab@Home Model 1 Syringe Tool or with a more standard rotational stepper. Examples of the later are the Fab@Home Model 2 Syringe Tool, a very early Syringe Pump Prototype by Adrian Bowyer, Zach Hoeken's Frostruder MK1 or Viktor's (VMX) Syringe Tool. We never had any experience using this type of extruder on clay paste so this is an incomplete list of (dis-)advantages:
Advantages
- Compatible with most software, firmware and electronics due to the use of a stepper engine
Disadvantages
- Paste oozing (source)
- Assembly height is at least double of syringe length making it rather impractical for larger volumes
- Inflexible in syringe size
Claystruder 1.x (Time-Pressure Valve)
Description
Based heavily on Zach Hoeken's Frostruder MK2, Claystruder 1.0 is the printhead that we used extensively for almost a year to successfully print earthenware and porcelain ceramic objects and is still a perfect tool to quickly test new material characteristics. Instead of a mechanical plunger, you use timed pulses of air pressure to drive the material out of the syringe hence in the industry this is called a Time-Pressure Valve. The only difference with the frostruder apart from the physical design is that we use one double action 3/2 solenoid valve instead of two 2/2 single action ones. The 3/2 valve will pressurise when powered and automatically de-pressurise when power is removed. Its cheaper and requires only one controller output to operate. The double 2/2 gives possibly a greater flexibility in pressure timing. You can build a Claystruder 1.0 for RapMan following the instructions below, create your own design or use a Frostruder from Makerbot to get similar results.
Videos
<videoflash type="vimeo">10839752|400|225</videoflash><videoflash type="vimeo">10839210|400|225</videoflash>
Build Instructions
Also on Thingiverse: It is important to note that it was never designed with elegance or easy printability in mind, its just a quick and dirty prototype. The Claystruder 1.1 is designed on top of a spare RapMan extruder mounting plate that we had around. The DXF for the mounting plate is attached. Laser cut out of 5mm material. The claystruder base that holds the syringe is glued on top of the mounting plate. Two feet fit in appropriate holes of the plate. (see, not very elegant...) The two STL's that make up the claystruder need to be printed with support turned on. It is kept to the minimum but its not completely without overhangs. You can fit most 50-60 cc syringes in the base of the Claystruder. The cap is also a mounting base for a 12v DC 6012, 3/2-Way Miniature Solenoid Valve from Burkert: link. You will also need two screw on connectors for the tubing. On short tube goes straight down true the cap and should end 5-10 mm below the bottom. Here you can fit a rubber plunger cap from a 60cc syringe that you perforate to guide the tube true the rubber cap. This will make sure that your syringe is air tight. On top of the valve goes your tube that runs from the compressor. At the front of the valve is the pressure release outlet. I always use two small clamps to hold the cap and the base together. You will need to fit something on the base plate to trigger your limit switches. I use a threaded rod and a few bolts. Like for the Frostruder, you need a compressor, 10 bar max, for it to work.
Advantages
- Simple straight forward design
- nearly instantaneous start/stop capability
- Easy to clean
Disadvantages
- Less compatible with most software, firmware and electronics due to the use of a solenoid valve
- Air compressor or other source of compressed air needed
- Difficult to control flowrate
Observations
- The biggest problem with a Time-Pressure Valve system is that it depends on many variables to keep a repeatable flowrate. The main variables are pressure and material viscosity and the combination of both (in addition to friction of plunger etc etc) gives you certain flowrate. So if your materials viscosity changes you need to compensate that with higher or lower pressure. Because most pressure controllers on air compressors are very unprecise we found good use for the ability of early Rapman firmware to change the XY speed to compensate for ever changing flowrates. But basically we never found a way to get repeatable constant flowrates. Therefore unguarded operation is no option.
- We have never tried but expect more trouble getting decent ceramics prints with machines that have a moving bed like Makerbot Cupcake or RepRap Mendel. The resulting movement of your complete model which is still plastic for the duration of the build can result in a collapse. A bed that moves only along the Z axis might be preferable, alternatively you can try using slow build times and the acceleration features of recent firmwares.
- While you can apply pressure directly on the material, it is advised to use the rubber plunger that comes with your standard medical syringe on top of the material to prevent air pressure from digging a canal true the last 10-20cc of material. Without it you loose the last bit of printable material but worse the resulting air jet will shoot a hole in your model (or even more destructive). Commercial dispensing syringes come with a range of plungers of which the PP versions might give less friction but they also seal a bit less.
Claystruder 2.x (Auger Valve)
Description
This is the current head under development and not based on previous RepRap developments but rather on research of industrial dispensing solutions. The aim is to solve some of the issues observed during extensive testing of v1.0.
Print Materials
Preparing Clay
Filling a syringe
While I was going through the excellent documentation of the Frostruder at Makerbot I found the following photo's of Zach filling a syringe (photo's by Makerbot):


I used this method exactly once :) Its totally unusable for getting a syringe filled with clay and trying to avoid any trapped air. So here's a method we hacked together in a few minutes.
The Syringe Transfer Tool!
The STT is a syringe from which the front is cut of and that is used to suck up material.

You still need a canister or lump of air free material but that's easier than to try and get the material compacted in every syringe individually. turns head-does not adjust speed-back to typing. Next step is to fully insert the plunger in the syringe and suck up material. The trick is to pull the plunger while simultaneously pushing the syringe in the material. After 100 times you can do it one handed while taking a picture :)


Now you detach the plastic plunger stick from the silicone plunger cap without letting air in (tricky part). After that you smooth the clay and taper it a bit, I always put little pit in the top to make sure air escapes before the clay reaches the nozzle when transferring the clay in the print syringe.


Onto the magic transfer move.... You make a nice stack of plunger stick - STT - empty syringe and you push the clay out of the STT into the empty syringe, et voila!


Special Clay?
We get the question often "is this special clay?". We always said that it was fairly standard but since diving deeper into clay it looks more and more like there's a whole other universe in that slurry. Its not pottery, its higher chemistry and I wish I stayed a bit longer in ceramics class :) At first we tried watering down modeling clay and this works but its hard to get consistent results. Now we always start from clay powder that you can find in the better ceramics supply store. I found out lately by buying a different type of clay that I had been lucky with the first clay that I bought because the last one had a really tough time NOT to collapse during print. The difference? Fat or lean clay, the one I always use is semi-fat (or semi lean, depends on your ideologies) and the one that collapses is lean. I can't find a good explanation in english online but fat clay particles are more plates and have a better cohesion. (if anyone has the explanation somewhere in english?) So you'll want semi-fat or fat clay for 3d printing with extrusion. Next you need to balance the viscosity so that it extrudes around 4-5 bar (60-70 psi) but has enough strength to support itself as a build object. A water : powder ratio of 1 : 2.2 gives the best results for the clay powder we use here, this may vary for the powder clay you buy in the store but this might be a good starting point. You could also reinforce your clay with cellulose fibers (paperclay). I have only done a quick test to see if it extrudes but did not build an object with it. I can imagine that it clogs faster.
Porcelain
Although typically regarded as difficult type of clay to work with, we find that it is our material of choice at the moment due to the ease of use when preparing. It is less sticky compared to earthenware clay when handling. On top of that its a fantastic material that has a nice white colour, bit of translucency and a nice bell like you would expect from a porcelain. We are not ceramic recipe formulating wizards but we found that a standard equal parts porcelain works great.
equal parts porcelain:
- Kaolin 25%
- Ball Clay 25%
- Feldspar 25%
- Flint 25%
Just like other clays mixed from powder you will need to experiment with the powder/water ratio but 1 water to 2.5 clay powder is a good starting point to get something that is extrudable at 4 bars.
References for mixing Porcelain here and here
Thixotropic Clay
Currently, a notable problem with extruding paste is that it tends to blob and get dragged around, thereby limiting both the accuracy and the finish quality of clay prints. A stiffer clay should hold its form much better, but that presents the problem of actually getting it through the nozzle.
A possible solution would be to add a vibrator motor to a Claystruder 2.x and use a clay that exhibits thixotropy. A formula (with two variants, one for firing to cone 5 and another to cone 9) may be found in Ceramics: A Potters Handbook, also available here. They are as follows:
Cone 5:
- 25 parts Kentucky Ball Clay
- 15 parts Spodumene
- 15 parts Kona F4 Feldspar
- 15 parts EPK Kaolin
- 10 parts Flint
- 20 parts Ferro Frit #3110
Cone 9:
- 25 parts Kentucky Ball Clay
- 15 parts Spodumene
- 15 parts Kona F4 Feldspar
- 15 parts EPK Kaolin
- 25 parts Flint
- 5 parts Ferro Frit #3110
These compositions are yet untested, so it's unknown just how stiff they can reasonably be, how powerful the vibrator motor needs to be, and how long it takes them to firm back up after agitation.
Images
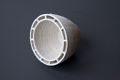
First printed ceramic vessel
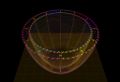
Gcode toolpath
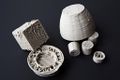
Various tests


Notes
- RJ Paste Extruder
- CeramicPrintHead
- ceramic delta
- designboom: "unfold and tim knapen: l'artisan electronique" "Z33 art centre in hasselt, belgium ... on show until may 30, 2010. the installation enables exhibit visitors to make their own forms using the device."