GranuleExtruder
Release status: experimental
| Description | A experimental extruder designed to use cheap plastic nurdle instead of more-expensive plastic welding rod.
|
| License | unknown
|
| Author | |
| Contributors | |
| Based-on | [[]]
|
| Categories | |
| CAD Models | |
| External Link |
These pages should be merged such that both pages do not attempt to cover the duplicate topics.
The standard RepRap polymer extruder works very reliably, is simple, and can be made almost all out of RP parts. But it needs a supply of 3mm diameter polymer filament. This is not hard to obtain (many companies can make it from polymer granules), but it does represent an extra cost and an extra process.
Timothy Nixon and Adrian Tan of the School of Mechanical Engineering, University of Adelaide, in Australia have designed an extruder for Fab@Home that uses polymer granules directly, and such granules are the standard and cheapest way that all thermoplastic polymers are supplied. I was so impressed that I decided to pinch some of their ideas (that's what open-source is all about :-) ) and add it to something Forrest and I tried almost two years ago (see the RepRap blog for Friday, February 17, 2006 and the subsequent fortnight).
We hope that an extruder that can handle a "virgin" nurdle (a plastic pellet) can also handle recycled plastic shreds or dust from a plastic recycler.
For further information, see this paper by TU Delft Uni on their working screw-driven granule extruder.
Contents
Design and construction
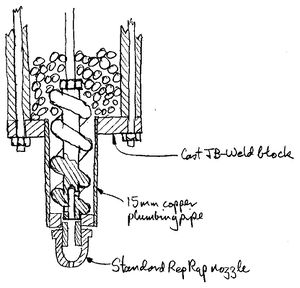
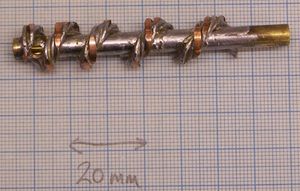
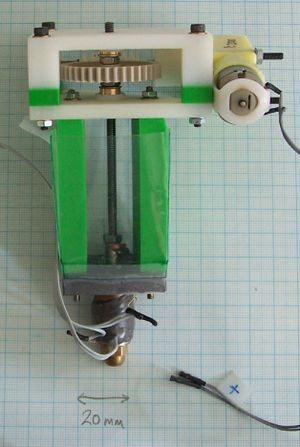
The device consists of a 30 mm length of ordinary 15 mm diameter copper plumbing pipe with a screw auger running down the middle. The screw is made from a 6 mm diameter brass rod. I twisted five 1.2mm diameter copper mains wires together to make a fatter copper wire, twisted that round the brass to form a helix, and soldered it all together. This was much easier than turning the helix in a lathe, and also allowed a variable pitch (closer windings at the bottom) to be made easily. Another way to make auger screw
I deliberately made the screw slightly oversized (the i.d. of the copper pipe was 13.5 mm and I made the screw about 14.5, though it wasn't very smooth). Then I turned it between centres just to skim the outside of the helix down to about 13 mm.
At the bottom (I was pleased with this idea...) the screw has a blind hole with side holes that run out between the helical coils. This allows the polymer to flow out down the centre of the screw, down a short length of M6 brass studding with a centre hole, and into a standard RepRap nozzle made from a brass M6 acorn (or dome) nut.
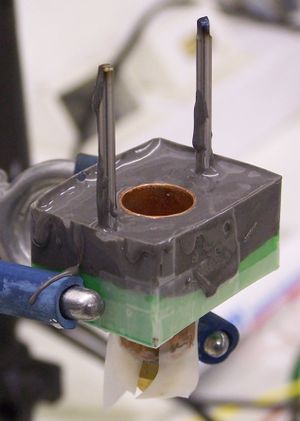
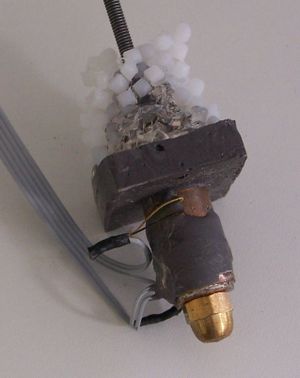
I set the copper tube in a rectangle of JB Weld high-temperature epoxy. To do this I made an RP rectangle 30 mm by 40 mm with a 15 mm hole in the middle and two 3mm holes at the ends. Then I taped a strip of overhead-projector acetate sheet round it to make a mould, and put two 3mm diameter silver-steel rods through to form holes. I greased the inside of the mould with silicone grease, put the copper tube in (being careful not to get grease on it), mixed up 12 g of JB, and pasted it in.
Assembly and testing
I wound two 8-ohm lengths of nichrome heater wire round the barrel and JBed them on, together with a thermistor.
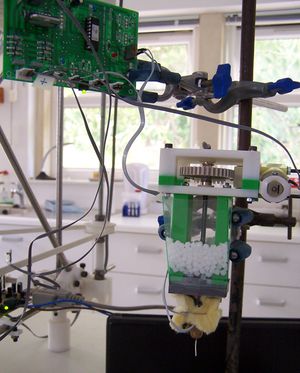
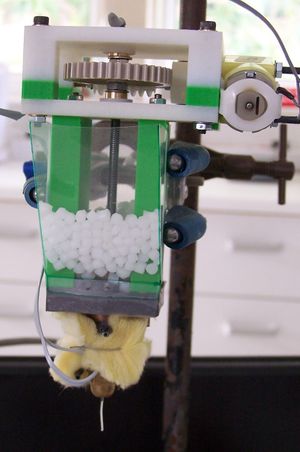
I had a design for a worm-drive driven by the standard geared motor that we use, so I fitted that to the top. I taped on some more acetate sheet to form a hopper for the granules.
All this just plugged into a completely standard and unmodified RepRap Extruder Controller, though I could only use one coil as the TIP110 heater driver maxed out at 2A. To run both coils in parallel would need a meatier Darlington or a MOSFET.
I insulated the barrel with a snip of fiberglass roof lagging, then ran Simon's extruder profile program on it to find the relationship between the power put in and the temperature at which it stabilised.
Then I poured in some polycaprolactone granules, set the temperature to 70oC, and waited for it to warm up.
I turned the motor on and, after waiting quite a while for the helix and then the nozzle to fill up, the device began to extrude :-)
Results and conclusions
After more of a while, the extrusion stopped. I switched everything off and, after it had cooled down, found the problem. Too much heat had conducted up the screw and started to melt the polycaprolactone granules above the entrance to the barrel (right). This stopped granules being entrained by the screw.
In total, the problems were:
- Too much heat conducted up the screw,
- The JB-Weld block was too small - the things attached to it got too hot, and
- The worm drive was too slow.
Good bits were:
- It worked!
- It was easy to make, and
- It used completely standard RepRap electronics and software.
The next one will:
- Have a moulded JB-Weld screw,
- Have a better thermal barrier between the top of the barrel and the rest of the machine, and
- Lose the worm drive - direct would be better and simpler.
-- Main.AdrianBowyer - 09 Sep 2007
RepRap: Blog "Well. That didn't work..."
2008-12-19 describes further improvements
(and the comments have several tantalizing possibilities).

