SAV 3D LCD
|
English • العربية • български • català • čeština • Deutsch • Ελληνικά • español • فارسی • français • hrvatski • magyar • italiano • română • 日本語 • 한국어 • lietuvių • Nederlands • norsk • polski • português • русский • Türkçe • українська • 中文(中国大陆) • 中文(台灣) • עברית • azərbaycanca • |
Release status: working

| Description | LCD controller, rotary encoder and 2 configurable push buttons
|
| License | Creative-Commons 4.0 CC BY-NC-SA
|
| Author | |
| Contributors | |
| Based-on | [[]]
|
| Categories | |
| CAD Models | |
| External Link |
Contents
Introduction
The SAV 3D LCD is an LCD with rotary encoder with click button and 2 push buttons to control your LCD. It allows the control of a 3D printer running Marlin firmware and a SAV MkI, sanguinololu, printrboard or similar electronics directly without having to have a computer connected.
Standard features are provided by marlin firmware all of which are fully operational: start and stop prints, control print speed while printing and change many calibration settings - saving these to the AVR’s EEPORM so they are persistent if you turn the printer on and off -. The design also counts with an enclosure box that can be mounted on your printer.
This module does not have an SD reader as this feature is provided by the SAV MkI, making the LCD interface more reliable and glitch free.
The LCD module comes with an expansion module to connect directly to the SAV MkI. Not only does it allow you to connect the SAV with the LCD backpack but it also expands the control to an external 5V device such as a servo for auto-bed levelling. The device's 5V supply comes from a dedicated voltage regulator, this will avoid any interference caused by it (servo) with your board's 5V supply rail.
The module connects to the main controller using a 14 wire ribbon cable using a 3M box connector. The LCD has been tested with a 1.5m ribbon cable without glitches. The entire LCD is controlled using 2 wires through a Shift Register (SR) interface, the rotary encoder has filtered outputs and relying on the internal AVR pull-ups.

The LCD is a derivative of electroFUN’s Shift Register LCD (SR LCD) which uses only 2 wires to control the LCD, however with the right library (New LiquidCrystal library by fmalpartida) is 4 times faster than the stock LCD driver.
Specifications
| Parameter | Description |
| LCD type | Hitachi HD44780 alphanumeric, 20x4, Blue background white text |
| LCD interface | 2 wire shift register |
| Control | Quadrature rotary encoder with push button, 24 PPR |
| Push button | 2 (predefined for KILL and HOME) |
| Connection | 3M boxed connector to LCD and expansion module 14 wire ribbon cable |
| Expansion module | 1 IO |
| 5V regulated output | 62dB ripple rejection - Typ |
Connection
Configuration and setup
This setup guide is for Marlin, however most of the steps in this section are also applicable to configure other firmware.
Firmware setup
Download and Install the New LiquidCrystal library
The first thing you will need is to download the New LiquidCrystal library from fmalpartida New LiquidCrystal library
Follow the instructions to install the library:
- Download the most recent version of the library - download.
- Install the library in the Arduino SDK library pool. To install the library, simply remove the stock Arduino LiquidCrystal library from the Arduino IDE install and replace it by this one.
To learn about libraries please follow the instructions in [www.arduino.cc/playground/Code/Library Library Tutorial], there is a Section in the Tutorial indicating how to install a library.
'REMARK: Don’t worry this library is completely compatible with the Arduino IDE stock library, the main difference is that it supports multiple LCD drivers and about 4 times faster than the stock library.
Marlin firmware download and setup
If you are using the SAV MkI follow Marlin’s installation guide described in its wiki page: SAV MkI Firmware.
You can download Marlin’s SAV MkI firmware configuration from here: SAV MkI Marlin
Once you have Marlin installed in your system and the New LiquidCrystal library, to configure and active that SAV 3D LCD you have to edit the ‘’’configuration.h’’’ and change the following lines:
//[FMC]#define SAV_3DLCD
//#define SAV_3DLCD
by:
//[FMC]#define SAV_3DLCD
#define SAV_3DLCD
Now you can compile and download the firmware on your SAV MkI. Following the instructions in the SAV MkI wiki page:
|
|
SAV MkI firmware Section |
When download completes, replace the jumper and press the reset button of your SAV MkI. If nothing appears on the LCD screen adjust the LCD’s contrast by adjusting the trimmer pot located at the back of the LCD.
REMARK:' The latests boards being shipped already have the firmware support for the LCD enabled. Otherwise, be sure to disable JTAG.
Connection
This is a small step by step guide to connect the SAV 3D LCD module to your Sanguinololu, printrboard or teensylu.
Find the backpack module that should accompany the SAV 3D LCD. Make sure that your board is powered off and follow the steps below.

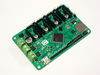
Step 1 - Connect the backpack module
Connect the backpack module to your printer electronics (in this case the SAV MkI) observing the orientation in the image below. The backpack should be flush with the board facing inwards.

Step 2 - Connect the ribbon cable to the backpack
Connect the ribbon cable to the backpack module. The cable can be connected towards the printer electronics or away from it. It will depend if you wish to have the ribbon cable facing downwards or upwards on your LCD module. I recommend that you connect it as the image below so that you can print the LCD's enclosure and mount it on your printer electronics.

Step 3 - Connect the LCD module to the ribbon cable
Connect the ribbon cable to the SAV 3D LCD module. You should end up with the connections as follows:

Remember to upgrade your board's firmware as indicated in the Firmware setup section. If everything has gone well you are set and good to go.
That's it, power on and enjoy.
Where to get one
If you'd like one you can find who has them in stock here: www.electrofunltd.com
Source files
Quick reference

Schematics and CAD files
- schematic:File:SAV 3D LCD RevB schematic.pdf
- CAD files: File:SAV 3D LCD RevB CAD files.zip
Enclosures
You can also download an print an enclosure for the SAV 3D LCD. There are two enclosures, one to be used as standalone.
Original enclosure
- 1 x enclosure
- 1 x Lid
- 1 x Support for your printer [optional]

There are a few accessories and couplers that accompany the housing, all of which you can download from here: download
REMARK: Print the housing face down.
Community Edition Designs
Designed by E. from RepRap Revolution.

Download design and accessories from: download
Acknowledgements
The author would like to thank all the project supporters from the RepRap Clone Wars community:
|
|
Proyecto Clone Wars |