SAV MKI
|
English • العربية • български • català • čeština • Deutsch • Ελληνικά • español • فارسی • français • hrvatski • magyar • italiano • română • 日本語 • 한국어 • lietuvių • Nederlands • norsk • polski • português • русский • Türkçe • українська • 中文(中国大陆) • 中文(台灣) • עברית • azərbaycanca • |
Release status: working

| Description | SAV MKI
|
| License | Creative-Commons 3.0 CC BY-SA
|
| Author | |
| Contributors | |
| Based-on | |
| Categories | |
| CAD Models | |
| External Link |
Contents
Introduction

This 3D printer board electronics has been designed and developed using all the great contributions and feedback from the RepRap CloneWars group in Spain. All shortcomings from other similar boards have been addressed providing an affordable yet feature rich 3D printer electronics. The SAV MkI, improves upon the previous production-grade electronics set (Gen6, sanguinololu) by adding well dimensioned power MOSFETS, SD card support, on-board regulated 3.3V to connect to 3.3V level peripherals such us Bluetooth, as well as improving on USB link's reliability and reducing cost by eliminating the FTDI UART chip.
The SAV MkI is a derivative of Teensylu and the Printrboard, an AT90USB1286 development board originally based on Sanguinololu. The Atmel AT90USB1286 MCU has an on-chip USB, removing the need for the FTDI UART (USB-to-serial) IC. On-chip USB means that you will get faster firmware upload times, communications, g-code transfer and reduce the time file transfers take from the host to the on-board microSD card. The AT90USB connects at any baud rate regardless of firmware configuration, and operates virtually free of serial communication errors/pauses.
In addition, the SAV MkI has broken out the second UART with its levels adjusted to 3.3V logic. You will be able to connect any HC-05 or HC-06 bluetooth dongle to wirelessly control your printer.
Features
Feature rich yet affordable 3d printer electronics. The SAV MkI has been designed after taking feedback from the Clone Wars RepRapers out there. We have come through with an electronics that we believe will meet your expectations.
- Hotend and heatbed well dimensioned FETs that can take up to 15A without heat-sinks.
- High speed native USB interface connectivity going up to 12Mbps so that there is no lag on your prints.
- As opposed to the 38400-115200 baud via FTDI. The end result is: virtually no serial communication errors (common with Sanguinololu and Generation_6_Electronics).
- 12V built-in fan controller for your layer fan or hot end cooling.
- Micro SD reader for autonomous printing.
- Bluetooth dongle (dongle not provided, tested with HC-05 and HC-06) interface adapted to its logic levels for wireless operation.
- Expansion bus to connect a keyboard and LCD.
- Support for 4 standard pololu compatible stepper motor drivers.

Specifications
HW
Processor
Atmel AT90USB1286 Microcontroller @16 MHz
- Native USB interface
- Flash: 128KB
- RAM: 16KB
- EEPROM: 128KB
Supply: 4.2V to 5.5V
Voltage input
11V-15V
Internal regulated voltage
5V and 3.3V
Logic supplied by on-board voltage regulator through Vin Logic can also be supplied through USB (internal source selection).
Connectivity
- Edge connectors enabling right-angle connections
- 2 x 15A switching connectors with high power N-MOSFETs.
- 1 x switching N-MOSFET for low power fan.
- 2 x 12V outputs 1.5A max load.
- 1 x on-board uSD connector
- Bluetooth interface output levels adjusted for 3.3V logic (connected to UART1 - Rx and Tx).
- 4 x Endstop connectors supplied @ 5V. Includes X, Y, Z and E
- 2 x Thermistors
- 14 Extra pins available for expansion and development, with the following capabilities
- UART1 (RX and TX)
- I2C (SDA and SCL)
- SPI (MOSI, MISO, SCK)
- PWM pin (1)
- Analog I/O (6)
- JTAG (uses some of the ADC pins)
LCD support
The board supports any LCD designed for the printrboard, teensylu or sanguinololu.
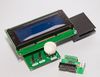
We have also designed an LCD for it with rotary encoder, 2 push buttons and an extension backpack to allow you to connect a 5V device (for example, a servo for your bed auto level) with an IO pin and its own regulated 5V output.
Check it out.
|
|
SAV 3D LCD |
|
|
SAV OLED |
Dimensions

SAV MkI box with integrated fan SAV MkI enclosure

SW, Firmware and SDK
All preassembled SAV-MkI come pre-loaded with a bootloader and Marlin firmware. You may also upgrade the firmware, modify calibration data for use with another style of RepRap, or perhaps assemble your own board.
Highlights
- Marlin (pre-loaded) - Marlin's main branch already supports the SAV-MkI (MOTHERBOARD==83) or (#define MOTHERBOARD BOARD_SAV_MKI, on Marlin 1.1.x).
- you can also get a pre-configured version of Marlin for the SAV MkI.
- Bootloader: LUFA's CDC Bootloader
- SDK: Arduino IDE with Teensy add-on.
- Windows users only, will need to install USB Serial device (will be downloaded with the Teensy environment).
To use a SAV MkI, you will need to load appropriate USB drivers, you can get them from:
- Windows-only: USB Serial Device (PRJC.com)
Compatible Firmware
- Marlin Marlin: Official support, use (MOTHERBOARD==83) or (#define MOTHERBOARD BOARD_SAV_MKI, on Marlin 1.1.x).
- Pre-configured version of Marlin for the SAV MkI. Use the released versions which have been tested, the main branch at times may contain experimental code.
- Repetier List_of_Firmware#Repetier-Firmware: No support yet.
(Other firmwares are currently untested but any firmware for an arduino mega should work with proper pin setup).
Setting-up the environment
The instructions here will help you setup the development environment using Arduino´s IDE version 1.0.6. Currently working in getting it going on Arduino 1.6.5.
Step 1: Download and install the Arduino IDE
Download the Arduino 1.0.6 development environment if you don't have it already. [Arduino]
Step 2: Download and install Teensyduino
Teensyduino was created by PJRC for their Teensy line of boards. Teensy is a great alternative to Arduino if you want an ultra compact board with built in USB. The Teensy++ happens to also use the AT90USB1286, so it’s compatible with the SAV MKI. Follow PJRC’s instructions for installation from the download link.
If you only plan to program for RepRap, you don’t need to install any of the libraries. On Windows, you will be prompted to install the serial driver. Select yes . You don’t have to worry when Windows complains that the driver is unsigned… it’s just an INF file to tell Windows to use one of its own built-in drivers.
Step 3: Setup the SAV MKI on Arduino's IDE
Download SAV MkI: SAV_MkI.
Navigate to where your Arduino files are located. On my computer (a Mac), I have them in Applications\Arduino. I will call this from now on <arduinofolder>. Now, find the subfolder where the Teensyduino library was installed:
<arduinofolder>\hardware\teensy
or (on a Mac)
<aduinofolder>/Contents/Resources/Java/hardware/teensy
If you are in the correct folder, you should already see a boards.txt and a subfolder called core in there. Drop the files from SAV_MkI into that folder, overwriting the existing boards.txt.
If you don’t plan to develop with any of PJRC’s Teensy or Teensy++ boards, you can keep them from showing up in your Arduino menu by copying boards.nopjrc.txt over boards.txt.
Now, when you start Arduino, you should see some new configurations in the Tools->Board menu. The important ones are:
[usbtinyisp]AT90USB1286
[usbtinyisp]SAV-MkI
[BootloaderCDC]SAV-MkI_RevD
[BootloaderCDC]SAV-MkI_RevD.1
Select SAV-MkI_RevD.1 for SAV MkI RevD.1.
Select SAV-MkI_RevD for all SAV MkI till RevD.
To use a USBtinyISP programmer, select either [usbtinyisp]AT90USB1286 or [usbtinyisp]SAV-MkI.
At this point, you can plug in your USBtinyISP and into your AT90USB1286/SAV-MkI and start programming!
So what are the [BootloaderCDC] configurations for? They allow you to download sketches into your target board directly through a USB connection to your host, without the USBtinyISP programmer.
To use the CDC bootloader, you would just need to set the board in bootloader mode (see below) and program the board through the USB using the arduino IDE.
Downloading the firmware with Arduino IDE

Unlike older AVR microcontrollers, the AT90USB has a special HWB_ALU pin (Hardware Button) which must be tied to ground during a reset cycle in order to place the microcontroller into bootloader mode. This is accomplished by removing a jumper on the SAV MkI called "PRG". Firmware can only be loaded while the chip has booted into its bootloader.
Download the pre-configured version of Marlin for the SAV MkI and open it in in the Arduino IDE. Use the released versions which have been tested, the main branch at times may contain experimental code.
To get into bootloader mode and upload new firmware:
- Remove the PRG jumper
- Press and release the Reset button. The AT90USB's bootloader will appear as a new USB device the first time you boot into the bootloader. On Windows only, the first time you connect the board it will install the USB driver (note the new COM port number).
- Proceed to upload new firmware using the method relevant to your installed bootloader.
- CDC BOOTLOADER (Arduino Bootloader)
- In Arduino 105, open firmware
- Choose [BootloaderCDC]SAV-MkI (RevD o RevD.1) from the Arduino Tools-->Board menu, and select the COM port associated with your SAV MkI bootloader.
- Click File --> Upload to Board.
- Arduino will compile and upload firmware. You should see an error a few seconds after the firmware compiles. This is because the AT90USB has successfully exited the bootloader.
- Replace the PRG jumper onto the board
- Press Reset. You may need to disconnect and reconnect the USB and power cables.
- CDC BOOTLOADER (Arduino Bootloader)
Bootloaders
There is no native Arduino bootloader for the AT90USB series microcontrollers, however, there is excellent opensource support for the MCU and Arduino integration is easily achieved.
- LUFA's CDC Bootloader: Allows direct uploading of firmware through Arduino/avrude via avr109 protocol. Requires no driver on Linux/Mac and free INF installer to use the built-in Windows driver, and Arduino 022 or 1.0 with modified Teensylu boards configuration.
Installing A Bootloader
Using AVRDUDE
- Obtain a compiled CDC bootloader File:BootloaderCDC.zip. See also Lincomatic's Bootloaders for AT90USB1286 article where you can get the pre-compiled version of the CDC bootloader too.
- Connect the 6 pin programming cable to the SAV MkI ICSP header.
- Connect your programmer's USB cable.
- Run the following avrdude commands, where BootloaderNAME_HERE.hex is the name of the Bootloader file you wish to install
avrdude -c usbtiny -p at90usb1286 -U lfuse:w:0x5E:m -U hfuse:w:0xD3:m -U efuse:w:0xF0:m
avrdude -c usbtiny -p at90usb1286 -U flash:w:BootloaderNAME_HERE.hex:i
- Press Reset again.
WARNING: Triple check the fuse values! Setting incorrect values will brick the microcontroller! Fuse values above are for the CDC bootloader.
WARNING: These fuse settings disallow JTAG, in order to use those pins for a display. If you want to enable JTAG, hfuse value should be 0x93.
Using Atmel Studio 6
You can also upload the bootloader using Atmel Studio 6.
Simply select the AT90USB1286 processor as your target and open the board programming window. Flash the File:BootloaderCDC.zip bootloader and then program the fuses:
low fuses: 0x5E
high fuses: 0xD3
extended fuses: 0xF0
WARNING: Triple check the fuse values! Setting incorrect values will brick the microcontroller!
How to wire your SAV MkI

Step by step connection of the SAV MkI video (in Spanish): SAV MkI first time setup
In the video the hotend and heatbed are interchanged. Always follow the indications on your board's serigraphy.
REMARK: follow the wiring diagram in this page (the video has a few typos). The board's serigraphy always prevails to whatever is published on this page.
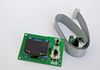
You can connect an inductive sensor directly to the SAV MkI RevD without the need of external componentes as indicated in the connection diagram above. The inductive sensor is connected to the auxiliary end-stop connector marked on the board's serigraphy as Z-12V. Make sure that you follow the wiring instructions for your particular sensor and connect V+ to 12V, GND or 0V to the GND pin of the connector and "signal" to the Sig pin on the end-stop pin of the board. In the wiring schematic above, you can see the most common color coding for the inductive sensor. However, ensure that you get the right polarity before connecting it to the board.
To get the inductive sensor working as the Z axis end-stop, you will need to modify the pin configuration on Marlin.
Change the file pins_SAV_MKI.h in Marlin as follows:
// #define Z_STOP_PIN         15
#define Z_STOP_PIN         36  // For inductive sensor.
Where to get one
If you missed the crowd funding campaign you can always get one from here, there are a few links to people that have them in stock: www.electrofunltd.com
Source files
- Schematic: File:SAV MK-I.pdf
- Eagle CAD files: File:SAV-MkI.zip
Rev E - not produced
- Schematic: File:SAV MK-I RevE.pdf
- Eagle CAD files: File:SAV-MkI RevE.zip
Schematic
Rev B

Rev E


History
The story behind the SAV MkI: The making of...
External links
Crowdfunding campaign: Indiegogo
electroFUN electrofun LTD
SAV MkI shootout: SAV MkI vs Sanguinololu shootout
SAV MkI box with integrated fan SAV MkI enclosure
SAV Mk1 holder for the M Prime One
Acknowledgements
The author would like to thank all these supporters and collaborators for making this project possible and backing it up during during the early stages of its crowdfunding campaign:
Clone Wars RepRap community, RepRap Zaragoza, Lluís Vilarrubies, Jose Antonio Perez , Pascual Alagon, Carlos Garcia, Javier Pajares, Jose M. Martin, Francisco Javier Sánchez, Antonio Javier Lopez, Manuel Palacios, Juan Manuel Amuedo - (oLE -, Adri, Chema Muñoz, Luis Macías, Ignacio Giniunas, Santiago Lopez, Valentín Cancelas, Antonio Javier Lucas, Clínica Veterinaria Noso Can, Arturo Pueyo, Shuttl3D, jgalaron, Ark, Fib and jgalaron.
The author would like to give a special thanks to these project supporters:
Andrew, ghosthawk
|
|
Proyecto Clone Wars |