A rebuildlog for a Delta printer
Posted by leadinglights
|
A rebuildlog for a Delta printer February 14, 2023 02:40PM |
Registered: 12 years ago Posts: 1,450 |
O.K., so I have weakened and been messing around with 3D printers again - possibly pathological nostalgia.
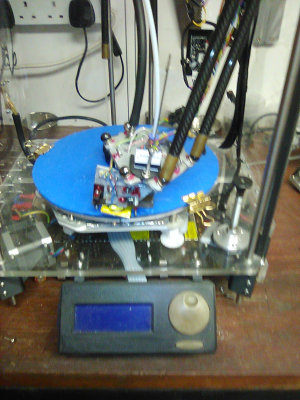
It is time to do a decennial regeneration and upgrade of the second printer I ever built. At the moment Miranda, for that is the name of my Delta printer, is stripped down on the workbench with controllers, steppers, and wires strewn about like entrails in one of the more gruesome episodes of CSI: Vegas. You can see Miranda when she was young in 2013 on YouTube at [www.youtube.com]
The most significant part of the upgrade will be to add a Raspberry Pi 2B running Klipper but using the Arduino Mega2650/RAMPS 1.4 to boss the steppers and hotend about. This last decision is driven partly by a lack of space to fit anything larger than a RAMPS; but also down to parsimony - I have lots of Arduinos, RAMPS boards, and Raspberry Pi 2Bs.
Miranda has been almost totally reliable, albeit not as accurate as my various cartesian printers. She is also my only printer at the moment, various others having been sent to good homes, rendered down for parts, or in the case of my dual-head printer, packed away until I decide what to do with it.
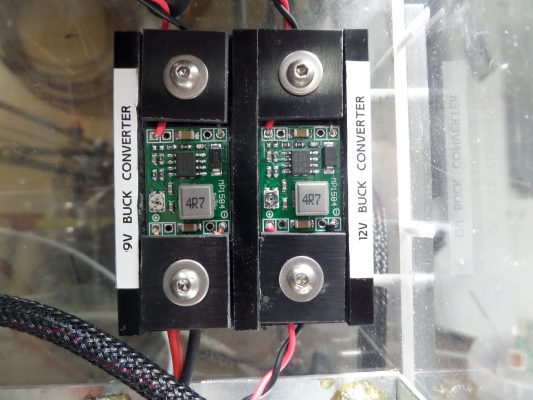
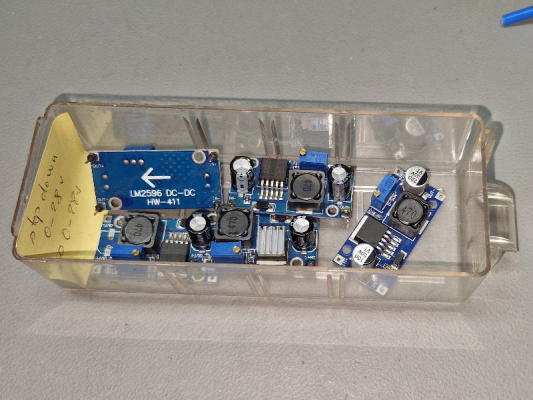
Besides the Klipper firmware, I have upgraded the main PSU to 24V - I hadn't realized that she was still on 12V. This did of course entail a bunch of buck converters to supply 12V to the fans, 9V to the Arduino, and 5V to the Raspberry Pi.
Other new parts are an enclosure for the diaphragm pump supplying air to a "Berd Ring" type cooler on the hotend as well as the diaphragm vacuum pump for the vacuum bed. These pumps had just been sitting wherever ther was space and each had its own wall wart and switch.
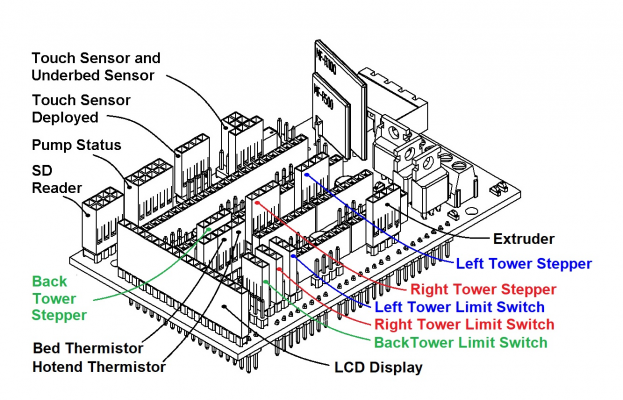
Another major change is a dual sensor setup for Z-related stuff: A single underbed piezo sensor to find the nozzle height and report on nozzle cleanliness; and a piezo touch sensor for bed mapping. You can see the general idea as I did it on my dual head printer on YouTube at [www.youtube.com] and [www.youtube.com]
Pictures and reports on progress will follow
Mike
|
Re: A rebuildlog for a Delta printer February 16, 2023 09:23AM |
Registered: 12 years ago Posts: 1,450 |
I guess that a buildlog or even a rebuildlog belongs elsewhere, such as Machines Organized by Style - Delta Machines. I think I will leave this in General as I think most readers are overcome by apathy halfway through the index page.
Progress in the last 24 hours has been sporadic and I have found that the documentation for installing Klipper is less helpful than following the agonized cries of those who have gone before me: That is, look for similar problems on [klipper.discourse.group] Suffice it to say, after my own agonized cries I have got the various bits communicating but only after several hours of my life that I won't get back.
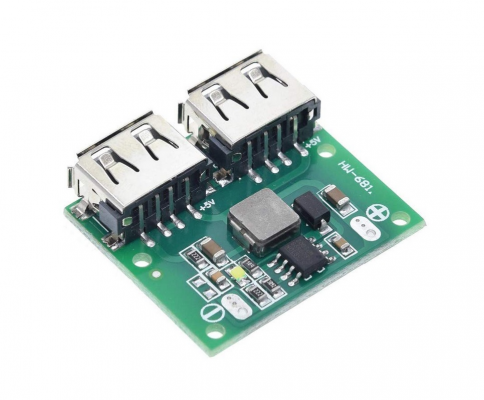
Less success was to be had with a power supply for the Raspberry Pi. I purchased a bunch of USB 5.2V output buck converters which were advertised as "Youmile 5PCS DC-DC Dual USB Step-Down Buck Converter 9V/12V/24V to 5V 3A 6-26V Car Charge Charging Regulator Power Supply Module" at £6.49 for 5.
These worked fine when powered from 12V and gave a steady 5.13V at 0 to 2A load - and much the same when the input voltage was wound up to 24V. However, when 24V was applied through a switch the circuit gave up and supplied 22V at the output. By the time I did the switch thing I had connected a Keyestudio MEGA2560 through a USB cable - the mega2560 went to a silicon hell somewhere. Two others out of the five did exactly the same, O.K. at 24V as long as it was bought up from a lower voltage on a Thurlby laboratory PSU but pop if 24V simply switched on. I will keep the two that I haven't tried to give to enemies.
More work and study are needed on Klipper before trying to get the motors to jiggle, the heaters to cook and the sensor to sense but I will return then.
Mike
|
Re: A rebuildlog for a Delta printer February 16, 2023 01:20PM |
Registered: 7 years ago Posts: 321 |
It took me about a year to get Klipper going on my Delta satisfactorily. Marlin just wasn't working out.
Am not convinced a 2B has enough computing power to be a consistent host, but I guess it will at least let you try. Depends partly on how you are running Klipper and what front end you have.
Rule of thumb, you should be able to get 500mm/s movement speed out of the thing with a mega2560 or equivalent and standard A4988 motor drivers.
|
Re: A rebuildlog for a Delta printer February 16, 2023 02:42PM |
Registered: 12 years ago Posts: 1,450 |
Everything does seem to take longer than expected - I was startled to realize that it is nearly 10 years since my delta first drew breath - or printed plastic.
The Raspberry Pi 2B is mostly because I have a few but also because I have found it difficult to guarantee a 5V supply to Pi 3 and 4 models. I am looking at alternatives and may even have something (Beaglebone Black) that I can repurpose. At the moment I am using Mainsail but will look into Fluidd and even Octoprint.
On the Klipper end, my main problem was that no description of setting up the USB/serial connection seemed to work as described - I think that the use of /dev/serial/by-id/* has been replaced by a symlink to /dev/ttywhatever without it getting into documentation yet.
Mike
|
Re: A rebuildlog for a Delta printer February 17, 2023 02:28AM |
Registered: 7 years ago Posts: 321 |
I didn't have quite that problem. At least, I didn't have it after I'd flashed the controller properly.
You might find the default Kossel config helpful, for the Anycubic. Controller is like 99% Mega2560 / Ramps compatible.
The serial port ID depends partly on what else is plugged into the host. For instance some people apply power over USB.
Also can be an issue if you change which port you connect the printer controller with - the ID goes with the individual port, so it make sense to mark which one usually connects to a given printer.
EDIT: It's not impossible to get a blown up Mega working again by replacing the voltage regulator on it.
Edited 1 time(s). Last edit at 02/17/2023 02:31AM by DragonFire.
|
Re: A rebuildlog for a Delta printer February 17, 2023 06:41AM |
Registered: 12 years ago Posts: 1,450 |
The problem was at least partly flashing the controller properly. Following a lot of videos and blogs failed to get it to communicaite, but the clues in the previously mentioned cries of frustration led to the following:-
Plug the MEGA2560 into the Pi with a USB cable and, using a PuTTy terminal to the Pi, type dmesg | tail This will get something like:-
This answer only seems partial as a stutter in the connection will result in the ttyACM0 being disconnected and ttyACM1 being created, however it will do until something better comes along.
btw, on the blown up MEGA2560 the USB chip was responding O.K., the voltage regulator also was good. Just the mcu was fried.
Mike
Edited 1 time(s). Last edit at 02/17/2023 06:45AM by leadinglights.
Plug the MEGA2560 into the Pi with a USB cable and, using a PuTTy terminal to the Pi, type dmesg | tail This will get something like:-
pi@miranda:~ $ dmesg | tail
[   18.092054] IPv6: ADDRCONF(NETDEV_CHANGE): eth0: link becomes ready
[   33.770401] cam-dummy-reg: disabling
[   48.040410] usb 1-1.4: new full-speed USB device number 5 using dwc_otg
[   48.195665] usb 1-1.4: New USB device found, idVendor=2341, idProduct=0042, bcdDevice= 0.01
[   48.195714] usb 1-1.4: New USB device strings: Mfr=1, Product=2, SerialNumber=220
[   48.195733] usb 1-1.4: Manufacturer: Arduino (www.arduino.cc)
[   48.195748] usb 1-1.4: SerialNumber: 856323331363517080D0
[   48.286835] cdc_acm 1-1.4:1.0: ttyACM0: USB ACM device
[   48.288644] usbcore: registered new interface driver cdc_acm
[   48.288668] cdc_acm: USB Abstract Control Model driver for USB modems and ISDN adapters
/dev/ttyACM0 in both the flash command and the printer.cfg worked worked while /dev/serial/by-id/usb-Arduino__www.arduino.cc__0042_856323331363517080D0-if00 didn't
This answer only seems partial as a stutter in the connection will result in the ttyACM0 being disconnected and ttyACM1 being created, however it will do until something better comes along.
btw, on the blown up MEGA2560 the USB chip was responding O.K., the voltage regulator also was good. Just the mcu was fried.
Mike
Edited 1 time(s). Last edit at 02/17/2023 06:45AM by leadinglights.
|
Re: A rebuildlog for a Delta printer February 17, 2023 10:07AM |
Registered: 7 years ago Posts: 321 |
Well, after checking the Github generic Ramps config, it does indeed recommend;-
...
[mcu]
serial: /dev/ttyACM0
...
[github.com]
So I'm guessing it boils down to later controllers implement something more USB like, wheras an Arduino Mega implements a 5V serial port which can be connected to a usb port but lacks some of the usb protocol built into more recent printer controller boards.
Fried MCU. I've done that with a Pi.
Edited 3 time(s). Last edit at 02/17/2023 10:13AM by DragonFire.
...
[mcu]
serial: /dev/ttyACM0
...
[github.com]
So I'm guessing it boils down to later controllers implement something more USB like, wheras an Arduino Mega implements a 5V serial port which can be connected to a usb port but lacks some of the usb protocol built into more recent printer controller boards.
Fried MCU. I've done that with a Pi.

Edited 3 time(s). Last edit at 02/17/2023 10:13AM by DragonFire.
|
Re: A rebuildlog for a Delta printer February 17, 2023 11:22AM |
Registered: 12 years ago Posts: 1,450 |
I found that a temporary failure of the USB connection would cause the Pi to assign a new ttyACMx number to the port - thus losing any connection. Sineos on [klipper.discourse.group] pointed me to a solution on [gist.github.com]
The solution was to put a rule in /etc/udev/rules.d/33-custom.rules. The new rule is:
The values for idVendor and idProduct were got from lsusb and udevadm (see the above github page) ttyP3D is just a meaningful new name that is now in the printer.cfg as
Edit: After checking this out it works well but I have found that this version of Linux has only ttyACM0 and ttyACM1 which cycle from one to the other with each disconnect or noise spike. So if you have in your printer.cfg file the serial as
Mike
Edited 1 time(s). Last edit at 02/17/2023 12:29PM by leadinglights.
The solution was to put a rule in /etc/udev/rules.d/33-custom.rules. The new rule is:
KERNEL=="ttyACM[0-9]*", SUBSYSTEM=="tty", ATTRS{idVendor}=="2341", ATTRS{idProduct}=="0042", SYMLINK="ttyP3D"
The values for idVendor and idProduct were got from lsusb and udevadm (see the above github page) ttyP3D is just a meaningful new name that is now in the printer.cfg as
serial: /dev/ttyP3Dand this should return even if you unplug the Arduino then plug it back in.
Edit: After checking this out it works well but I have found that this version of Linux has only ttyACM0 and ttyACM1 which cycle from one to the other with each disconnect or noise spike. So if you have in your printer.cfg file the serial as
serial: /dev/ttyACM0and it disconnects unexpectedly you could try simply unplugging the USB and plugging it back in.
Mike
Edited 1 time(s). Last edit at 02/17/2023 12:29PM by leadinglights.
|
Re: A rebuildlog for a Delta printer February 18, 2023 02:34PM |
Registered: 12 years ago Posts: 1,450 |
Power supplies are next. I have already replaced the previous 12V 150W power supply with a shiny new Meanwell 24V 250W unit. As mentioned before, this means that the Arduino can no longer be fed from the RAMPS board and several 12V fans would have to be replaced with 24V units. The better option was to fit little buck converters to supply 12V for the fans and 9V for the barrel connector on the Arduino. For both of these, I used MP1584EN DC-DC Buck Converter Adjustable Power Supply Modules which seem to be well-made and robust devices.
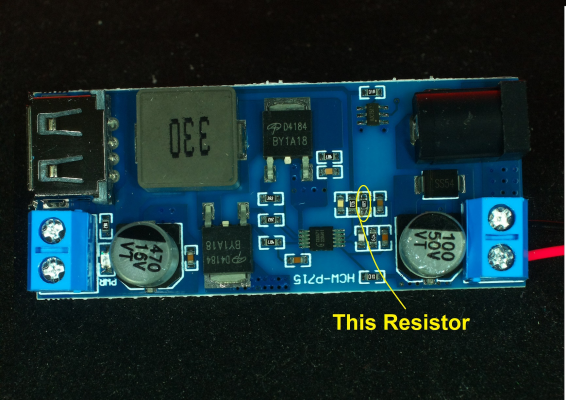
The Raspberry Pi would also need a power supply but the voltage from the mini modules dropped off too badly at 2 Amps so would not be suitable. The first attempt at a USB module for the Pi was a disaster as described earlier and my options were a bit constrained by the space available to fit both the Pi and a PSU. An xy-3606 buck module looked promising but the one I bought was not adjustable and was on the lower end of the spec - giving 5.0V open circuit and 4.7V at the Pi with some peripherals. I managed to adjust the voltage up to 4.9V on load by putting a 0.5MΩ resistor across one of the feedback resistors.
The next thing is shoehorning the Raspberry Pi into the base of the printer. Then perhaps getting the motors to jiggle.
Mike
|
Re: A rebuildlog for a Delta printer February 18, 2023 06:50PM |
Registered: 4 years ago Posts: 90 |
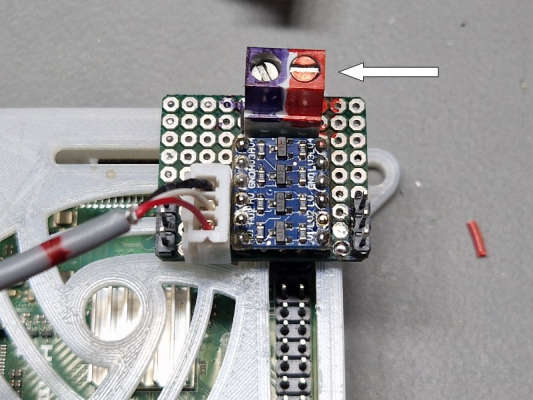
I've been using buck converters for the Pi's, feeding them through the GPIO (direct 5V), getting rid of the crappy USB..
Never had a problem. Safety nazis will tell you that it bypasses the TVS, and chances are it will burn your house down...
I have a PiHole working this way, 24/7, for years, without any problems ; 2 more also are powered this way. With a fake LM2596 chinese module (the ones everybody know). Cheap and easy. Just a piece of protoboard and a a screw terminal.
Meanwell PSUs are hugely overrated. Yes, they are well built, and reliable. But entry level ones (common ones) have no PFC. Not that great...
1st pic : direct 5V over GPIO (with a level shifter, out of topic !)
2nd pic : direct 5V over GPIO on a custom Pi hat
3rd pic : the ubiquitous modules I use
|
Re: A rebuildlog for a Delta printer February 19, 2023 02:27PM |
Registered: 12 years ago Posts: 1,450 |
I will try out, or at least look closely, at the idea of sending the 5V directly to the GPIO pins. On this immediate project though, I will keep to the micro USB connector - it is only a Pi 2B, which is not quite as demanding as Pi 3 & 4. I am looking at the alternatives to the Raspberry Pi, both because there is little sign of the supply improving, but also because options such as the Rock pi 4C offer things like M.2 SSD.
Mike
Mike
|
Re: A rebuildlog for a Delta printer February 27, 2023 12:21PM |
Registered: 12 years ago Posts: 1,450 |
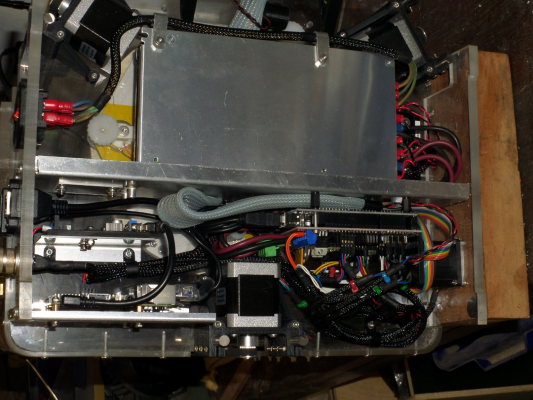
This stage of the rebuild of Miranda is perhaps not the most entertaining but perhaps I can add some interest with pictures of Miranda's bottom.
The last few days have been trying to cram the additional things into the available space. In this 3D printer, I planned out carefully where I would put the controller but did not allow space for controllers larger than the Mega 2560/RAMPS combination.
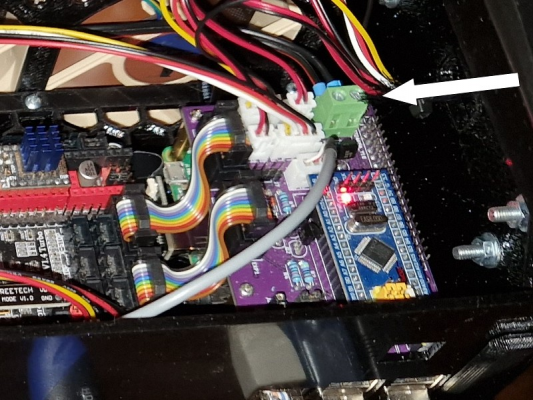
The RAMPS connections, never easy at the best of times, have become a bit of a nightmare now - There is a connector at every part except the I2C and one stepper motor. Above can be seen the tangle of wires which all have to be inserted in sequence and checked by looking through the perspex of the base of the printer.
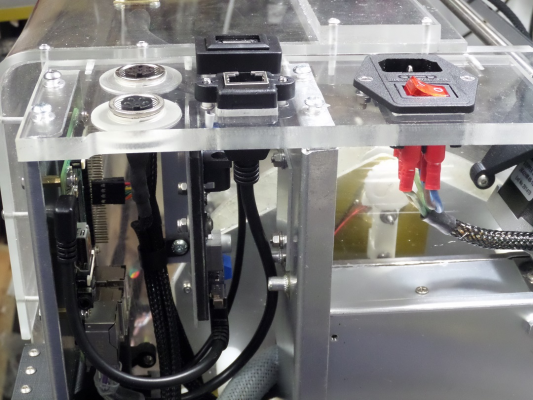
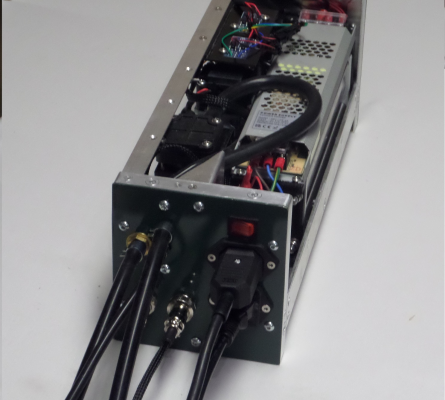
By moving the mains connector from the back to the side I managed to liberate enough space for the Raspberry Pi and its power supply, and even improve the connector layout.
In the picture above, the two circular DIN connectors are for the extruder and an accessory box containing the vacuum pump for the bed and the pump for the print cooling air. In the middle is an Ethernet connector to the Raspberry Pi and a USB connector, also to the Pi. On the right are the mains power connector and switch.
Klipper has the ability to measure and cancel the resonances of the printer and largely eliminate many of the printer artifacts. As I have only the most tenuous understanding of how this is done and what is the best way, I have allowed a bit of flexibility by having provision for both a direct connection from the Raspberry Pi 2B to the accelerometer and also by a subsidiary Raspberry Pi Pico to gather the accelerometer data.
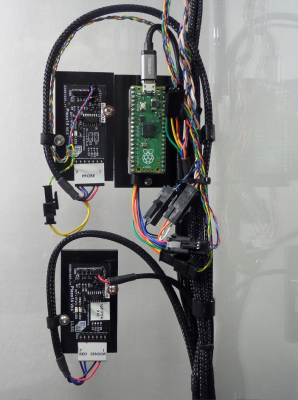
Pictured above is the Raspberry Pi Pico along with two piezo controllers for the single underbed piezo sensor and the piezo touch sensor. I will report further on the dual sensor Z and bed mesh sensing in another article when I have it all running.
Mike
Edited 1 time(s). Last edit at 02/27/2023 12:28PM by leadinglights.
|
Re: A rebuildlog for a Delta printer February 28, 2023 06:45PM |
Registered: 7 years ago Posts: 321 |
The reasonance compensation is like the final tweak really. You can either print a model to do that or use acceleration meters to measure it "live". Although I suspect that latter one might not be on an option with 2B as your host.
The model method does give you an idea of what your maximum acceleration is for resonance free printing anyway.
My advice in general when Klipperizing a Delta;-
1) First complete sanity checks that heaters and endstops work properly, axes are moving.
2) Calibrate the rotation distance on the extruder. Measure 100mm of filament, and if you're not getting enough, decrease rotation distance. If you're getting too much, increase rotation distance. Bear in mind that Klipper has to reset every time a configuration change happens, but that's a lot quicker than reburning the firmware to the Arduino every time.
3) Do a full delta calibrate by printing the delta calibration model, measuring it, and inputting the values. This is a horribly involved process the first time around but it's really why Klipper is the best for deltas. And the printer won't properly adjust z offsets until the full calibration is done. The documentation is sketchy at mentioning this but it is there vaguely and has certainly been my experience.
4) After that, you can improve quality and find the limits of pressure advance and resonance compensation / acceleration limiting. Assuming your extruder hasn't worn out and gives erratic results (this has always been a factor with Reprap filaments printers).
If you chance nozzle size or extruder, you will probably have to redo the latter steps, and you might have to recalibrate rotation distance on the extruder too. It depends how Toque-ee it is. With a high torque extruder it won't care about pressure differences or changing filament types.
Edited 4 time(s). Last edit at 02/28/2023 06:51PM by DragonFire.
|
Re: A rebuildlog for a Delta printer February 28, 2023 07:16PM |
Registered: 4 years ago Posts: 285 |
Mike, I have used my IPhone with the "Vibration" app to get resonance readings for both the bed and effector on my delta, running Marlin with Input Shaping by Tom Brazier. It worked oddly well, although the current input shaping is NOT delta compatible, since it only deals with the X and Y axes. The take away is that the IPhone has a pretty darn good accelerometer, and the app I mention uses it pretty darn well.
My resonances are at about 38.8 Hz on both X and Y, whether measured at the bed or the effector.
My resonances are at about 38.8 Hz on both X and Y, whether measured at the bed or the effector.
|
Re: A rebuildlog for a Delta printer March 01, 2023 06:16AM |
Registered: 12 years ago Posts: 1,450 |
@DragonFire. I am a bit concerned whether the Pi 2B has the mojo to do the accelerometer bit so that is why I gave myself the option of the accelerometer having its own Raspberry Pi Pico [www.youtube.com]
@rq3. I have a deep distrust of any smartphones: Being a compulsive early adopter I then found them to be untrustworthy and deceitful. Being one who holds a grudge, I think it will be some years before I trade in my flip phone; and then only under duress.
I have made a good deal of progress on Miranda, but only after a few minor problems. I spent an hour trying to connect to the Raspberry Pi before realizing that I seem to have been playing a shell game with my three Pis and had put the wrong one in. After this little diversion, everything seems to work albeit not without problems. I seem to have half the movement in all axes so will need to find the error in the Printer.cfg. Another one is that selecting SD card on the LCD control panel results in the Pi freezing up.
I hope to spend a couple of days going through the Printer.cfg and getting my basic settings right before doing all of the calibration bits. Since it has gone far more smoothly than I expected so I have decided to replace the A4988 stepper drivers with TMC2225 drivers.
Mike
|
Re: A rebuildlog for a Delta printer March 01, 2023 08:45AM |
Registered: 7 years ago Posts: 321 |
Quote
leadinglights
....Another one is that selecting SD card on the LCD control panel results in the Pi freezing up.
Mike
Yeah, in general you don't use the SD card part of the printer control panel when you upgrade. You have to do everything to start a print on the Pi side. BUT, having that control panel is really really handy when you want to fine tune the aforementioned z offset.
It seems like Klipper is hard coded that way, to start a print high rather than low.
Printing with a fat brim gives you a minute or so to tweak the z offset just right, and if yours seems to float about a little between printer resets, this is "normal" for Klipper on a delta.
Here's why - the calibration done from a model gives all the slight imperfections in the axes as far as tower distance and angle goes. Even slightly different rod lengths.
This seems like a kludge until you get used to calibrating a delta with Klipper. Once it has working adjustments coded into the end of the config file, prints then get a lot more straightforward.
Edited 1 time(s). Last edit at 03/01/2023 09:24AM by DragonFire.
|
Re: A rebuildlog for a Delta printer March 03, 2023 05:49AM |
Registered: 12 years ago Posts: 1,450 |
@DragonFire. I was not sure what to expect from the SD card entry on the LCD display. I had amalgamated a number of Printer.cfg files that seemed to apply, but had (have) not yet understood quite a lot of detail such as which SD card? What is a virtual SD card? Why do so many people have to burn a Klipper image onto an SD card? and many etceteras. When I saw the SD card entry come up on my 4X20 LCD display I naturally clicked on it and was enlightened - it exists to freeze up the printer.
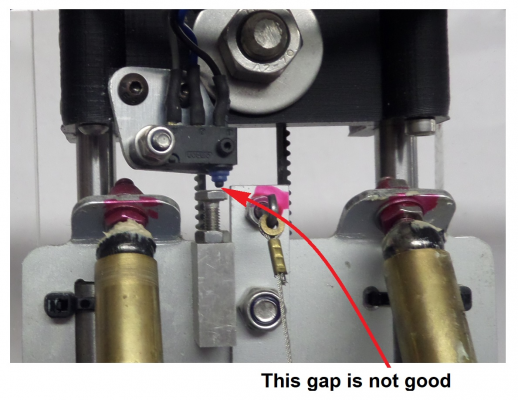
Otherwise, most things have gone smoothly. Movements and PIDs are good and I started doing the basic Delta Calibration before I reached a temporary hiatus: It didn't want to calibrate. After a while, standing and staring at it in inner frustration I noticed something. The printer was in its home position, with the carriages fully up, when I heard an almost imperceptible click. Looking carefully at the carriages I noticed that there was a gap between the actuator of the limit switch and the adjustment screw. While I was staring at this there was another almost apologetically quiet click and the gap increased - as it did every 20 seconds until I re-homed it.
My money is on there being a thermal problem with one of the A4988 stepper drivers - outside possibilities being electronic noise or a bug or incompatibility somewhere. Now I have to wait for the new TMC2225 drivers to get here - the sheer craminage of the electronics makes unnecessary tinkering an unwelcome prospect.
Mike.
p.s. The first time I submitted the above the forum rejected it, saying that it suspected me to be a bot!!! Talk about the pot calling the kettle black. ..... and now of course I've got this terrible pain in all the diodes down my left-hand side....
Edited 3 time(s). Last edit at 03/03/2023 05:55AM by leadinglights.
|
Re: A rebuildlog for a Delta printer March 03, 2023 03:54PM |
Registered: 7 years ago Posts: 321 |
IIRC, after a simple delta calibrate, it's pretty normal for the printer to stop in the last "probe" position.
A home and a Save Config should change the end of the config files with some additions done by the simple calibrate.
I think you are pretty close to getting the extruder tuned to give the right amount of plastic, and after that you can try doing some prints.
After that doesn't go very well, you'll be doing your best to do a delta calibration mode finished.
The Z of it doesn't matter too much, all the measurements are done in X and Y, and it works out the tower tweaks needed to be consistent.
Only after that will a bed mesh actually work properly, in the meantime the printer will assume you have a flat bed anyway.
|
Re: A rebuildlog for a Delta printer March 04, 2023 07:18AM |
Registered: 12 years ago Posts: 1,450 |
Hopefully, my new TMC2225 drivers will be in the post today as I am champing at the bit to get on to calibration.
Shown above is the creeping gap alluded to before.
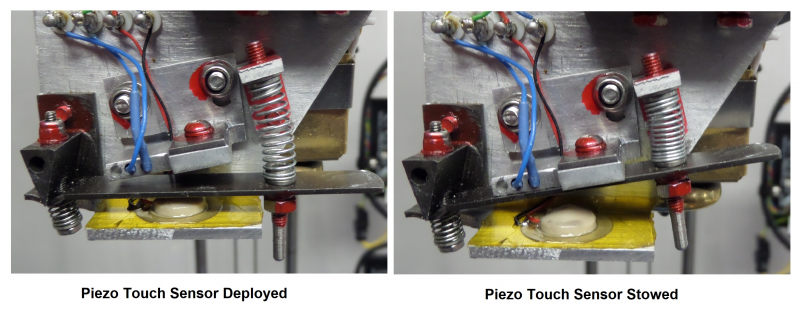
Bed mesh will initially be a bit difficult as my setup is far from typical. The setting of the Z height is done with a single under-bed sensor. Probing with the nozzle directly over the sensor measures not only the Z height but also how clean the nozzle is. The bed mesh is done with a piezo touch sensor. This sensor is splendidly accurate and repeatable but takes about half a dozen probe operations to settle down - thereafter it has a resolution of about 0.25µm and a repeatability < 1µm.
The touch sensor deployed and stowed. I will retire this probe and replace it with a BL touch when Miranda returns to what she does best - printing quietly and reliably but with no great accuracy.
Edit:O.K., the new drivers didn't arrive (bummer) so I have tried again to run the DELTA_CALIBRATE METHOD=manual. I had some hope that it would work as the workshop is pretty cold today and there was no sign of the steppers stuttering. Sadly, the calibration was only marginally successful and there is a variation of about ±0.1mm - a bit too much for printing.
Mike
Edited 1 time(s). Last edit at 03/04/2023 11:03AM by leadinglights.
|
Re: A rebuildlog for a Delta printer March 07, 2023 02:20AM |
Registered: 1 year ago Posts: 2 |
This is amazing. I am new to 3d printing even though I purchased the kit in 2016, it was never built until a few weeks ago. Your Miranda seems to be on a parallel path to my Mad Max haha.
[www.facebook.com]
Edited 1 time(s). Last edit at 03/07/2023 02:23AM by jazzboy.
[www.facebook.com]
Edited 1 time(s). Last edit at 03/07/2023 02:23AM by jazzboy.
|
Re: A rebuildlog for a Delta printer March 07, 2023 11:31AM |
Registered: 12 years ago Posts: 1,450 |
@jazzboy. Welcome to the club, you will enjoy it if your pleasure at success is greater than your pain when things go wrong. I will put up a picture of Miranda when I have the time to wipe off the evidence of blood, sweat, toil, and tears.
I got my new TMC2225 stepper driver modules yesterday, but only after cursing the supplier for only posting them on the day they were supposed to be delivered.
When I installed the new drivers I expected some changes as the jumpers on the RAMPS had to be changed. I elected to use 32 microsteps instead of the 16 microsteps on the A4988 modules so set the jumpers accordingly but initially left the printer.cfg showing 16 microsteps - the reason being that it should only move half as far and half as fast; initial checks being only that the creeping carriage problem had been cured. A slight surprise was that the direction of the motors was now wrong, but I had seen mention of this in some forum posts.
More of a surprise was when I set the microsteps to 32 in the Printer.cfg. Mainsail immediately complained that it was too fast. Since I had initially set max_velocity to 150, max_acceleration to 1500, and max_z_velocity to 75 - all of these are 1/2 of the speeds in the sample Rostock config. Reducing these to 75, 750, and 50 didn't cure the problem and I was only able to get movement at 40mm/sec and 20mm/sec on Z.
Leaving aside this strange behavior above, obviously, I have either done something stupid or in some way offended the gods, most things have gone smoothly. Basic Delta Calibration allowed me to print a fair calibrate_size and I have fed all of the numbers into Klipper. The numbers were a bit strange but I will do some further adjustments for better print quality and then do another test print.
Mike
|
Re: A rebuildlog for a Delta printer March 09, 2023 06:05AM |
Registered: 12 years ago Posts: 1,450 |
The last few days have been largely successful. I have done the basic delta calibration and the enhanced delta calibration and am happy with the results of those as it approximately halves the constructional errors. The results of the pressure advance were beyond my expectations and show that Miranda's Bowden tube is not a significant problem.
Frustrating problems at the moment are that the maximum speed the I can home Z, as set by
What is odd is that I can move at up to 300mm/sec with commands like
A second problem is that I am unable to access the accelerometer via a connected MCU, a Raspberry Pi Pico. The USB connection seems to be available under a number of aliases but printer.cfg complains that it is not there.
Ah well, at least it keeps me off the streets - which in this weather is no bad thing.
Mike
Edited 1 time(s). Last edit at 03/09/2023 06:08AM by leadinglights.
Frustrating problems at the moment are that the maximum speed the I can home Z, as set by
max_z_velocity = 20is about, or even less than 20mm per second. If it is set higher than this, and I click "Home All" on mainsail, the mcu throws a spanner in the works with a message:-
Klipper reports: SHUTDOWN

MCU 'mcu' shutdown: Rescheduled timer in the past
This generally occurs when the micro-controller has been
requested to step at a rate higher than it is capable of
obtaining.
What is odd is that I can move at up to 300mm/sec with commands like
G0 Z0 F18000and it works without complaint but setting max_z_velocity to anything above 20 causes the above shutdown. This problem only appeared when I set micro-steps to 32 with the change of stepper driver modules to TMC2225.
A second problem is that I am unable to access the accelerometer via a connected MCU, a Raspberry Pi Pico. The USB connection seems to be available under a number of aliases but printer.cfg complains that it is not there.
Ah well, at least it keeps me off the streets - which in this weather is no bad thing.
Mike
Edited 1 time(s). Last edit at 03/09/2023 06:08AM by leadinglights.
|
Re: A rebuildlog for a Delta printer March 21, 2023 07:25AM |
Registered: 12 years ago Posts: 1,450 |
The most recent changes are to reduce the micro-steps on the tower motors from 32 to 16. Using 32 micro-stepping, the Z homing speed was limited to about 18mm per second and X and Y movements would erratically crash out above about 250mm/s, in each case with the message reported in the last post.
Back to 16 micro-steps and the speeds don't complain at Z at 75mm/s and X and Y at 300mm/s.
A hardware thing I wanted to correct is that before stuffing in all of the extra bits I had an IEC mains inlet socket with a built-in Schaffner filter. I found a way to put a new Schaffner filter although it was a bit of a squeeze - at least I won't panic whenever a neighbor uses a power tool.
The next part of the rebuild is the auxiliary box with a vacuum pump for the bed and two pumps for cooling air. I will need to do some preliminary tests to try to find if I can get decent bridges with just a three-level (no air, some air, more air) or if I need fine throttling. Oh! what fun that will be.
Mike
Back to 16 micro-steps and the speeds don't complain at Z at 75mm/s and X and Y at 300mm/s.
A hardware thing I wanted to correct is that before stuffing in all of the extra bits I had an IEC mains inlet socket with a built-in Schaffner filter. I found a way to put a new Schaffner filter although it was a bit of a squeeze - at least I won't panic whenever a neighbor uses a power tool.
The next part of the rebuild is the auxiliary box with a vacuum pump for the bed and two pumps for cooling air. I will need to do some preliminary tests to try to find if I can get decent bridges with just a three-level (no air, some air, more air) or if I need fine throttling. Oh! what fun that will be.

Mike
|
Re: A rebuildlog for a Delta printer April 04, 2023 09:01AM |
Registered: 7 years ago Posts: 321 |
Odd thing with the new steppers not working... but the f4ault is from the Pi Host not being able to keep up?
I had heard that some TMC drivers dont like working at 12V but you did say you had 2V so cant be that end?
Anyway, if you got it printing fast enough you are doing cooler upgrades, you are doing pretty good I would say.
Edited 1 time(s). Last edit at 04/04/2023 09:01AM by DragonFire.
I had heard that some TMC drivers dont like working at 12V but you did say you had 2V so cant be that end?
Anyway, if you got it printing fast enough you are doing cooler upgrades, you are doing pretty good I would say.
Edited 1 time(s). Last edit at 04/04/2023 09:01AM by DragonFire.
|
Re: A rebuildlog for a Delta printer May 08, 2023 10:28AM |
Registered: 12 years ago Posts: 1,450 |
A report back on the status of this rebuild. As I said in my last posting, I am working on a box to put the vacuum pump for the build stage (table) and the air ring cooling pumps.
As with many projects, it prove to be a bigger task than anticipated, with many parts being unavailable or unacceptably pricy. Fortunately, though, some parts, such as the BLDC pumps for cooling air, were available on eBay a lot cheaper than I expected.
The box contains a vacuum pump, a vacuum reservoir, and two vacuum switches - one for vacuum regulation and one to warn of vacuum failure. There are also the two BLDC cooling air pumps along with their MOSFET switches along with a 24V 150W PSU, silencer for the vacuum pump, and filters for the two compressors.
The photo below is without the cover or filters. Front connections are the vacuum line, vacuum gauge line, cooling air out, control connector from the 3D printer, switch connector for the vacuum pump, mains power in, and mains power out to the printer.
The pumps are working very well, in particular, the two compressors can blow up a hoolie. To get a wide range of control I have PWM control on one pump along with on/off control on the other. I have yet to characterize the pumps or to find how I can control them over the full range from Klipper.
Mike
|
Re: A rebuildlog for a Delta printer May 23, 2023 11:32AM |
Registered: 12 years ago Posts: 1,450 |
I have got the auxiliary box with the pumps fully working, all that is really left to be done is making a 3D printed part holding the case fan, air filter for the cooling pumps, and silencer for the vacuum pump.
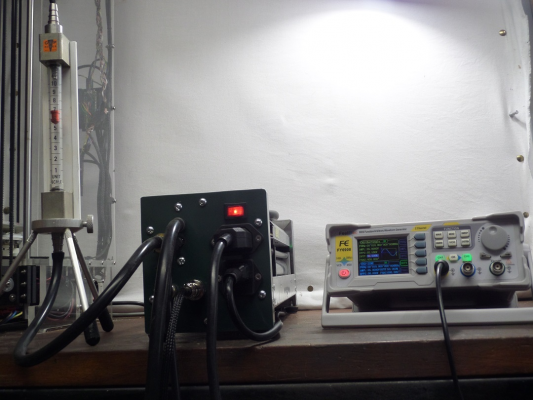
I connected up the pumps for the air ring through a gapmeter to find how linear or not the airflow was and found that they are hardly linear at all: At 24V there was hardly any airflow below about 50% duty cycle with 3.6 liters per minute which rose to 5.6l/m at 97% but 7.0l/m at 100%. With one pump at 100% and the other at 75%, the flow was 8.2l/m and 10.3l/m with both pumps at 100%.
The setup for the flow tests is pictured below. The gapmeter is the thing on a tripod on the left with an AWG to supply the variable duty cycle switching on the right.
The vacuum system for the bed is largely independent of the printer, being switched on manually and with the pump being switched by a vacuum switch to maintain the vacuum. I did feel that it was necessary to have a vacuum failure switch to abort the print should the vacuum fail, but was unable to find a vacuum switch to my specification. Even those fairly close to spec were fiercely expensive and physically too large.
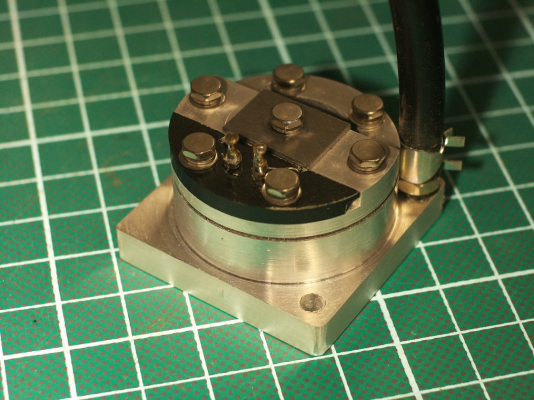
The solution was to make my own vacuum switch with a deliberately very wide hysteresis. The need was for the switch to close when that vacuum fell below -90kPa (about 13.5psi below atmospheric pressure) but only to open again if the vacuum is not maintained below -50kPa.
Below is a picture of the vacuum switch. It uses two small magnets and a tiny reed switch in a "flux thief" magnetic circuit.
The other major item is that I have joined the realms of the truly blessed - I received a Raspberry Pi 4B with 8GB memory this morning.
Mike
Edited 1 time(s). Last edit at 05/23/2023 11:52AM by leadinglights.
|
Re: A rebuildlog for a Delta printer May 30, 2023 06:18AM |
Registered: 12 years ago Posts: 1,450 |
Almost everything is working well on the auxiliary pump box now but the vacuum pump is too powerful and I have had to rethink how this will work. The printer bed often develops a small leak through the petroleum jelly that is used on the seal and the pump may be called on perhaps once every couple of minutes for about one second to maintain the vacuum. The problem arises in that the pump is decidedly not rated for continuous operation and a vacuum failure would likely burn out the pump before the failure was detected.
The solution is to reduce the power to the vacuum pump by using a duty cycle of about 60%, a speed at which the vacuum pump can run continuously.
With the redesign, the pump now pulls the full vacuum (ca -90kPa) for about 4 seconds on the initial switch on and then maintains the vacuum at reduced power, running for perhaps 4 seconds every few minutes. Only if the vacuum falls below -50kPa with the pump running continuously will the vacuum fail switch operate and abort the print.
By Murphy's Law, I had used up the PWM pins on the RAMPS AUX1 port that I designated for pump control but now will have to swap some ports.
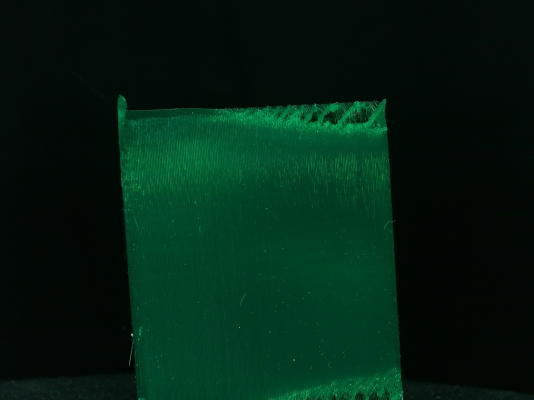
I had a second problem when I tried to print a Rope Vase [www.thingiverse.com] as it had a layer slippage about a quarter of the way done - something that this printer hasn't done in many years. I restarted the print and monitored it for a while. While I was looking away for a moment I heard a loud click but couldn't find any obvious cause or any damage to the print. Suspecting that it may have come from some thin steel cables that I use as safety belts for the magnetic Delta rods, I removed these. Pictures below of the result which occurred while I was on the phone. Sorry about the crappy picture taken on an ancient Nokia flip phone.
I now need to put a video camera on this printer to find out what is happening. Sadly the Raspberry Pi 2B on this printer is a little too puny to run Klipper and a video camera at the same time so I will have to use the Pi 4 that I have just acquired for one of my other printers.
Mike
|
Re: A rebuildlog for a Delta printer June 15, 2023 05:50AM |
Registered: 12 years ago Posts: 1,450 |
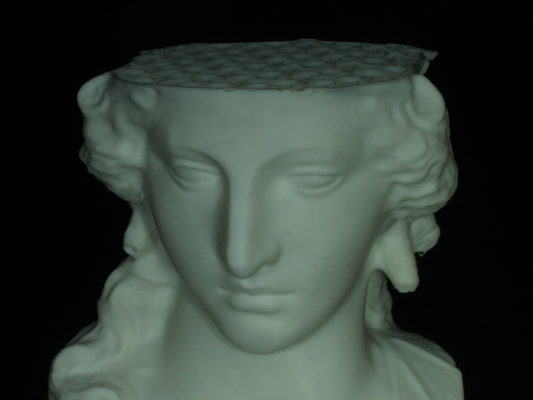
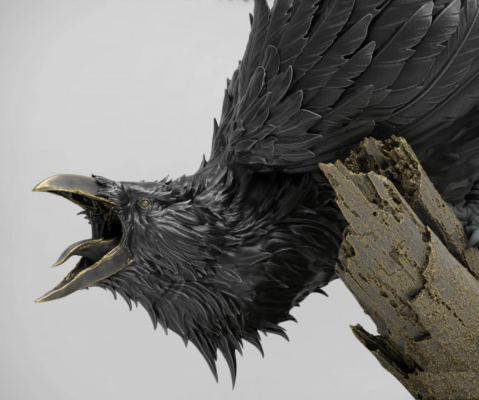
O.K., so the rebuild of Miranda seeming almost to be done, I thought I would venture into fields where I rarely tread: The arts - that place inhabited by minds foreign to the Morlocks of the techy world. What I want to do is take a favorite poem, "The Raven" by Edgar Allen Poe, and print a raven perched on a bust of Pallas.
A search on MyMiniFactory yielded several possible candidates so, with a newly downloaded copy of Prusa Slicer Beta 2.6 I launched into the unknown by scaling an SLA to as big as I could fit onto the printer bed, turning on organic supports, and slicing it.
I have done many prints on the newly installed Klipper firmware and tweaked most things to the point of exhaustion. After having a layer slippage when printing a rope bowl, I went over just about every physical or electrical part and replaced anything that was worn, old, or otherwise suspect. Anything that is plugged in has been checked for mating pressure and lubricated with a drop of contact cleaner. Much sweat was sacrificed to the gods "Murphy" and "Sod" who made the laws that govern all of technology.
So it was that after nearly twenty hours of printing, as I admired the elegant dance of Miranda's six arms that I heard an alarming 'KLIK' sound and saw that the nozzle had left its ordained path and was clattering about on the gyroid area where Pallas's brain would be.
Resignedly canceling the print I took the partly completed wreck from the bed and removed the organic supports. What I saw made me really sad as the supports showed how good the print would have been had it gone to completion.
Lovely complexion, a bit pallid though.
I tried several prints since then: The top half and helmet for Pallas was one. Some arms for a new camera to record what was happening is another, but nothing now goes to completion. Looking at the clues, the nozzle seems to come down sharply about 2 mm, typically gets stuck, then tries to continue printing from a random position. Time to failure is completely random.
I suspect that there is a bad contact somewhere so have been going over everything. Connectors have been rechecked and every soldered joint looked at, poked, wiggled, prodded, and cleaned. The stepper has been exercised by running circles in gcode while being thwacked with the blunt end of a screwdriver. I have even replaced the Raspberry Pi 2B with a Raspberry Pi 4 ( 8 GB ) which was intended for another printer and new RAMPS and Arduino Mega 2560 boards await installation.
Although not yet tested, I don't have any faith that I have found the cause of the problem since nothing even vaguely suspect has been found. Could it be a bug in Klipper? Maybe malware in the computer? A poltergeist in the workshop?
For the moment I am left with no option but to vent my frustration.
Mike
Edited 1 time(s). Last edit at 06/15/2023 05:55AM by leadinglights.
|
Re: A rebuildlog for a Delta printer June 18, 2023 03:50PM |
Registered: 7 years ago Posts: 321 |
My opinion - you've got a subtle extruder problem.
The maths start off good, but you got slight over extrusion on each layer, and eventually you get no space to extrude. Or, the filament has random tangles in it, but tangles are usually pretty obvious so probably not that.
Or, maybe it's just the filament being a bit wide in places. That causes the overextrusion, jam, and subsequent print failure.
What I'd try doing is a selection of tall, narrow objects, see if they go OK or if they jam at a certain height. That would point to a mechanical problem. Unlikely but it might help eliminate mechanical height of the print being an issue.
I've had "flat head" print failures from both causes, and if your extruder rotation distance is a bit too low, that would over extrude and also cause it. (Software not hardware problem).
It could be the filament feed has a jam problem at certain heights.
Edited 2 time(s). Last edit at 06/18/2023 03:53PM by DragonFire.
|
Re: A rebuildlog for a Delta printer June 18, 2023 03:59PM |
Registered: 7 years ago Posts: 321 |
Sorry, only registered users may post in this forum.
