thereprapkitstore.com Prusa Mendel construction Notes/Discussions
Posted by MotoBarsteward
|
Re: losing-steps-problem solved August 28, 2012 05:46PM |
Registered: 14 years ago Posts: 65 |
> How did you secure them to the board, chips?
Well right now, it is just the weight But i will screw the 5V power regulator into it, than the heat sink will be grounded. On the opposite site, i can secure the dissipator with the two power mosfets. Yet these have to be isolated and i don't have these little plastic isolators in stock.
> I have lost a thermistor.
Like me I have just bought 2kg of PLA and ABS on ebay
Will ask the seller to add a thermistor, either as a gift or for something like $5
Just find a seller offering a Sangudingidongo and he will be able to sell you a thermistor..
roland
Well right now, it is just the weight
But i will screw the 5V power regulator into it, than the heat sink will be grounded. On the opposite site, i can secure the dissipator with the two power mosfets. Yet these have to be isolated and i don't have these little plastic isolators in stock.> I have lost a thermistor.
Like me
I have just bought 2kg of PLA and ABS on ebayWill ask the seller to add a thermistor, either as a gift or for something like $5
Just find a seller offering a Sangudingidongo and he will be able to sell you a thermistor..
roland
|
Re: thereprapkitstore.com Prusa Mendel construction Notes/Discussions August 28, 2012 06:01PM |
Registered: 11 years ago Posts: 40 |
I should be able to grab one from RS at work so sourcing isnt an issue, just need to know which one to get (preferably to match the kit).
The options (from Epcos, they look the most similar) seem to be a 15s +/-1% accuracy one, or a 3s +/-5% accuracy one. Given that its for the extruder, which is hotter (and thus 5% is a reasonably large temp change) and near the melting point of the hot end plastic holder, I'm inclined towards the slower, more accurate one. Anyone got an opinion?
Clem
|
Re: thereprapkitstore.com Prusa Mendel construction Notes/Discussions August 28, 2012 06:26PM |
Admin Registered: 17 years ago Posts: 7,879 |
|
Re: thereprapkitstore.com Prusa Mendel construction Notes/Discussions August 28, 2012 06:28PM |
Registered: 11 years ago Posts: 40 |
|
thermistor August 28, 2012 06:29PM |
Registered: 14 years ago Posts: 65 |
somewhere i read, that this thermistor will do: [uk.farnell.com]
I think, the 100k-ohm is the important specification. And with the heatbed it doesn't matter that much anyway, i think. I blew hot air with my digital heat gun onto the glass pane, and it worked as well
roland
"the little physicist"
I think, the 100k-ohm is the important specification. And with the heatbed it doesn't matter that much anyway, i think. I blew hot air with my digital heat gun onto the glass pane, and it worked as well
roland
"the little physicist"
|
Re: thereprapkitstore.com Prusa Mendel construction Notes/Discussions August 29, 2012 06:41AM |
Registered: 11 years ago Posts: 19 |
Hi all,
If anyone has problems getting hold of the thermistor at a sensible price, PM me. I have a Farnell account so don't get caught for minimum order value and also I don't pay postage.
I busted a linear bearing (de-burr the smooth rods or the magic balls fall out!) so my build is waiting for me to get to the sorting office for a replacement off ebay
I found suitable Z springs in the skip at work (weren't in my kit), James eventually delivered the missing hobbed bolt (I had made my own by then), but still no emails from Mr Elusive... Ho hum!
Might get some more of my Prusa built tonight :-)
Lee
|
Re: thereprapkitstore.com Prusa Mendel construction Notes/Discussions August 29, 2012 02:39PM |
Registered: 14 years ago Posts: 65 |
yes, these linear bearings are quite fragile. i also lost some little steel balls
Already bought one pololu driver [www.ebay.de] and seller sold me an additional thermistor for $5
Already bought one pololu driver [www.ebay.de] and seller sold me an additional thermistor for $5
|
Re: thereprapkitstore.com Prusa Mendel construction Notes/Discussions August 29, 2012 03:14PM |
Registered: 11 years ago Posts: 19 |
|
Re: thereprapkitstore.com Prusa Mendel construction Notes/Discussions August 31, 2012 02:56PM |
Registered: 11 years ago Posts: 273 |
Hello,
I have a rough idea about a lock washer. But I am afraid that what I think a lock washer is might break the plastic parts :-(
So could maybe anyone with an ABSPrusa provide me with a picture of those lock washers used in the kit ?
What I expect
Thanks
Michael
I have a rough idea about a lock washer. But I am afraid that what I think a lock washer is might break the plastic parts :-(
So could maybe anyone with an ABSPrusa provide me with a picture of those lock washers used in the kit ?
What I expect
Thanks
Michael
|
Re: thereprapkitstore.com Prusa Mendel construction Notes/Discussions August 31, 2012 03:29PM |
Registered: 11 years ago Posts: 40 |

|
Re: thereprapkitstore.com Prusa Mendel construction Notes/Discussions September 01, 2012 08:33AM |
Registered: 11 years ago Posts: 40 |
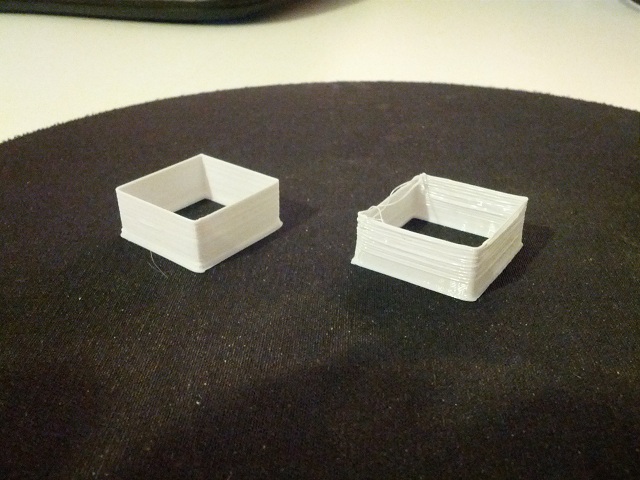
Well at about 1am last night I managed my first print! So pleased!
Thanks for the help on this forum guys ... with this kit this forum thread is invaluable (if for nothing more than support!)
The firmware settings pre-programmed were quite a way from correct, especially true for extrusion which was 30% overboard. So I went ahead and installed Marlin, got that set up for this kit rather than an Ultimaker and went ahead with printing.
Attached is my first (right hand) and best print (about the 7th attempt at this box!)
I think that the nozzle is dragging a bit, especially on the first layer. Anyone got a number for where to set the z-stop? I have it set at touching, but am tempted to move it up a bit.
|
Re: thereprapkitstore.com Prusa Mendel construction Notes/Discussions September 01, 2012 11:08AM |
Registered: 11 years ago Posts: 31 |
|
Re: thereprapkitstore.com Prusa Mendel construction Notes/Discussions September 01, 2012 02:27PM |
Registered: 11 years ago Posts: 40 |
I went through the configuration.h file and changed the obvious stuff (picking the extruder type and thermistors and stuff)
Beyond that It was just compile - upload - check steppers go the right way and that the endstops work correctly and so on then repeat. Finally checked all the temp settings and spent the next 3 or so hours calibrating the steppers
I've attached my configuration.h to this post so you can start with that if you want, might be a good starting point.
Pretty sure my Y-axis is crossed so you might need to change that. My Y axis endstop is at the front also (opposite from motor).
I don't claim to have set everything up perfectly (or even understood half of it!) but it seems to work
|
Re: thereprapkitstore.com Prusa Mendel construction Notes/Discussions September 01, 2012 03:55PM |
Registered: 12 years ago Posts: 283 |
If you set the base level and at the correct height then you do not need to set the Z offset. I used to set the bed as closely as I could and then try to fine adjust using the Z offset until until I realised that negative values did not work because the Z axis end stop switch stopped the negative values doing anything. An alternative is to level off the bed but with the head pressing the bed down and then using z offset but here is a danger that he head might break the glass bed. This happened to me and I'm beginning to run out of picture in my house from which I can steal the glass without my wife noticing!
Getting the first layer right is extremely important as all else will fail unless it is correct so it is work taking the time setting the head so that it is truly at zero. I have found that there is no better way than printing a test pattern that has five 1cm cubes, one in each corner, and one in the centre. I keep printing the first layer and adjusting the z axis end stop position until I get a well formed first layer across the whole bed.
I've also noticed that the boundary ring that slicer generates is printed at z=0 so, if you have the bed set too high, the pressure of the bed can prevent the plastic extruding out of the head so, when it goes to start printing the first layer, you get a blob.
Clem Wrote:
-------------------------------------------------------
> Well at about 1am last night I managed my first
> print! So pleased!
>
> Thanks for the help on this forum guys ... with
> this kit this forum thread is invaluable (if for
> nothing more than support!)
>
> The firmware settings pre-programmed were quite a
> way from correct, especially true for extrusion
> which was 30% overboard. So I went ahead and
> installed Marlin, got that set up for this kit
> rather than an Ultimaker and went ahead with
> printing.
>
> Attached is my first (right hand) and best print
> (about the 7th attempt at this box!)
>
> I think that the nozzle is dragging a bit,
> especially on the first layer. Anyone got a number
> for where to set the z-stop? I have it set at
> touching, but am tempted to move it up a bit.
Using ABSPrusa Mendel Zaphod with Pronterface and slic3r 1.3.0. Printing well with 3mm PLA and ABS through 2 x J Head Mk IV b and Wade Geared Exruders. Controlled using RAMPS1.4 board running Marlin_v1.1.9
|
Re: thereprapkitstore.com Prusa Mendel construction Notes/Discussions September 02, 2012 05:17AM |
Registered: 11 years ago Posts: 31 |
|
Re: thereprapkitstore.com Prusa Mendel construction Notes/Discussions September 03, 2012 05:48AM |
Registered: 11 years ago Posts: 31 |
So after a lot of messing around I updated my firmware to Marlin. It seems the bed temperature is incorrect. I used the thermistor setting from clems config file (100k EPCOS thermistor) but my IR thermometer shows it is about 10/20 degrees hotter than it is reporting. Should I try another thermistor setting or could that damage it?
Also the z-steppers are very noisy when moving upwards, I have tried increasing the pot several times but the noise persists. Is this just the marlin firmware or should I keep tuning?
Also the z-steppers are very noisy when moving upwards, I have tried increasing the pot several times but the noise persists. Is this just the marlin firmware or should I keep tuning?
|
Re: thereprapkitstore.com Prusa Mendel construction Notes/Discussions September 03, 2012 06:23AM |
Registered: 11 years ago Posts: 40 |
|
Re: thereprapkitstore.com Prusa Mendel construction Notes/Discussions September 04, 2012 07:41AM |
Registered: 11 years ago Posts: 31 |
Hey Clem, that worked, I switched it to 1 (100k thermistor) and now i'm getting the proper readings. The z-steppers are still giving me problems, even when I crank the pots way up I am still getting weird noises. I have oiled everything using PTFE spray grease so I suppose more tuning is required. I also wanted to enable the fan pin on my melzi board. A previous post said it should be pin 4 but that is already taken by the heater bed pin. Anyone know what the correct pin for the fan is?
|
Re: thereprapkitstore.com Prusa Mendel construction Notes/Discussions September 04, 2012 09:25AM |
Admin Registered: 17 years ago Posts: 7,879 |
|
Re: thereprapkitstore.com Prusa Mendel construction Notes/Discussions September 04, 2012 11:44AM |
Registered: 11 years ago Posts: 31 |
Hmm, in the firmware I downloaded github, the HEATER_BED_PIN is set to 4 and the heater bed seemed to work okay. do I risk killing my machine if I play around with the pins?
|
Re: thereprapkitstore.com Prusa Mendel construction Notes/Discussions September 04, 2012 11:50AM |
Registered: 11 years ago Posts: 40 |
Speaking of fans ... any advice on where to mount one?
Something like this? with a 40mm fan on the hot end
[www.thingiverse.com]
Or a bigger fan elsewhere? I already have an 80mm fan i stole from a PC but have no idea where to mount it that it wont just cool one side of the print (open to getting another one for other side if thats the best way ...)
Something like this? with a 40mm fan on the hot end
[www.thingiverse.com]
Or a bigger fan elsewhere? I already have an 80mm fan i stole from a PC but have no idea where to mount it that it wont just cool one side of the print (open to getting another one for other side if thats the best way ...)
|
Re: thereprapkitstore.com Prusa Mendel construction Notes/Discussions September 04, 2012 11:58AM |
Registered: 11 years ago Posts: 31 |
|
Re: thereprapkitstore.com Prusa Mendel construction Notes/Discussions September 04, 2012 12:23PM |
Registered: 11 years ago Posts: 40 |
|
Re: thereprapkitstore.com Prusa Mendel construction Notes/Discussions September 04, 2012 12:28PM |
Registered: 11 years ago Posts: 31 |
|
Re: thereprapkitstore.com Prusa Mendel construction Notes/Discussions September 04, 2012 12:30PM |
Registered: 11 years ago Posts: 40 |
|
Re: thereprapkitstore.com Prusa Mendel construction Notes/Discussions September 10, 2012 02:59AM |
Registered: 12 years ago Posts: 283 |
Maplin do some. I wouldn't use the 38x38x38 one though. For some reason, my sangionolu and fan control module don't control the spead very well. the fan won't start unless the spead is at least 80% and it is very noisy.
The other problem is that the fan only cools one side of the object. This is ok for small things but not for larger stuff. I think I'm going to mount a couple of 80mm fans to each end of the X axis and see how that works.
Using ABSPrusa Mendel Zaphod with Pronterface and slic3r 1.3.0. Printing well with 3mm PLA and ABS through 2 x J Head Mk IV b and Wade Geared Exruders. Controlled using RAMPS1.4 board running Marlin_v1.1.9
|
Re: thereprapkitstore.com Prusa Mendel construction Notes/Discussions September 25, 2012 08:24AM |
Hey all,
I got an abs prusa kit from thereprapkitstore and uhm ... it seems I've run out of instructions
I have to warn you: I'm a complete noob to 3D printing and assembly (I've been known to get ikea closets wrong), but I've played a lot with lego when I was young, so how hard can it be, right?
So anyway, the frame is assembled. The engines are on, the cogs turn, everything big is in place minus some tightening and some reallignments of a rod or two. I've tried to look around for instructions for the rest of the build and I think I've got a fair idea of what's needed, but I'm lost a bit in the details so I was hoping you guys could answer some questions for me.
1) Hotbed assembly
Am I right in presuming that the 3x20mm Hex thingies are supposed to go between the metal plate and the hotbed? If so, what screws am I supposed to put in there to attach the hotbed? The 3x20mm screws are too long for the hexes and I only have 2 of the 3x10mm ones left.
2) Electronics attachment
I'm a bit lost on how I'm supposed to attach the electronics board to the frame. I have 3 plastic U-shaped elements with some screws that seem like they might be intended for that, but I can't get that to fit anywhere except in the top and that seems wrong for a number fo reasons (because I suspect that's whre the fillament feed is supposed to go?).
3) End-stops
I'm similarly unsure where to put the end-stop for the Y axis. If I put it on one of the smooth rod that the printbed sits on, it seems like the endpoint would be quite a distance from the edge of the plate.
4) Hot-end wiring
I can't really seem to find instructions on how to wire up the hot-end. I know the big resistor goe sinto the big hole and the thermistor in the small one, but that's about as far as I got ... Should I solder wires on the end of those and isolate them somehow and then lead all of that to the electronics plate?
Sorry for asking very basic beginner questions, but I'm afraid that's what I am.
|
Re: thereprapkitstore.com Prusa Mendel construction Notes/Discussions September 25, 2012 02:47PM |
Registered: 11 years ago Posts: 40 |
I came at this same kit with zero experience and I came to pretty the same point before getting stuck ... the instructions quite simply suck beyond a point.
1. I initially used a longish bolt with 2 nuts between the bed and the alu plate (then another nut). This turned out to be crap to adjust, I now use the longish bolt with a spring harvested from a ballpoint pen (and that nut underneath). I also now use the 3 mounting points rather than 4, there should be a hole in the middle on one side of the PCB for this, I had to drill the aluminium plate for this though. Not a difficult job and much easier to adjust the bed in the future. In summary, no ... not the hex pillars ... I think they are for the melzi but in the end I just havent used them.
2. Again the solution provided for mounting the melzi isnt great. I used a bit of trunking cover and zip tied it across the frame on one of the diagonals (anything that is as wide as the machine and as tall as the pcb will do). Then I zip tied the electronics to that. I am not especially happy with this solution but now the machine works I have zero reason to bother to change it.
3. My Y endstop sits on the smooth rod but outside the rod mounting point. Basically I made the rod stick out a bit at the end and attached the switch there, it only grips on half the width but it doesnt take any force so it works fine. I put mine at the opposite end to the motor which I think caused me to have to fiddle in the firmware so maybe motor end is the best.
4. This is one that took me MANY goes to get right. Firstly, the kapton tape in the kit isnt great and doesnt stick when hot, which I believe its supposed to. I managed to get it work anyhow.
Solder the thermistor to some wires and wrap the solder joint in some kaptop a few times to thermally insulate the joint (the hot end is hot enough to remelt the solder). Then use more tape to wrap the thermistor wires to make sure they are electrically and thermally insulated. Then tape the whole thing to the hot end, this is where the kapton sucked, I had to work a way to get it to stick to itself rather than the brass as it kept coming off when hot. I cannot really describe how that works and I cannot take a picture as I've since taken it apart in the hope some better kapton might help. My second attempt will be neater with use of better kapton I hope.
Having attached the thermistor (by force of will in the end), the next job to wrap the heater resistor in foil until its snug in the hole, making sure to not short it out by accident. Attaching the resistor to wires by solder did not work (it took a while to realise as I thought solder melted at nearer 300C rather than the 180C I had the hot end at) so I harvested some screw terminals from a chocblock and wrapped them in kapton to insulate them. Once that was done I zip tied the 4 wires together and ran them up, through the hole in the x-carriage (zip tied to to that too) and up to the top rail to attach to the electronics.
Anyway ... hope that lot helps, just ask if I havent explained well.
Clem
|
Re: thereprapkitstore.com Prusa Mendel construction Notes/Discussions September 27, 2012 04:13AM |
Hey Clem,
Thanks a lot, that does help plenty. It confirms most of my suspicions and matches what we were trying already (like the endstop on the outside). Now I have to find some pens to butcher.
Out of curiosity, what guide did you follow to wire up the electronics? I'd hate to get the wrong colour wire in the wrong hole.
Regards,
Mithandir
|
Re: thereprapkitstore.com Prusa Mendel construction Notes/Discussions September 27, 2012 04:16AM |
Registered: 11 years ago Posts: 31 |
What electronics are you using? I hhave a melzi board and I wired it up using the huxley instructions:
[www.reprap.org]
[www.reprap.org]


Sorry, only registered users may post in this forum.