parts list? gen7 also atmega
Posted by terramir
|
parts list? gen7 also atmega December 30, 2011 12:59PM |
Registered: 12 years ago Posts: 279 |
I looked on the page it links to the dedicated page and it links to the dedicated page and I cannot find the part's list, I dunno maybe it's just me but for the life of me I cannot find the Parts list.
On another question when it comes to this gen7 are all the ATmega 644P /644PU /1284 and 1284P drop in compatible both in hardware and software?
Also I see there are unused pins and I got the following question how hard would it be to add an extra extruder to this design, I mean a future upgrade would be nice if I could make two colored pieces but that's a thought for the future all that would need to be done there is measure and calculate the offset on the X axis and add a color variable how that would figure into the designs I have not yet figured out but it would be cool.
terramir
|
Re: parts list? gen7 also atmega December 31, 2011 04:21AM |
Registered: 13 years ago Posts: 7,616 |
Quote
I looked on the page it links to the dedicated page and it links to the dedicated page and I cannot find the part's list, I dunno maybe it's just me but for the life of me I cannot find the Parts list.
Uhm, not sure how one can miss that, but here it is, along with many links to distributors: [reprap.org]
Quote
On another question when it comes to this gen7 are all the ATmega 644P /644PU /1284 and 1284P drop in compatible both in hardware and software?
The 644 types are interchangeable. The 128x types would require an adjusted bootloader (different device signature).
Quote
Also I see there are unused pins and I got the following question how hard would it be to add an extra extruder
Do it. It's more a problem of finding space on the board than of electrical issues.
| Generation 7 Electronics | Teacup Firmware | RepRap DIY |
|
Re: parts list? gen7 also atmega December 31, 2011 01:38PM |
Registered: 12 years ago Posts: 279 |
ehh how do I do that or is there an 128x type in a download section somewhere, or is this something we compile ourselves out of source code and we just cange a few lines?Quote
Traumflug Wrote:
-------------------------------------------------------
The 644 types are interchangeable. The 128x types
would require an adjusted bootloader (different
device signature).
Quote
Traumflug Wrote:
-------------------------------------------------------
Do it. It's more a problem of finding space on the
board than of electrical issues.
My question is which of the unused pins will do more like the question is does your x,y,z , extruder one more or less correspond to the outputs on ramps and sanguinololu, or is it totally different and if they do correspond which pins would be used for the header (extruder II) so I choose like the same pinout for easy compatibility later. I'm assuming that the ramps and the sanguinololu and the gen7 boards have fairly much in common I'm hoping that the developers here not just you everyone kept the designs fairly analog to each other. Let me know please.
shouldn't making the board a little bigger (actually longer) solve the space problem?
terramir
|
Re: parts list? gen7 also atmega January 01, 2012 12:55AM |
Registered: 12 years ago Posts: 279 |
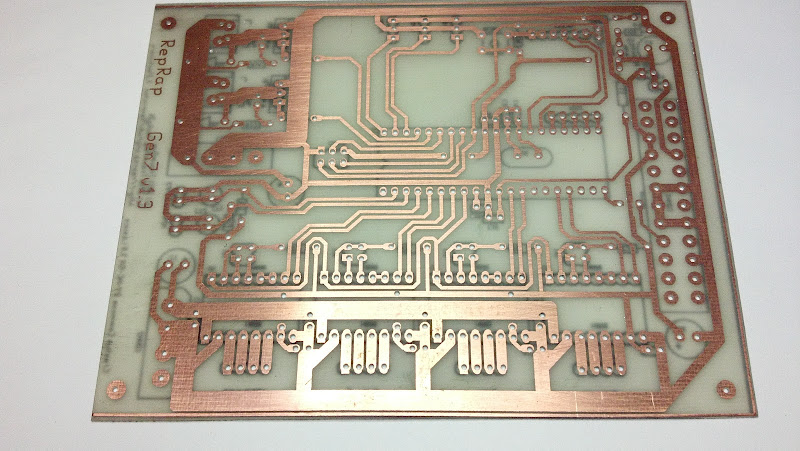
got a question Traumflug or anyone that has such a board like on the wiki can anyone dump it in a scanner at 150dpi or so (the copper side), Traumflug do you have 1.31 boards without solder I'd like to make a standard board first I'll do some experiments later and I have copper clad board but I need a print to scale to make it by hand yeah that will be a pain but I have the time and a dremel :p. I could etch it but it would be a pain to etch it right now and the more copper the better (cuts down on the resistance). I saw the picture of the 1.3 board but I have not figured out the changes yet and well that photo is taken at an angle be easier for me to to have a 150 dpi scan so I can work from that and print a 150 dpi copy to then work on the pcb
Happy new year btw
terramir
Happy new year btw
terramir
|
Re: parts list? gen7 also atmega January 01, 2012 05:24AM |
Registered: 13 years ago Posts: 7,616 |
Quote
can anyone dump it in a scanner at 150dpi
Why this? Is printing one page of a PDF too difficult? [github.com] (click on "view raw")
Quote
Traumflug do you have 1.31 boards without solder
Yes I have, as I manufacture almost daily one or two. Please email me at mah@jump-ing.de so I can answer you with prices.
My impression is, modifying Gen7 isn't going to work without a lot more research on your side. Read the wiki, click links you find there, get gEDA running, download the repository. It's all documented and adding a third thermistor input to two already existing isn't exactly difficult.
| Generation 7 Electronics | Teacup Firmware | RepRap DIY |
|
Re: parts list? gen7 also atmega January 24, 2012 09:24AM |
Registered: 12 years ago Posts: 7 |
FYI, when you export out of gEDA pcb for use with toner transfer you need to make sure you clear the 'auto-mirror' checkbox. If you can read 'RepRap Gen7 v1.3' then you forgot to clear this checkbox.
FWIW, the pdf in github had auto-mirror checked, so its unusable for folks that want to do toner transfer. Its probably also unusable because the pads are too small and the drill holes are too big. Personally I'd leave it to folks to learn pcb and fix these things themselves.
Here's the process that I used:
I loaded Traumflug's pcb layout into gEDA. I googled around until I found a couple of pcb footprint libraries that had oval pads. (here and here)
I used 'Load layout data into paste buffer' to load the fp file into pcb and just placed it directly on top of the existing round hole footprint. After I overlaid all the footprints I went back and had to move a couple of traces. A few pins were too close after etching but I cleaned those up with a dremel. I tried to error on too much copper rather than too little.
My final layout is attached. NOTE: This is Traumflug's latest development work from github and I have not yet tested it. Use at your own risk.
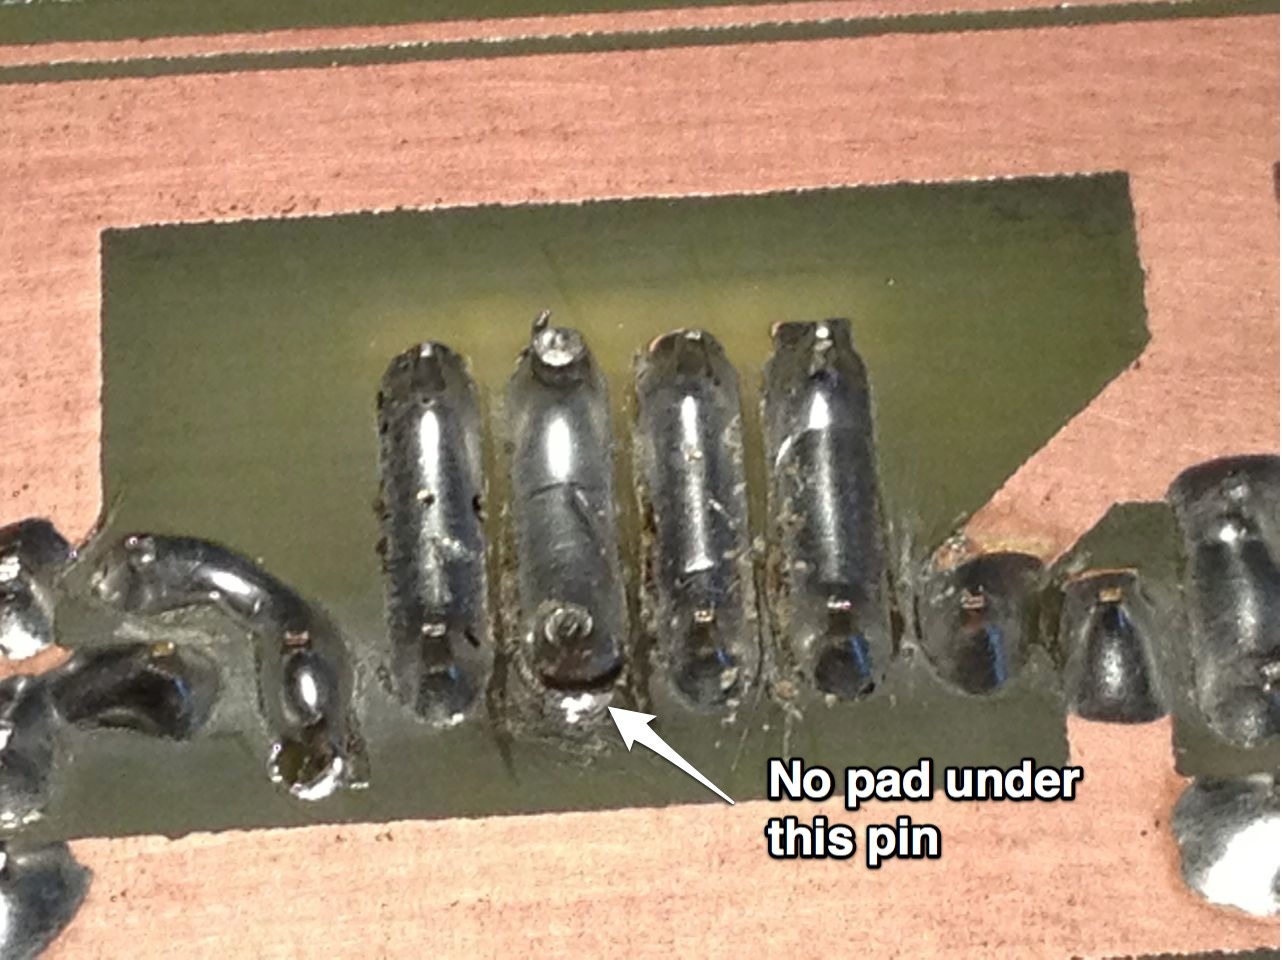
Unfortunately I did get a little anxious during drilling and pushed a little too hard. I broke the bit and took out almost all of a pad. I thought there was just enough copper left to make it work but when I went to solder, just couldn't get it to bind. I ended up wire wrapping two pins. Can you spot it?
FWIW, the pdf in github had auto-mirror checked, so its unusable for folks that want to do toner transfer. Its probably also unusable because the pads are too small and the drill holes are too big. Personally I'd leave it to folks to learn pcb and fix these things themselves.
Here's the process that I used:
I loaded Traumflug's pcb layout into gEDA. I googled around until I found a couple of pcb footprint libraries that had oval pads. (here and here)
I used 'Load layout data into paste buffer' to load the fp file into pcb and just placed it directly on top of the existing round hole footprint. After I overlaid all the footprints I went back and had to move a couple of traces. A few pins were too close after etching but I cleaned those up with a dremel. I tried to error on too much copper rather than too little.
My final layout is attached. NOTE: This is Traumflug's latest development work from github and I have not yet tested it. Use at your own risk.
Unfortunately I did get a little anxious during drilling and pushed a little too hard. I broke the bit and took out almost all of a pad. I thought there was just enough copper left to make it work but when I went to solder, just couldn't get it to bind. I ended up wire wrapping two pins. Can you spot it?
|
Re: parts list? gen7 also atmega February 23, 2012 12:07AM |
Registered: 12 years ago Posts: 52 |
ggal625 Wrote:
-------------------------------------------------------
> My final layout is attached. NOTE: This is
> Traumflug's latest development work from github
> and I have not yet tested it. Use at your own
> risk.
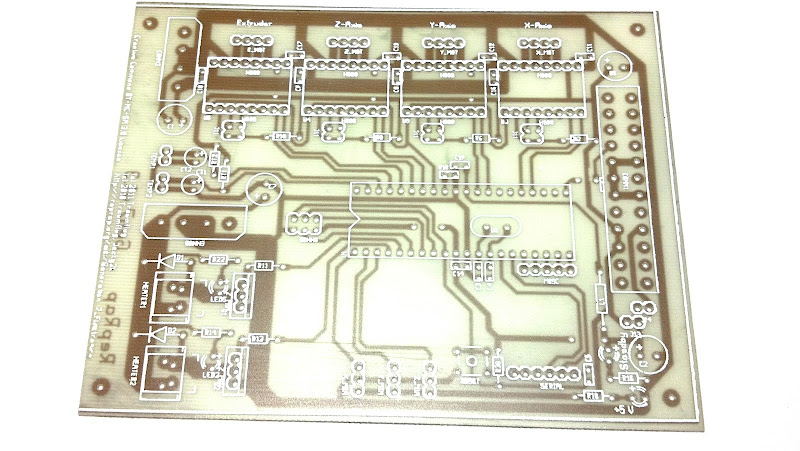
Thanks for posting the pdf. I've since installed and learned how to use gEDA (much simpler than I feared thankfully), but I etched, drilled and assembled your board anyway. The dry transfer didn't turn out perfect, but it's mostly functional at least (FYI - that layer needs to be mirrored to use it too - you pdf'd the positive image of silk). I'll test power tomorrow - I'm too tired tonight, but I think it turned out pretty good.
NC
Edited 1 time(s). Last edit at 02/23/2012 12:08AM by JazzyMT.
-------------------------------------------------------
> My final layout is attached. NOTE: This is
> Traumflug's latest development work from github
> and I have not yet tested it. Use at your own
> risk.
Thanks for posting the pdf. I've since installed and learned how to use gEDA (much simpler than I feared thankfully), but I etched, drilled and assembled your board anyway. The dry transfer didn't turn out perfect, but it's mostly functional at least (FYI - that layer needs to be mirrored to use it too - you pdf'd the positive image of silk). I'll test power tomorrow - I'm too tired tonight, but I think it turned out pretty good.
NC
Edited 1 time(s). Last edit at 02/23/2012 12:08AM by JazzyMT.
|
Re: parts list? gen7 also atmega February 23, 2012 03:53AM |
Registered: 12 years ago Posts: 290 |
|
Re: parts list? gen7 also atmega February 23, 2012 11:42AM |
Registered: 12 years ago Posts: 52 |
I used the Pulsar kit:
[www.pcbfx.com]
Colored foil transfers on top of the black toner to give you a white (or any color) "silk" layer.
The white foil actually transferred very poorly this time - I had to scrub off a bunch of extra loose white foil after the toner transfer, but I have had very clean, sharp transfers - I think I just heated it too much during transfer and I was too lazy to redo it. Anyway - the white foil is just bling - even a black toner transfer works pretty well and is handy to have the legend on-board.
Sorry, only registered users may post in this forum.