Building my Mendel90 from kit
Posted by daichiasuka
|
Building my Mendel90 from kit January 18, 2013 03:30AM |
Registered: 11 years ago Posts: 31 |
Let me start by saying that I am very new to 3D printing . I took an interest in it about 6 months ago and have since been bugging my wife to let me buy one.  I chose the Mendel90 because of the excellent reviews and recommendations I have seen scattered about the reprap forums. It certainly didn’t hurt that, just as I was starting to seriously look at buying a printer, the new sleek black Dibond design came out.
This is a very well designed machine and I am extremely happy with it and the things I have been able to produce with it thus far. I wanted to share with anyone considering purchasing one my experience and a few notes this n00b had along the way.
Some background on myself so you can level set your expectations with my experience: I consider myself mechanically competent, good at improvising when need, and a hobbyist in electronics. I own a nice soldering iron and have assembled a few through-hole kits, but I’ve never fully designed something myself.
For the most part the 72 page assembly manual is very thorough and easy to follow. Here are a few notes I had:
All total the build took me about 25 hours to complete. If I were to build a second one, I could probably do it in about half of that time.
I want to reiterate that the quality and design of this printer is superb and the tweaks I am pointing out here are minor details that obviously didn’t cause me issues during assembly.
I am left with a few questions:
Edited 2 time(s). Last edit at 01/18/2013 03:33AM by daichiasuka.
I chose the Mendel90 because of the excellent reviews and recommendations I have seen scattered about the reprap forums. It certainly didn’t hurt that, just as I was starting to seriously look at buying a printer, the new sleek black Dibond design came out.This is a very well designed machine and I am extremely happy with it and the things I have been able to produce with it thus far. I wanted to share with anyone considering purchasing one my experience and a few notes this n00b had along the way.
Some background on myself so you can level set your expectations with my experience: I consider myself mechanically competent, good at improvising when need, and a hobbyist in electronics. I own a nice soldering iron and have assembled a few through-hole kits, but I’ve never fully designed something myself.
For the most part the 72 page assembly manual is very thorough and easy to follow. Here are a few notes I had:
- - I’m an American (sorry). While I personally like metric, tiny metric bolts and tools for them are fairly hard to find here. This isn’t really nophead’s problem, but I feel I need to give any US folks a heads up.
- There is a note in the beginning about the polypropylene strips needing to be cut to length. If you don’t the ribbon slack for the X Motor Assembly will be much longer than you need.
- The link in step 11 for the heatshield template is broken.
- In step 18 the note “note that the wires exit the motor on the bottom edge (right in the picture)” is incorrect. In the picture the bottom of the motor once it is mounted is on the left. I actually missed this note completely when I was putting it together and my wires exit out the right side (down in the picture) and loop under the gap in the bracket. In the end I don’t think it really matters, but I wouldn’t have them coming out the left side (up in the picture).
- In step 19 some clarity should be added for the orientation of the motor since the PCB is attached. It isn’t mentioned in the text and is not shown attached in the image. The PCB should be on the side facing the hobbed bolt. I also initially assembled this wrong and just removed the screws and moved the PCB to the right spot later. (This is also why my motor wires exit behind it.) For some reason when I got to this spot I also did not have 2 bolts the same size for the idler. One was 50mm the other was probably 60mm. I cut the 60mm to length because it would not fit otherwise.
- I realize this is some tuning and individual preference, but I recommend tightening the bolts on the idler pretty far. I have been able to print much more consistently and at lower temperatures after doing so.
- The spool holder is for large spools of filament that I do not nave. I have small 1 kg ones that are way too small to use this. I haven’t had a chance yet, but I will put up a redesigned version for smaller spools or a printable adapter to use the smaller spools with the larger brackets.
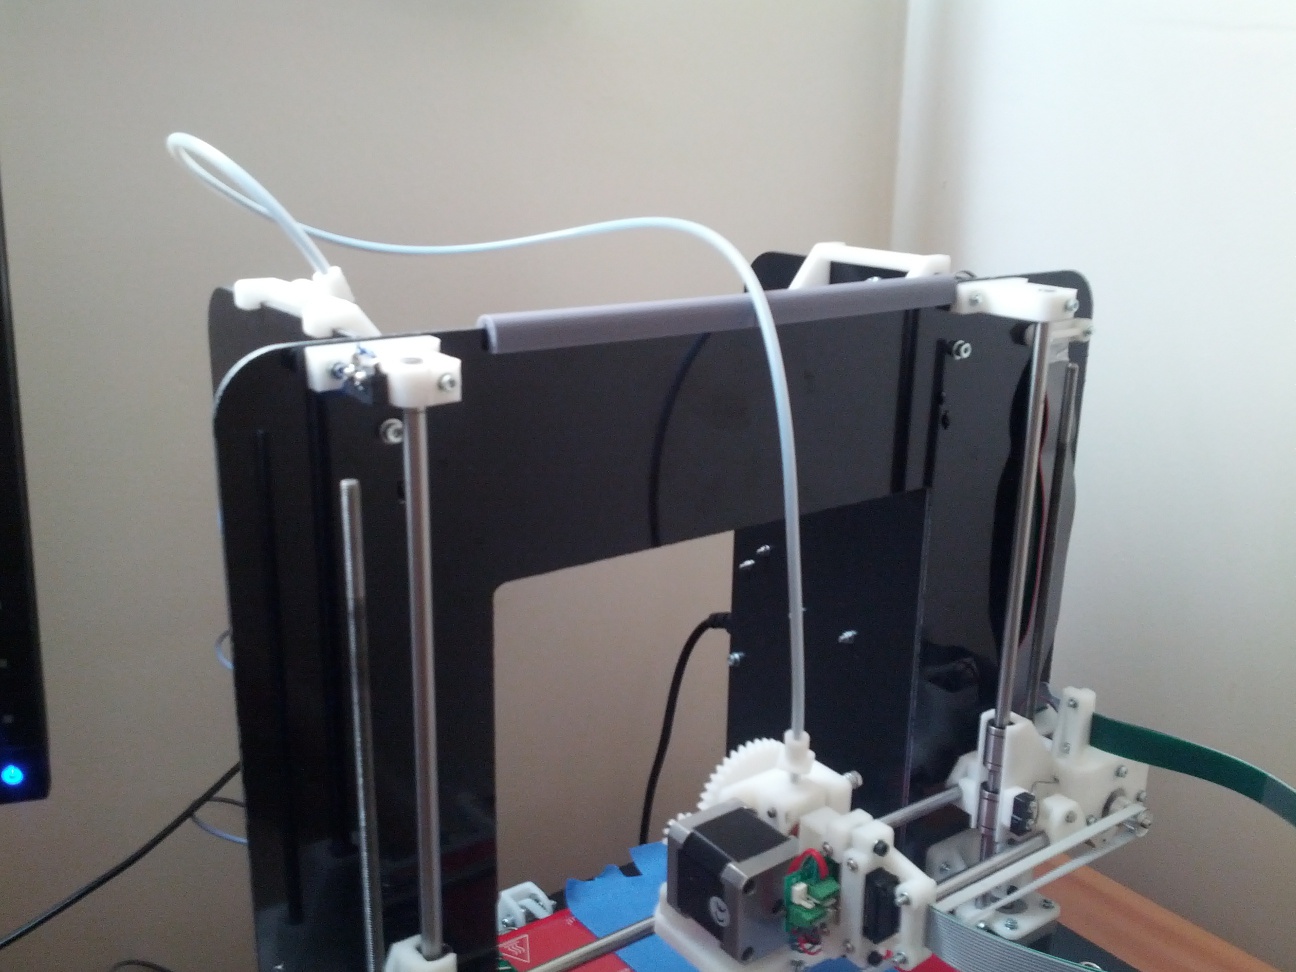
-The PTFE tube the filament flows through gets twisted back by my filament and rubs on the sharp edge of the Dibond. This creates small groves in the tube that can then catch on the edge while printing. You could probably solve this with tape or a guide of some kind. I designed and printed a cover for the edge that the tube can glide across: [www.thingiverse.com].
- My PSU experience was different since I’m not using the one normally supplied with the kit. (It doesn’t work in the US.) I also used a much newer ATX12V PSU with a single rail of 12V power. Many have multiple 12V rails now and the results of combining rails vary by manufacturer so I stuck with a single rail.
- - Steps 1 and 2 were fine. For step 3: many of the new PSUs don’t color code the sense wire and, if you are unfortunate enough (like me) to have already cut the ends off the wires, it looks exactly like every other orange 3.3V wire. Take the screws out of the PSU cover and look at the connections inside. Follow the one that is separated (it was labeled “Sense” on the board for me) and use that and another orange wire.
- I had a massive number of wires (15 each yellow and black) that just wasn’t going to work with a terminal so, since I had the PSU open, I did a little pruning where the wires met the PSU board. I cut all but 4 yellow and 6 black (8 total with the resistors) wires. I also pruned the unused red, the unused orange, purple, blue, and grey wires internally.
- The bottom PSU bracket didn’t quite fit for me due to the different PSU. It was off by only a few mm. I used the scad from github to hack a slightly longer one: [www.thingiverse.com].
All total the build took me about 25 hours to complete. If I were to build a second one, I could probably do it in about half of that time.
I want to reiterate that the quality and design of this printer is superb and the tweaks I am pointing out here are minor details that obviously didn’t cause me issues during assembly.
I am left with a few questions:
- - The instructions mention the optional bed fan with a link to the instructions. Will these work as written with the Melzi board? The pin layout for the connector is different and there is no 12V pin [reprap.org]. I get that I could just get 12V from the input terminal or PSU, but would the IO pin be the same?
- Similarly, could I use the other pins for other things? I have a 12V LED light bar that I would like to be able to turn on and off in gcode (and maybe blink when done printing).
Edited 2 time(s). Last edit at 01/18/2013 03:33AM by daichiasuka.
|
Re: Building my Mendel90 from kit January 18, 2013 07:38AM |
Admin Registered: 17 years ago Posts: 7,879 |
Hi Frank,
Thanks for the positive comments.
I have updated the manual with your tweaks.
Yes I have always had a problem with left and right. I have no innate sense which is which without working out from which hand I write with each time!
The over long bolt was mixed in a supply we bought. I though I had removed them all but obviously missed one, sorry.
The problem with the PTFE tubing rubbing on the frame doesn't happen with the supplied spool holder. Have you anchored the tube at the spool end? It needs to be anchored to work as a Bowden tube to stop the force required to pull the filament off the spool from tugging on the carriage.
I thought ATX power supplies where supposed to have standard dimensions but maybe the depth is allowed to vary as that isn't critical when fitted to a PC.
You can't use the same I/O line for a second fan because it is already used by the first fan. Since it doesn't need PWM you can use any spare digital port. Similarly you can connect a second MOSFET to drive LEDs if you want.
[www.hydraraptor.blogspot.com]
|
Re: Building my Mendel90 from kit January 18, 2013 11:04AM |
Registered: 11 years ago Posts: 31 |
The filament I use (from Matterhackers) is wound very tight on a small spool. The tube is anchored properly, but the tightly would filament twists the whole tube backwards. (see attached)
I realize I can't use the same I/O port. I will just grab a spare digital one off the end.
Is there anyway to make the onboard LED work? I see it is commented out in the source for some reason. Was it a problem?
I realize I can't use the same I/O port.
I will just grab a spare digital one off the end.Is there anyway to make the onboard LED work? I see it is commented out in the source for some reason. Was it a problem?
|
Re: Building my Mendel90 from kit January 18, 2013 11:54AM |
Admin Registered: 17 years ago Posts: 7,879 |
daichiasuka Wrote:
-------------------------------------------------------
> The filament I use (from Matterhackers) is wound
> very tight on a small spool. The tube is anchored
> properly, but the tightly would filament twists
> the whole tube backwards. (see attached)
I see. I think they must heat it to coil it that tight. It probably needs a thicker walled PTFE tube but that gets expensive. It might work better if the spool was mounted as pulling filament from a coil that does not rotate causes it to twist like that.
I might stop including the spool holder as it seems not many people use the same size spool as I do these days. It's quite a lot of printing and vitamins.
>
> I realize I can't use the same I/O port. I will
> just grab a spare digital one off the end.
>
> Is there anyway to make the onboard LED work? I
> see it is commented out in the source for some
> reason. Was it a problem?
You can turn it on and off with M42, as you can any other unused pin. If I define it in pins.h Marlin does nothing with it and it can't then be controlled with M42. That is why it is commented out.
[www.hydraraptor.blogspot.com]
-------------------------------------------------------
> The filament I use (from Matterhackers) is wound
> very tight on a small spool. The tube is anchored
> properly, but the tightly would filament twists
> the whole tube backwards. (see attached)
I see. I think they must heat it to coil it that tight. It probably needs a thicker walled PTFE tube but that gets expensive. It might work better if the spool was mounted as pulling filament from a coil that does not rotate causes it to twist like that.
I might stop including the spool holder as it seems not many people use the same size spool as I do these days. It's quite a lot of printing and vitamins.
>
> I realize I can't use the same I/O port.
I will> just grab a spare digital one off the end.
>
> Is there anyway to make the onboard LED work? I
> see it is commented out in the source for some
> reason. Was it a problem?
You can turn it on and off with M42, as you can any other unused pin. If I define it in pins.h Marlin does nothing with it and it can't then be controlled with M42. That is why it is commented out.
[www.hydraraptor.blogspot.com]
|
Re: Building my Mendel90 from kit January 18, 2013 03:14PM |
Registered: 11 years ago Posts: 31 |
> You can turn it on and off with M42, as you can
> any other unused pin. If I define it in pins.h
> Marlin does nothing with it and it can't then be
> controlled with M42. That is why it is commented
> out.
Ahhh... I was reading it backwards. I thought it needed to be defined in pins.h to work and it was driving me nuts last night. Now that I removed it again, it works fine.
|
Re: Building my Mendel90 from kit January 20, 2013 11:30AM |
Hey daichiasuka,
I'm from MatterHackers and want to make sure our filament is working for you all the way through the end of the spool.
Internally we have found that running the filament through a PTFE tube helps ensure that we can print every last bit of it. But it may be that the tube that comes with the M90 is a bit softer than the one we have been using. I can see in your photo that the filament is pushing your PTFE tube around quite a bit, but are you still able to print to the end? We have been debating getting the filament on a bigger spool, or wound less tight, at least in 3mm. We like the size of the spools currently and want to stick with them, but only if our customers are having success.
We would love your feedback. We'll check back here, or you can email us at support@matterhackers.com.
Thanks, Lars.
|
Re: Building my Mendel90 from kit January 20, 2013 11:54AM |
Admin Registered: 17 years ago Posts: 7,879 |
Hi Lars,
What are the dimensions of your spools? If I can cook up a design for that style of filament I could offer it as an option.
[www.hydraraptor.blogspot.com]
What are the dimensions of your spools? If I can cook up a design for that style of filament I could offer it as an option.
[www.hydraraptor.blogspot.com]
|
Re: Building my Mendel90 from kit January 22, 2013 02:11PM |
Registered: 11 years ago Posts: 19 |
|
Re: Building my Mendel90 from kit January 22, 2013 03:01PM |
Registered: 11 years ago Posts: 31 |
I stopped getting emails about replies to this thread for some reason, or I would have responded sooner.
I have had the printer for a little over a week and haven't hit the end of a spool yet, so, I'm not sure.
nophead: I actually have an stl and parameters for your scad files that will fit the spool at home. I'll upload the files and parameters to thingiverse in a few hours and drop a link here.
I tried printing it out of PLA, but it shattered when I tried to clip on the new dust filter. There should be ABS at my house today and I will try to print them again for testing. I'm curious if the new ones I designed will work for your larger spools as well just support them differently.
I have had the printer for a little over a week and haven't hit the end of a spool yet, so, I'm not sure.
nophead: I actually have an stl and parameters for your scad files that will fit the spool at home. I'll upload the files and parameters to thingiverse in a few hours and drop a link here.
I tried printing it out of PLA, but it shattered when I tried to clip on the new dust filter.
There should be ABS at my house today and I will try to print them again for testing. I'm curious if the new ones I designed will work for your larger spools as well just support them differently.
|
Re: Building my Mendel90 from kit January 22, 2013 08:48PM |
Registered: 11 years ago Posts: 31 |
Link: [www.thingiverse.com]
|
Re: Building my Mendel90 from kit January 23, 2013 08:36PM |
Registered: 11 years ago Posts: 31 |
I printed them and fit them to the back. It is a little bit of a snug fit on the spool, but I think it is supposed to be to stop it from freely rotating. Pictures attached to the thingiverse link above.
[Matterhackers: You're welcome for the free marketing plug. ]
]
I received some other material on a much thinner spool. It is 200x72. I'm working on putting that on the same bracket by just adding another bearing to each side.
[Matterhackers: You're welcome for the free marketing plug.
]I received some other material on a much thinner spool. It is 200x72. I'm working on putting that on the same bracket by just adding another bearing to each side.
|
Re: Building my Mendel90 from kit January 24, 2013 09:10PM |
Registered: 11 years ago Posts: 71 |
Interesting. I was thinking of making a spool holder like this, but you beat me to it.
Also per an earlier suggestion from nophead I printed off this reel spool bracket. So my M90 can support both the small and large spools.
[www.thingiverse.com]
Also per an earlier suggestion from nophead I printed off this reel spool bracket. So my M90 can support both the small and large spools.
[www.thingiverse.com]
|
Re: Building my Mendel90 from kit January 25, 2013 03:11AM |
Registered: 11 years ago Posts: 18 |
lions3 Wrote:
-------------------------------------------------------
> Interesting. I was thinking of making a spool
> holder like this, but you beat me to it.
>
> Also per an earlier suggestion from nophead I
> printed off this reel spool bracket. So my M90 can
> support both the small and large spools.
> [www.thingiverse.com]
I use the same solution, but only with at ube holding the two spools and the tube fixed to the printer structure with strips.
Easy and works really well to. But will be making holders like this now, since they look much better.
|
Re: Building my Mendel90 from kit January 25, 2013 08:57AM |
Registered: 11 years ago Posts: 24 |
Is the solution to make an adjustable width spool holder to accomodate different sizes? I've seen threaded rod, bearings and nuts used to make the width adjustable.
Nopehead: This is an important feature of the kit. I vote for keeping it and possibly making some adjustments.
Edited 1 time(s). Last edit at 01/25/2013 09:48AM by cts519chris.
Nopehead: This is an important feature of the kit. I vote for keeping it and possibly making some adjustments.
Edited 1 time(s). Last edit at 01/25/2013 09:48AM by cts519chris.
|
Re: Building my Mendel90 from kit January 25, 2013 09:09AM |
Registered: 11 years ago Posts: 31 |
Possibly. The design would need to change though to do that. Today the brackets are identical with a single mount screw on the bottom right. If you change the width, they will no longer align when mounted to the frame.
What I want to do is add another bearing on the inside of the bracket to account for smaller width (~55 mm) spools. The only widths I've seen mentioned are 86 mm and 55 mm.
I'll try to get to this and update here and the thingiverse post early next week.
What I want to do is add another bearing on the inside of the bracket to account for smaller width (~55 mm) spools. The only widths I've seen mentioned are 86 mm and 55 mm.
I'll try to get to this and update here and the thingiverse post early next week.
|
Re: Building my Mendel90 from kit February 08, 2013 11:40AM |
Registered: 11 years ago Posts: 31 |
|
Re: Building my Mendel90 from kit February 08, 2013 12:47PM |
Registered: 11 years ago Posts: 24 |
|
Re: Building my Mendel90 from kit February 08, 2013 01:02PM |
Registered: 11 years ago Posts: 31 |
|
Re: Building my Mendel90 from kit March 06, 2013 10:27AM |
Registered: 11 years ago Posts: 71 |
FYI diachiasuka, I thought you might like knowing that I made a derivative of your spool holder to fit my 1/2 inch MDF Mendel90 frame. I've also added some washers to help it fit 1kg Ultimachine spool.
[www.thingiverse.com]
[www.thingiverse.com]
Sorry, only registered users may post in this forum.