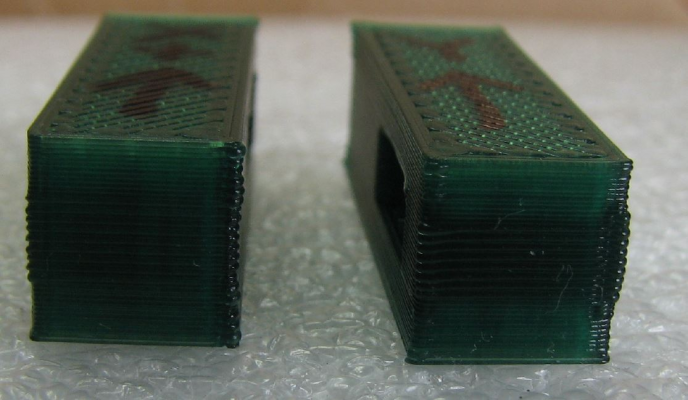
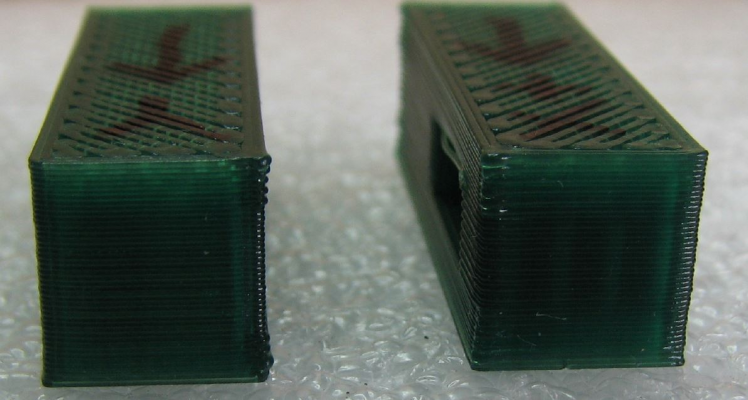
Printing artefacts: cause and remedy?
Posted by dc42
|
Printing artefacts: cause and remedy? April 17, 2014 06:20PM |
Registered: 10 years ago Posts: 14,672 |
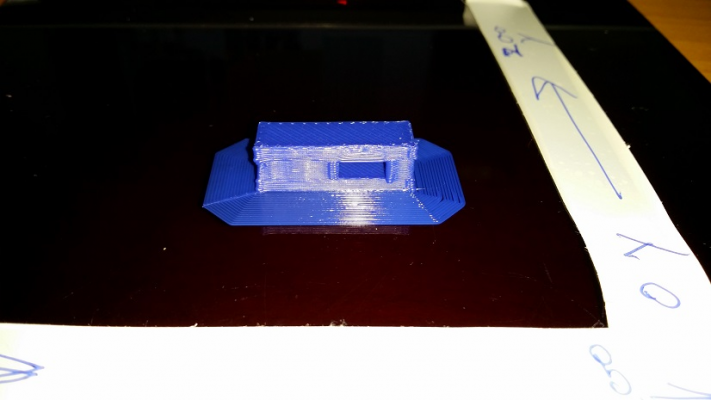
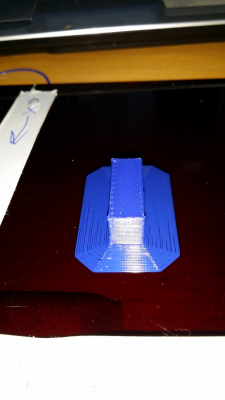
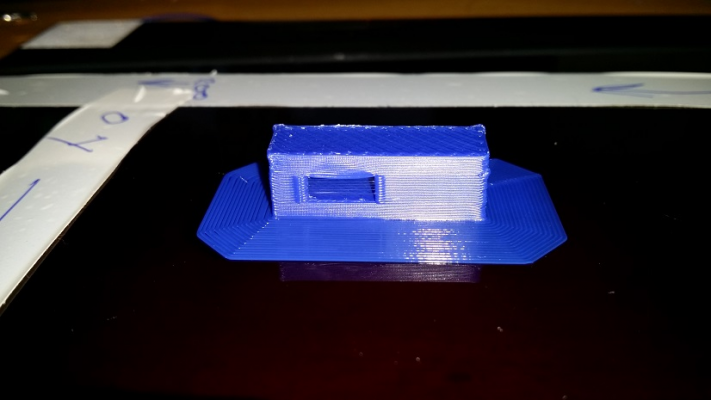
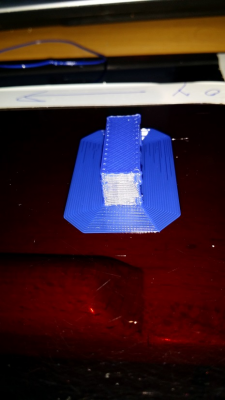
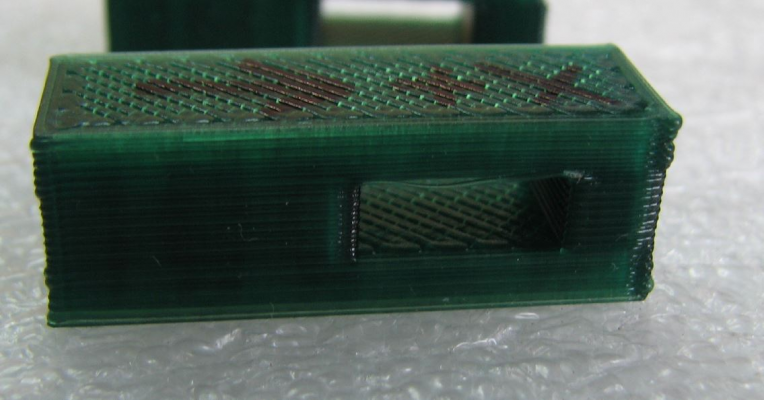
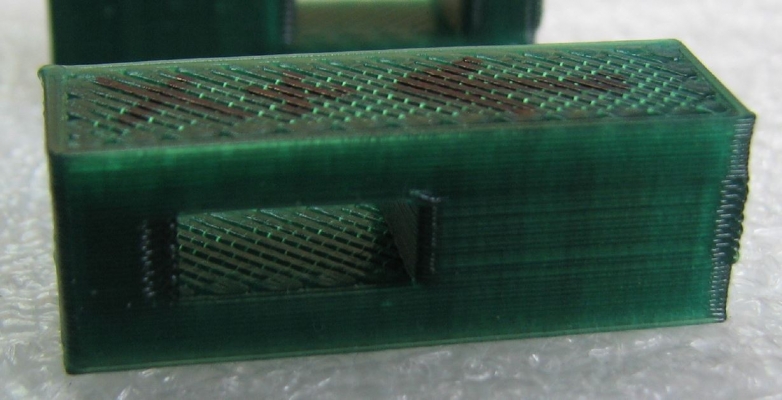
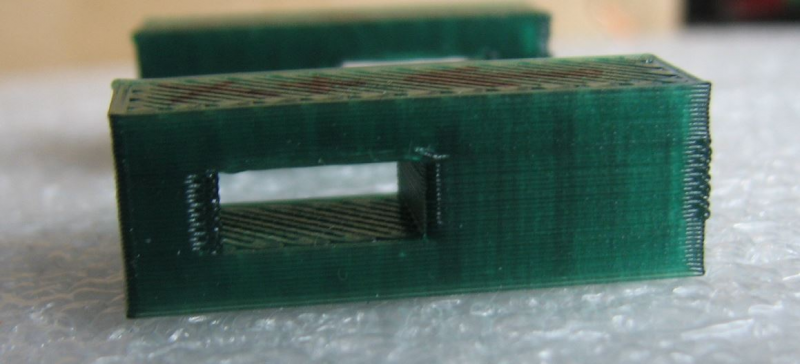
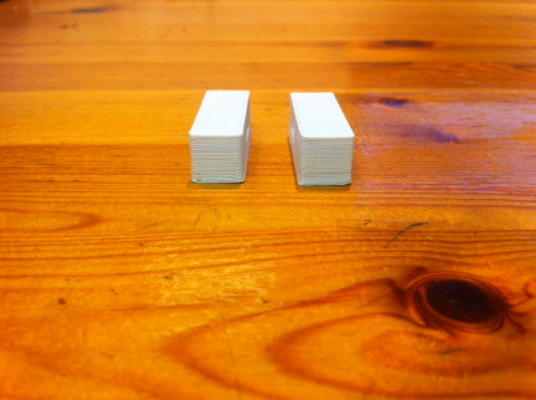
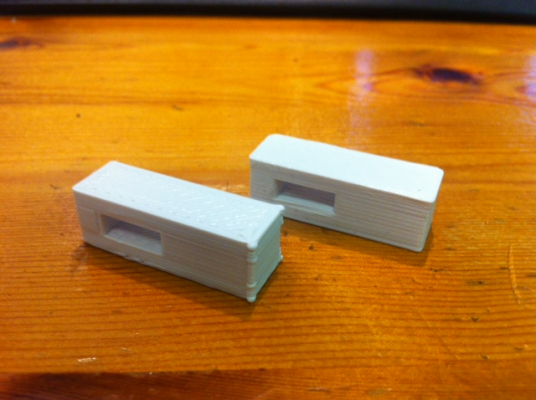
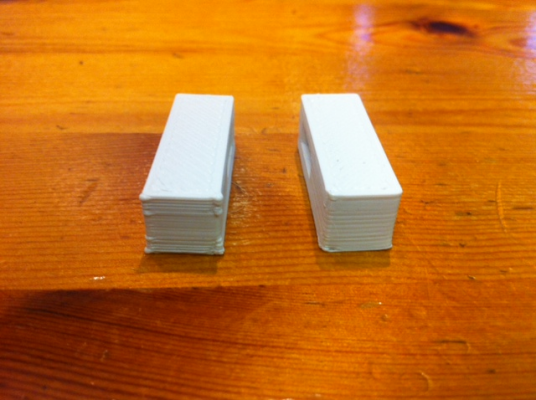
I've noticed that certain features in a model being printed cause artefacts such as small steps elsewhere in the model at the same z-height. In order to pin this down, I created and printed a simple model, then rotated it 90 degrees and printed it again. The results were very similar.
I'm wondering what the cause might be:
1. Mechanical? I don't think it can be belt slippage or a stepper motor missing steps, because there are no permanent steps in the piece. Looking at the photos of the ends, one side is more or less vertical, the other is not.
2. slic3r issue? As far as I can see, the positions of the X and Y extremities are the same throughout the gcode file. I haven't checked whether the extrusion rates are also constant.
3. Firmware? Could it be causing the XY positions at the end of a move to be out by a substantial fraction of a mm, the amount depending on the size of the move, only to be corrected when it moves back?
4. Cooling? Could it be that in the seconds after a section of perimeter has been printed, depending on the subsequent head movement the rate of cooling varies, and this in turn affects the width when the extruded filament solidifies?
5. Something else?
I would be interested to know whether other users see the same thing, and whether other 3D printers display the same effect.
Large delta printer [miscsolutions.wordpress.com], E3D tool changer, Robotdigg SCARA printer, Crane Quad and Ormerod
Disclosure: I design Duet electronics and work on RepRapFirmware, [duet3d.com].
|
Re: Printing artefacts: cause and remedy? April 17, 2014 08:28PM |
Registered: 10 years ago Posts: 665 |
Hello dc42,
I've always blamed retraction and travel speed for these artifacts, although I guess printing speed and cooling play a big role as well,
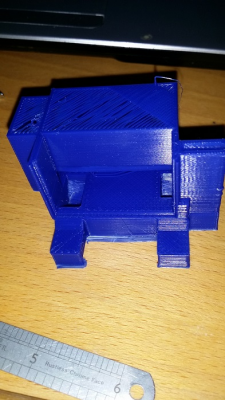
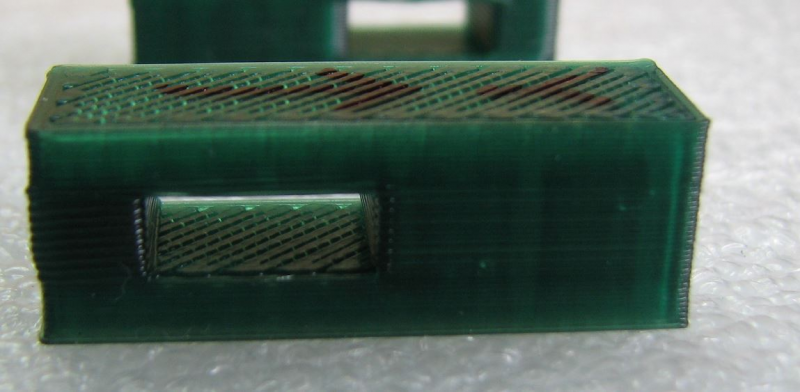
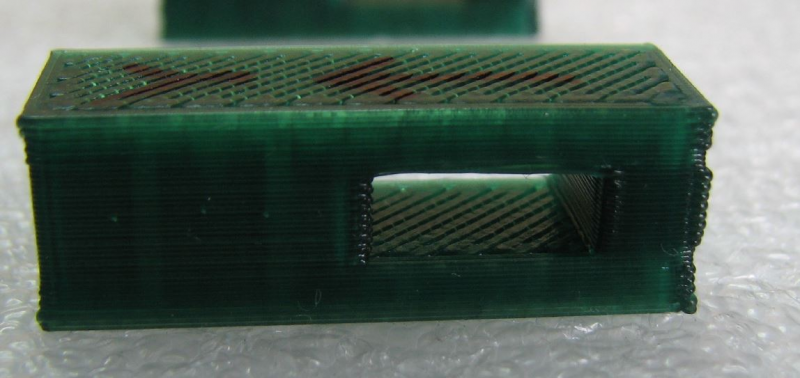
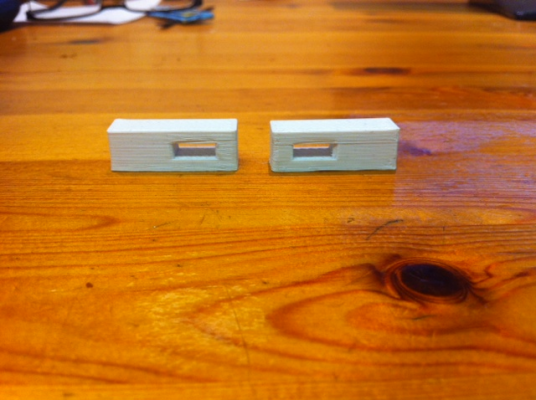
Usually I print ABS only, but because my PSU was broken til today I switched back to PLA for the moment. However, when printing ABS, I can't discover this kind of artifacts at all. Just for comparion, here's an ABS-printed part for my replacement alu bed:
And here is your test piece printed with PLA:
This makes me think your firmware is working properly, but perhaps the last layer of laid PLA doesn't cool down quickly enough and deforms when retraction is triggered. Out of curiosity, what do your extruder settings in Slic3r look like?
|
Re: Printing artefacts: cause and remedy? April 18, 2014 03:00AM |
Registered: 10 years ago Posts: 42 |
Quote
dc42
1. Mechanical? I don't think it can be belt slippage or a stepper motor missing steps, because there are no permanent steps in the piece. Looking at the photos of the ends, one side is more or less vertical, the other is not.
A quick check for this could be to use several different slicing engines with as close to the same settings as possible.
4. Cooling? Could it be that in the seconds after a section of perimeter has been printed, depending on the subsequent head movement the rate of cooling varies, and this in turn affects the width when the extruded filament solidifies?
When KimBrown releases the latest big blue this could be put to the test.
5. Something else?
I have noticed that a print can run perfect for a dozen prints and then churn out a disaster. Can't really explain this and have tried several different simple prints with exactly the same results. I thought it could have been something to do with if there was a draft or some environmental change but it still does it when enclosed in a controlled environment
I would be interested to know whether other users see the same thing, and whether other 3D printers display the same effect.
|
Re: Printing artefacts: cause and remedy? April 18, 2014 06:16AM |
Registered: 10 years ago Posts: 780 |
Hi David,
Just printed your test piece and can not see the sort of problem you are having.
I did have a thought though. Is your Orthogonal Axis Compensation values still valid?
I remember redoing mine earlier on when I was having set up problems and the new values were completely different from the originals I had been using..
I am using your latest firmware, although at the moment I am using manual bed compensation, if you use automatic bed compensation, that could be a factor in your print as well.
If I can help in any other way just ask.
Paul
appjaws - Core XYUV Duet Ethernet Duex5
firmware 3.1.1 Web Interface 3.1.1
Ormerod 1-converted to laser engraver, Duet wifi
OpenSCAD version 2020.07
slic3r-1.3.0, Simplify3D 4.1.2, Cura-4.4.1
|
Re: Printing artefacts: cause and remedy? April 18, 2014 07:22AM |
Registered: 10 years ago Posts: 14,672 |
Paul, thanks for printing those. What temperature settings did you use?
Judging from the amount of patterning on the top surface of your prints, I think you are using a lower extrusion factor than I am. I'll try reducing my extrusion factor setting.
Large delta printer [miscsolutions.wordpress.com], E3D tool changer, Robotdigg SCARA printer, Crane Quad and Ormerod
Disclosure: I design Duet electronics and work on RepRapFirmware, [duet3d.com].
|
Re: Printing artefacts: cause and remedy? April 18, 2014 07:51AM |
Registered: 10 years ago Posts: 780 |
David,
I used 198/192 and 65/65, also my extusion multiplier is currently set to 1 and Top infill at 40% of an infill of 50mm/s.
As I explained in another thread, my slic3r settings have been adjusted so much when trying to identify the hot-end-3 vent printing problems where large holes would try and be bridged. All I can say is that it appears to be down to speed settings and I'm trying to narrow down which one now.
appjaws - Core XYUV Duet Ethernet Duex5
firmware 3.1.1 Web Interface 3.1.1
Ormerod 1-converted to laser engraver, Duet wifi
OpenSCAD version 2020.07
slic3r-1.3.0, Simplify3D 4.1.2, Cura-4.4.1
|
Re: Printing artefacts: cause and remedy? April 20, 2014 03:05PM |
Registered: 10 years ago Posts: 665 |
I *think* I know what's going on. Recently I've upgraded my Slic3r version to 1.0.0 stable and and since then I'm no longer able to print the XYZ testpiece because it messes up the Z-axis part by extruding too much filament into the solid infill. Now I'm using Slic3r 1.1.0 experimental and my testpiece seems to be printed properly - I'll report whether this has an effect on dc42's testpiece when I'm done calibrating 

|
Re: Printing artefacts: cause and remedy? April 20, 2014 09:50PM |
Registered: 10 years ago Posts: 859 |
Hmmmmmmmmmmmm, I was hoping that in a few hours time I would have the test print completed of the Final Big Blue, but it looks like Slic3r has added a shelf inside the duct that's not there in the design.... (I've even been moving balls around inside a duct on the drawing board, and the design is fine..).
Back to the topic....
I can't say I get the blurred deffinition of your print here. Where the layers are at the top and bottom of the opening You have clear artifacts, where as I get crisp lines. I'll print your test piece out in the morning after some sleep.
My prints are like Zombies prints, but in PLA, and are crisp. I get a sheen change when a shelf or floor is in the model, and where there's a bulk of material the surface isn't as 'sharp' as a thinner wall. But no big artifacts. I would have said your temp was to high my self, or lack of cooling....
I've also found that if the nozzle is not quite vertical, that that affect a print in that way as well... If you think about it, it's extruding the plastic at an angle then which puts it out of line.
I hope to release the final Big Blue soon, but I want to check it out first, and if the Cad software isn't playing up then Slic3r is.....Grrrrrrrrrrrr!
Please send me a PM if you have suggestions, or problems with Big Blue 360.
I won't see comments in threads, as I move around to much.
Working Link to Big Blue 360 Complete
|
Re: Printing artefacts: cause and remedy? April 20, 2014 10:30PM |
Registered: 10 years ago Posts: 859 |
A quick PS here as I need some sleep.
Look at the bottom of your print... There's lots to see....
Look at the infill...
If the lines of filament are thicker in one direction than the other, then your nozzel isn't vertical. It only has to be out a fraction.
When the first layer is printed we want the plastic to be pushed on to the glass. If the nozzle isn't vertical, you can have a hell of a time getting it to stick to the glass......
If the nozzle isn't vertical, in one direction it will be great, and pushed onto the glass ...Fairly thick... in the other direction thinner as it's rolling off the nozzle instead of getting pushed on to the glass, because it's round. Hence I designed new mounts....
This will also give you some of the artifacts your seeing in the sides, as it's doing a similar thing there...
(ie extruding some plastic to the side instead of downwards,...
But I think we will find out later that cooling is your main issue there... or should I say lack of cooling...
I'll run your stl later to find out.
You can tell allot from the bottom of the print... I don't run compensation, I hate it. I use a level bed...
When I look at the bottom of a print I can tell by the thickness of the filament lines if the bed needs leveling again.
(Mine gets knocked out by vibration of the ships engines when the vibration is extream).
If the bed moves out of level to far, the print won't stick to the glass, and a corner might lift, but you can tell by the thickness of the lines if it's a chilled air issue (BackWash), or a bed out of level issue... Thick lines are good, thin lines is where the bed is to low...
Thick lines with warping, are caused by BackWash chilling the print.... Which is where Big Blue steps in....
Please send me a PM if you have suggestions, or problems with Big Blue 360.
I won't see comments in threads, as I move around to much.
Working Link to Big Blue 360 Complete
Look at the bottom of your print... There's lots to see....
Look at the infill...
If the lines of filament are thicker in one direction than the other, then your nozzel isn't vertical. It only has to be out a fraction.
When the first layer is printed we want the plastic to be pushed on to the glass. If the nozzle isn't vertical, you can have a hell of a time getting it to stick to the glass......
If the nozzle isn't vertical, in one direction it will be great, and pushed onto the glass ...Fairly thick... in the other direction thinner as it's rolling off the nozzle instead of getting pushed on to the glass, because it's round. Hence I designed new mounts....
This will also give you some of the artifacts your seeing in the sides, as it's doing a similar thing there...
(ie extruding some plastic to the side instead of downwards,...
But I think we will find out later that cooling is your main issue there... or should I say lack of cooling...
I'll run your stl later to find out.
You can tell allot from the bottom of the print... I don't run compensation, I hate it. I use a level bed...
When I look at the bottom of a print I can tell by the thickness of the filament lines if the bed needs leveling again.
(Mine gets knocked out by vibration of the ships engines when the vibration is extream).
If the bed moves out of level to far, the print won't stick to the glass, and a corner might lift, but you can tell by the thickness of the lines if it's a chilled air issue (BackWash), or a bed out of level issue... Thick lines are good, thin lines is where the bed is to low...
Thick lines with warping, are caused by BackWash chilling the print.... Which is where Big Blue steps in....

Please send me a PM if you have suggestions, or problems with Big Blue 360.
I won't see comments in threads, as I move around to much.
Working Link to Big Blue 360 Complete
|
Re: Printing artefacts: cause and remedy? April 20, 2014 11:47PM |
Registered: 10 years ago Posts: 859 |
I'll try 175' later.... These look a bit hot
Please send me a PM if you have suggestions, or problems with Big Blue 360.
I won't see comments in threads, as I move around to much.
Working Link to Big Blue 360 Complete
Please send me a PM if you have suggestions, or problems with Big Blue 360.
I won't see comments in threads, as I move around to much.
Working Link to Big Blue 360 Complete
|
Re: Printing artefacts: cause and remedy? April 21, 2014 05:30AM |
Registered: 10 years ago Posts: 859 |
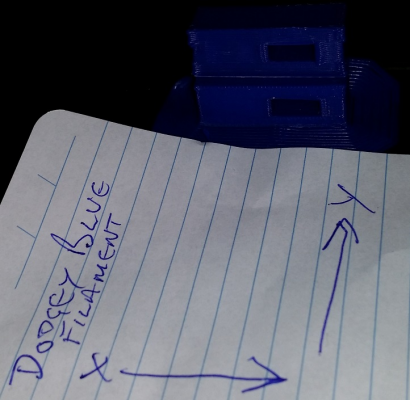
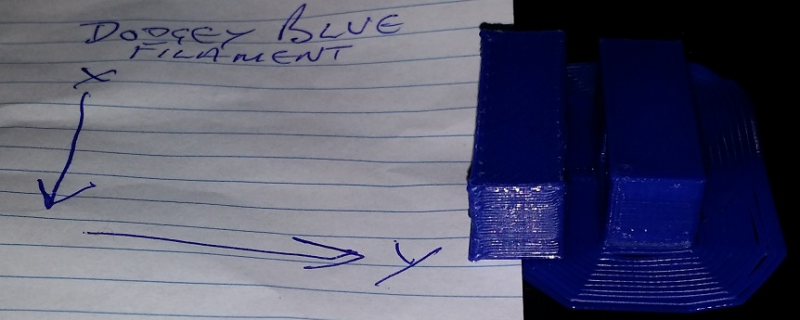
BTW I meant to say that this Blue Filament I have here is a real pain.....
Ok I'll try and tweak the Slic3r settings some more later but here goes.
Now you will see there is some curling of the Brim.
1) I hadn't washed the glass and this spool of filament hates that....
2) I tried upping the amount of filament it layed down on the first layer, which it didn't like...
3) I'd dropped the bed temp a little to far.
But.... the actual print is better... The artifacts near the opening are about 1/3rd the size of the first print...
Mainly because I turned wipe on retract on.
Right I must get on with other stuff... I'll tweak again later.
Slic3r settings attached...
Edited 1 time(s). Last edit at 04/21/2014 05:45AM by KimBrown.
Please send me a PM if you have suggestions, or problems with Big Blue 360.
I won't see comments in threads, as I move around to much.
Working Link to Big Blue 360 Complete
|
Re: Printing artefacts: cause and remedy? April 21, 2014 07:26AM |
Registered: 10 years ago Posts: 780 |
Hi Kim I have been having problems with slic3r filling in large hole, making a platform.
I didn't get to the bottom of the problem but the indications were that the problem appeared with some slic settings. I printed my model using dc42's settings and everything printed properly. So you might like to try them they are in the " Help with a slic3r or scad problem" thread
The other thing I noticed was that the problem seemed to be a continuation of an infill/bridge, it was almost like slic3r didn't know when to stop the infill/bridge.
appjaws - Core XYUV Duet Ethernet Duex5
firmware 3.1.1 Web Interface 3.1.1
Ormerod 1-converted to laser engraver, Duet wifi
OpenSCAD version 2020.07
slic3r-1.3.0, Simplify3D 4.1.2, Cura-4.4.1
|
Re: Printing artefacts: cause and remedy? April 21, 2014 07:48AM |
Registered: 10 years ago Posts: 859 |
Yes I have DC42s settings he sent me ages ago for Slic3r which I might have to go back to.
The print was about 3/4hr in, it dropped a couple of loops which was odd, then 10 minutes later just built a platform across the whole print blocking everything off.....
Edited 1 time(s). Last edit at 04/21/2014 07:49AM by KimBrown.
Please send me a PM if you have suggestions, or problems with Big Blue 360.
I won't see comments in threads, as I move around to much.
Working Link to Big Blue 360 Complete
|
Re: Printing artefacts: cause and remedy? April 21, 2014 09:40AM |
Registered: 10 years ago Posts: 34 |
Hi have just completed your print dc42 and apart from a stray thred whilst bridging have not had your problem. there is a slight textur change parralell to the gap but i can not get a good enouf pictur to show it. This is printing with PLA but using Cura rather than slic3r. If you are still having this issue i can try with slic3r and see if the print is the same
|
Re: Printing artefacts: cause and remedy? April 21, 2014 11:32AM |
Registered: 10 years ago Posts: 145 |
Kim,
I'm not sure what tools you use to create your STLs, but if you form holes etc by 'taking away' one shape from another, then you may have hit a problem I had with SCAD.
When my 'take away' shape only extended to the edge of the object, sometimes it would look OK as a hole, and sometimes it would leave a miniscule layer over the hole. This had a knock on effect when exporting as STL.
Solution was to make sure my 'take away' shape extended beyond the boundary of the object.
Greg
Ormerod #17
|
Re: Printing artefacts: cause and remedy? April 21, 2014 11:43AM |
Registered: 10 years ago Posts: 859 |
Hi Greg, yes thanks for that, and I understand exactly what your meaning as I've seem that happen in other Software.
I'm using FreeCad, which is exceptional.... I'd say it probably one of the best Cad software packages going....
I view the STL in both it, and a seperate STL viewer, and the STL was fine.... Going back through passed Slic3r packages, the problem DOESN'T occur in version 0.9.9.10.
Rather than mess people about I will publish the Gcode as well as the STL for people to use.
It's Slic3r glitch, halfway up a horizontal screw hole, it decides to blank off two adjacent compartments for no good reason.... By adding a floor... Which would make the Duct totaly useless.
Hopefully now I will get the test print done today.... It's been a mighty struggle over 4 days so far, and I nearly gave up on everything earlier....
Please send me a PM if you have suggestions, or problems with Big Blue 360.
I won't see comments in threads, as I move around to much.
Working Link to Big Blue 360 Complete
|
Re: Printing artefacts: cause and remedy? April 22, 2014 12:31PM |
Registered: 10 years ago Posts: 1,230 |
|
Re: Printing artefacts: cause and remedy? April 22, 2014 01:37PM |
Registered: 10 years ago Posts: 859 |
I'm just printing a replacement Big Blue that I've strengthend.... I broke mine,,,,, OOops!
Anyway I've upped the speeds to 60mm/s and started printing the Duct on a lowish temp.
180' I think and the finish was not how I'd like it....
I'm now at 200' and the finish is really quite good.
I will up the speed some more next as I want to print an X-axis motor mount.
I'll also try wipe on retract next, but at higher speeds it seem to fast I think.
Please send me a PM if you have suggestions, or problems with Big Blue 360.
I won't see comments in threads, as I move around to much.
Working Link to Big Blue 360 Complete
|
Re: Printing artefacts: cause and remedy? April 24, 2014 05:31AM |
Registered: 10 years ago Posts: 34 |
|
Re: Printing artefacts: cause and remedy? April 24, 2014 07:05AM |
Registered: 10 years ago Posts: 14,672 |
JMC, those look much better than mine! What settings are you using?
Large delta printer [miscsolutions.wordpress.com], E3D tool changer, Robotdigg SCARA printer, Crane Quad and Ormerod
Disclosure: I design Duet electronics and work on RepRapFirmware, [duet3d.com].
Large delta printer [miscsolutions.wordpress.com], E3D tool changer, Robotdigg SCARA printer, Crane Quad and Ormerod
Disclosure: I design Duet electronics and work on RepRapFirmware, [duet3d.com].
|
Re: Printing artefacts: cause and remedy? April 24, 2014 09:35AM |
Registered: 10 years ago Posts: 28 |
Hi DC42,
Sliced with Slicr verrion 1.0.0.CR2:
When I look at your pictures, my first impression was:
Or you print directly from Pronterface in stead of the SD card (I strongly doubt it but I justy mention it to rule out this option )
)
Or, the feederate of the extruder is too high
Or extruder temperature is too high (but even then the effect would not be so big)
But an other option could be the setting of the perimeters
What are your following settings:
Layer height (in my case 0.25mm)
Extruder width for perimeters? (default 0, in my case 0.75)
External perimiter first? (in my case no)
This last setting helped me to solve a sortlike issue where small droplets were seen on the outside of vertical surfaces. After unchecking External perimeters first, the droplets were gone so maybe that’s helpful.
Hope for you this is helpfull
Sliced with Slicr verrion 1.0.0.CR2:
When I look at your pictures, my first impression was:
Or you print directly from Pronterface in stead of the SD card (I strongly doubt it but I justy mention it to rule out this option
 )
)Or, the feederate of the extruder is too high
Or extruder temperature is too high (but even then the effect would not be so big)
But an other option could be the setting of the perimeters
What are your following settings:
Layer height (in my case 0.25mm)
Extruder width for perimeters? (default 0, in my case 0.75)
External perimiter first? (in my case no)
This last setting helped me to solve a sortlike issue where small droplets were seen on the outside of vertical surfaces. After unchecking External perimeters first, the droplets were gone so maybe that’s helpful.
Hope for you this is helpfull
|
Re: Printing artefacts: cause and remedy? April 24, 2014 10:48AM |
Registered: 10 years ago Posts: 28 |
|
Re: Printing artefacts: cause and remedy? April 24, 2014 11:24AM |
Registered: 10 years ago Posts: 34 |
Quote
dc42
JMC, those look much better than mine! What settings are you using?
Hot end 180C
bed 60C
Layer height .2
With a fast retraction and a low print speed (cant remember exact)
My brother and i have spent a fair bit of time trying to remove as much slop as possible from the X Y and Z (using a lot of stuff from this forum as well as some of our own modding).
Am going diving in the morning but if i dont get eaten by a shark ill try using slic3r and print it again in the arvo.
|
Re: Printing artefacts: cause and remedy? April 24, 2014 03:26PM |
Registered: 10 years ago Posts: 3 |
Hi,
In slic3r (I use 1.0.1), Print settings->Advanced, I set all extrusion width to 0.5 (diameter of the nozzle),
please read this article.
This removed completly the artefacts. Fast retraction (I set it to 60) and "External perimeters first" unchecked help too.
In slic3r (I use 1.0.1), Print settings->Advanced, I set all extrusion width to 0.5 (diameter of the nozzle),
please read this article.
This removed completly the artefacts. Fast retraction (I set it to 60) and "External perimeters first" unchecked help too.
|
Re: Printing artefacts: cause and remedy? April 24, 2014 04:47PM |
Registered: 10 years ago Posts: 14,672 |
Thanks for all your responses. It definitely appears that having "External perimeters first" checked is bad, so I'll un-check it. I'll also try setting the extrusion widths manually.
Large delta printer [miscsolutions.wordpress.com], E3D tool changer, Robotdigg SCARA printer, Crane Quad and Ormerod
Disclosure: I design Duet electronics and work on RepRapFirmware, [duet3d.com].
Large delta printer [miscsolutions.wordpress.com], E3D tool changer, Robotdigg SCARA printer, Crane Quad and Ormerod
Disclosure: I design Duet electronics and work on RepRapFirmware, [duet3d.com].
|
Re: Printing artefacts: cause and remedy? April 25, 2014 06:05AM |
Registered: 10 years ago Posts: 34 |
Hi i printed your block using slic3r insted of cura with defult settings and your artifacts problem showed up. I also noticed that it did use the thick extrusion widths for the infill as mentioned in Vincent Fretins link.
hadent used slic3r for a while because we have been getting better prints with cura but it looks like slic3r does a much better job of the bridging than cura.
hadent used slic3r for a while because we have been getting better prints with cura but it looks like slic3r does a much better job of the bridging than cura.
|
Re: Printing artefacts: cause and remedy? April 25, 2014 07:04AM |
Registered: 13 years ago Posts: 1,611 |
Our standard Slic3r profiles [reprappro.com] set extrusion widths to the nozzle size - I hate the standard sizes that Slic3r comes up with! We always print the external perimeter before the internal, as you tend to get more accurately sized parts. In newer versions of Slic3r, there is a setting for 'Start perimeters at: concave points' (and non-overhanging points) which can help hide any blob, but it's not going to help on a square part, so it's best to try to tune out the blob. Blobbing on the corners is usually down to hot end temperature (too hot and you'll get more ooze, as the PLA is more liquid), and increasing retraction distance/speed. This is limited in the firmware; add this to config.g, which speeds up the motor acceleration and speed, which will help:
M203 X15000 Y15000 Z300 E3600; speed tweaks for improved finish
M201 X1000 Y1000 Z15 E1000; acceleration tweaks for improved finish
Ian
RepRapPro tech support
M203 X15000 Y15000 Z300 E3600; speed tweaks for improved finish
M201 X1000 Y1000 Z15 E1000; acceleration tweaks for improved finish
Ian
RepRapPro tech support
|
Re: Printing artefacts: cause and remedy? April 25, 2014 07:10AM |
Registered: 10 years ago Posts: 64 |
|
Re: Printing artefacts: cause and remedy? April 25, 2014 11:21AM |
Registered: 10 years ago Posts: 780 |
Hi David,
I just printed your test item again using Ian's suggested settings in slic3r, set all extrusion widths to the nozzle size, print the external perimeter first = yes and Start perimeters at: concave points' (and non-overhanging points).
I also followed his suggestion of putting the following in config.g:-
M203 X15000 Y15000 Z300 E3600; speed tweaks for improved finish
M201 X1000 Y1000 Z15 E1000; acceleration tweaks for improved finish
The attached photos are the results and I must say that it has better quality than the original print I did for you especially top and bottom surfaces.
I am also using my new HotEnd-3Vents which I think helps with bridging but I need to do more tests.
Hope that helps
Paul
appjaws - Core XYUV Duet Ethernet Duex5
firmware 3.1.1 Web Interface 3.1.1
Ormerod 1-converted to laser engraver, Duet wifi
OpenSCAD version 2020.07
slic3r-1.3.0, Simplify3D 4.1.2, Cura-4.4.1
Sorry, only registered users may post in this forum.


