First print but what is wrong
Posted by jyucel
|
First print but what is wrong August 29, 2014 06:02PM |
Registered: 9 years ago Posts: 10 |
I finaly printer my first object. 
It is the snowman that is included in the 79a release.
But can anyone tell what I am doing wrong?
I have attached front and back sida
It is the snowman that is included in the 79a release.
But can anyone tell what I am doing wrong?
I have attached front and back sida
|
Re: First print but what is wrong August 29, 2014 06:16PM |
Registered: 10 years ago Posts: 14,672 |
Congratulations on your first print!
Assuming the first photo is the top and the second is the underside, then I think the main problem is that the nozzle was too high when the print started, due to inaccurate z-homing or bed compensation.
Large delta printer [miscsolutions.wordpress.com], E3D tool changer, Robotdigg SCARA printer, Crane Quad and Ormerod
Disclosure: I design Duet electronics and work on RepRapFirmware, [duet3d.com].
|
Re: First print but what is wrong August 29, 2014 07:38PM |
Registered: 9 years ago Posts: 10 |
|
Re: First print but what is wrong August 30, 2014 05:18AM |
Registered: 10 years ago Posts: 14,672 |
First, confirm the problem. Make sure there is no filament stuck to the bottom of the nozzle which will prevent you from measuring the nozzle height accurately. Heat up the bed, then home the axes and run bed compensation. Then execute G1 X100 Y100, put a sheet of ordinary 80gsm paper under the nozzle, and run G1 Z0. The nozzle should lightly grip the paper to the bed, but you should sill be able to slide the paper around. If it isn't gripping, then the nozzle is too high. If it grips too firmly, the nozzle is too low.
If this is confirmed as the problem, then I suggest one or more of these three approaches:
A. Get the best you can out of the proximity sensor supplied with the kit:
1. Make sure that your 4 bed probe points place the sensor (the rectangular black component at the bottom of the proximity sensor board) in the middle of the white targets on the bed. For the targets, don't use the aluminium tape that was supplied with early kits, use white paper or white PVC tape.
2. Edit the homez.g and homeall.g files to set the Z homing coordinates (in the G1 command just before the G30 command) to be the same as the first bed probe point.
3. Re-do the G31 calibration. Make sure there is no strong sunlight or incandescent artificial light falling on the bed (LED and fluorescent light is OK).
4. Whenever doing bed compensation, z homing or starting a print with a home-all command in the gcode file, make sure there is no strong sunlight or incandescent artificial light falling on the bed.
B. Make do without bed compensation, and home Z manually.
1. If you are printing pre-made gcode files such as the snowman, edit the gcode file (e.g. using Notepad++) to remove any G28 homing commands in it.
2. Use manual bed adjustment and compensation, see the Ormerod instructions for details. Add the manual bed levelling screws so that you need little or no bed compensation. To make the bed stable, replace the MDF bed support by DaveK's aluminium version, see [www.ebay.co.uk]. I recommend installing Matt's y-belt clamps at the same time, see [www.thingiverse.com] and [www.thingiverse.com].
3. Prior to printing, ensure there is no plastic on the bottom of the nozzle. Home X and Y, heat up the bed, do G1 X100 Y100, put a piece of 80gsm paper on the bed, and lower the head until the nozzle just grips the paper, using 0.05mm steps at the end. Then do G92 Z0 to define this point as Z=0. Then print.
C. Buy and fit one of my differential LED z-probe/hot end boards to replace the proximity sensor. See [forums.reprap.org]. [Disclosure: I have an interest in this!]
Whatever solution you adopt, I highly recommend improving the bed support, see step B2. Also look along the X-plate and place the edge of a metal ruler against it to check that it is straight.
Edited 3 time(s). Last edit at 08/30/2014 05:22AM by dc42.
Large delta printer [miscsolutions.wordpress.com], E3D tool changer, Robotdigg SCARA printer, Crane Quad and Ormerod
Disclosure: I design Duet electronics and work on RepRapFirmware, [duet3d.com].
|
Re: First print but what is wrong September 01, 2014 03:05AM |
Registered: 9 years ago Posts: 10 |
I still have some major issues with the printouts
I have calibrated the board and also tested with different temperatures both on bed and nozzle.
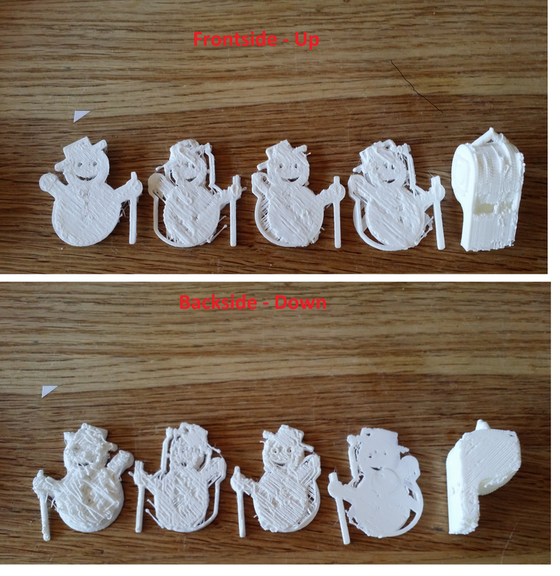
I have attached a photo on some of the printouts (both upper side and bottom side).
I noticed that if nozzle Z home is very close to the bed, the nozzle will hit the printouts after some layers being printed. The bottom side looks fine but the front side is a mess. On the other hand if nozzle Z home is a bit from the bed, then the front side looks OK, but the bottom side is a mess. If I have something in between then both sides are a mess.
Then we have the shape that looks little strange on snowman, see picture.
Anyone faced the same problem or knows how to resolve this?
I have calibrated the board and also tested with different temperatures both on bed and nozzle.
I have attached a photo on some of the printouts (both upper side and bottom side).
I noticed that if nozzle Z home is very close to the bed, the nozzle will hit the printouts after some layers being printed. The bottom side looks fine but the front side is a mess. On the other hand if nozzle Z home is a bit from the bed, then the front side looks OK, but the bottom side is a mess. If I have something in between then both sides are a mess.
Then we have the shape that looks little strange on snowman, see picture.
Anyone faced the same problem or knows how to resolve this?
|
Re: First print but what is wrong September 01, 2014 03:45AM |
Registered: 10 years ago Posts: 378 |
There might be multiple things going wrong. In all the snowmen except the leftmost one, it looks like it has been skipping in the X direction. Does that happen when it gets caught in the print, or just during "regular printing"? The latter might be due to some acceleration bugs in earlier firmware versions.
Regarding Z homing, the thing is you have to get it right in a fairly tight window (not too high, not too low). The first layer needs to be low enough to stick, but not so low that it starts "blobbing", and once the first layer starts out ok all the other layers should be in the right place. Of your four snowmen, only the one on the right looks like it at about the right height, the others seem too high. The problems later might be due to the X motor/belt skipping, causing some layers to be printed in the wrong place. That would cause at least part of it to be printed with nothing underneath it, which will mess things up.
To begin with, it is probably better to start out doing all manual homing with a piece of paper as dc42 mentions, and only bother with the IR probing when you know what to expect. I started out printing on blue painters tape, and found that to be a lot easier than kapton or glass. It seems a bit more tolerant to Z homing or bed levelling being a little bit off (it can compress a bit when too low, and still sticks well when too high).
Bed temperature shouldn't really be an issue for print quality when dialling things in; as long as the first layer sticks, you're good. Has some importance when printing very large parts to prevent warping, but not for such small items.
|
Re: First print but what is wrong September 01, 2014 04:17AM |
Registered: 10 years ago Posts: 14,672 |
Some suggestions:
1. Do you clean the Kapton bed before printing? Use isopropanol or acetone.
2. Are you certain that the Z axis is moving correctly? Does the Z threaded rod rotate easily when the power is off? Have you lubricated the threaded rod? To test it, lower the nozzle to be just touching the bed. Then send G91, send G1 Z0.24 twenty times, then send G90. The nozzle should now be 4.8mm above the bed.
3. If the Z axis really is moving correctly, then I wonder whether your printer might be over-extruding. What E value do you have in your M92 command in config.g? A lower value may work better.
From the photos of the underside, the rightmost of the four snowmen looks close to having the correct nozzle starting height.
Large delta printer [miscsolutions.wordpress.com], E3D tool changer, Robotdigg SCARA printer, Crane Quad and Ormerod
Disclosure: I design Duet electronics and work on RepRapFirmware, [duet3d.com].
|
Re: First print but what is wrong September 01, 2014 06:26AM |
Registered: 9 years ago Posts: 10 |
Thanks for your answers.
So what I can tell from your answers I actually have at least 2 problems.
First is the z axis. When the nozzle is close enough the the bed the first layers are ok but the nozzle will hit the printed material after a while. So here there seems to bee a problem with z-axis.
Second problem is x-axis, thats why I have a hole in snowman
Is this correct assumption?
I will check these things today after work.
What firmware version should I use. Currently running 79a
|
Re: First print but what is wrong September 01, 2014 06:36AM |
Registered: 9 years ago Posts: 10 |
|
Re: First print but what is wrong September 01, 2014 06:49AM |
Registered: 10 years ago Posts: 14,672 |
Quote
jyucel
So what I can tell from your answers I actually have at least 2 problems.
First is the z axis. When the nozzle is close enough the the bed the first layers are ok but the nozzle will hit the printed material after a while. So here there seems to bee a problem with z-axis.
Second problem is x-axis, thats why I have a hole in snowman
Is this correct assumption?
I agree with that. I suggest you start by doing the Z axis checks I suggested in my previous post. Also, what M201 and M203 commands do you have in config.g? It could be that your Z axis speed and/or acceleration is too high. RRP reduced the default Z speed to 100mm/sec when they released 0.78.
The X axis issues may lessen when the Z is is sorted out, because they may be partly due to the nozzle hitting the print.
Quote
jyucel
What firmware version should I use. Currently running 79a
I presume you mean 78a. That is a good base on which to get your printer working.
Large delta printer [miscsolutions.wordpress.com], E3D tool changer, Robotdigg SCARA printer, Crane Quad and Ormerod
Disclosure: I design Duet electronics and work on RepRapFirmware, [duet3d.com].
|
Re: First print but what is wrong September 02, 2014 03:52AM |
Registered: 9 years ago Posts: 10 |
Hi
I verified that the X axis that it runs smoothly and don't get stuck anywhere.
Also z axis runs smoothly. I noticed that the hole of the Z gear is not 100% centered (don't know if this actually affect the z movement ...)
During the printout the first layer was perfect (if I just look at the details). After a few layers the nozzle hits the printout (Z axis is not moving accordingly)
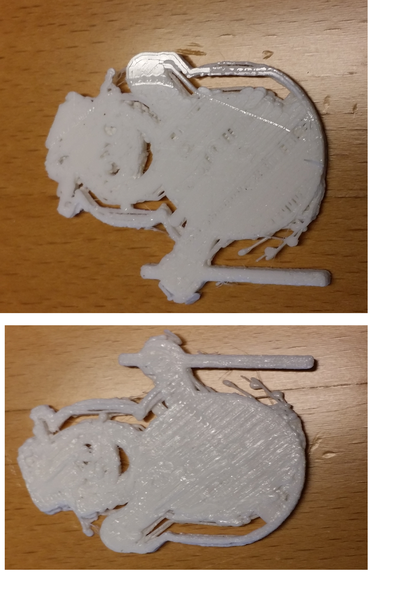
I have attached a photo. I think the Z home is fine (or at least very close to ...)
Thanks all
I verified that the X axis that it runs smoothly and don't get stuck anywhere.
Also z axis runs smoothly. I noticed that the hole of the Z gear is not 100% centered (don't know if this actually affect the z movement ...)
During the printout the first layer was perfect (if I just look at the details). After a few layers the nozzle hits the printout (Z axis is not moving accordingly)
I have attached a photo. I think the Z home is fine (or at least very close to ...)
Thanks all
|
Re: First print but what is wrong September 02, 2014 08:53AM |
Registered: 9 years ago Posts: 10 |
|
Re: First print but what is wrong September 02, 2014 09:23AM |
Registered: 10 years ago Posts: 780 |
Just a thought.
Have you completed the Orthogonal Axis Compensation as detailed in the Printing part of the instructions?
Are you sure it is your nozzle that is causing the problem and not the IR circuit board or the fan housing being too low?
appjaws - Core XYUV Duet Ethernet Duex5
firmware 3.1.1 Web Interface 3.1.1
Ormerod 1-converted to laser engraver, Duet wifi
OpenSCAD version 2020.07
slic3r-1.3.0, Simplify3D 4.1.2, Cura-4.4.1
|
Re: First print but what is wrong September 03, 2014 02:37AM |
Registered: 10 years ago Posts: 176 |
Was the last photo your last attempt?
If so, then you're still battling with a few issues I see - with guesswork:
I'm thinking that there might be belt slackness - do the belts make a low tone when you flick them (think of a guitar string)?
Have you done the 'Axis Compensation' section of the instructions? (https://reprappro.com/documentation/ormerod/axis-compensation/)
Does the filament move freely through the extruder block - are both ends of the Bowden tube firmly attached to both the pipe, the extruder block and the hot end?
Using Pronterface are you able to move the z-axis smoothly up and down with no grinding sounds?
Edited 1 time(s). Last edit at 09/03/2014 02:40AM by VortyZA.
|
Re: First print but what is wrong September 03, 2014 05:02AM |
Registered: 10 years ago Posts: 105 |
Look on the bright side - your print quality is already getting significantly better  - my first message would be to stick with it...we have all had the same or similar issues while getting our printers "dialled in" and rest assured you will get there and you'll be amazed at what you can achieve; it is ultimately very satisfying and you will have an in-depth knowledge of how your printer works and why it does what it does.
My top tips would be:
1) Don't bother trying to use the z-probe just yet - come back to it once you are basically up and running and instead do an x-home and a y-home then just manually lower the nozzle until it just grips a piece of standard photocopy paper (you will get a vibration through the paper and you won't even need to look) - when you find that point send a G92 Z0 command - and voila - you are homed correctly
2) make sure you can "twang" your timing belts - I would go for slightly too tight over slightly too loose initially as slipping/jumping looks like it might be one of your issues and this would prove that - easiest to do on the x-axis by getting it roughly right, then slacken off the x-axis stepper mounting bolts and pull it taught by moving out the motor slightly
3) Just check that it really is the nozzle catching the print - my experience is that it is more often the fan mounting or the z-probe, both of which can be lifted out of the way...the nozzle should absolutely be the lowest thing on the whole set up by a couple of millimetres
4) If using Kapton tape (I do very happily), clean it before each print with acetone on a piece of kitchen towel - only takes a few seconds to do and makes all the difference to that all-important first layer...if you can get the first layer right, the rest will get sorted
Hope this helps
Edited 1 time(s). Last edit at 09/03/2014 05:03AM by MrCrispi.
- my first message would be to stick with it...we have all had the same or similar issues while getting our printers "dialled in" and rest assured you will get there and you'll be amazed at what you can achieve; it is ultimately very satisfying and you will have an in-depth knowledge of how your printer works and why it does what it does.My top tips would be:
1) Don't bother trying to use the z-probe just yet - come back to it once you are basically up and running and instead do an x-home and a y-home then just manually lower the nozzle until it just grips a piece of standard photocopy paper (you will get a vibration through the paper and you won't even need to look) - when you find that point send a G92 Z0 command - and voila - you are homed correctly
2) make sure you can "twang" your timing belts - I would go for slightly too tight over slightly too loose initially as slipping/jumping looks like it might be one of your issues and this would prove that - easiest to do on the x-axis by getting it roughly right, then slacken off the x-axis stepper mounting bolts and pull it taught by moving out the motor slightly
3) Just check that it really is the nozzle catching the print - my experience is that it is more often the fan mounting or the z-probe, both of which can be lifted out of the way...the nozzle should absolutely be the lowest thing on the whole set up by a couple of millimetres
4) If using Kapton tape (I do very happily), clean it before each print with acetone on a piece of kitchen towel - only takes a few seconds to do and makes all the difference to that all-important first layer...if you can get the first layer right, the rest will get sorted
Hope this helps
Edited 1 time(s). Last edit at 09/03/2014 05:03AM by MrCrispi.
|
Re: First print but what is wrong September 03, 2014 05:24AM |
Registered: 10 years ago Posts: 14,672 |
Good advice from MrCrispi there. One thing I would add: when you are lowering the nozzle to grip a piece of paper and find Z=0, do it when the bed is already at printing temperature. Also you need to make sure the nozzle is clear of filament stuck to the bottom. One way is to heat the nozzle to 180C and when the nozzle grips the paper, slide the paper under the nozzle a few times, and check that it is still gripping.
Large delta printer [miscsolutions.wordpress.com], E3D tool changer, Robotdigg SCARA printer, Crane Quad and Ormerod
Disclosure: I design Duet electronics and work on RepRapFirmware, [duet3d.com].
Large delta printer [miscsolutions.wordpress.com], E3D tool changer, Robotdigg SCARA printer, Crane Quad and Ormerod
Disclosure: I design Duet electronics and work on RepRapFirmware, [duet3d.com].
|
Re: First print but what is wrong September 08, 2014 05:22PM |
Registered: 9 years ago Posts: 10 |
Hi All.
Thanks for all advices.
I practically reassembled the whole printer and still got exact the same problem.
I used to run the pronterface that I got from reprappro home page (https://reprappro.com/wp-content/uploads/2014/02/Pronterface-Ormerod-Win7.zip)
Today I changed to [koti.kapsi.fi]. With this version I got much better result (if not perfect ...)
See attached file
|
Re: First print but what is wrong September 09, 2014 10:51AM |
Registered: 10 years ago Posts: 2,472 |
If the interface makes a difference to the print quality, it sounds like you may be printing from USB. Don't do that! Put the print file onto the SD card and print from file rather than direct through the USB. The problem is that sometimes the USB cannot get the data to the printer as fast as the printer is printing the moves, so it will move jerkily - and that upsets the print quality tremendously. Print "circle.g" via USB and again from the SD card to see the difference.
Dave
(#106)
Dave
(#106)
|
Re: First print but what is wrong September 09, 2014 10:58AM |
Registered: 9 years ago Posts: 10 |
 before with almost same bad result.
Sorry, only registered users may post in this forum.