Home
>
Reprappers
>
Topic
How do you attach the x tensioner?
Posted by foul_owl
|
How do you attach the x tensioner? August 05, 2015 06:07PM |
Registered: 10 years ago Posts: 197 |
Hi folks,
I have seen plenty of build instructions for the vanilla i3, but none for the "standard" i3.
How do you attach the x tensioner to the x idler? Do you have to clip out the two support beams on the x idler?
Anyone seen a good set of build instructions for the "standard" i3?
Thanks!
I have seen plenty of build instructions for the vanilla i3, but none for the "standard" i3.
How do you attach the x tensioner to the x idler? Do you have to clip out the two support beams on the x idler?
Anyone seen a good set of build instructions for the "standard" i3?
Thanks!
|
Re: How do you attach the x tensioner? August 17, 2015 06:21PM |
Registered: 10 years ago Posts: 581 |
Do you mean the prusa i3 rework? It would help to know specifically what you have - any links to the one you're building would help.
[3DKarma.com] - suppliers of quality, affordable 3D printer kits and filament for the UK market.
[3DKarma.com] - suppliers of quality, affordable 3D printer kits and filament for the UK market.
|
Re: How do you attach the x tensioner? September 01, 2015 08:44PM |
Registered: 10 years ago Posts: 197 |
This is the one I am building:
[github.com]
What do you call that one? I call it "standard" since there is no other qualifier. It's certainly not "vanilla" which is here:
[github.com]
Thanks!
[github.com]
What do you call that one? I call it "standard" since there is no other qualifier. It's certainly not "vanilla" which is here:
[github.com]
Thanks!
|
Re: How do you attach the x tensioner? September 02, 2015 03:18PM |
Registered: 9 years ago Posts: 752 |
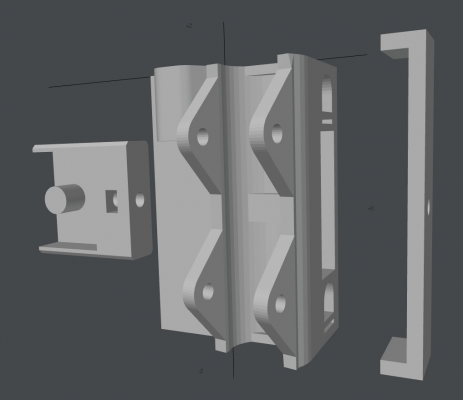
I haven't looked at the github you linked to, and I don't know what tensioner you use, but mine is a rework and it has just replaced the entire idler part. It has a hole in which the actual idler sits. The tensioner spannerplate does the actual tensioning using a screw. The x belt spanner (the left most part) contains the bearing, and a nut for the spannerplate screw. I've made a 3D render here, I've 'exploded' the view so that all parts are visible. The left most part sits in the square hole of the center part. The rightmost part claps around the center part with the screw.
The parts can be found here:
https://github.com/marcovannoord/Prusa-i3v2
My guess is that you can just replace your x-idler part with the three in the github above:
x-belt-spannerplate.stl
x-belt-spanner.stl
x-belt-spannerplate.stl
The 5mm threaded rod and 8mm smoothroud with the LM8UU bearings are the same, so the parts should be interchangeable. There are other parts on thingiverse you can try, but I'd recommend to use the part above, and when you're able to print your own you can try different tensioning systems. I know this one works as I'm using it myself. It's not perfect but it works. The pin for the bearing can snap off if you don't use 100% infill for example. Even then you shouldn't over tension it. Other systems use a m3 screw which is probably stronger. I have no issues so I'm going to keep using it I did run into some issues with layer adhesion, so make sure your parts are printed fairly solidly, with good layer adhesion (usually this means that the print temperature is pretty high, fusing the layers better).
Edited 1 time(s). Last edit at 09/02/2015 03:19PM by imqqmi.
The parts can be found here:
https://github.com/marcovannoord/Prusa-i3v2
My guess is that you can just replace your x-idler part with the three in the github above:
x-belt-spannerplate.stl
x-belt-spanner.stl
x-belt-spannerplate.stl
The 5mm threaded rod and 8mm smoothroud with the LM8UU bearings are the same, so the parts should be interchangeable. There are other parts on thingiverse you can try, but I'd recommend to use the part above, and when you're able to print your own you can try different tensioning systems. I know this one works as I'm using it myself. It's not perfect but it works. The pin for the bearing can snap off if you don't use 100% infill for example. Even then you shouldn't over tension it. Other systems use a m3 screw which is probably stronger. I have no issues so I'm going to keep using it
 I did run into some issues with layer adhesion, so make sure your parts are printed fairly solidly, with good layer adhesion (usually this means that the print temperature is pretty high, fusing the layers better).
Edited 1 time(s). Last edit at 09/02/2015 03:19PM by imqqmi.
Sorry, only registered users may post in this forum.
