Home
>
Reprappers
>
Topic
Cleaning Extruder with 12v Power Supply
Posted by psneddon
|
Cleaning Extruder with 12v Power Supply October 05, 2015 01:17PM |
Registered: 9 years ago Posts: 124 |
I have a MK-V J-Head extruder (from my I3 Reowrk printer) that, after several months of use, started giving me problems - stops extruding plastic during printing and extruder gear/motor stuttering.
I removed the J-head and unthreaded the brass head from the heat break (?) and wanted to clean it out, but I think I should have left it heated up for a while to let the PLA ooze out of it over time prior to disassembly (?).
I wanted to know if I could just hook up the resistor (while it's in the brass housing) using a 12v power supply to get the PLA out. Is this a god idea? Has anyone tried this method before?
I have read a few things about using a blow torch, but I didn't want to go that route. Anyone know if it is 'acceptable' to do it this way? Any information would be greatly appreciated.
|
Re: Cleaning Extruder with 12v Power Supply October 05, 2015 02:17PM |
Registered: 9 years ago Posts: 978 |
Just to clarify nomenclature... The brass nozzle screws into the heater block. The heat break screws into the heater block from the top. The heat sink screws onto the heat break. The heater cartridge goes into a hole in the side of the heater block, held in place by a grub screw.
Generally speaking, you should screw/unscrew the nozzle whilst the heater block is hot, because there will be plastic in the threads which will make things difficult if it is solid.
It would be a bad idea to hook the heater cartridge directly up to the 12V supply... this would get very hot very fast. If you have a PTFE liner, it will probably be damaged.
To clear clogs, I sometimes remove the heat sink, then turn on the heater (still under control of the Marlin software) to 250C. This heats the whole of the heat break to melt any plastic anywhere in it. A piece of wire can then be pushed through the heat break to push out any plastic stuck in there. If you're careful, the PTFE liner will survive this process, but be prepared with a replacement.
The proper technique for reassembly is to heat the heater block, screw the nozzle all the way in, then back it out 1 turn. Now screw the heat sink onto the heat break, and screw the heat break all the way into the heater block (finger-tight... the heat break isn't strong), and tighten the nozzle into the heater block. This should seal the nozzle against the heat break, inside the heater block.
|
Re: Cleaning Extruder with 12v Power Supply October 05, 2015 02:46PM |
Registered: 9 years ago Posts: 124 |
Quote
frankvdh
Just to clarify nomenclature... The brass nozzle screws into the heater block. The heat break screws into the heater block from the top. The heat sink screws onto the heat break. The heater cartridge goes into a hole in the side of the heater block, held in place by a grub screw.
Generally speaking, you should screw/unscrew the nozzle whilst the heater block is hot, because there will be plastic in the threads which will make things difficult if it is solid.
It would be a bad idea to hook the heater cartridge directly up to the 12V supply... this would get very hot very fast. If you have a PTFE liner, it will probably be damaged.
To clear clogs, I sometimes remove the heat sink, then turn on the heater (still under control of the Marlin software) to 250C. This heats the whole of the heat break to melt any plastic anywhere in it. A piece of wire can then be pushed through the heat break to push out any plastic stuck in there. If you're careful, the PTFE liner will survive this process, but be prepared with a replacement.
The proper technique for reassembly is to heat the heater block, screw the nozzle all the way in, then back it out 1 turn. Now screw the heat sink onto the heat break, and screw the heat break all the way into the heater block (finger-tight... the heat break isn't strong), and tighten the nozzle into the heater block. This should seal the nozzle against the heat break, inside the heater block.
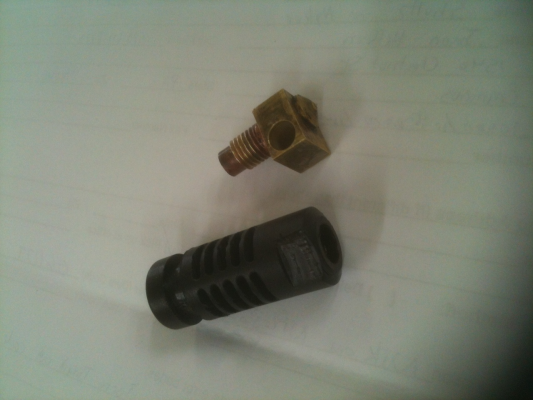
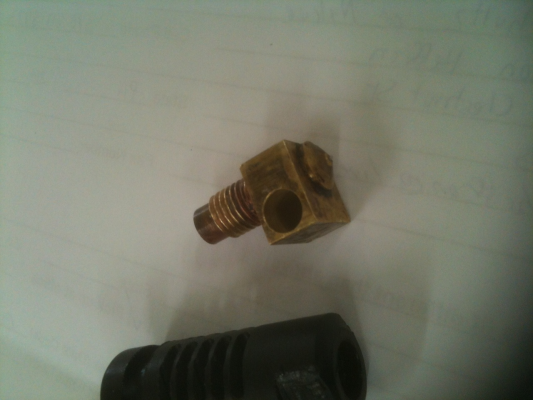
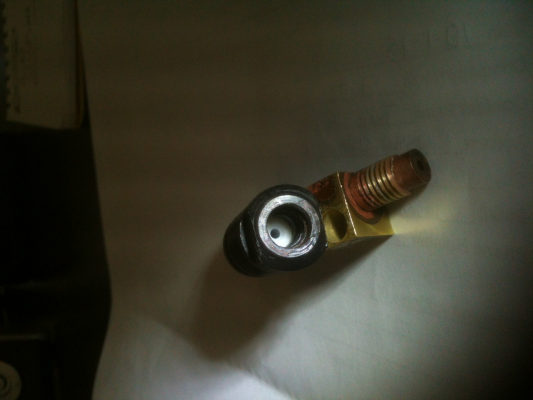
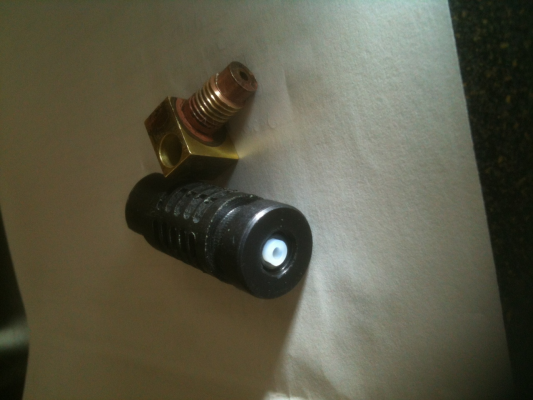
Thanks for the clarification. Here are a few pictures of my disassembled hot end. It was sold as a 'genuine' MK-V hotend, but I'm not sure if it is...
The part with the cooling vents seems to be all one piece. I can't figure out how (if at all) I could remove the PTFE liner (white part?) if I had to. I don't see any set screws holding anything together.
The brass portion had remnants of what looked like teflon tape on the threads (which I removed and cleaned up).
|
Re: Cleaning Extruder with 12v Power Supply October 05, 2015 03:32PM |
Registered: 9 years ago Posts: 124 |
I screwed the heatbreak on part way so any heat wouldn't touch the PTFE liner and was able to use a soldering iron (inserted into the resistor hole) to heat up the nozzle enough to gently pull the remaining strand of PLA out of the nozzle. I believe all of the PLA has been removed - I performed a 100C pull of the filament before I removed the hot end and the filament had a bit of a 'bulb' with a little solid nub on the end.
I am now able to shine a flashlight in one end and see the light coming out the other.
But how can one tell if the nozzle is clean of PLA? What steps does one do to clean out any possible foreign matter that might be causing friction/clogs if you can't see insode the nozzle?
Edited 1 time(s). Last edit at 10/05/2015 03:34PM by psneddon.
|
Re: Cleaning Extruder with 12v Power Supply October 05, 2015 07:58PM |
Registered: 9 years ago Posts: 978 |
I was assuming that your MkV J-head was similar to what Chinese sell as J-head extruders (e.g. AliExpress). Sorry for adding to the confusion.
Looks like yours has the nozzle and heater block as one part. In your photo, the heat break is still screwed in, I think. It looks like there's a reddish-brown insulator between it and the heater block? Yes, the white tube is the PTFE liner. On my head, it just pulls out. Yours may just be held in place by melted-and-solidified PLA. But if you can easily slide filament through the heat sink, I don't think that matters.
Chemically cleaning up PLA is difficult... it's pretty much resistant to all solvents.I guess the good news is that any remnants of PLA will melt and won't be a problem. The bad news is that any impurities or charred PLA will still be stuck down there. Your technique of cold-pulling PLA sounds good. If you think there's still gunk in there, try heating the heater block up (either with soldering iron or heater cartridge+thermistor) and removing the bits with a piece of wire or similar. Or try pushing clean filament in and pulling it out without screwing on the heat sink.
|
Re: Cleaning Extruder with 12v Power Supply October 06, 2015 12:06AM |
Registered: 15 years ago Posts: 537 |
Hello,
Normally, PLA is burned out with a torch if you can't clear it any other way.
Also, for re-assembly, you need to remove that small tube that goes through the hollow set-screw in the top. (It should pull out with a small pointed pick of some sort. I use dental picks.) Then, the hollow set-screw can be used to adjust the ptfe liner tension. The small tube is then pushed back through the hollow set-screw.
So, to assemble it, you first need to put ptfe tape on the threads. Next screw the brass nozzle into the PEEK nozzle holder unti it is snug.
Since the hot-end was used, I would install the heater and thermistor then bring it up to temperature for a 5 minutes or so. Then, you should be able to ensure that the hollow set-screw is snug. If the hollow set-screw is not used to push the ptfe liner against the brass, the hot-end will fail. After the hollow set-screw is set, you can put the small guide tube back through the hollow set-screw.
Oh, yeah, that is a geniune J-Head hot-end made by me.
Best Regards,
Brian
|
Re: Cleaning Extruder with 12v Power Supply October 06, 2015 02:15PM |
Registered: 9 years ago Posts: 124 |
Quote
reifsnyderb
Hello,
Normally, PLA is burned out with a torch if you can't clear it any other way.
Also, for re-assembly, you need to remove that small tube that goes through the hollow set-screw in the top. (It should pull out with a small pointed pick of some sort. I use dental picks.) Then, the hollow set-screw can be used to adjust the ptfe liner tension. The small tube is then pushed back through the hollow set-screw.
So, to assemble it, you first need to put ptfe tape on the threads. Next screw the brass nozzle into the PEEK nozzle holder unti it is snug.
Since the hot-end was used, I would install the heater and thermistor then bring it up to temperature for a 5 minutes or so. Then, you should be able to ensure that the hollow set-screw is snug. If the hollow set-screw is not used to push the ptfe liner against the brass, the hot-end will fail. After the hollow set-screw is set, you can put the small guide tube back through the hollow set-screw.
Oh, yeah, that is a geniune J-Head hot-end made by me.
Best Regards,
Brian
Brian,
Thanks. That's great news to know it's not a knock-off! I wanted to get the right hot-end to eliminate problems later on. I set my extraction to zero (originally it was set at 4.5mm as per CURA's recommendations - without any issues over the last 8 months).
I put everything back together, leveled the bed and tried to print an object about 60mm x 60mm. The first layer went down great and then the skipping and stuttering on the second layer.
Running white PLA
around 200C w/.4mm nozzle
I kept the print running and fiddled with the idler tension to see if I could get it corrected. I knew from my initial testing early on not to have the idler set too tight, but all my fiddling had a hit and miss effect. I was able to semi-hand feed it with no problem, which seemed to indicate that it wasn't feeding properly.
My roll of PLA is set directly above the hot end on an I3 Rework frame and as I was trying to print my object the roll (being very loose) decided to release quite a bit of filament which I had to try and roll back while fiddling. It was during this unravelling that I noticed that if I kept my filament pushed back toward the motor there were no skips or stutters. If I released it where it was fedding directly downward my issue would reappear after a little while. So, I kept my filament pushed towards the extruder motor for the remainder of the printing and was able to verify that it's some kind of feed issue. Definitely not the hot end. Here's an illustration of how I had to hold the filament to feed properly.
So, I disassembled the drive gear, hobbed bolt and removed the bearings which seemed a bit gummy/sluggish. I have cleaned up th hobbed bolt with a brass wire brush, smoothed thetop of the idler filament guide to lessen the friction maybe (?) and cleaned and applied a little light oil to the bearings and rolled them around a bit until they were a lot smoother. I'll see what happens later on tonight.
|
Re: Cleaning Extruder with 12v Power Supply October 06, 2015 07:04PM |
Registered: 9 years ago Posts: 124 |
|
Re: Cleaning Extruder with 12v Power Supply October 08, 2015 12:10PM |
Registered: 9 years ago Posts: 124 |
Well, I found that my extruder motor gear was a bit loose, so I tightened it up and ran the 100 extrusion test and reset my E-steps. It is able to print, but not very well. The extruder makes that crackling sound like it's grinding the filament, but adjusting the idler tension isn't working. 
I'm going to order a new hobbed bolt. Is it possible for the PLA filament to wear out/destroy a hobbed bolt?

I'm going to order a new hobbed bolt. Is it possible for the PLA filament to wear out/destroy a hobbed bolt?
|
Re: Cleaning Extruder with 12v Power Supply October 08, 2015 10:11PM |
Registered: 9 years ago Posts: 124 |
I decided to order a new hobbed bolt. In the meantime, I found a video on youTube about repairing a hobbed bolt so I went ahead and tried "re-grooving" it with a power drill and an M4 tap. I managed to get a bit of an edge back on the hobbed bolt and put everything back together to try it out. I ran the extrusion calibration routine a couple of times and re-flashed the firmware and began printing an object I had printed before.
I expected the same crackling sound to start up sometime after starting the print. To my surprise, the crackling was gone. After the first 10 to 12 layers I noticed that it didn't seem to be extruding enough, so I bumped up the flow percentage to 105% (I'm using CURA). The remainder of the print turned out pretty good. So, it seems like a new hobbed bolt should put me back to order (I hope).
I have another question though. If I calibrated my extruder for 100mm of PLA, then why should I have to increase the flow percentage to get it to fill properly? Before I started having these problems my flow percentage was 100 percent with no problems.
|
Re: Cleaning Extruder with 12v Power Supply October 09, 2015 05:12PM |
Registered: 9 years ago Posts: 182 |
When you re-tapped the hobbed bolt you may have lowered the diameter of the hobbed bolt, which in turn lowers the circumference and mm extruder per rotation. Re calibrate the extruder steps per mm.Quote
I have another question though. If I calibrated my extruder for 100mm of PLA, then why should I have to increase the flow percentage to get it to fill properly? Before I started having these problems my flow percentage was 100 percent with no problems.
Prusa i3 Rework - Ramps 1.4 - E3d Lite6 - Full Graphic LCD Controller
Sorry, only registered users may post in this forum.


