Home
>
Reprappers
>
Topic
First layer spots getting dragged away
Posted by djtrance2
|
First layer spots getting dragged away October 12, 2015 09:16PM |
Registered: 8 years ago Posts: 57 |
Hi all,
So I'm finally back up and running. I've successfully printed the calibration pattern and it looks as close to perfect as i can imagine.
Then i move on to printing more complicated shapes, like a skull. Most of those shapes, I am not able to print the first layer because they seem to just be a few dots.
The second layer then tries to connect the dots, but the dots get dragged away when the head tries to print lines between. Once the foundation is unpeeled, we have no way to keep printing.
What am I doing wrong?
|
Re: First layer spots getting dragged away October 12, 2015 09:26PM |
Registered: 8 years ago Posts: 57 |
The skull I'm trying to print is this one
[grabcad.com]
The calibration pattern is
[www.wamungo.com]
[grabcad.com]
The calibration pattern is
[www.wamungo.com]
|
Re: First layer spots getting dragged away October 13, 2015 12:44AM |
Registered: 9 years ago Posts: 445 |
|
Re: First layer spots getting dragged away October 13, 2015 01:30AM |
Registered: 8 years ago Posts: 57 |
Thanks for the tip. I did notice that we didn't have the skirt in this model, which probably doesn't help.
I also found some info about a brim, which would be the next thing I try if the skirt fails.
[www.simplify3d.com]
I also found some info about a brim, which would be the next thing I try if the skirt fails.
[www.simplify3d.com]
|
Re: First layer spots getting dragged away October 13, 2015 02:05AM |
Registered: 8 years ago Posts: 57 |
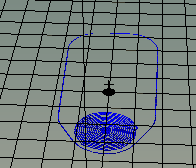
Following your advice, I printed a skirt, and a brim.
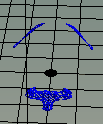
The brim looks like this.
As you can see on the image called 2nd layer, there is some more things being printed on top, but does not have a brim. Those parts are the base of what's going to be printed next so I'd think Slicr should have made a brim there but it doesnt.
How would I configure the brim to be on all those areas?
I'm going to try the raft too, but it looks like when I enable the raft, the slicer does not show that layer. Does that mean there is no raft or is it implied and not shown?
edit: i realized that we have to click the "enable support" for the raft to appear.
Edited 1 time(s). Last edit at 10/13/2015 02:20AM by djtrance2.
|
Re: First layer spots getting dragged away October 13, 2015 02:33AM |
Registered: 8 years ago Posts: 5,232 |
When I have to print those complex 1st layers, I either "cut off" the part until the contour looks printable ( can be done by Cura in "advanced" settings) or open the part with OpenScad and add a solid layer to make the 1st layer flat and easy to print.
-Olaf
Edited 1 time(s). Last edit at 10/13/2015 02:35AM by o_lampe.
union(){
   translate([0,0,0.2]) import("blabla\\partpath\\part.stl");
   cube([x-size, y-size, 0.2]);
-Olaf
Edited 1 time(s). Last edit at 10/13/2015 02:35AM by o_lampe.
|
Re: First layer spots getting dragged away October 13, 2015 05:44AM |
Registered: 9 years ago Posts: 445 |
Didn't look at the model you tried to print when I wrote my first answer, now I have.
That looks pretty "advanced" to print.
You are going to want to look into adding support for that model as well.
A skirt is useful for priming the hotend to make sure there's plastic lined up when the actual print starts.
A brim is helpful in keeping the object attached to the bed, prevents "warping" plus it also primes the hotend to make sure there's plastic lined up when the actual print starts.
EDIT: The first layer is very important to get right, and to get it right you must have a well calibrated printer, but since you've already printed a calibration object and gotten that first layer to stick I'm assuming it is calibrated.
A spotty first layer is otherwise an indication for a printer that doesn't have the Z-axis correct, but the slicers have ways to get around this, for instance you can set a different extrusionrate and/or height of the first layer.
Edited 2 time(s). Last edit at 10/13/2015 05:55AM by Koenig.
|
Re: First layer spots getting dragged away October 14, 2015 12:26AM |
Registered: 8 years ago Posts: 57 |
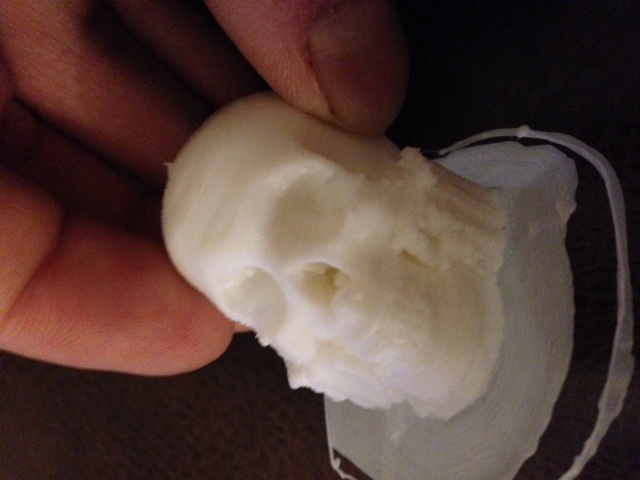
The raft seems to make a huge difference. The layers are sticking and we're finally able to build up.
Now the skull I printed looks good, however, the support material (pillars) are built all the way to the cheekbones. Is there a way to remove the support material?
Now the skull I printed looks good, however, the support material (pillars) are built all the way to the cheekbones. Is there a way to remove the support material?
|
Re: First layer spots getting dragged away October 14, 2015 04:06AM |
Registered: 9 years ago Posts: 752 |
If you can't break it off, you can increase the interface distance in the support settings.
You can also rotate it to find a better starting point like the top of the skull. It will flatten it a bit though.
I'd use an editor to rotate the skull to the back, face facing upwards,cut the object in two and print separately. The face and back of the skull can be glued together.
3D printers can handle objects that are flat and wide at the base and taper to narrow much btter than starting narrow.
|
Re: First layer spots getting dragged away October 15, 2015 01:41AM |
Registered: 8 years ago Posts: 57 |
I've watched a few videos of people removing the support material.
1- looks very easy to break off. It looks like my settings are not ideal for breaking it off.
2- I've read that I should use a shroud to cool down the extruded PLA right after it gets placed on the model. Would that be helpful? I see the thin walls actually bending quite a bit when the head places a layer on top of it, seems to be because it hasnt cooled down yet.
|
Re: First layer spots getting dragged away October 15, 2015 11:16PM |
Registered: 8 years ago Posts: 166 |
|
Re: First layer spots getting dragged away October 16, 2015 12:26AM |
Registered: 8 years ago Posts: 57 |
|
Re: First layer spots getting dragged away October 16, 2015 07:20AM |
Registered: 11 years ago Posts: 5,780 |
You calibrated the steps/mm to get to 20cm x 20 cm. The extruder calibration should be done before the steps/mm calibration.
Overextrusion is probably also why your first layer bits kept getting dragged away in the first place. When you overextrude on the first layer, the plastic gets squished wider than it should and when the nozzle passes by it catches the previously overextruded material and drags it away. Calibrate the extruder (best done at thinnest layer setting you intend to use) then recalibrate the steps/mm. Start here: [reprap.org]
and pay careful attention to the "e steps fine tuning" procedure.
One more thing- if the filament diameter is larger than your slicer thought it was, you will have over extrusion, no matter how well the extruder is calibrated. Don't trust that the filament is actually 1.75mm diameter because the manufacturer says it is. You have to measure it. A difference of a few hundreds of a mm is visible/measureable in the prints. Before I print with any spool of filament, I do the following:
1) unwrap the spool and remove desiccant.
2) weigh the full spool and write the empty spool weight (full weight - 1 kg) on the label
3) pull about 10m of filament from the spool and measure the diameter with a caliper that reads down to 0.01mm. Measure in at least 20 place and vary the orientation of the caliper on the filament when measuring. Calculate the average value of the diameter from those measurements and mark it on the filament spool.
4) write the spool material on the label if it isn't already marked (some manufacturers actually ship unlabeled spools!)
I use volumetric extrusion when I slice- in slic3r there's an option for it, in Cura you have to enter the filament diameter as 1.128379 mm. When it's time to print, I enter the filament diameter at the printer- the number that I wrote on the spool. That way I can change colors, etc. without having to reslice and always get a great result.
Getting ready to start a big print? Not sure if that spool has enough filament? Weigh it! If the spool weighs 650g and the empty weight is 300g, you have 350g for your print.
Edited 2 time(s). Last edit at 10/16/2015 08:04AM by the_digital_dentist.
Ultra MegaMax Dominator 3D printer: [drmrehorst.blogspot.com]
Sorry, only registered users may post in this forum.