Home
>
Reprappers
>
Topic
Building a HICTOP metal frame 3D printer
Posted by Mike_C
|
Building a HICTOP metal frame 3D printer November 25, 2015 09:34AM |
Registered: 8 years ago Posts: 8 |
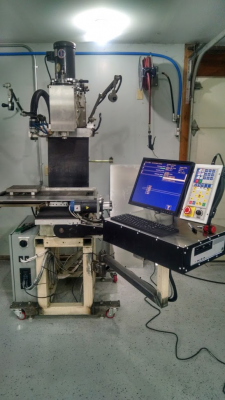
I've been wanting a 3d printer of my own for awhile, I have access to a Stratasys Uprint at work. I've been watching amazon for their Black Friday Lightning deals, and saw the HICTOP kit. So I did some research on it, then waited for the deal. For $335, I felt it was worth the risk of getting a cheap kit. Sounds like the instructions for it are poorly written. And the power supply is weak, stepper motors might be to small as well? And the guide blocks might be poorly printed. I have a good understanding of low voltage wiring, and I have worked with 80/20 framing.
At home I have a benchtop CNC mill, which I use to make RC truck parts for my self, along with other stuff I need at home. I also have a small 7x14 manual lathe. I'll mainly be using the 3d printer to test fit parts before I spend the time cutting them on the CNC mill. I will also use it to make simple brackets for non critical parts.
The printer shows up today. So I am hoping to at least get the mechanics of it together tonight. I will do my best to document the build as I go.
Here is my CNC mill in my garage
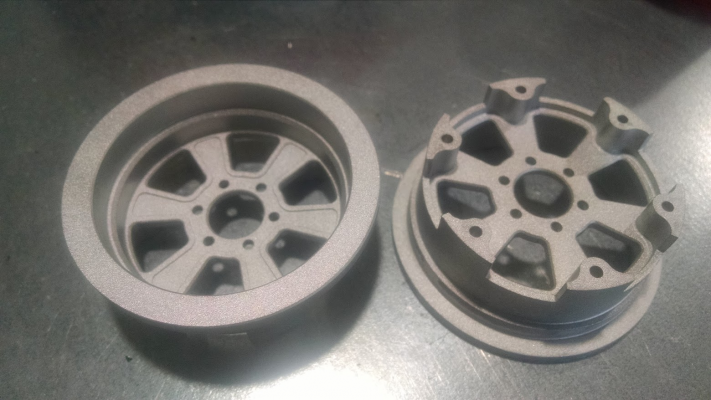
And here is one of the parts I machined on it
At home I have a benchtop CNC mill, which I use to make RC truck parts for my self, along with other stuff I need at home. I also have a small 7x14 manual lathe. I'll mainly be using the 3d printer to test fit parts before I spend the time cutting them on the CNC mill. I will also use it to make simple brackets for non critical parts.
The printer shows up today. So I am hoping to at least get the mechanics of it together tonight. I will do my best to document the build as I go.
Here is my CNC mill in my garage
And here is one of the parts I machined on it
|
Re: Building a HICTOP metal frame 3D printer December 11, 2015 02:48PM |
Registered: 8 years ago Posts: 1 |
I've had this printer for about a month now. I am up and printing, but my print quality is pretty poor. Lots of globs, and gaps, so it seems like the extruder is not consistent. I've been working on tightening belts and adjusting the height between the bed and the nozzle.
What have you found? Are your prints clean?
What have you found? Are your prints clean?
|
Re: Building a HICTOP metal frame 3D printer December 11, 2015 03:56PM |
Registered: 8 years ago Posts: 8 |
I'll try to take some pictures this weekend.
I can get fairly clean prints of the little ultimaker test robot, worked great at double the standard size. I did a test print of a single wall cylinder which came out great after all of my recent tweaks. But I have a part I want to make 30 parts of, which I am still having issues with shifting in the y axis, mainly around sharp corners.
I've used 3 different PLA's so far. The sample PLA that was included, which worked great once I had the printer dialed in. Seemed to be fairly consistent, and no moisture. Then I used a small 0.2KG spool of makerbot PLA, which also looked great once I had the printer dialed in, most of that material was used figuring out what I was doing, and what I needed to fix on the printer. And now I am using a 1kg spool of Hatchbox. It has a fair bit of moisture in the PLA. But its printing smooth for the most part, you can see some light pin hole marks where the moisture popped.
Here is what I have done so far.
- Changed out all of the linear bearings in the Y axis, the stock bearings were very loose.
- Put loctite on several of the fasteners.
- Printed some belt tension clips I found on thingiverse for the y axis, this helped a lot.
- Calibrated the extruder values in the firmware
- Lowered the default max accelerration values in the firmware
- Tested prints with different build tray temps and extruder temps.
- Lowered the shell print speed, and kept a fast infill speed
This weekend I plan on spending some more time tweaking it. I am going to play with the jerk values and see if the helps with the sharp corners. And I am going to play with different speed settings and temps. I might need to look into adding a anti backlash system to the z axis threaded rods as well.
|
Re: Building a HICTOP metal frame 3D printer December 21, 2015 11:41PM |
Registered: 8 years ago Posts: 8 |
Finally took a few pictures of a some of my prints. I spent a lot of time over the weekend tweaking the firmware to further smooth things out.
I was getting random shifts in the y axis, as you can see in these parts.
And here are a couple things I printed tonight. This is by far the best print I have successfully made of the ultimaker test bot at its standard scale. I am also pretty happy with how the rook turned out, using cheap PLA.
I had a couple prints that were even smoother over the weekend, but towards the end of those prints my hotend dropped in temp and ruined the parts. After that, I continued to have problems when trying to print PLA at 200-210°c. I've been printing at 225, and things have been running smooth, I am thinking its the thermister and the poor design of the hotend its self. Looking into getting a E3D to replace it.
I was getting random shifts in the y axis, as you can see in these parts.


And here are a couple things I printed tonight. This is by far the best print I have successfully made of the ultimaker test bot at its standard scale. I am also pretty happy with how the rook turned out, using cheap PLA.


I had a couple prints that were even smoother over the weekend, but towards the end of those prints my hotend dropped in temp and ruined the parts. After that, I continued to have problems when trying to print PLA at 200-210°c. I've been printing at 225, and things have been running smooth, I am thinking its the thermister and the poor design of the hotend its self. Looking into getting a E3D to replace it.
|
Re: Building a HICTOP metal frame 3D printer December 21, 2015 11:44PM |
Registered: 8 years ago Posts: 8 |
Here are the values I changed in the marlin Firmware as well.
#define DEFAULT_AXIS_STEPS_PER_UNIT {80,80,2560,98.6} // default steps per unit for ultimaker //78.7402, 78.7402,1070,865.88
#define DEFAULT_MAX_FEEDRATE {200, 200, 3, 25} // (mm/sec)
#define DEFAULT_MAX_ACCELERATION {9000,3000,500,10000} // X, Y, Z, E maximum start speed for accelerated moves. E default values are good for skeinforge 40+, for older versions raise them a lot.
#define DEFAULT_ACCELERATION 3000 // X, Y, Z and E max acceleration in mm/s^2 for printing moves
#define DEFAULT_RETRACT_ACCELERATION 3000 // X, Y, Z and E max acceleration in mm/s^2 for r retracts
// Offset of the extruders (uncomment if using more than one and relying on firmware to position when changing).
// The offset has to be X=0, Y=0 for the extruder 0 hotend (default extruder).
// For the other hotends it is their distance from the extruder 0 hotend.
// #define EXTRUDER_OFFSET_X {0.0, 20.00} // (in mm) for each extruder, offset of the hotend on the X axis
// #define EXTRUDER_OFFSET_Y {0.0, 5.00} // (in mm) for each extruder, offset of the hotend on the Y axis
// The speed change that does not require acceleration (i.e. the software might assume it can be done instanteneously)
#define DEFAULT_XYJERK 2.0 // (mm/sec)
#define DEFAULT_ZJERK 0.4 // (mm/sec)
#define DEFAULT_EJERK 5.0 // (mm/sec)
|
Re: Building a HICTOP metal frame 3D printer December 30, 2015 10:45PM |
Registered: 8 years ago Posts: 8 |
Got some blue Hatchbox PLA and decided to try printing a 3D Benchy with it.
I am going to try another one tomorrow at a lower temp, this was at 210°. The smoke stake melted a little, other than that I am pretty happy with the results.
You can see where the smoke stack warped a bit.
I am also getting some ghosting after harsh edges. I think this is from the flimsy steel bed support, I might machine a aluminum one.
I am also thinking about picking up a E3D V6 hot end, and leaning towards a bowden setup. Still doing some research on my options though.
I am going to try another one tomorrow at a lower temp, this was at 210°. The smoke stake melted a little, other than that I am pretty happy with the results.

You can see where the smoke stack warped a bit.

I am also getting some ghosting after harsh edges. I think this is from the flimsy steel bed support, I might machine a aluminum one.

I am also thinking about picking up a E3D V6 hot end, and leaning towards a bowden setup. Still doing some research on my options though.
|
Re: Building a HICTOP metal frame 3D printer January 04, 2016 06:13PM |
Registered: 8 years ago Posts: 200 |
|
Re: Building a HICTOP metal frame 3D printer April 15, 2016 10:33AM |
Registered: 8 years ago Posts: 26 |
Hello fellow HICTOP'ers,
Have been learning this machine for a few weeks and just now getting a hang of it, firmware (currently Marlin 1.1.0-RC4), Z-axis rod upgrade, stock type, but machine shop straight stainless standard 8mm x 1.25mm pitch, turned down ends w/custom couplers, X and Y motor fans, updated 30 amp power supply (along with 12AWG wiring), etc.
FYI: if your interested have been posting my progress, comments, firmware, etc here on a phpBB forum that a friend created a sub-forum just for the HICTOP users:
[www.3dprintingforum.us]
Right now replacing all the Y linear bearings but have run into a problem. Even after buying new bearings to replace the OEM ones, I noticed even the new ones have a sloppy/loose fit in the bearing holders. My Y axis and bed felt sloppy and pretty sure this is the culprit. Anyone else notice the loose fit (although small) of the bearing inserts in the bearing holders?
Chip
---
Edited 2 time(s). Last edit at 04/15/2016 10:35AM by GeorgeL16.
|
Re: Building a HICTOP metal frame 3D printer April 15, 2016 11:55AM |
Registered: 8 years ago Posts: 26 |
|
Re: Building a HICTOP metal frame 3D printer April 15, 2016 12:11PM |
Registered: 8 years ago Posts: 26 |
In configuration.h, what type of thermistor are you all setting. I have original 'China' supplied source code that defines it as a type '3', however updated and other sources are showing a type '1' thermistor.
Also, I ran the internal firmware PID test and once updating the values, my nozzle time is more stable. Anyone else do this?
Also, I ran the internal firmware PID test and once updating the values, my nozzle time is more stable. Anyone else do this?
Sorry, only registered users may post in this forum.